Note
Access to this page requires authorization. You can try signing in or changing directories.
Access to this page requires authorization. You can try changing directories.
This article shows how to set up an automated notification workflow for updating the status of an API after registration in your organization's API center. Adapt this example to automate workflows for other types of events in your API center.
There are several benefits for setting up a notification workflow:
- Real-time updates: Receive alerts immediately when certain events occur, such as API registration or API definition updates. Quickly address issues or take further action based on these events.
- Automation: Save time and reduce manual monitoring. For example, set up alerts for when a new API is registered, an API definition changes, or API analysis reports are generated.
- Improved user experience: Take advantage of integrated notifications and keep users informed about the status of their requests or actions. Actions might include approval processes for your APIs or changing custom metadata based on criteria.
- Collaboration: Send notifications to different team members based on their roles (API administrator, API developer, and so on) and ensure the right users are informed and can take appropriate action.
The example in this article builds the following process:
- When an API is registered in your API center, an event triggers that runs an Azure Logic Apps workflow.
- The workflow sends a notification in Microsoft Teams to a designated user.
- The user decides the status of the API registration directly from the notification in Microsoft Teams.
- The workflow updates the API status metadata in the API registration based on the user's decision. API status is a custom metadata property that you set up in your API center.
You can adapt the example to meet your organization's notification and governance requirements for your API center. You can also trigger a similar automated cloud workflow in Microsoft Power Automate.
Prerequisites
An API center in your Azure subscription. To create a subscription, see Quickstart: Create your API center.
An instance of Azure Logic Apps in your Azure subscription. For the example in this article, you can create a Consumption logic app by following the steps in Quickstart: Create an example Consumption logic app workflow in the Azure portal. Only create the resource. Later in this article, you add triggers to the workflow.
Permissions to assign RBAC roles in your API center.
The Event Grid resource provider registered in your subscription. If you need to register the Event Grid resource provider, see Subscribe to events published by a partner with Azure Event Grid.
Add a custom metadata property in your API center
The workflow demonstrated in this article sets the value of an example custom metadata property in your API center, which is used to track the status of an API registration.
Create a custom api-status property in your API center:
In the Azure portal, browse to your API center.
Expand Inventory, select Metadata, and select + New metadata.
In the Details tab, configure the following settings:
For the Title value, enter api-status.
For the Type value, select Predefined choices.
For the set of Choices, add the following names: new, pending, approved. Select Next.
In the Assignments tab, set the APIs value to Optional.
(Optional) Make assignments for the Deployments and Environments values. Select Next.
Review the configuration, and select Create.
Enable a managed identity in your logic app
For this scenario, the logic app uses a managed identity to access the API center. Depending on your needs, enable either a system-assigned or user-assigned managed identity. To configure the managed identity, see Authenticate access and connections to Azure resources with managed identities in Azure Logic Apps.
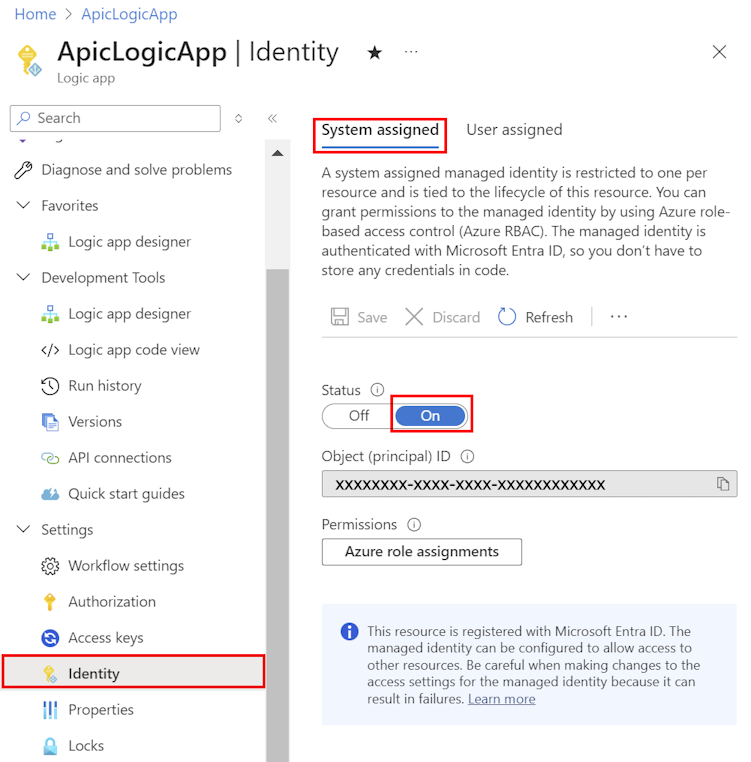
Assign permissions to the managed identity
Assign the logic app managed identity the necessary permissions to access the API center. For this scenario, assign the Contributor role to the managed identity.
In the Azure portal, browse to your API center and select Access control (IAM).
Select + Add > Add role assignment.
Select the Privileged administrator roles tab.
In the list of roles, select Contributor, and then select Next.
On the Members page, under Assign access to, select Managed identity.
Under Members, select + Select members.
On the Select managed identities page, set the Managed identity to your new logic app, and then choose Select.
On the Add role assignment, select Next.
Review the role assignment, and select Review + assign.
Configure the logic app workflow
This section provides the manual steps to configure an event subscription that triggers a logic app workflow when an API is registered in your API center.
Trigger when a resource event occurs
Configure a workflow step to trigger the logic app workflow when an event occurs in the API center.
In the Azure portal, browse to your logic app.
Expand Development tools and select Logic app designer.
In the designer surface, select Add a trigger.
Search for Azure Event Grid, and select the When a resource event occurs trigger.
In the When a resource event occurs pane, configure the following settings:
For the Resource type value, select Microsoft.ApiCenter.Services.
For the Subscription value, select your subscription.
For the Resource Name value, enter the full resource name of your API center, in the following form:
/subscriptions/<subscription ID>/resourceGroups/<resource group nam>/providers/Microsoft.ApiCenter/services/<API Center name>For the Event Type Item - 1 value, enter or select Microsoft.ApiCenter.ApiAdded.
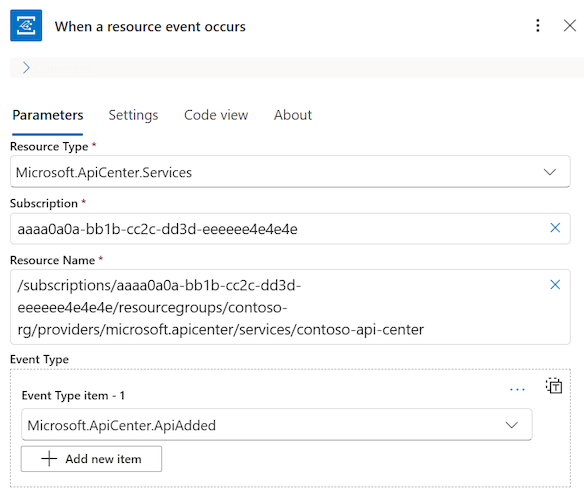
Close the pane to return to the design surface.
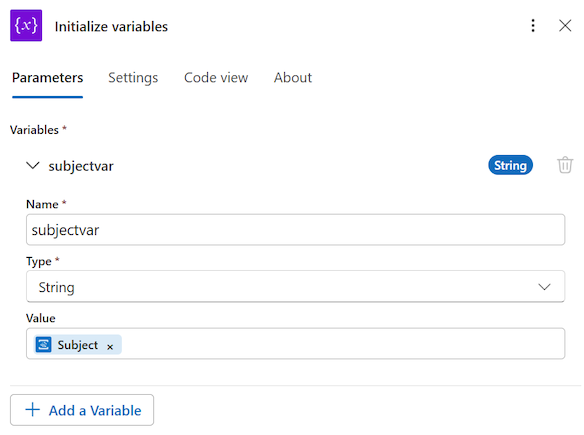
Initialize a variable for the API ID
Add a workflow step to initialize a variable that stores the ID of the registered API.
Under the When a resource event occurs trigger widget, select the plus sign +, and select Add an action.
Search for Variables, and select Initialize variables.
In the Initialize variables pane, configure the following settings for a New Variable:
For the Name value, enter subjectvar.
For the Type value, select String.
For the Value value, enter forward slash
/, and select Insert dynamic content.Under When a resource event occurs, select Subject.
Initialize a variable for the API version
Add a workflow step to initialize a variable to store the version of the API Center management API. This version is needed for the HTTP requests in the workflow.
Tip
Initializing a variable for the version makes it easy to change the value later, as the management API is updated.
In the Initialize variables pane, select Add a Variable.
Configure the following settings:
For the Name value, enter versionvar.
For the Type value, select String.
For the Value value, enter
?api-version=2024-03-01.
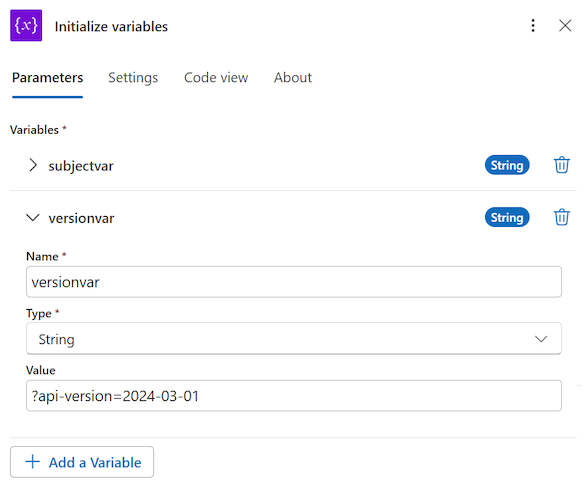
Close the pane to return to the design surface.
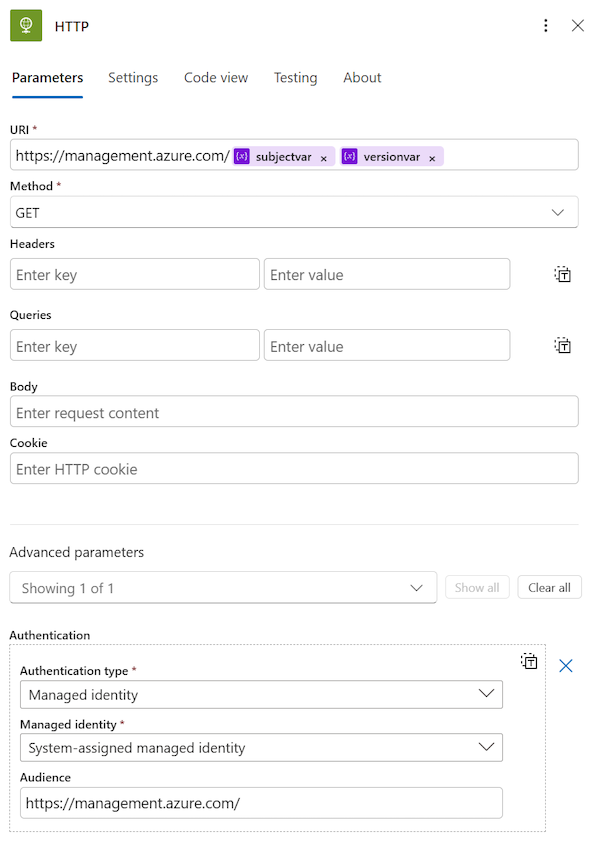
Configure an HTTP action to get the API details
Add a workflow step to make an HTTP GET request to retrieve API details from the API center.
Under the Initialize variables action widget, select the plus sign +, and select Add an action.
Search for HTTP, and select HTTP.
In the HTTP pane:
For the URI value, enter
https://management.azure.com/(including the trailing forward slash/).When the system detects the forward slash
/, select Insert dynamic content, and select the subjectvar variable.Enter forward slash
/again, select Insert dynamic content, and select the versionvar variable.
The final value should look like this example where the URI ends with a forward slash
/:
For the Method, select GET.
Under Advanced parameters, expand the dropdown list and select Authentication. Configure the following settings:
For the Authentication type value, select Managed Identity.
For the Managed identity value, select System-assigned managed identity.
For the Audience value, enter the URI value
https://management.azure.com/.
Close the pane to return to the design surface.
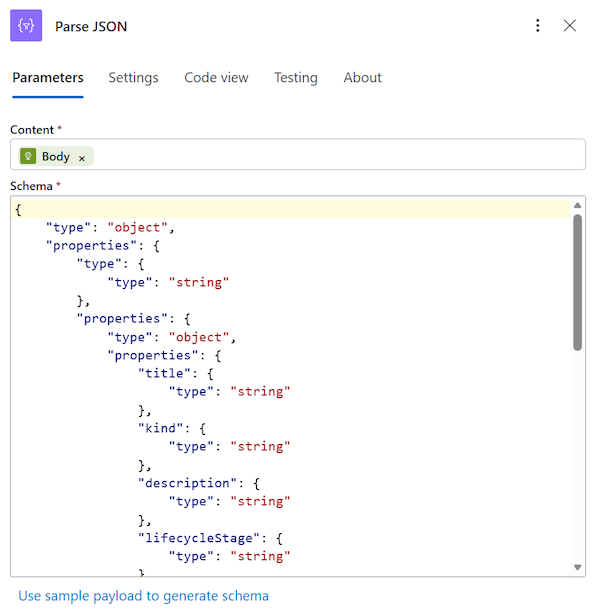
Parse the JSON action output
Add a workflow step to parse the JSON output of the preceding HTTP request.
Under the HTTP action widget, select the plus sign +, and select Add an action.
Search for Parse JSON, and then select Parse JSON under Data operations.
In the Parse JSON pane, configure the following settings:
For the Content value, enter forward slash
/, and select Insert dynamic content.Under HTTP, select Body.
For the Schema value, enter the following code:
{
    "type": "object",
    "properties": {
        "type": {
            "type": "string"
        },
        "properties": {
            "type": "object",
            "properties": {
                "title": {
                    "type": "string"
                },
                "kind": {
                    "type": "string"
                },
                "description": {
                    "type": "string"
                },
                "lifecycleStage": {
                    "type": "string"
                },
                "externalDocumentation": {
                    "type": "array"
                },
                "contacts": {
                    "type": "array"
                },
                "customProperties": {
                    "type": "object",
                    "properties": {}
                }
            }
        },
        "id": {
            "type": "string"
        },
        "name": {
            "type": "string"
        },
        "systemData": {
            "type": "object",
            "properties": {
                "createdAt": {
                    "type": "string"
                },
                "lastModifiedAt": {
                    "type": "string"
                }
            }
        }
    }
}
The following image shows the configuration settings in the Parse JSON pane:
Close the pane to return to the design surface.
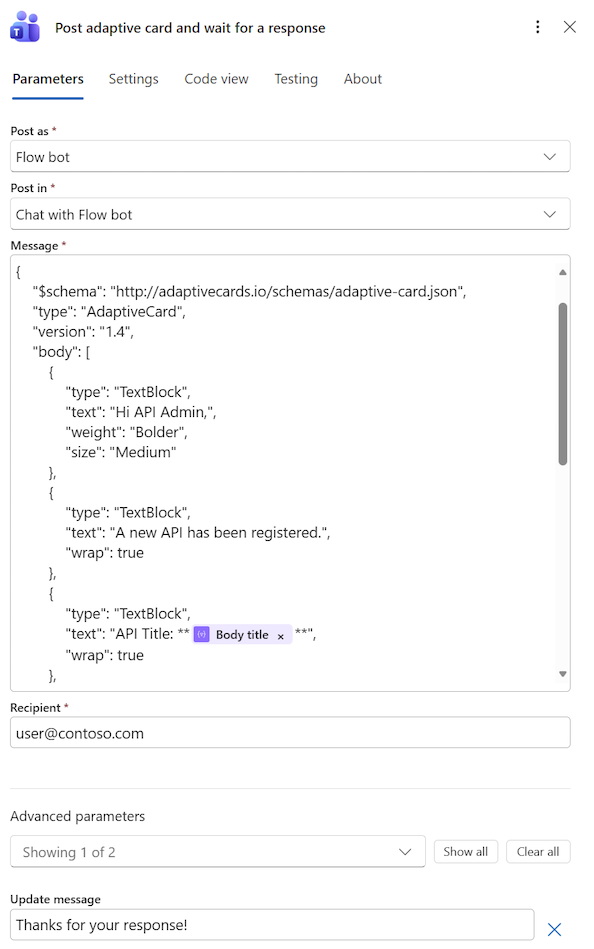
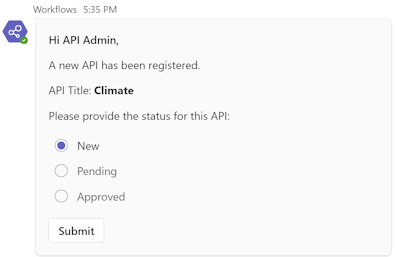
Post an adaptive card to Teams
Add a workflow step to post the notification as an adaptive card in Microsoft Teams.
Under the Parse JSON action widget, select the plus sign +, and select Add an action.
Search for Teams, and then select Post adaptive card and wait for a response under Microsoft Teams.
You might need to select See more to locate this option. If prompted, sign in to your Microsoft Teams account.
In the Post adaptive card and wait for a response pane, configure the following settings:
For the Post as value, select Flow bot.
For the Post in value, select an appropriate option for your Teams setup. For testing, you can select Chat with Flow bot.
For the Message value, enter the following text for an adaptive card. Modify the text as needed.
{
    "$schema": "http://adaptivecards.io/schemas/adaptive-card.json",
    "type": "AdaptiveCard",
    "version": "1.4",
    "body": [
        {
            "type": "TextBlock",
            "text": "Hi API Admin,",
            "weight": "Bolder",
            "size": "Medium"
        },
        {
            "type": "TextBlock",
            "text": "A new API has been registered.",
            "wrap": true
        },
        {
            "type": "TextBlock",
            "text": "API Title: **{{apiTitle}}**",
            "wrap": true
        },
        {
            "type": "TextBlock",
            "text": "Please provide the status for this API:",
            "wrap": true
        },
        {
            "type": "Input.ChoiceSet",
            "id": "apiStatus",
            "style": "expanded",
            "choices": [
                {
                    "title": "New",
                    "value": "new"
                },
                {
                    "title": "Pending",
                    "value": "pending"
                },
                {
                    "title": "Approved",
                    "value": "approved"
                }
            ],
            "isRequired": true,
            "errorMessage": "Please select a status."
        }
    ],
    "actions": [
        {
            "type": "Action.Submit",
            "title": "Submit"
        }
    ]
}
Adjust the title for the message. In the
"body"section of the message schema, locate the"text": "API Title: **{{apiTitle}}**",statement.Select the
{{apiTitle}}portion of the statement and delete it.Enter forward slash
/and select Insert dynamic content.Under Parse JSON, select Body title to replace the selected text with the dynamic content.
The updated portion should look like this example:

For the Recipient value, enter the email address of the user who receives notifications.
Close the pane to return to the design surface.
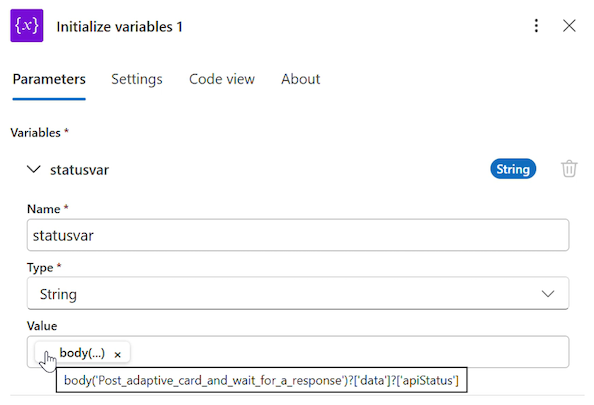
Initialize a variable for the API status
Add a workflow step to initialize the value of a variable that stores the API status value returned from the Teams adaptive card.
Under the Post adaptive card and wait for a response action widget, select the plus sign +, and select Add an action.
Search for Variables, and select Initialize variables.
In the Initialize variables pane, configure the following settings for a New Variable:
For the Name value, enter statusvar.
For the Type value, select String.
For the Value value, enter the script
@body('Post_adaptive_card_and_wait_for_a_response')?['data']?['apiStatus'].After you enter the script, the system adds the
body(...)glyph to the setting value. You can hover on the glyph to confirm your script is added as expected.
Close the pane to return to the design surface.
The system adds the new widget with the name Initialize variables 1 to your workflow. The number in the title indicates that you have another action of the same type in this workflow. The first instance of the action is number 0, the second is number 1, and so on. You can change the name of the widget in the Initialize variables pane.
Configure an HTTP action to update API properties
Add a workflow step to make an HTTP PUT request to update the API properties in your API center.
Under the Initialize variables 1 action widget, select the plus sign +, and select Add an action.
Search for HTTP, and then select HTTP.
In the HTTP pane, configure the following settings:
For the URI value, enter
https://management.azure.com/(including the trailing forward slash/).When the system detects the forward slash
/, select Insert dynamic content, and select the subjectvar variable.Enter forward slash
/again, select Insert dynamic content, and select the versionvar variable.
The final value should look like this example where the URI ends with a forward slash
/:
For the Method value, select PUT.
For the Body value, enter the following code:
{
    "properties": {
    "customProperties": {
        "api-status": "@variables('statusvar')"
    },
    "title": "@body('Parse_JSON')?['properties']?['title']",
    "description": "@body('Parse_JSON')?['properties']?['description']",
    "lifecycleStage": "@body('Parse_JSON')?['properties']?['lifecycleStage']",
    "kind": "@body('Parse_JSON')?['properties']?['kind']"
    }
}
Under Advanced parameters, select Authentication, and configure the following settings:
For the Authentication type value, select Managed Identity.
For the Managed identity value, select System-assigned managed identity.
For the Audience value, enter
https://management.azure.com/.
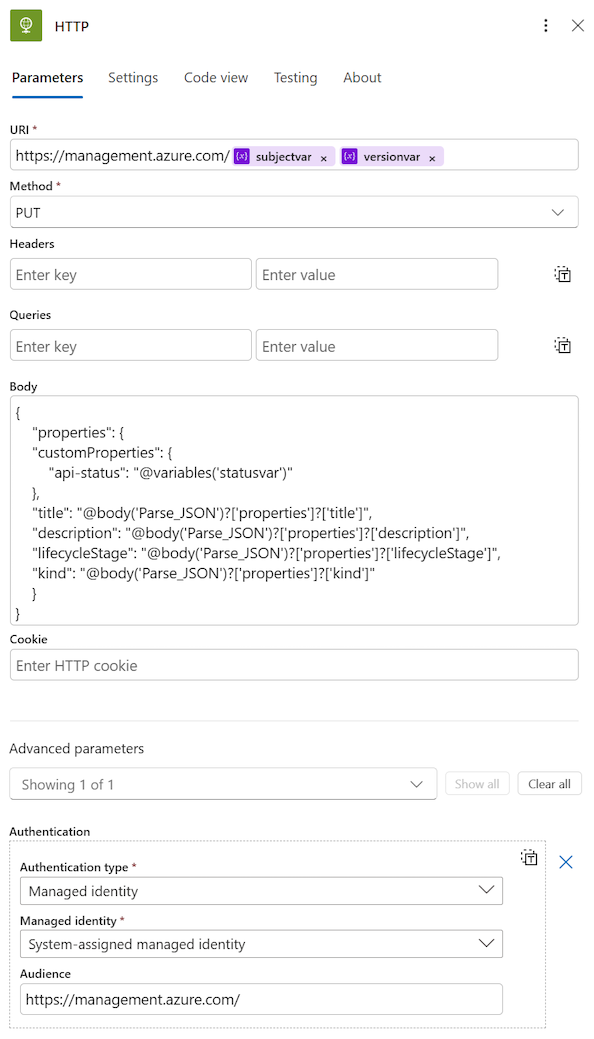
Close the pane to return to the design surface.
The system adds the new widget with the name HTTP 1 to your workflow. You can change the name of the widget in the HTTP pane.
Save the workflow
In the Logic app designer, select Save in the menubar to keep your workflow. The complete workflow should look similar to the following example:

Confirm the event subscription is successfully created in your API center. It might take a few minutes for the event subscription to provision.
In the Azure portal, browse to your API center.
Expand Events and select Event Subscriptions.
Confirm the logic app is listed under Name, and the Endpoint is set to Webhook.

Test the event subscription
Test the event subscription by registering an API in your API center:
In the Azure portal, browse to your API center.
Register an API in your API center.
After the API is registered, confirm the following actions:
- The event subscription triggers the logic app workflow.
- The logic app workflow runs and sends a notification to the designated recipient in Microsoft Teams.
In Microsoft Teams, view the adaptive card, make an API status selection, and select Submit.
The logic app workflow updates the api-status property in the API registration in your API center.
In your API center, view the API details to see the updated value for the custom
api-statusproperty.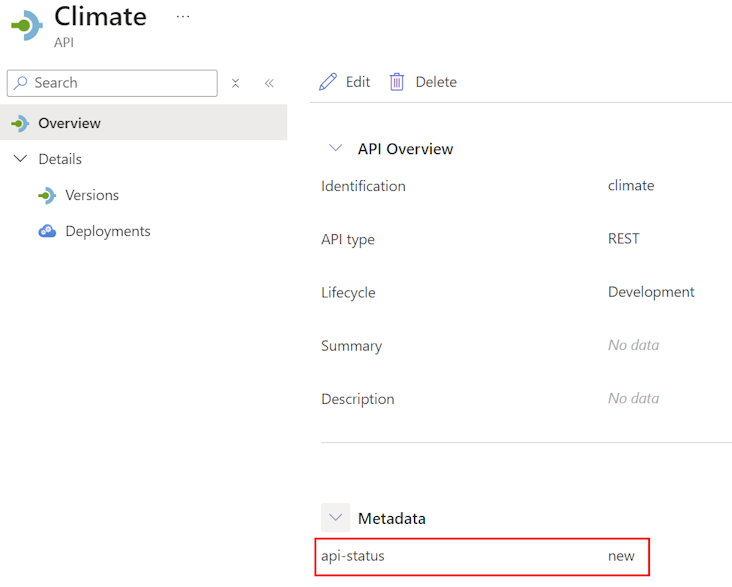
View the logic app process history
To get details about the logic app process and troubleshoot any issues:
In the Azure portal, browse to your logic app.
Expand Development Tools and select Run History.
Select the run to see the details of each step.