Note
Access to this page requires authorization. You can try signing in or changing directories.
Access to this page requires authorization. You can try changing directories.
APPLIES TO: Developer | Basic v2 | Standard | Standard v2 | Premium | Premium v2
In this article, you learn how to:
- Enable access to the developer portal for users in your organization's Microsoft Entra ID tenant or other Microsoft Entra ID workforce tenants.
- Optionally, add external identity providers, such as Google or Facebook, to your Microsoft Entra ID workforce tenant to allow users to sign in with those accounts.
- Manage groups of Microsoft Entra users by adding external groups that contain the users.
For an overview of options to secure the developer portal, see Secure access to the API Management developer portal.
Important
- This article is updated with steps to configure a Microsoft Entra app by using the Microsoft Authentication Library (MSAL).
- If you previously configured a Microsoft Entra app for user sign-in by using the Azure AD Authentication Library (ADAL), migrate to MSAL.
Tip
API Management now supports access to the developer portal from users in more than one Microsoft Entra ID tenant through a single app registration and identity configuration. Currently this is supported in the Developer, Standard, and Premium tiers.
Prerequisites
Complete the Create an Azure API Management instance quickstart.
Import and publish an API in the Azure API Management instance.
If you created your instance in a v2 tier, enable the developer portal. For more information, see Tutorial: Access and customize the developer portal.
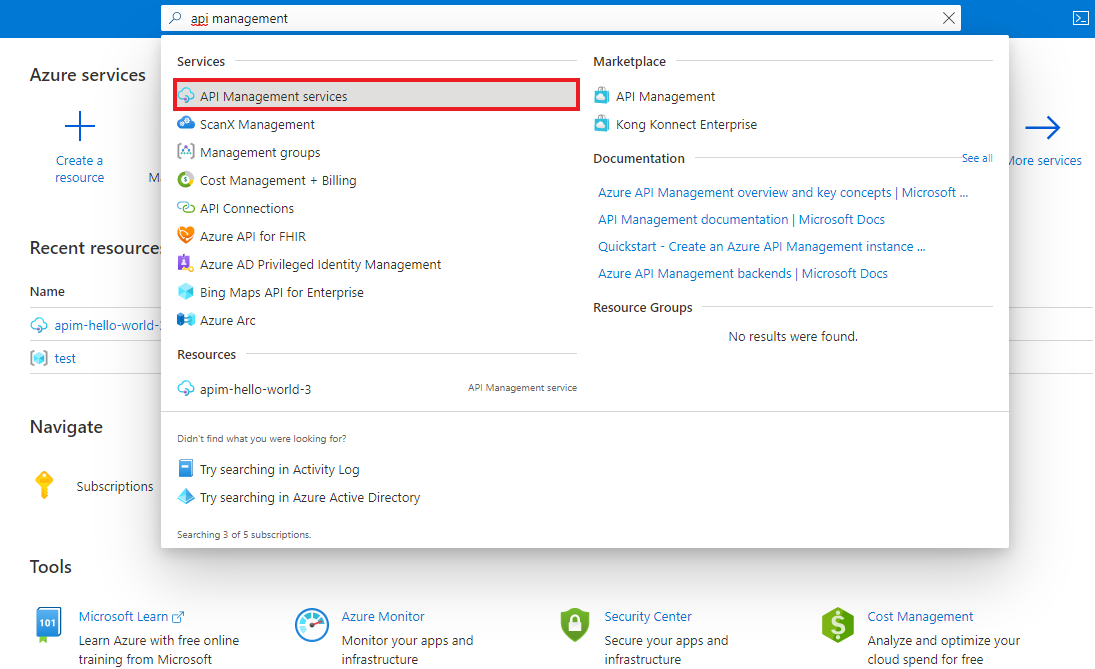
Go to your API Management instance
In the Azure portal, search for and select API Management services:
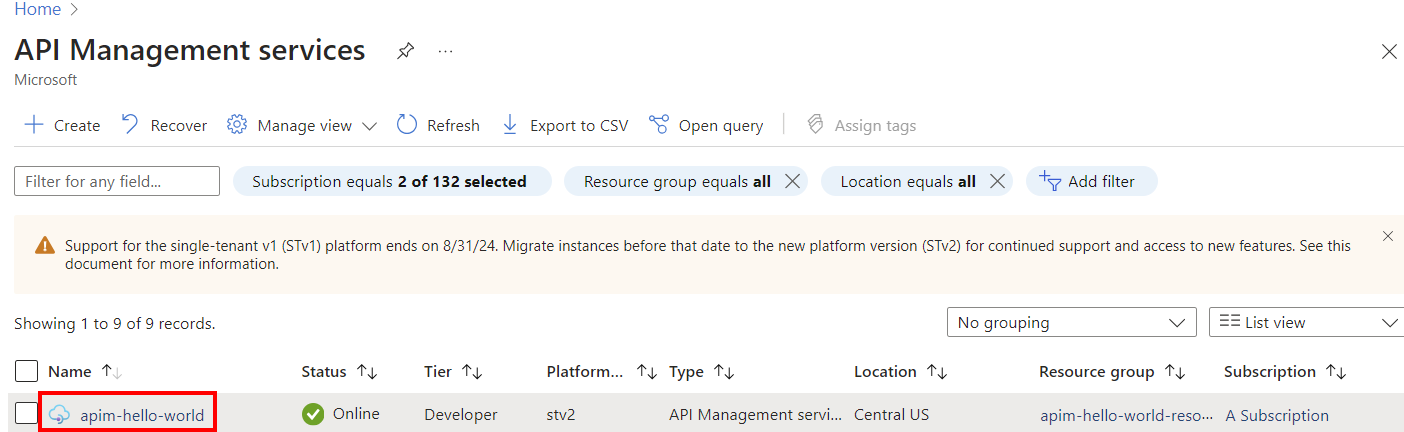
On the API Management services page, select your API Management instance:


Enable user sign-in using Microsoft Entra ID - portal
To simplify the configuration, API Management can automatically enable a Microsoft Entra application and identity provider for users of the developer portal. Alternatively, you can manually enable the Microsoft Entra application and identity provider.
Automatically enable Microsoft Entra application and identity provider
Follow these steps to automatically enable Microsoft Entra ID in the developer portal:
In the left menu of your API Management instance, under Developer portal, select Portal overview.
On the Portal overview page, scroll down to Enable user sign-in with Microsoft Entra ID.
Select Enable Microsoft Entra ID.
On the Enable Microsoft Entra ID page, select Enable Microsoft Entra ID.
Select Close.

After the Microsoft Entra provider is enabled:
- Users in your Microsoft Entra tenant can sign into the developer portal by using a Microsoft Entra account.
- You can manage the Microsoft Entra identity provider configuration on the Developer portal > Identities page in the portal.
- Optionally update the app registration in Microsoft Entra ID to support multiple tenants, as described in Configure app registration for multiple tenants. The name of the default app registration created by API Management is the same as the API Management instance name.
- Optionally configure other sign-in settings by selecting Identities > Settings. For example, you might want to redirect anonymous users to the sign-in page.
- Republish the developer portal after any configuration change.
Manually enable Microsoft Entra application and identity provider
Alternatively, manually enable Microsoft Entra ID in the developer portal by registering an application yourself in Microsoft Entra ID and configuring the identity provider for the developer portal.
In the left menu of your API Management instance, under Developer portal, select Identities.
Select + Add from the top to open the Add identity provider pane to the right.
Under Type, select Microsoft Entra ID from the drop-down menu. When you select this option, you can enter other necessary information.
- In the Client library dropdown, select MSAL.
- To add Client ID and Client secret, see steps later in the article.
Save the Redirect URL for later.

In your browser, open the Azure portal in a new tab.
Navigate to App registrations to register an app in Microsoft Entra ID.
Select New registration. On the Register an application page, set the values as follows:
- Set Name to a meaningful name such as developer-portal
- Set Supported account types, make a selection appropriate for your scenarios. If you want to allow users in multiple Microsoft Entra ID tenants to access the developer portal, select Accounts in any organizational directory (Multitenant).
- In Redirect URI, select Single-page application (SPA) and paste the redirect URL you saved from a previous step.
- Select Register.
After you register the application, copy the Application (client) ID from the Overview page.
Switch to the browser tab with your API Management instance.
In the Add identity provider window, paste the Application (client) ID value into the Client ID box.
Switch to the browser tab with the app registration.
Select the appropriate app registration.
Under the Manage section of the side menu, select Certificates & secrets.
From the Certificates & secrets page, select the New client secret button under Client secrets.
- Enter a Description.
- Select any option for Expires.
- Choose Add.
Copy the client Secret value before leaving the page. You need it in a later step.
Under Manage in the side menu, select Token configuration > + Add optional claim.
- In Token type, select ID.
- Select (check) the following claims: email, family_name, given_name.
- Select Add. If prompted, select Turn on the Microsoft Graph email, profile permission.
Switch to the browser tab with your API Management instance.
Paste the secret into the Client secret field in the Add identity provider pane.
Important
Update the Client secret before the key expires.
In Signin tenant, specify a tenant name or ID to use for sign-in to Microsoft Entra. If you don't specify a value, the Common endpoint is used.
In Allowed tenants, add one or more specific Microsoft Entra tenant names or IDs for sign-in to Microsoft Entra.
Note
If you specify additional tenants, the app registration must be configured to support multiple tenants. For more information, see Configure app registration for multiple tenants.
After you specify the desired configuration, select Add.
Republish the developer portal for the Microsoft Entra configuration to take effect. In the left menu, under Developer portal, select Portal overview > Publish.
After the Microsoft Entra provider is enabled:
- Users in the specified Microsoft Entra tenant(s) can sign into the developer portal by using a Microsoft Entra account.
- You can manage the Microsoft Entra configuration on the Developer portal > Identities page in the portal.
- Optionally configure other sign-in settings by selecting Identities > Settings. For example, you might want to redirect anonymous users to the sign-in page.
- Republish the developer portal after any configuration change.
Migrate to MSAL
If you previously configured a Microsoft Entra app for user sign-in by using ADAL, you can use the portal to migrate the app to MSAL and update the identity provider in API Management.
Update Microsoft Entra app for MSAL compatibility
For steps, see Switch redirect URIs to the single-page application type.
Update identity provider configuration
- In the left menu of your API Management instance, under Developer portal, select Identities.
- Select Microsoft Entra ID from the list.
- In the Client library dropdown, select MSAL.
- Select Update.
- Republish your developer portal.
Enable access by external users in your Microsoft Entra ID tenant (optional)
API Management supports external identity providers when you configure them in a Microsoft Entra ID workforce tenant. For example, if you're enabling access to the developer portal by users in your workforce tenant, such as the Contoso organization, you might want to configure Google or Facebook as an external identity provider so that these external users can also sign in by using their accounts.
To optionally enable access to the developer portal by external users in your Microsoft Entra ID tenant, complete the following steps:
- Add an external identity provider to your Microsoft Entra ID tenant.
- Enable self-service sign-up.
1. Add an external identity provider to your Microsoft Entra ID tenant
For this scenario, you must enable an external identity provider in your workforce tenant. Configuring the external identity provider depends on the specific provider and is outside the scope of this article. For example, for Google you must create a project in the Google Developers Console, then configure the project credentials in Microsoft Entra.
For options and links to steps, see Identity providers for External ID in workforce tenants.
2. Enable self-service sign-up
To allow external users to register for access to the developer portal, complete the following steps:
a. Enable self-service sign-up for your tenant.
b. Add your app to the self-service sign-up user flow.
For more information and detailed steps, see Add self-service sign-up user flows for B2B collaboration.
Enable access by users in more than one Microsoft Entra ID tenant (optional)
Note
Support for access to the developer portal by users from multiple Microsoft Entra ID tenants is currently available in the API Management Developer, Standard, and Premium tiers.
To optionally enable access to the developer portal by users from more than one Microsoft Entra ID tenant, complete the following steps:
- Configure app registration for multiple tenants.
- Update the Microsoft Entra ID identity provider configuration for the developer portal to add another tenant.
1. Configure app registration for multiple tenants
The app registration must support multiple tenants. You can configure this support in either of the following ways:
- When creating the app registration, set Supported account types to Accounts in any organizational directory (Any Microsoft Entra ID tenant - Multitenant).
- If you previously configured an app registration for a single tenant, update the Supported account types setting on the Manage > Authentication page of the app registration.
2. Update Microsoft Entra ID identity provider configuration for multiple tenants
Update the identity provider configuration to add another tenant:
- In the Azure portal, go to your API Management instance.
- Under Developer portal, select Identities.
- Select Microsoft Entra ID from the list.
- In the Tenant ID field, add the extra tenant IDs separated by commas.
- Update the value of Signin tenant to one of the configured tenants.
- Select Update.
- Republish your developer portal.
Add an external Microsoft Entra group
After you enable access for users in a Microsoft Entra tenant, you can:
- Add Microsoft Entra groups into API Management. You must add groups in the tenant where you deployed your API Management instance.
- Control product visibility by using Microsoft Entra groups.
- Go to the App Registration page for the application you registered in the previous section.
- Select API Permissions.
- Add the following minimum application permissions for Microsoft Graph API:
User.Read.Allapplication permission – so API Management can read the user’s group membership to perform group synchronization when the user signs in.Group.Read.Allapplication permission – so API Management can read the Microsoft Entra groups when an administrator tries to add the group to API Management by using the Groups blade in the portal.
- Select Grant admin consent for {tenantname} to grant access for all users in this directory.
Now you can add external Microsoft Entra groups from the Groups tab of your API Management instance.
Under Developer portal in the side menu, select Groups.
Select the Add Microsoft Entra group button.
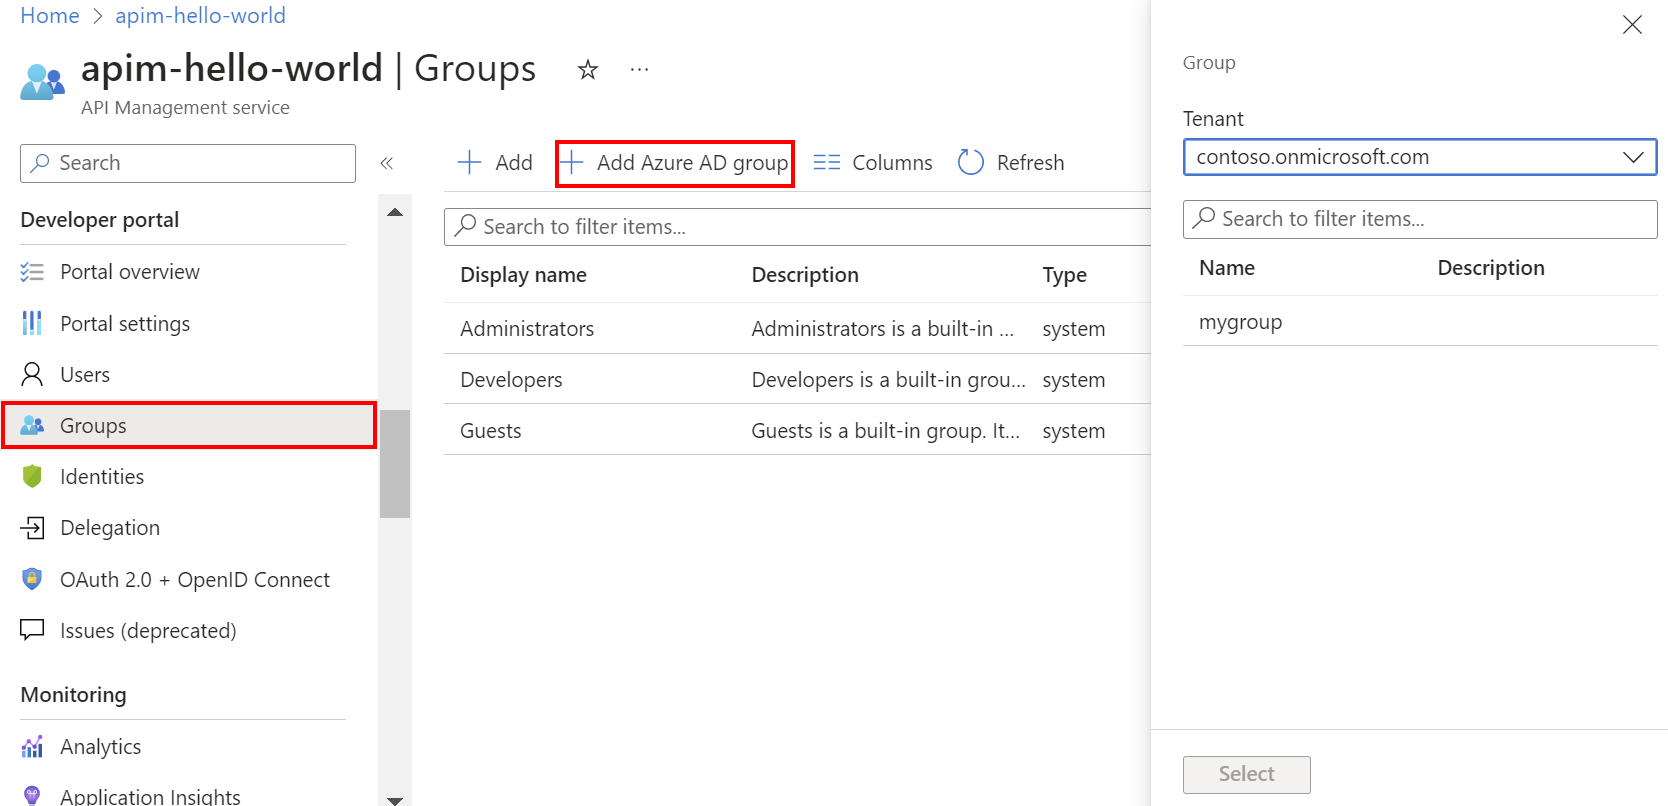
Select the Tenant from the drop-down.
Search for and select the group that you want to add.
Select Select.
After you add an external Microsoft Entra group, you can review and configure its properties:
- Select the name of the group from the Groups tab.
- Edit Name and Description information for the group.
Users from the configured Microsoft Entra instance can now:
- Sign in to the developer portal.
- View and subscribe to any groups for which they have visibility.
Note
Learn more about the difference between Delegated and Application permissions types in Permissions and consent in the Microsoft identity platform article.
Synchronize Microsoft Entra groups with API Management
Groups you configure in Microsoft Entra must synchronize with API Management so that you can add them to your instance. If the groups don't synchronize automatically, use one of the following steps to manually synchronize group information:
- Sign out and sign in to Microsoft Entra ID. This activity usually triggers synchronization of groups.
- Ensure that you specify the Microsoft Entra sign-in tenant the same way (by using either the tenant ID or domain name) in your configuration settings in API Management. You specify the sign-in tenant in the Microsoft Entra ID identity provider for the developer portal and when you add a Microsoft Entra group to API Management.
Developer portal: Add Microsoft Entra account authentication
In the developer portal, you can enable sign in with Microsoft Entra ID by using the Sign-in button: OAuth widget included on the sign-in page of the default developer portal content.
A user can then sign in by using Microsoft Entra ID as follows:
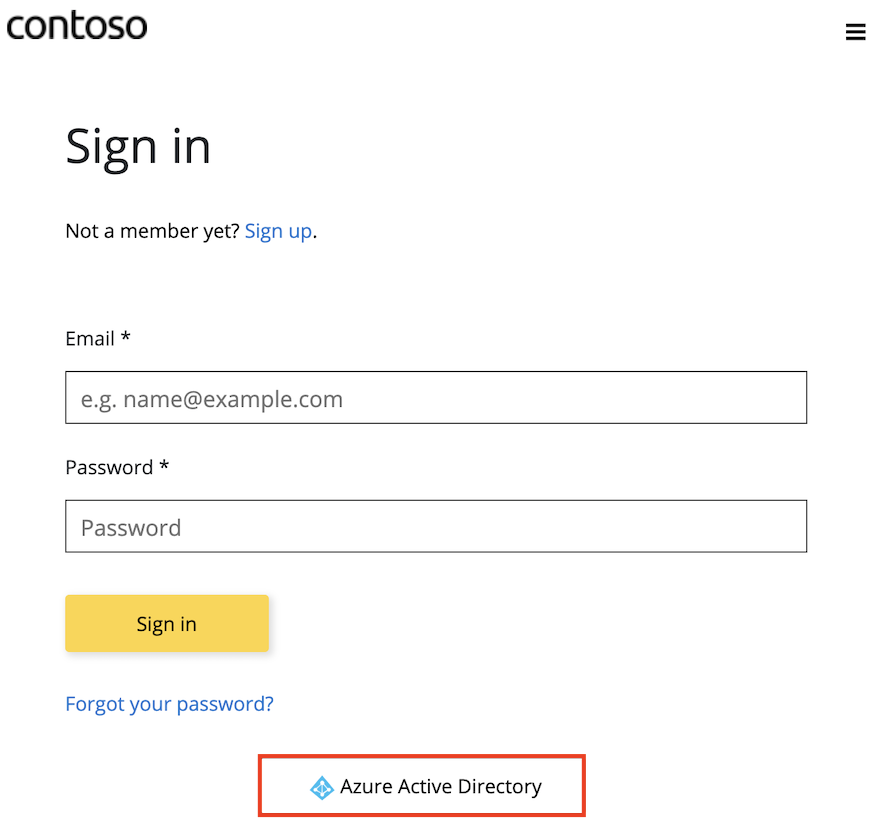
Go to the developer portal. Select Sign in.
On the Sign in page, select Microsoft Entra ID. Selecting this button opens the Microsoft Entra ID sign-in page.
Tip
If you configure more than one tenant for access, more than one Microsoft Entra ID button appears on the sign-in page. Each button is labeled with the tenant name.
In the sign-in window for the Microsoft Entra tenant, respond to the prompts.
Note
If you enabled an external identity provider in your Microsoft Entra tenant and configured self-service sign-up, select the external identity provider in the sign-in window to sign in with those credentials. For example, if you configured Google as an identity provider, select Sign in with Google.
After sign-in is complete, the user is redirected back to the developer portal. The user is now signed in to the developer portal and added as a new API Management user identity in Users.
Although a new account is automatically created when a new user signs in by using Microsoft Entra ID, consider adding the same widget to the sign-up page. The Sign-up form: OAuth widget represents a form used for signing up by using OAuth.
Important
You need to republish the portal for the Microsoft Entra ID changes to take effect.
Related content
- To learn more about Microsoft Entra ID and OAuth 2.0, see Microsoft Entra ID and OAuth2.0.
- To learn more about MSAL, see MSAL and migrating to MSAL.
- To troubleshoot network connectivity to Microsoft Graph from inside a virtual network, see Troubleshoot network connectivity to Microsoft Graph from inside a VNet.