Note
Access to this page requires authorization. You can try signing in or changing directories.
Access to this page requires authorization. You can try changing directories.
APPLIES TO: All API Management tiers
In this article, you learn how to create a managed connection in API Management and call a GitHub API that requires an OAuth 2.0 token. This example uses the authorization code grant type.
You learn how to:
- Register an application in GitHub
- Configure a credential provider in API Management
- Configure a connection
- Create an API in API Management and configure a policy
- Test your GitHub API in API Management
Prerequisites
- A GitHub account.
- A running API Management instance. If you need one, create an Azure API Management instance.
- Enable a system-assigned managed identity for API Management in the API Management instance.
Step 1: Register an application in GitHub
Create a GitHub OAuth app for the API and give it the appropriate permissions for the requests that you want to call.
Sign in to GitHub.
In your account profile, go to Settings > Developer Settings > OAuth Apps. Select New OAuth app.
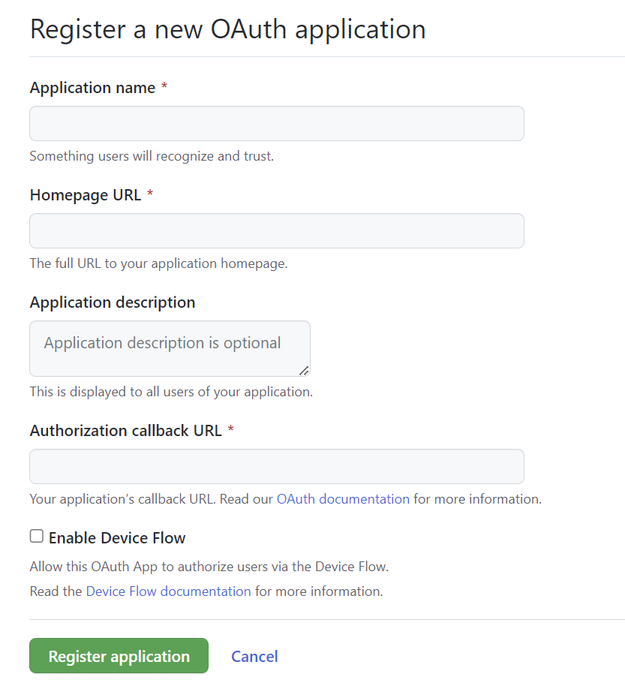
- Enter an Application name and Homepage URL for the application. For this example, you can supply a placeholder URL such as
http://localhost. - Optionally, add an Application description.
- In Authorization callback URL (the redirect URL), enter
https://authorization-manager.consent.azure-apim.net/redirect/apim/<YOUR-APIM-SERVICENAME>, substituting the name of the API Management instance where you configure the credential provider. - Optionally select Enable device flow (not required for this example).
- Enter an Application name and Homepage URL for the application. For this example, you can supply a placeholder URL such as
Select Register application.
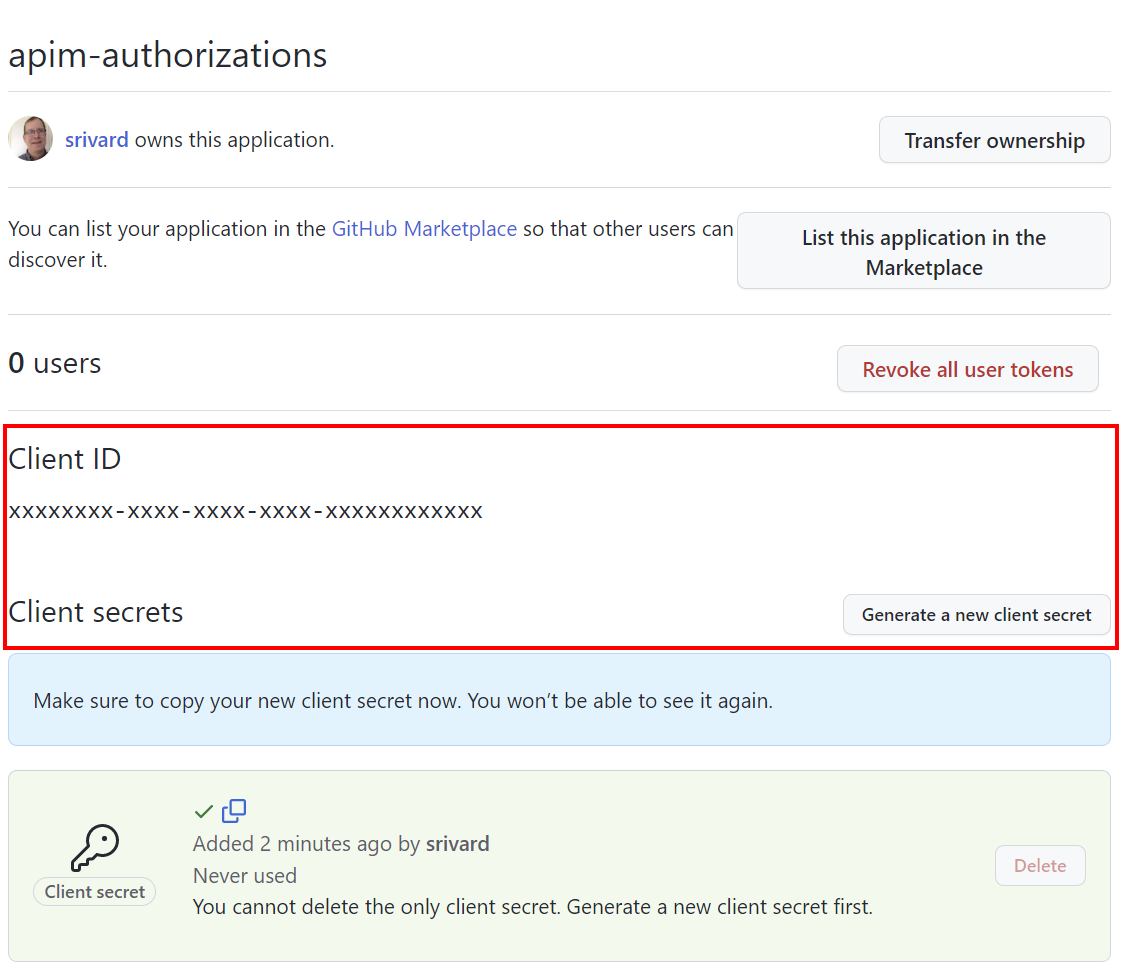
On the General page, copy the Client ID, which you use in Step 2.
Select Generate a new client secret. Copy the secret, which isn't displayed again. You configure the secret in Step 2.
Step 2: Configure a credential provider in API Management
Sign in to the Azure portal and go to your API Management instance.
On the left menu, select APIs > Credential manager > + Create.
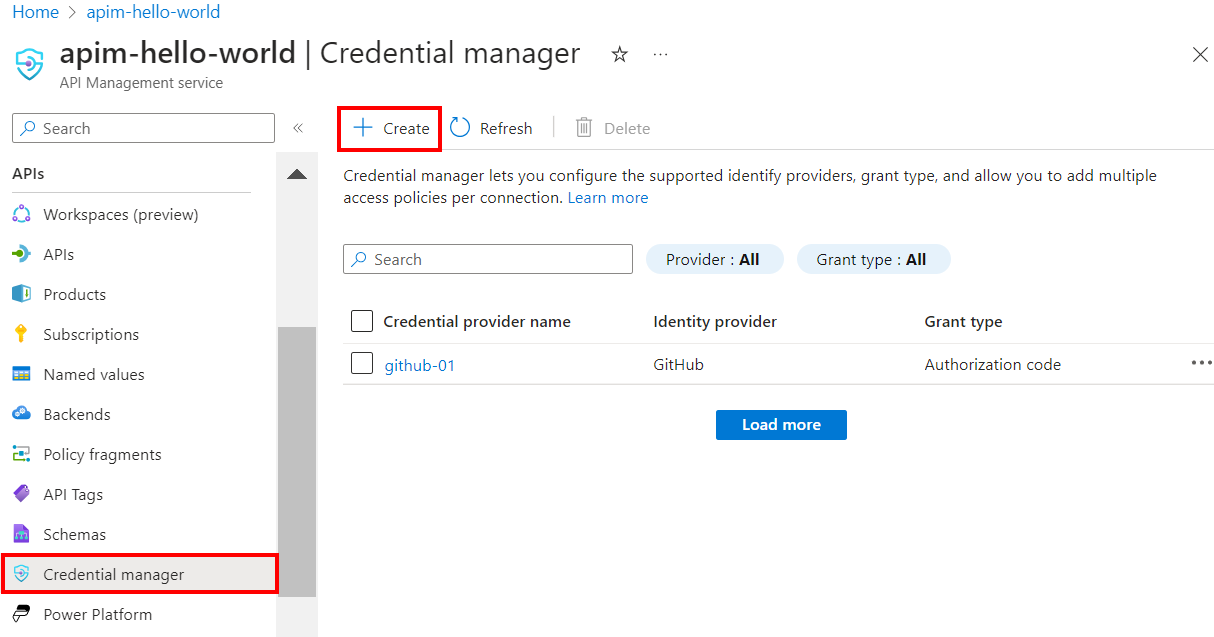
On Create credential provider, enter the following settings:
Settings Value Credential provider name A name of your choice, such as github-01 Identity provider Select GitHub Grant type Select Authorization code Client ID Paste the value you copied earlier from the app registration Client secret Paste the value you copied earlier from the app registration Scope For this example, set the scope to User Select Create.
When prompted, review the OAuth redirect URL that's displayed, and select Yes to confirm that it matches the URL you entered in the GitHub app registration.
Step 3: Configure a connection
On the Connection tab, complete the steps for your connection to the provider.
Note
When you configure a connection, API Management by default sets up an access policy that enables access by the instance's systems-assigned managed identity. This access is sufficient for this example. You can add additional access policies as needed.
- Enter a Connection name, then select Save.
- Under Step 2: Login to your connection (for authorization code grant type), select the Login button. Complete steps with your identity provider to authorize access, and return to API Management. After successful login, the status of the connection changes to Connected.
- Under Step 3: Determine who will have access to this connection (Access policy), the managed identity member is listed. Adding other members is optional, depending on your scenario.
- Select Complete.
The new connection appears in the list of connections, and shows a status of Connected. If you want to create another connection for the credential provider, complete the preceding steps.
Tip
Use the Azure portal to add, update, or delete connections to a credential provider at any time. For more information, see Configure multiple connections.
Step 4: Create an API in API Management and configure a policy
Sign in to the Azure portal and go to your API Management instance.
On the left menu, select APIs > APIs > + Add API.
Select HTTP and enter the following settings, then select Create.
Setting Value Display name githubuser Web service URL https://api.github.comAPI URL suffix githubuser Go to the new API and select Add Operation. Enter the following settings and select Save.
Setting Value Display name getauthdata URL for GET /user 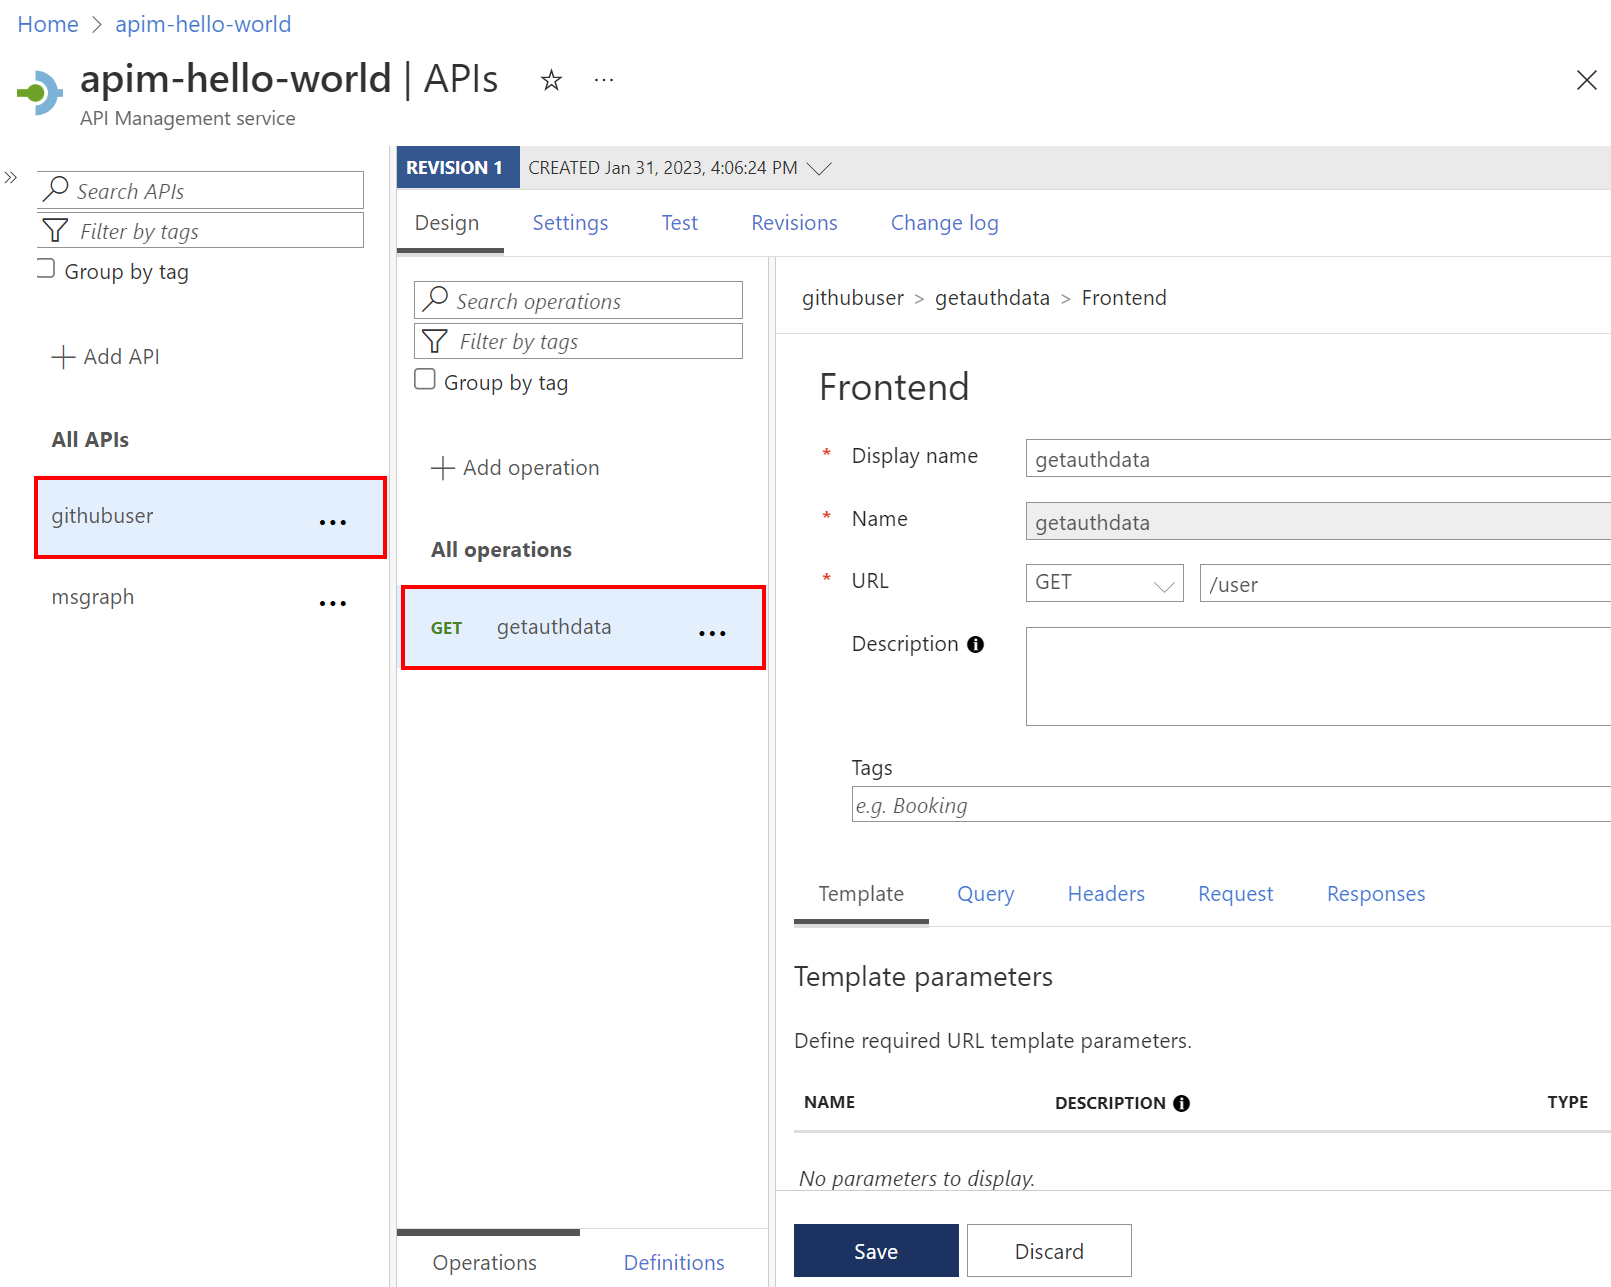
Follow the preceding steps to add another operation with the following settings.
Setting Value Display name getauthfollowers URL for GET /user/followers Select All operations. In the Inbound processing section, select the (</>) (code editor) icon.
Copy and paste the following code in the policy editor. Make sure the
provider-idandauthorization-idvalues in theget-authorization-contextpolicy correspond to the names of the credential provider and connection, respectively, that you configured in the preceding steps. Select Save.<policies> <inbound> <base /> <get-authorization-context provider-id="github-01" authorization-id="first-connection" context-variable-name="auth-context" identity-type="managed" ignore-error="false" /> <set-header name="Authorization" exists-action="override"> <value>@("Bearer " + ((Authorization)context.Variables.GetValueOrDefault("auth-context"))?.AccessToken)</value> </set-header> <set-header name="User-Agent" exists-action="override"> <value>API Management</value> </set-header> </inbound> <backend> <base /> </backend> <outbound> <base /> </outbound> <on-error> <base /> </on-error> </policies>
The preceding policy definition consists of three parts:
- The get-authorization-context policy fetches an authorization token by referencing the credential provider and connection that you created earlier.
- The first set-header policy creates an HTTP header with the fetched authorization token.
- The second set-header policy creates a
User-Agentheader (GitHub API requirement).
Step 5: Test the API
On the Test tab, select one operation that you configured.
Select Send.
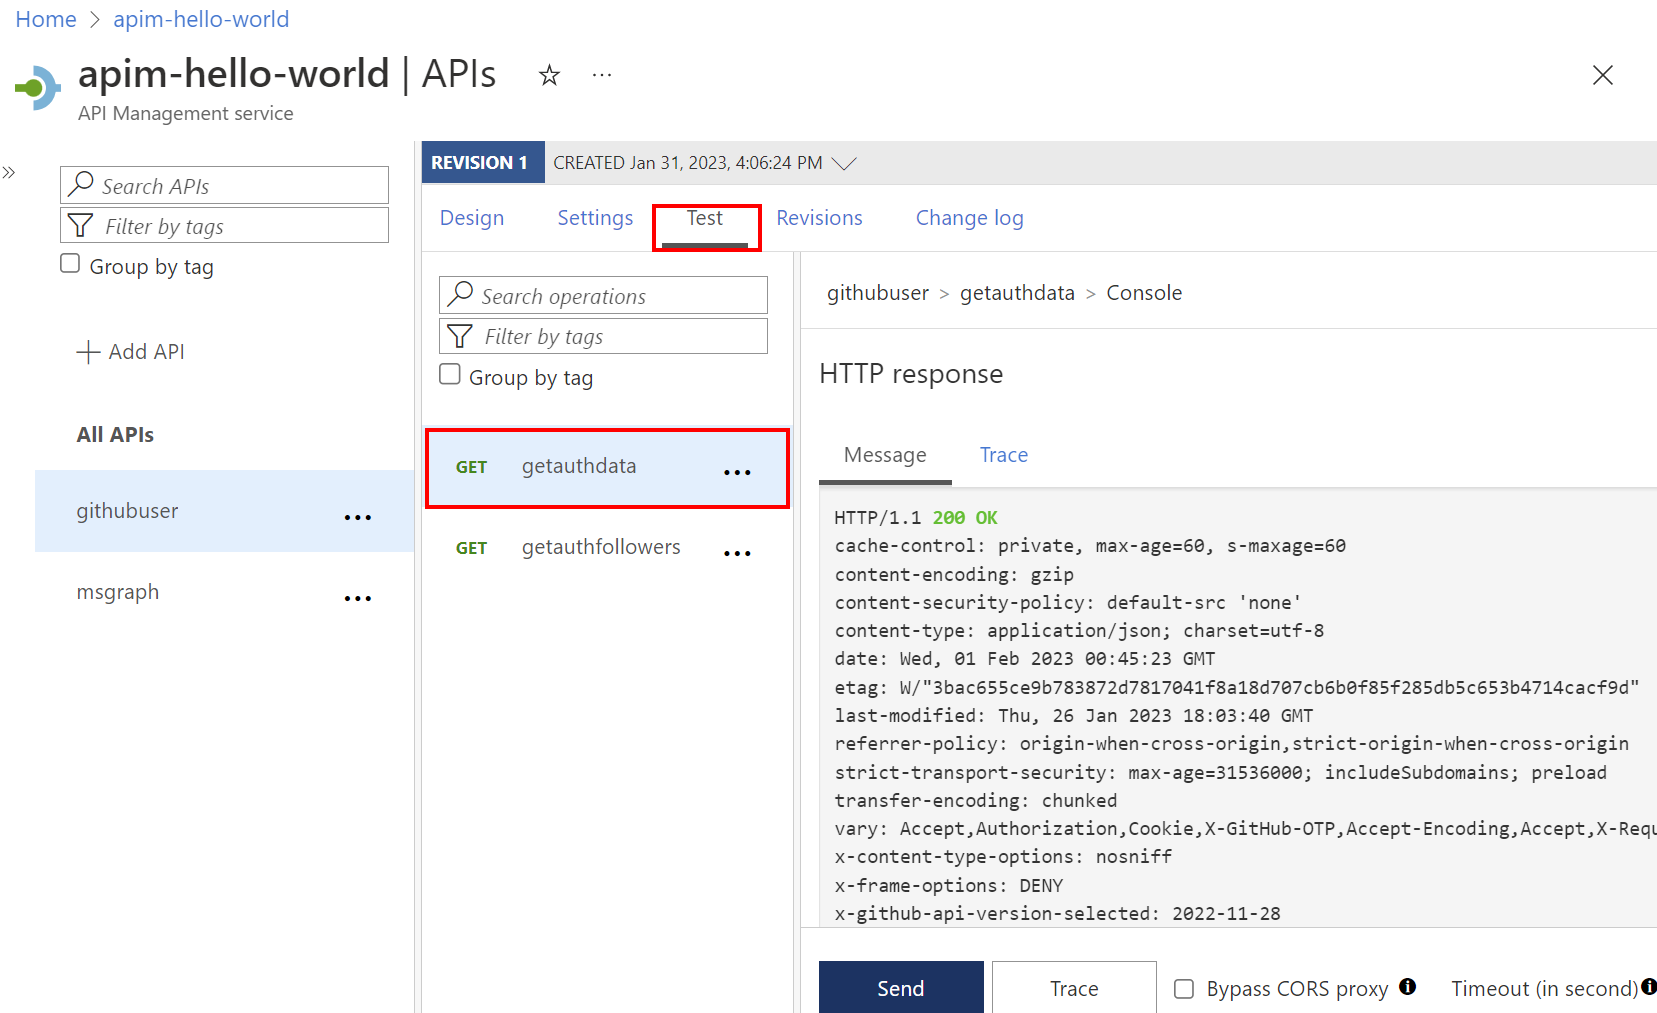
A successful response returns user data from the GitHub API.
Related content
- Learn more about authentication and authorization policies
- Learn more about GitHub's REST API