Events
Sep 16, 11 PM - Oct 18, 11 PM
Join us on a learning journey combining AI, apps and cloud-scale data to build unique solutions.
Learn moreThis browser is no longer supported.
Upgrade to Microsoft Edge to take advantage of the latest features, security updates, and technical support.
Important
This article is about App Service Environment v1. App Service Environment v1 and v2 are retired as of 31 August 2024. There's a new version of App Service Environment that is easier to use and runs on more powerful infrastructure. To learn more about the new version, start with the Introduction to the App Service Environment. If you're currently using App Service Environment v1, please follow the steps in this article to migrate to the new version.
As of 31 August 2024, Service Level Agreement (SLA) and Service Credits no longer apply for App Service Environment v1 and v2 workloads that continue to be in production since they are retired products. Decommissioning of the App Service Environment v1 and v2 hardware has begun, and this may affect the availability and performance of your apps and data.
You must complete migration to App Service Environment v3 immediately or your apps and resources may be deleted. We will attempt to auto-migrate any remaining App Service Environment v1 and v2 on a best-effort basis using the in-place migration feature, but Microsoft makes no claim or guarantees about application availability after auto-migration. You may need to perform manual configuration to complete the migration and to optimize your App Service plan SKU choice to meet your needs. If auto-migration isn't feasible, your resources and associated app data will be deleted. We strongly urge you to act now to avoid either of these extreme scenarios.
If you need additional time, we can offer a one-time 30-day grace period for you to complete your migration. For more information and to request this grace period, review the grace period overview, and then go to Azure portal and visit the Migration blade for each of your App Service Environments.
For the most up-to-date information on the App Service Environment v1/v2 retirement, see the App Service Environment v1 and v2 retirement update.
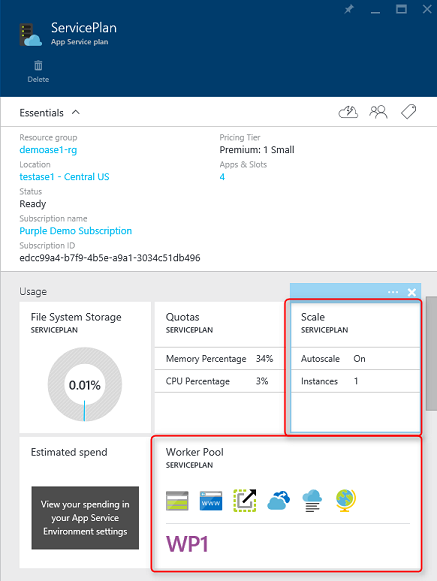
In the Azure App Service, there are normally three things you can scale:
In an ASE, there's no need to select or change the pricing plan. In terms of capabilities it's already at a Premium pricing capability level.
With respect to worker sizes, the ASE admin can assign the size of the compute resource to be used for each worker pool. That means you can have Worker Pool 1 with P4 compute resources and Worker Pool 2 with P1 compute resources, if desired. They don't have to be in size order. For details around the sizes and their pricing see the document here Azure App Service Pricing. This leaves the scaling options for web apps and App Service Plans in an App Service Environment to be:
Changing either item is done through the appropriate UI shown for your ASE hosted App Service Plans.
You can't scale up your ASP beyond the number of available compute resources in the worker pool that your ASP is in. If you need compute resources in that worker pool, you need to get your ASE administrator to add them. For information around reconfiguring your ASE read the information here: How to Configure an App Service environment. You might also want to take advantage of the ASE autoscale features to add capacity based on schedule or metrics. To get more details on configuring autoscale for the ASE environment, itself see How to configure autoscale for an App Service Environment.
You can create multiple app service plans using compute resources from different worker pools, or you can use the same worker pool. For example if you have (10) available compute resources in Worker Pool 1, you can choose to create one app service plan using (6) compute resources, and a second app service plan that uses (4) compute resources.
When you first create your web app in an App Service Environment, it starts with one instance. You can then scale out to more instances to provide extra compute resources for your app.
If your ASE has enough capacity, then this is simple. You go to your App Service Plan that holds the sites you want to scale up and select Scale. This opens the UI where you can manually set the scale for your ASP or configure autoscale rules for your ASP. To manually scale your app set Scale by to an instance count that, I enter manually***. From here either drag the slider to the desired quantity or enter it in the box next to the slider.
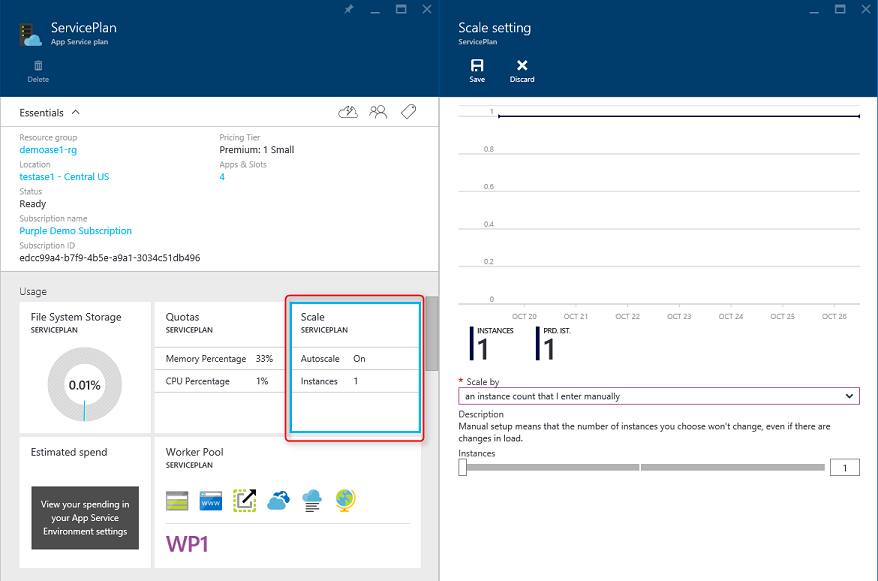
The autoscale rules for an ASP in an ASE work the same as they do normally. You can select CPU Percentage under Scale by and create autoscale rules for your ASP based on CPU Percentage or you can create more complex rules using schedule and performance rules. To see more complete details on configuring autoscale use the guide here Scale an app in Azure App Service.
As noted earlier, the worker pool selection is accessed from the ASP UI. Open the page for the ASP that you want to scale and select worker pool. You see all of the worker pools which you configured in your App Service Environment. If you have only one worker pool, then you only see the one pool listed. To change what worker pool your ASP is in, you select the worker pool you want your App Service Plan to move to.
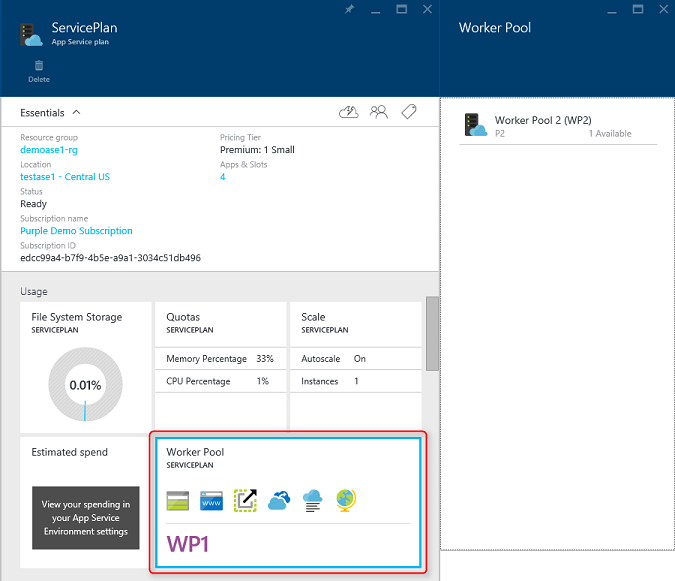
Before moving your ASP from one worker pool to another, it's important to make sure you have adequate capacity for your ASP. In the list of worker pools, not only is the worker pool name listed but you can also see how many workers are available in that worker pool. Make sure that there are enough instances available to contain your App Service Plan. If you need more compute resources in the worker pool you wish to move to, then get your ASE administrator to add them.
Note
Moving an ASP from one worker pool will cause cold starts of the apps in that ASP. This can cause requests to run slowly as your app is cold started on the new compute resources. The cold start can be avoided by using the application warm up capability in Azure App Service. The Application Initialization module described in the article also works for cold starts because the initialization process is also invoked when apps are cold started on new compute resources.
To get started with App Service Environments, see How to Create an ASEv1 from template
Events
Sep 16, 11 PM - Oct 18, 11 PM
Join us on a learning journey combining AI, apps and cloud-scale data to build unique solutions.
Learn moreTraining
Module
Learn how to respond to periods of increased activity by incrementally increasing the resources available and then freeing these resources when activity drops.
Certification
Microsoft Certified: Azure Database Administrator Associate - Certifications
Administer an SQL Server database infrastructure for cloud, on-premises and hybrid relational databases using the Microsoft PaaS relational database offerings.