Note
Access to this page requires authorization. You can try signing in or changing directories.
Access to this page requires authorization. You can try changing directories.
In this quickstart, you create an App Service Environment. App Service Environment is a single-tenant deployment of Azure App Service that integrates with an Azure virtual network. Each App Service Environment deployment requires a dedicated subnet, which you can't use for other resources.
If you don't have an Azure account, create a free account before you begin.
Before you create an App Service Environment
Review the following settings before you create your environment. You can't change them later.
- Location
- Subscription
- Resource group
- Azure virtual network
- Subnets
- Subnet size
- The name of your App Service Environment
Ensure that your subnet is large enough to accommodate the maximum scale of your App Service Environment. Use a
/24subnet with 256 addresses as the recommended size.Select your virtual IP (VIP) type. The virtual IP type determines how your apps are accessed.
Choose between the following two virtual IP types:
Internal VIP: Your apps use an address within your App Service Environment subnet that doesn't appear in the public Domain Name System (DNS). When you create an App Service Environment in the Azure portal, you can set up an Azure private DNS zone. Specify an Inbound IP address and select either Automatic or Manual.
External VIP: Your apps use a public-facing address listed in public DNS. You can specify an Inbound IP address and select either Automatic or Manual. If you select Manual, you must create a standard public IP address in Azure first.
Select your deployment type. The deployment type determines how your apps are distributed across the App Service Environment. Choose between the following three types:
Regional deployment: Also called a nonzonal deployment, this option is available in all regions that support App Service Environment v3. In regions with availability zones, your apps run in a single zone. If any availability zone in the region experiences an outage, regional deployments can experience downtime.
You must pay a minimum charge for one instance of Windows Isolated v2 in your App Service plan. When you use one or more instances, the charge is removed. This fee isn't additive.
Zone redundant deployment: Zone redundancy ensures that workloads remain available even if one zone experiences an outage. In regions that support availability zones, you can configure App Service Environments so that apps are distributed across multiple availability zones within the same region. You must include at least two instances in your App Service plan to ensure redundancy across zones. You can scale out by adding one or more instances at a time. For more information, see Reliability in App Service Environment.
Host group deployment: Your apps are deployed onto a dedicated host group. The dedicated host group isn't zone redundant. You can install and use your App Service Environment on dedicated hardware. There's no minimum instance charge for using an App Service Environment on a dedicated host group. However, you must pay for the host group when you provision the App Service Environment. You must also pay a discounted App Service plan rate when you create your plans and scale out.
A dedicated host group deployment allocates a finite number of cores, which both the App Service plans and the infrastructure roles use. This type of deployment can't reach the 200 total instance count normally available in App Service Environment. The number of total possible instances is related to the total number of App Service plan instances, plus the load-based number of infrastructure roles.
Create an App Service Environment in the portal
To create an App Service Environment in the Azure portal, do the following steps:
Search Azure Marketplace for App Service Environment v3.
In the Basics tab, do the following steps:
- Select the subscription.
- Select or create the resource group.
- Enter the name of your App Service Environment.
Choose the Virtual IP type:
- Select Internal if you want the inbound address to be within your subnet.
- Select External if you want the inbound address to face the public internet.
Enter an App Service Environment Name that's fewer than 36 characters. The name also serves as the domain suffix.
- For example, if the name is contoso and you have an internal VIP, the domain suffix is
contoso.appserviceenvironment.net. - If the name is contoso and you have an external VIP, the domain suffix is
contoso.p.azurewebsites.net.

In the Hosting tab, configure the following settings:
For Physical hardware isolation, select Enabled or Disabled.
If you enable this option, you can deploy on dedicated hardware. When you create an App Service Environment v3 with a dedicated host deployment, Azure bills you for two dedicated hosts. As you scale, extra resources incur charges at the specialized Isolated v2 rate for each vCore. For each instance, the following allocations apply:
- I1v2 uses two vCores.
- I2v2 uses four vCores.
- I3v2 uses eight vCores.
For Zone redundancy, select Enabled or Disabled.

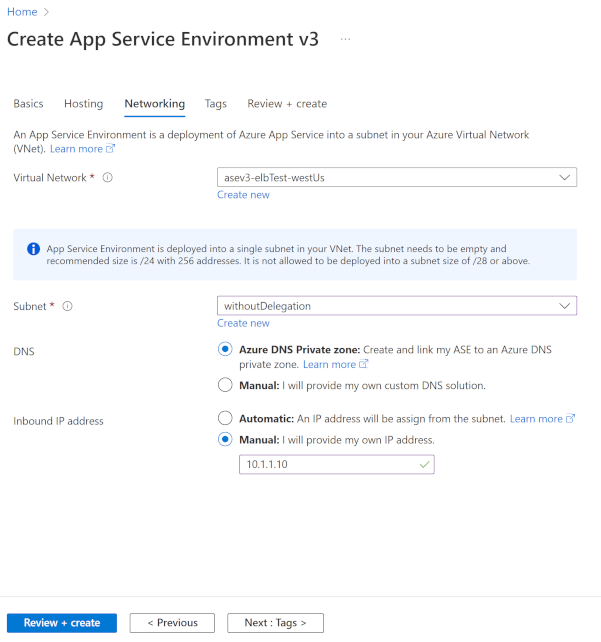
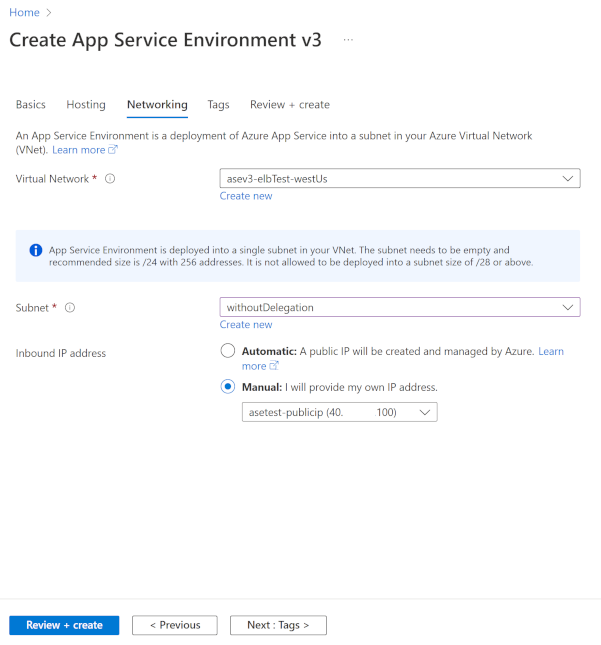
On the Networking tab, complete the following steps:
- Select or create your Virtual Network.
- Select or create your Subnet.
If you create an App Service Environment that has an internal VIP, you can:
Configure Azure DNS private zones to point your domain suffix to your App Service Environment. For more information, see DNS configuration.
Specify a private IP address by using the Manual option for Inbound IP address.
Note
If you use an existing subnet that has either a network security group or route table associated with it, you must either delegate the subnet to
Microsoft.web/hostingEnvironmentsor ensure that you have at least the following role-based access control (RBAC) permissions for the associated resources:Microsoft.Network/routeTables/join/actionMicrosoft.Network/networkSecurityGroups/join/action
If you create an App Service Environment with an external VIP, you can select a public IP address by using the Manual option for Inbound IP address.
In the Review + create tab, check the accuracy of your configuration, and then select Create. Your App Service Environment can take more than one hour to create.


After you successfully create your App Service Environment, you can select it as a location when you create your apps.