Events
Sep 16, 11 PM - Oct 18, 11 PM
Join us on a learning journey combining AI, apps and cloud-scale data to build unique solutions.
Learn moreThis browser is no longer supported.
Upgrade to Microsoft Edge to take advantage of the latest features, security updates, and technical support.
Note
The migration feature described in this article is used for in-place (same subnet) automated migration of App Service Environment v1 and v2 to App Service Environment v3. If you're looking for information on the side-by-side migration feature, see Migrate to App Service Environment v3 by using the side-by-side migration feature. If you're looking for information on manual migration options, see Manual migration options. For help deciding which migration option is right for you, see Migration path decision tree. For more information on App Service Environment v3, see App Service Environment v3 overview.
You can automatically migrate App Service Environment v1 and v2 to App Service Environment v3 by using the in-place migration feature. To learn more about the migration process and to see if your App Service Environment supports migration at this time, see the overview of the in-place migration feature.
Important
We recommend that you use this feature for development environments before migrating any production environments, to avoid unexpected problems. Please provide any feedback related to this article or the feature by using the buttons at the bottom of the page.
Ensure that you understand how migrating to App Service Environment v3 affects your applications. Review the migration process to understand the process timeline and where and when you need to get involved. Also review the FAQs, which can answer some of your questions.
Ensure that there are no locks on your virtual network, resource group, resource, or subscription. Locks block platform operations during migration.
Ensure that no Azure policies are blocking actions that are required for the migration, including subnet modifications and Azure App Service resource creations. Policies that block resource modifications and creations can cause migration to get stuck or fail.
Since scaling is blocked during the migration, you should scale your environment to the desired size before starting the migration. If you need to scale your environment after the migration, you can do so once the migration is complete.
We recommend that you use the Azure portal for the in-place migration experience. If you decide to use the Azure CLI for the migration, follow the steps described here in order and as written, because you're making Azure REST API calls. We recommend that you use the Azure CLI to make these API calls. For information about other methods, see Azure REST API reference.
For this guide, install the Azure CLI or use Azure Cloud Shell and use a Bash shell.
Note
We recommend that you use a Bash shell to run the commands given in this guide. The commands might not be compatible with PowerShell conventions and escape characters.
Run the following commands to get your App Service Environment ID and store it as an environment variable. Replace the placeholders for the name and resource groups with your values for the App Service Environment that you want to migrate. ASE_RG and VNET_RG are the same if your virtual network and App Service Environment are in the same resource group.
ASE_NAME=<Your-App-Service-Environment-name>
ASE_RG=<Your-ASE-Resource-Group>
VNET_RG=<Your-VNet-Resource-Group>
ASE_ID=$(az appservice ase show --name $ASE_NAME --resource-group $ASE_RG --query id --output tsv)
The following command checks whether your App Service Environment is supported for migration. If you receive an error or if your App Service Environment is in an unhealthy or suspended state, you can't migrate at this time. See the troubleshooting section for descriptions of the potential error messages that you can get. If your environment isn't supported for migration using the in-place migration feature or you want to migrate to App Service Environment v3 without using the in-place migration feature, see the manual migration options. This command also validates that your App Service Environment is on the supported build version for migration. If your App Service Environment isn't on the supported build version, you need to start the upgrade yourself, which could take 8-12 hours or longer depending on the size of your environment. For more information on the premigration upgrade, see Validate that migration is supported using the in-place migration feature for your App Service Environment.
az rest --method post --uri "${ASE_ID}/migrate?api-version=2021-02-01&phase=validation"
If there are no errors, your migration is supported, and you can continue to the next step.
If you need to start an upgrade to upgrade your App Service Environment to the supported build version, run the following command. Only run this command if you fail the validation step and you're instructed to upgrade your App Service Environment.
az rest --method post --uri "${ASE_ID}/migrate?api-version=2021-02-01&phase=PreMigrationUpgrade"
Run the following command to create new IP addresses. This step takes about 15 minutes to complete. Don't scale or make changes to your existing App Service Environment during this time.
az rest --method post --uri "${ASE_ID}/migrate?api-version=2021-02-01&phase=premigration"
Run the following command to check the status of this step:
az rest --method get --uri "${ASE_ID}?api-version=2021-02-01" --query properties.status
If the step is in progress, you get a status of Migrating. After you get a status of Ready, run the following command to view your new IPs. If you don't see the new IPs immediately, wait a few minutes and try again.
az rest --method get --uri "${ASE_ID}/configurations/networking?api-version=2021-02-01"
Note
Due to a known bug, for ELB App Service Environment migrations, the inbound IP address may change again once the migration step is complete. Be prepared to update your dependent resources again with the new inbound IP address after the migration step is complete. This bug is being addressed and will be fixed as soon as possible. Open a support case if you have any questions or concerns about this issue or need help with the migration process.
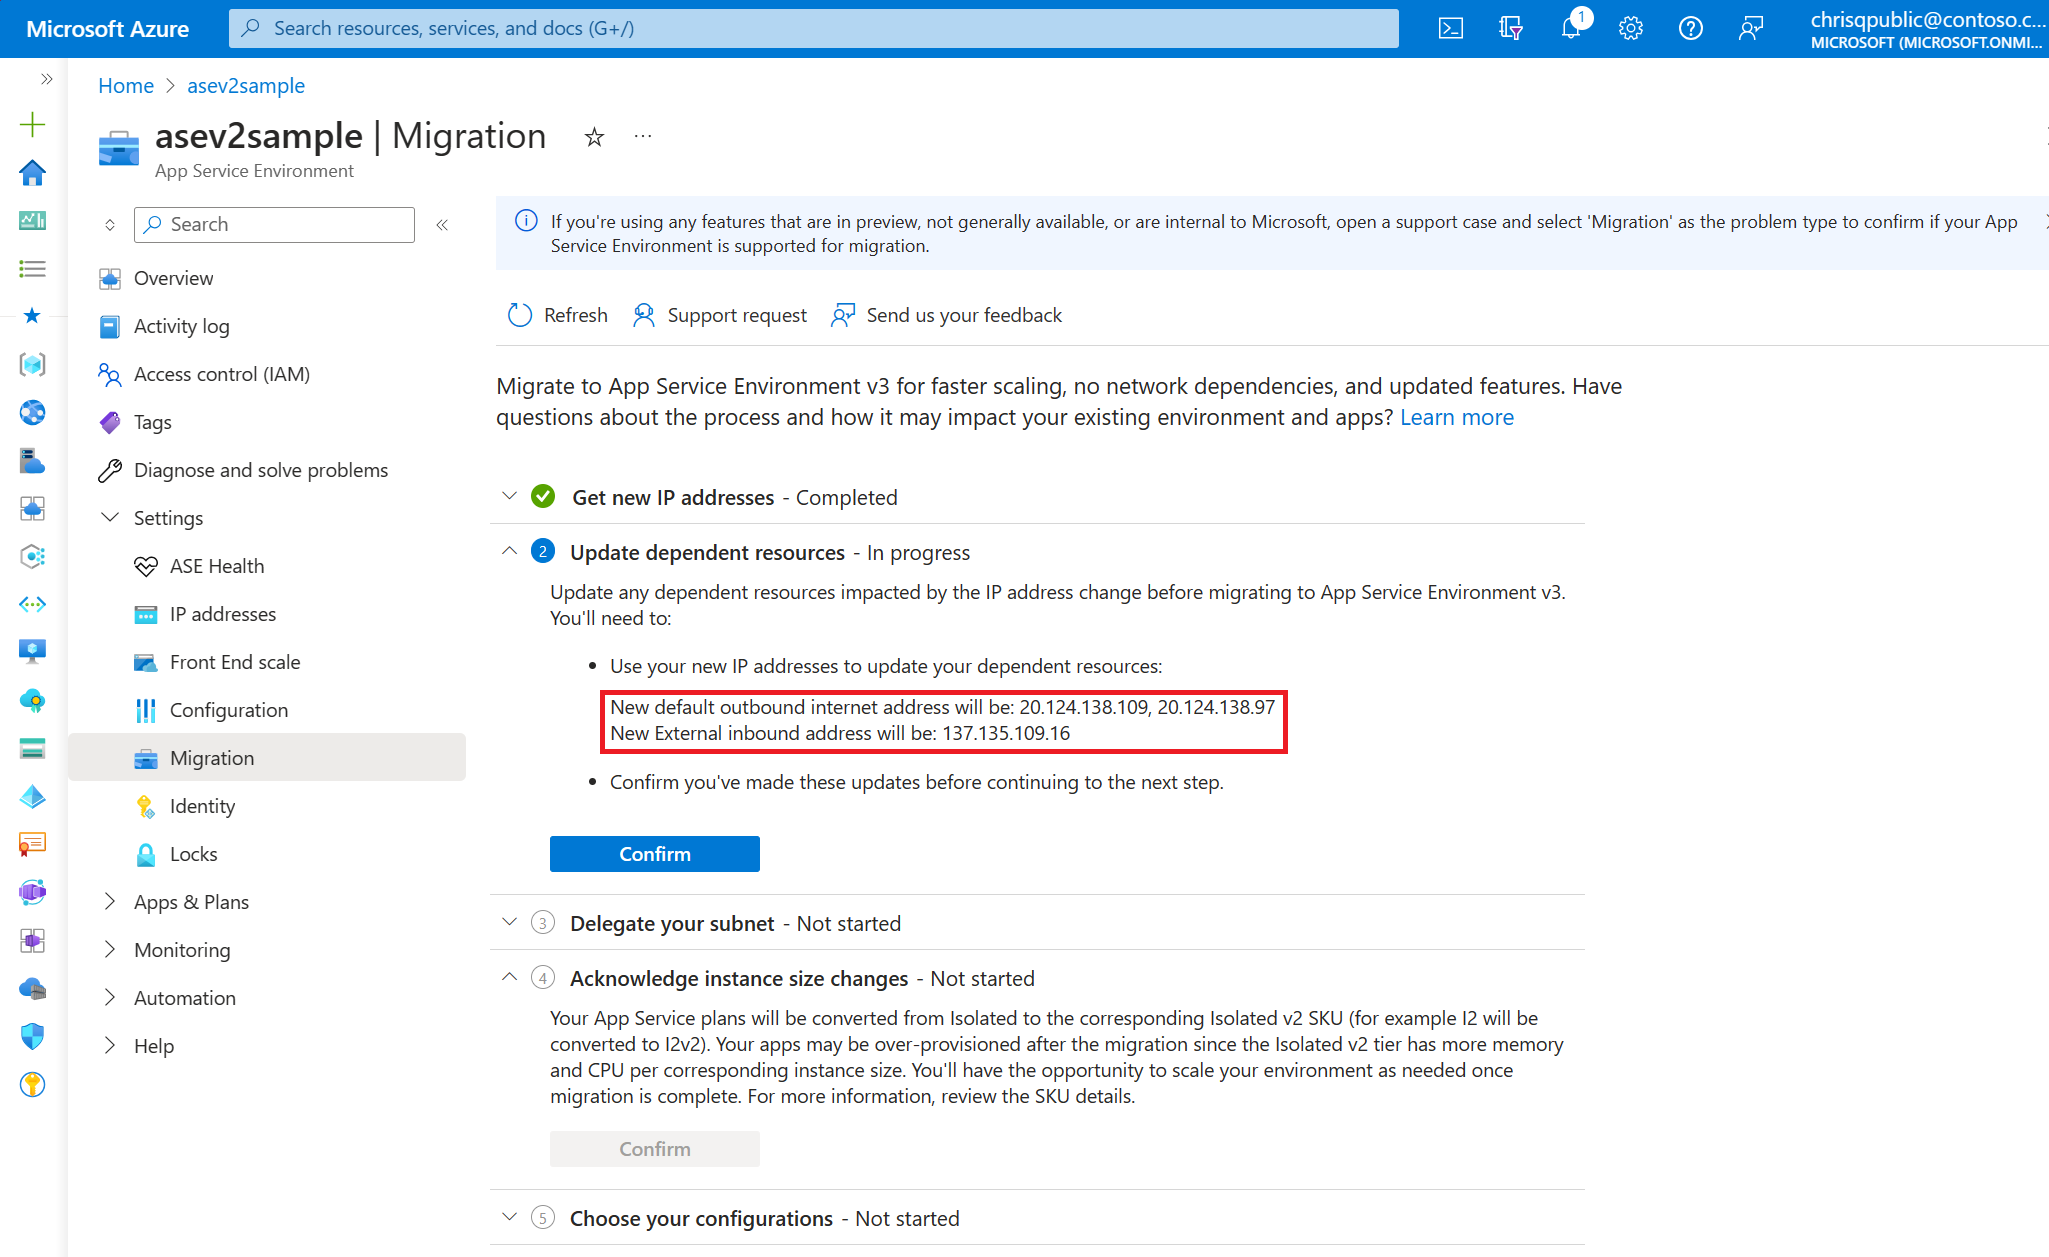
By using the new IPs, update any of your resources or networking components to ensure that your new environment functions as intended after migration is complete. It's your responsibility to make any necessary updates.
This step is also a good time to review the inbound and outbound network dependency changes when moving to App Service Environment v3. These changes include the port change for Azure Load Balancer, which now uses port 80. Don't migrate until you complete this step.
App Service Environment v3 requires the subnet it's in to have a single delegation of Microsoft.Web/hostingEnvironments. Previous versions didn't require this delegation. You need to confirm that your subnet is delegated properly and update the delegation (if necessary) before migrating. You can update the delegation either by running the following command or by going to the subnet in the Azure portal.
az network vnet subnet update --resource-group $VNET_RG --name <subnet-name> --vnet-name <vnet-name> --delegations Microsoft.Web/hostingEnvironments
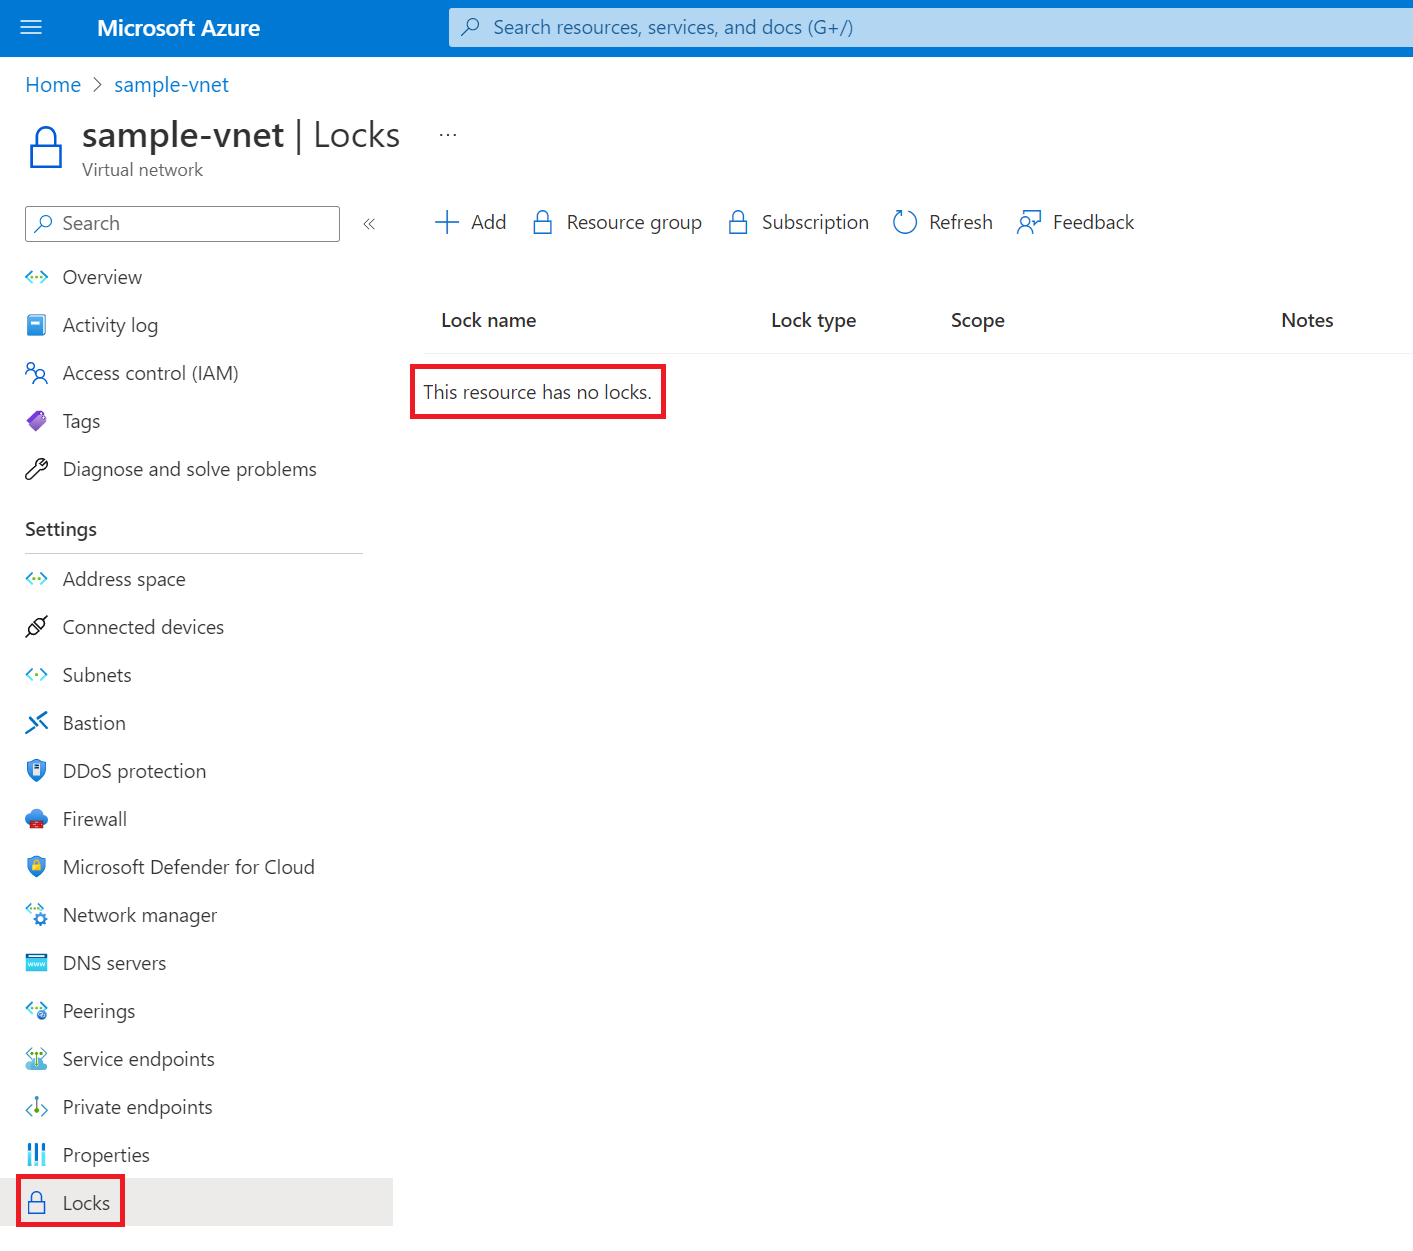
Virtual network locks block platform operations during migration. If your virtual network has locks, you need to remove them before migrating. If necessary, you can add back the locks after migration is complete.
Locks can exist at three scopes: subscription, resource group, and resource. When you apply a lock at a parent scope, all resources within that scope inherit the same lock. If you have locks applied at the subscription, resource group, or resource scope, you need to remove them before the migration. For more information on locks and lock inheritance, see Lock your resources to protect your infrastructure.
Use the following command to check if your virtual network has any locks:
az lock list --resource-group $VNET_RG --resource <vnet-name> --resource-type Microsoft.Network/virtualNetworks
Delete any existing locks by using the following command:
az lock delete --resource-group $VNET_RG --name <lock-name> --resource <vnet-name> --resource-type Microsoft.Network/virtualNetworks
For related commands to check if your subscription or resource group has locks, see the Azure CLI reference for locks.
You can make your new App Service Environment v3 resource zone redundant if your existing environment is in a region that supports zone redundancy. You can configure zone redundancy by setting the zoneRedundant property to true.
Zone redundancy is an optional configuration. You can set it only during the creation of your new App Service Environment v3 resource. You can't remove it at a later time. For more information, see Choose your App Service Environment v3 configurations. If you don't want to configure zone redundancy, don't include the zoneRedundant parameter.
If your existing App Service Environment uses a custom domain suffix, you need to configure one for your new App Service Environment v3 resource during the migration process. Migration fails if you don't configure a custom domain suffix and are using one currently. Migration also fails if you try to add a custom domain suffix during migration to an environment that doesn't have one configured. For more information on App Service Environment v3 custom domain suffixes, including requirements, step-by-step instructions, and best practices, see Custom domain suffix for App Service Environments.
Note
If you're configuring a custom domain suffix, when you're adding the network permissions on your Azure key vault, be sure that your key vault allows access from your App Service Environment's new outbound IP addresses that were generated in step 3. If you're accessing your key vault using a private endpoint, ensure you've configured private access correctly.
If your migration doesn't include a custom domain suffix and you aren't enabling zone redundancy, you can move on to migration.
To set these configurations, create a file called parameters.json with the following details based on your scenario. Don't include the properties for a custom domain suffix if this feature doesn't apply to your migration. Pay attention to the value of the zoneRedundant property, because this configuration is irreversible after migration. Set the value of the kind property based on your existing App Service Environment version. Accepted values for the kind property are ASEV1 and ASEV2.
If you're migrating without a custom domain suffix and you're enabling zone redundancy, use this code:
{
    "type": "Microsoft.Web/hostingEnvironments",
    "name": "sample-ase-migration",
    "kind": "ASEV2",
    "location": "westcentralus",
    "properties": {
        "zoneRedundant": true
    }
}
If you're using a user-assigned managed identity for your custom domain suffix configuration and you're enabling zone redundancy, use this code:
{
    "type": "Microsoft.Web/hostingEnvironments",
    "name": "sample-ase-migration",
    "kind": "ASEV2",
    "location": "westcentralus",
    "properties": {
        "zoneRedundant": true,
        "customDnsSuffixConfiguration": {
            "dnsSuffix": "internal.contoso.com",
            "certificateUrl": "https://contoso.vault.azure.net/secrets/myCertificate",
            "keyVaultReferenceIdentity": "/subscriptions/00000000-0000-0000-0000-000000000000/resourcegroups/asev3-migration/providers/Microsoft.ManagedIdentity/userAssignedIdentities/ase-managed-identity"
        }
    }
}
If you're using a system-assigned managed identity for your custom domain suffix configuration and you're not enabling zone redundancy, use this code:
{
    "type": "Microsoft.Web/hostingEnvironments",
    "name": "sample-ase-migration",
    "kind": "ASEV2",
    "location": "westcentralus",
    "properties": {
        "customDnsSuffixConfiguration": {
            "dnsSuffix": "internal.contoso.com",
            "certificateUrl": "https://contoso.vault.azure.net/secrets/myCertificate",
            "keyVaultReferenceIdentity": "SystemAssigned"
        }
    }
}
After you complete all of the preceding steps, you can start the migration. Make sure that you understand the implications of migration.
This step takes three to six hours for v2 to v3 migrations and up to six hours for v1 to v3 migrations, depending on the environment size. During that time, there's about one hour of application downtime. Scaling, deployments, and modifications to your existing App Service Environment are blocked during this step.
Include the body parameter in the following command if you're enabling zone redundancy and/or configuring a custom domain suffix. If neither of those configurations applies to your migration, you can remove the parameter from the command.
az rest --method post --uri "${ASE_ID}/migrate?api-version=2021-02-01&phase=fullmigration" --body @parameters.json
Run the following commands to check the detailed status of your migration. For information on the statuses, see the migration status descriptions.
The first command gets the operation ID for the migration. Copy the value of the ID property.
az rest --method get --uri "${ASE_ID}/operations?api-version=2022-03-01"
Replace the placeholder for the operation ID in the following command with the value that you copied. This command returns the detailed status of your migration. You can run this command as often as needed to get the latest status.
az rest --method get --uri "${ASE_ID}/operations/<operation-id>/details/default?api-version=2022-09-01"
After you get a status of Ready, migration is done, and you have an App Service Environment v3 resource. Your apps are now running in your new environment.
Get the details of your new environment by running the following command or by going to the Azure portal.
az appservice ase show --name $ASE_NAME --resource-group $ASE_RG
Note
Due to a known bug, for ELB App Service Environment migrations, the inbound IP address may change once the migration step is complete. Check your App Service Environment v3's IP addresses and make any needed updates if there have been changes since the IP generation step. Open a support case if you have any questions or concerns about this issue or need help with the confirming the new IPs.
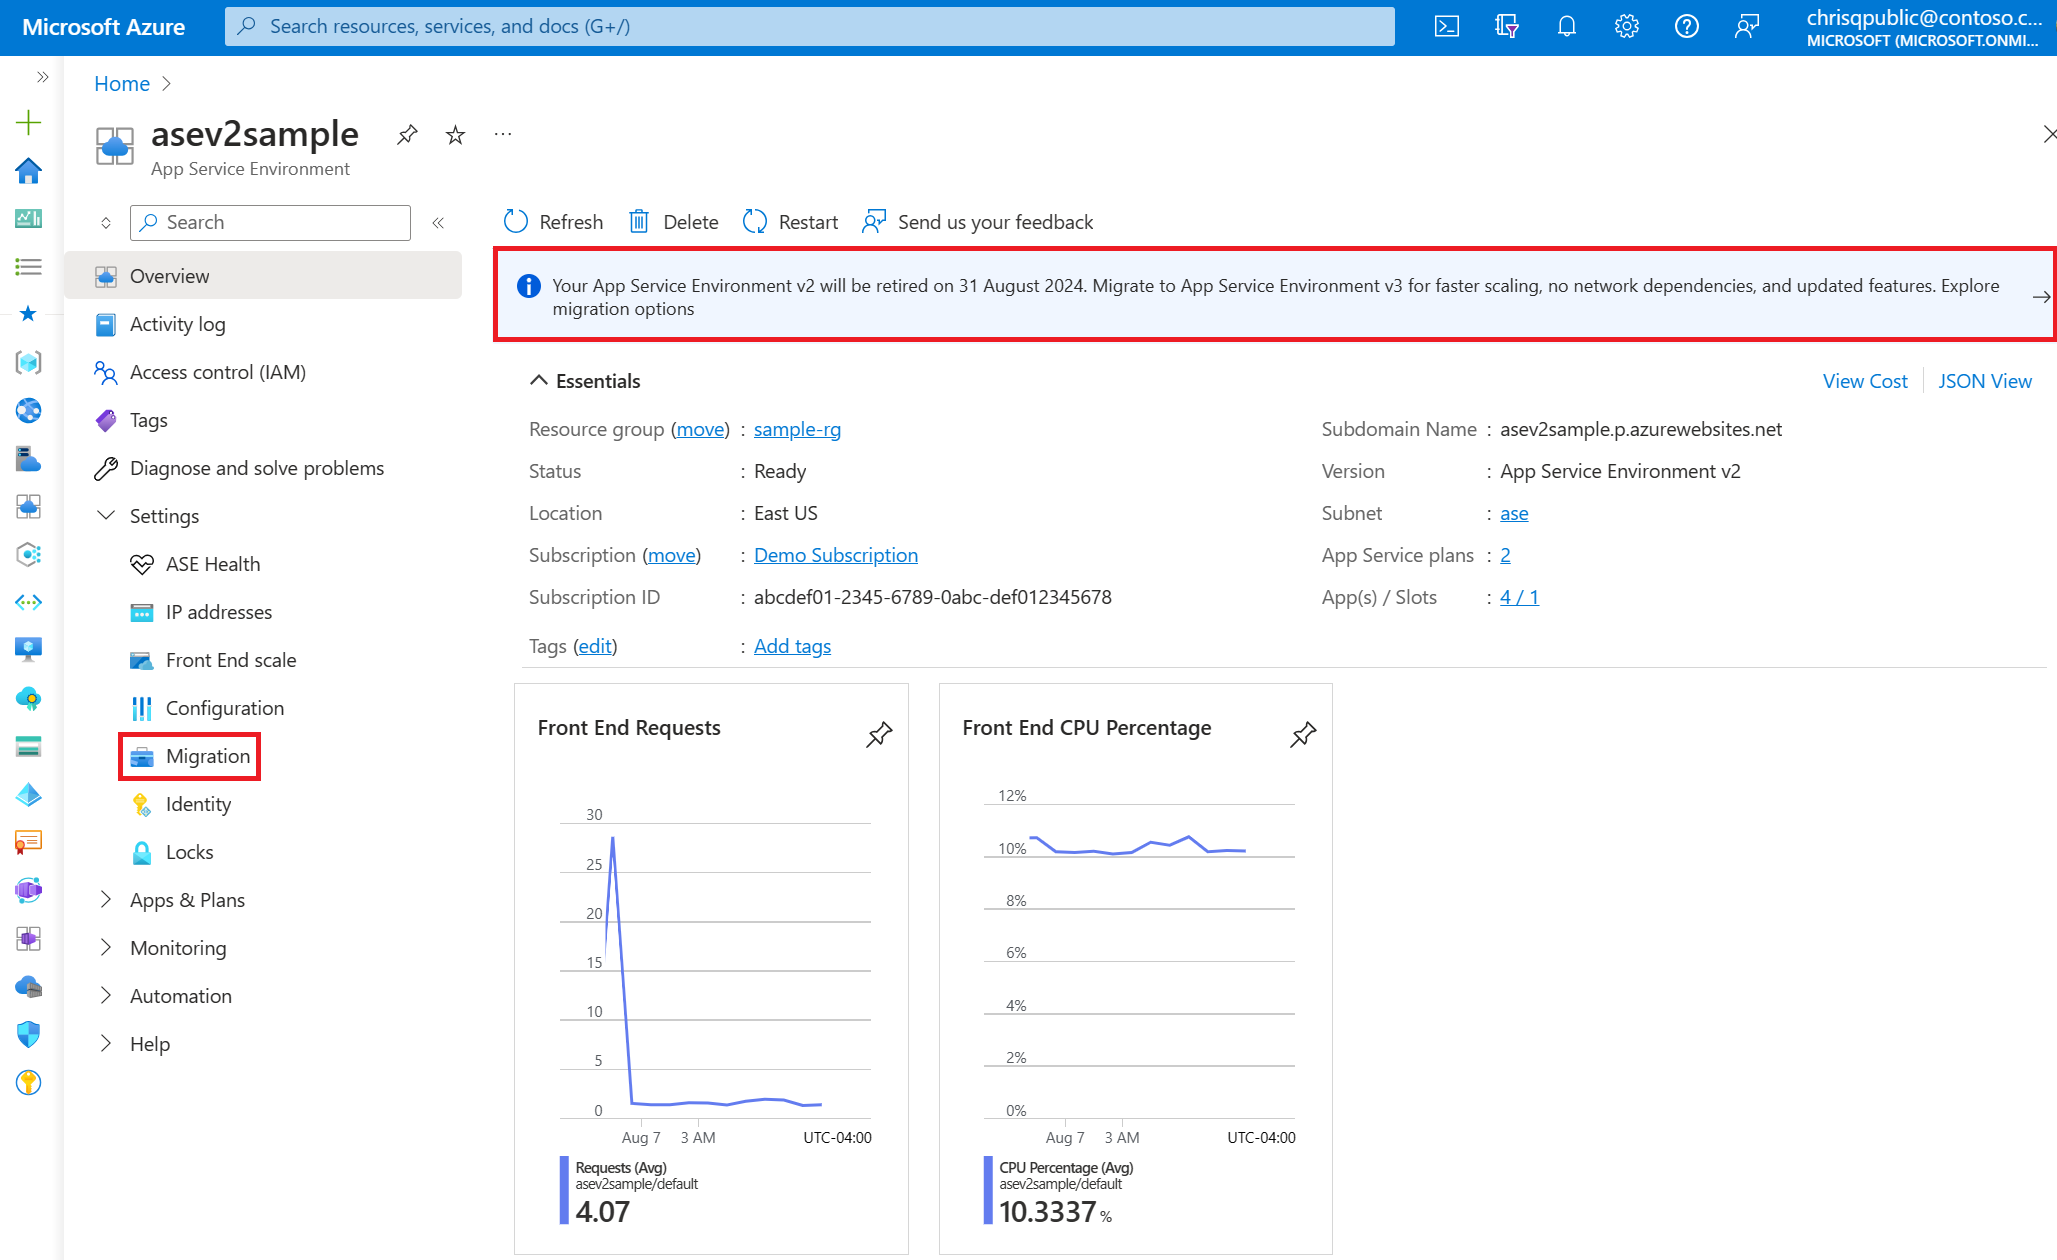
In the Azure portal, go to the Migration page for the App Service Environment that you're migrating. You can get to the Migration page by selecting the banner at the top of the Overview page for your App Service Environment, or by selecting the Migration item on the left menu.
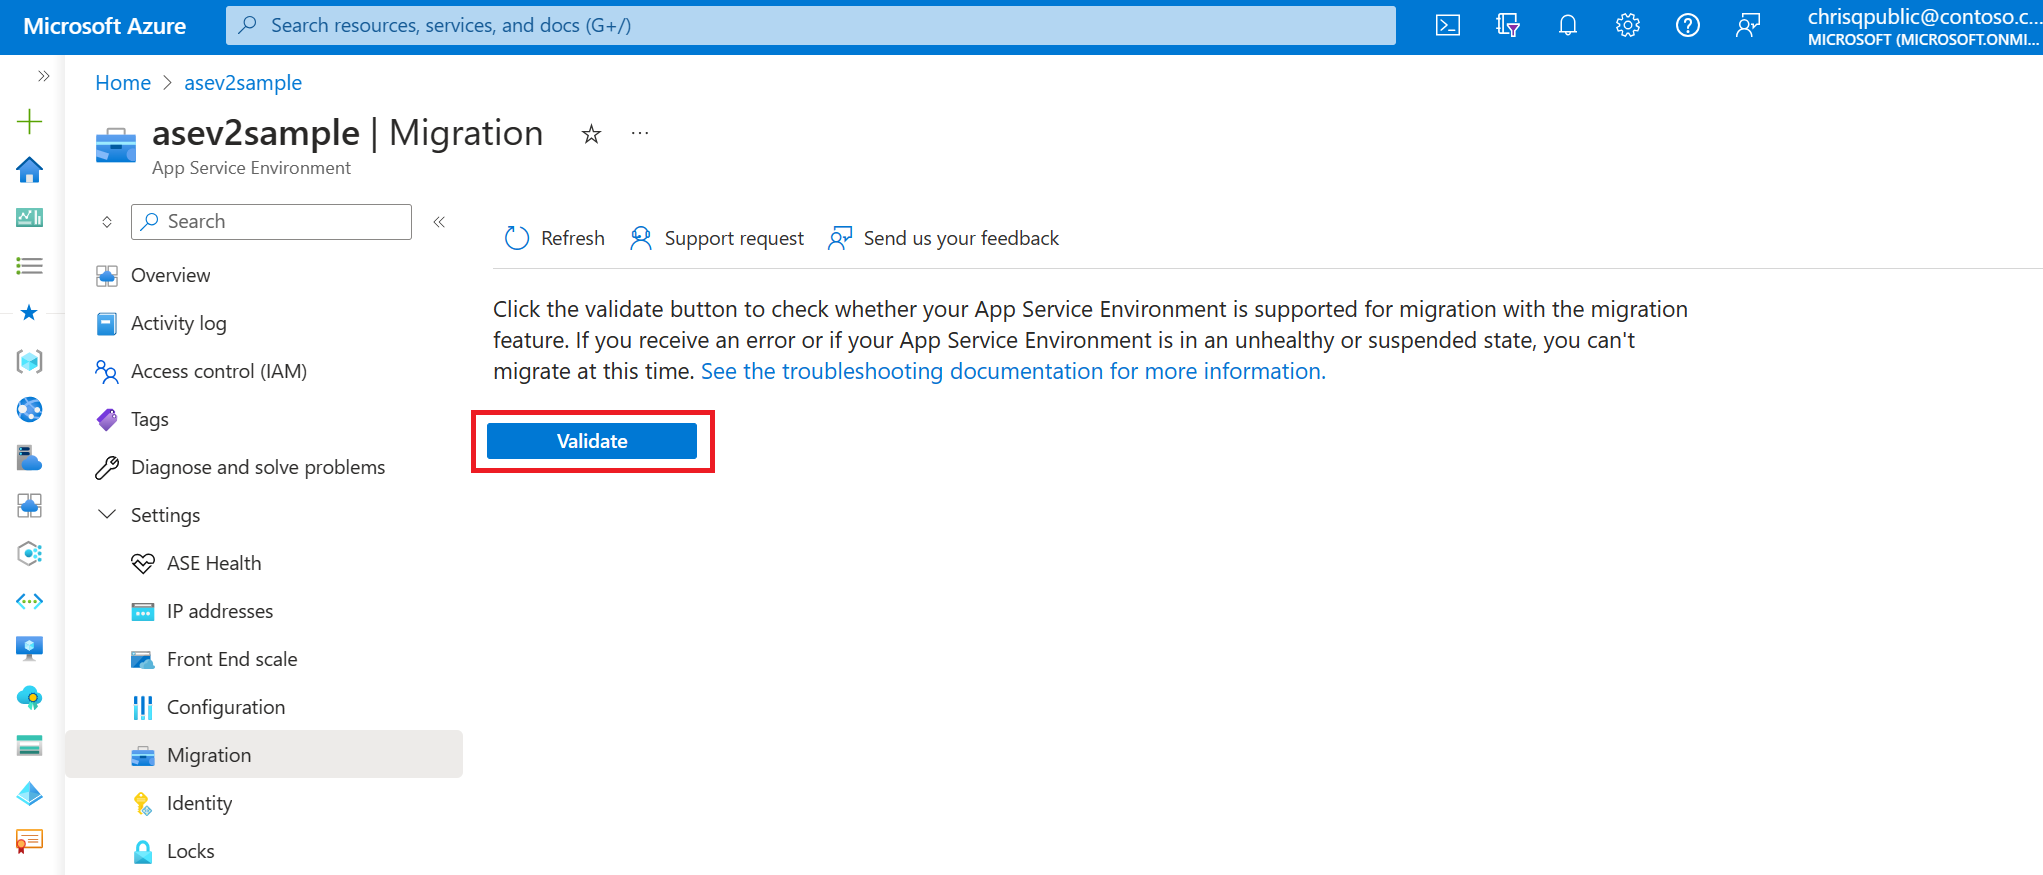
On the Migration page, the platform validates if migration is supported for your App Service Environment. Select Validate, and then confirm that you want to proceed with the validation. The validation process takes a few seconds.
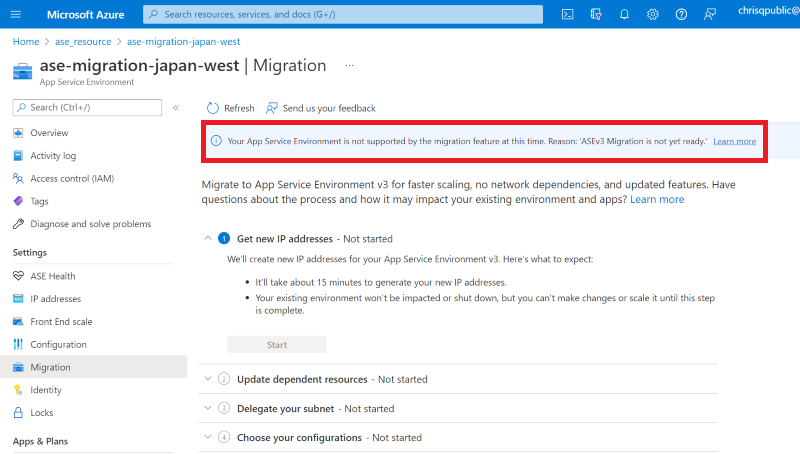
If your environment isn't supported for migration, a banner appears at the top of the page and includes an error message with a reason. For descriptions of the error messages that can appear if you aren't eligible for migration, see Troubleshooting.
If your App Service Environment isn't supported for migration at this time or your environment is in an unhealthy or suspended state, you can't use the migration feature. If your environment isn't supported for migration with the in-place migration feature or you want to migrate to App Service Environment v3 without using the in-place migration feature, see the manual migration options.
If you need to start an upgrade to upgrade your App Service Environment to the supported build version, you're prompted to start the upgrade, which could take 8-12 hours or longer depending on the size of your environment. Select Upgrade to start the upgrade. When the upgrade completes, you pass validation and can use the migration feature to start your migration.
If migration is supported for your App Service Environment, proceed to the next step in the process. The Migration page guides you through the series of steps to complete the migration.
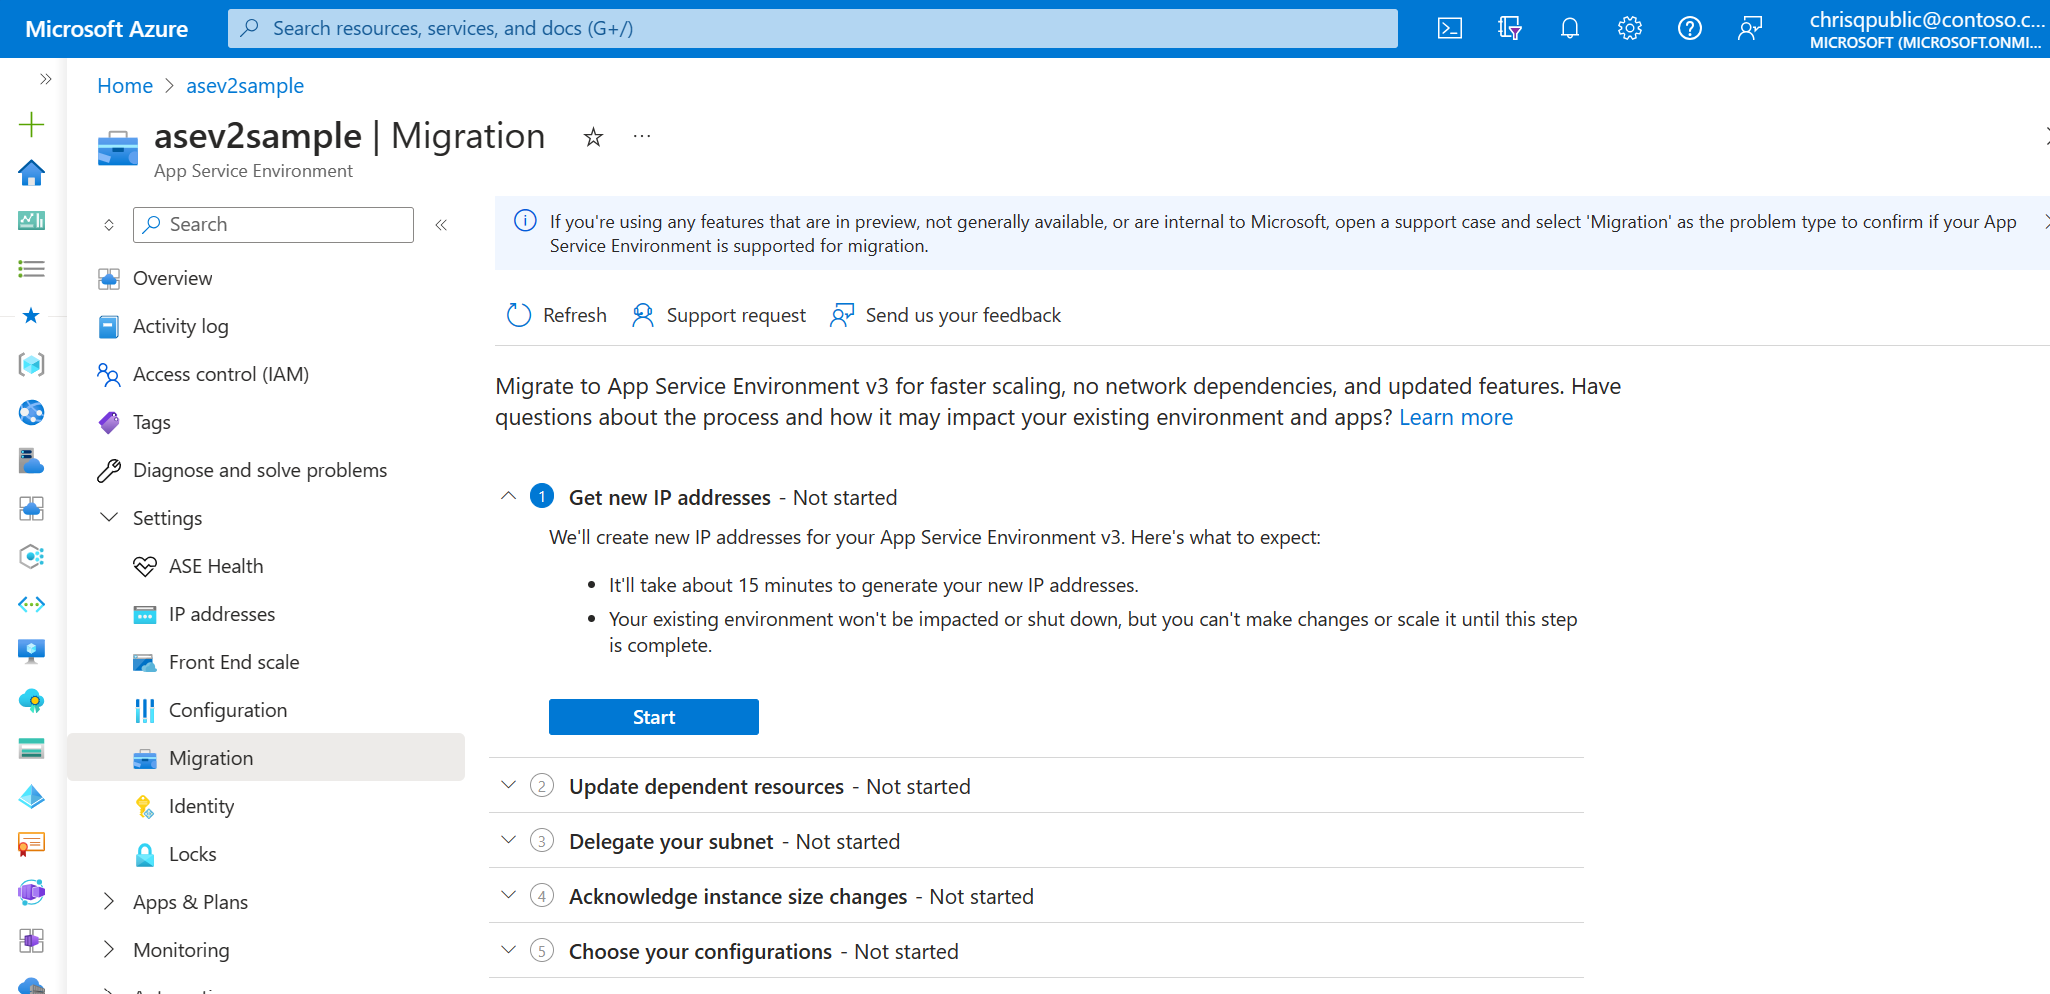
Under Get new IP addresses, confirm that you understand the implications and select the Start button. This step takes about 15 minutes to complete. You can't scale or make changes to your existing App Service Environment during this time.
When the previous step finishes, the IP addresses for your new App Service Environment v3 resource appear. Use the new IPs to update any resources and networking components so that your new environment functions as intended after migration is complete. It's your responsibility to make any necessary updates.
This step is also a good time to review the inbound and outbound network dependency changes in moving to App Service Environment v3. These changes include the port change for Azure Load Balancer, which now uses port 80. Don't move to the next step until you confirmed that you made these updates.
App Service Environment v3 requires the subnet that it's in to have a single delegation of Microsoft.Web/hostingEnvironments. Previous versions didn't require this delegation. You need to confirm that your subnet is delegated properly and update the delegation (if necessary) before migrating. The portal displays a link to your subnet so that you can confirm and update as needed.

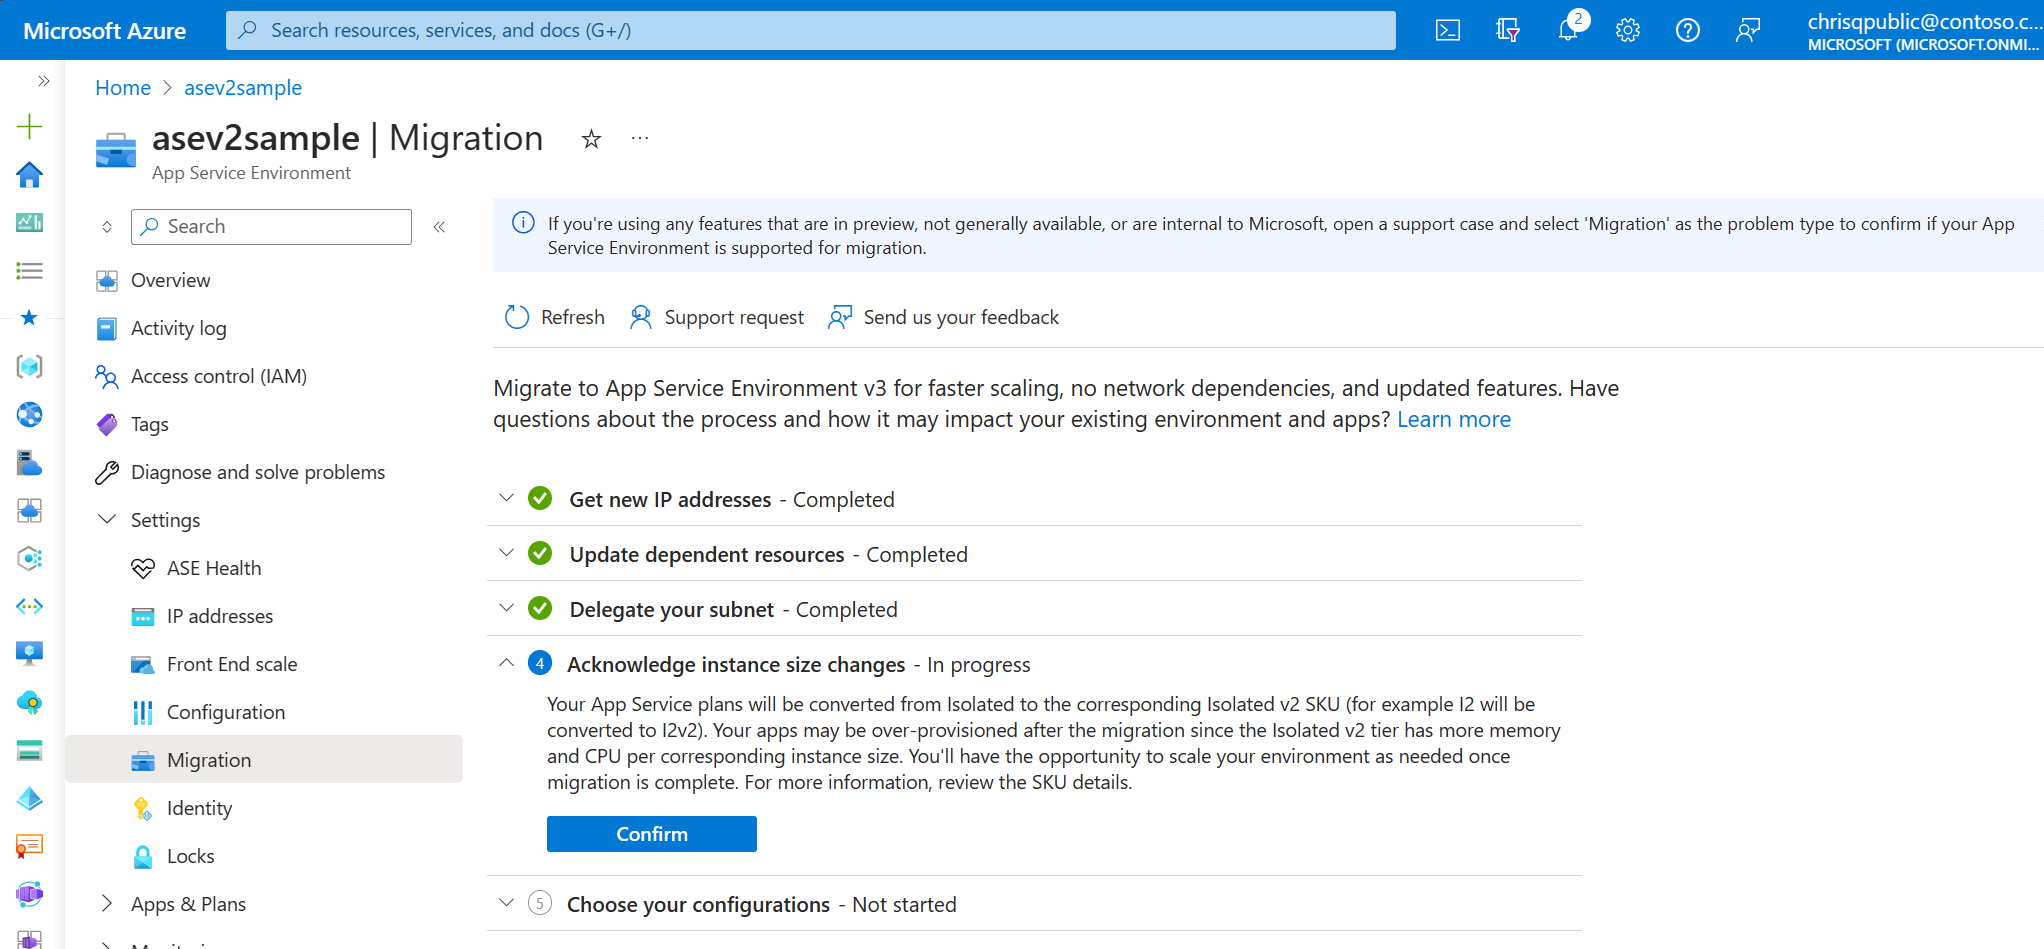
Your App Service plans are converted from Isolated to the corresponding Isolated v2 tier. For example, I2 is converted to I2v2. Your apps might be overprovisioned after the migration, because the Isolated v2 tier has more memory and CPU per corresponding instance size. You have the opportunity to scale your environment as needed after migration is complete. For more information, review the pricing details.
Virtual network locks block platform operations during migration. If your virtual network has locks, you need to remove them before migrating. If necessary, you can add back the locks after migration is complete.
Locks can exist at three scopes: subscription, resource group, and resource. When you apply a lock at a parent scope, all resources within that scope inherit the same lock. If you have locks applied at the subscription, resource group, or resource scope, you need to remove them before the migration. For more information on locks and lock inheritance, see Lock your resources to protect your infrastructure.
For details on how to check if your subscription or resource group has locks, see Configure locks.
You can make your new App Service Environment v3 resource zone redundant if your existing environment is in a region that supports zone redundancy. Zone redundancy is an optional configuration. You can set it only during the creation of your new App Service Environment v3 resource. You can't remove it at a later time. For more information, see Choose your App Service Environment v3 configurations.
Select the Enabled checkbox if you want to configure zone redundancy.
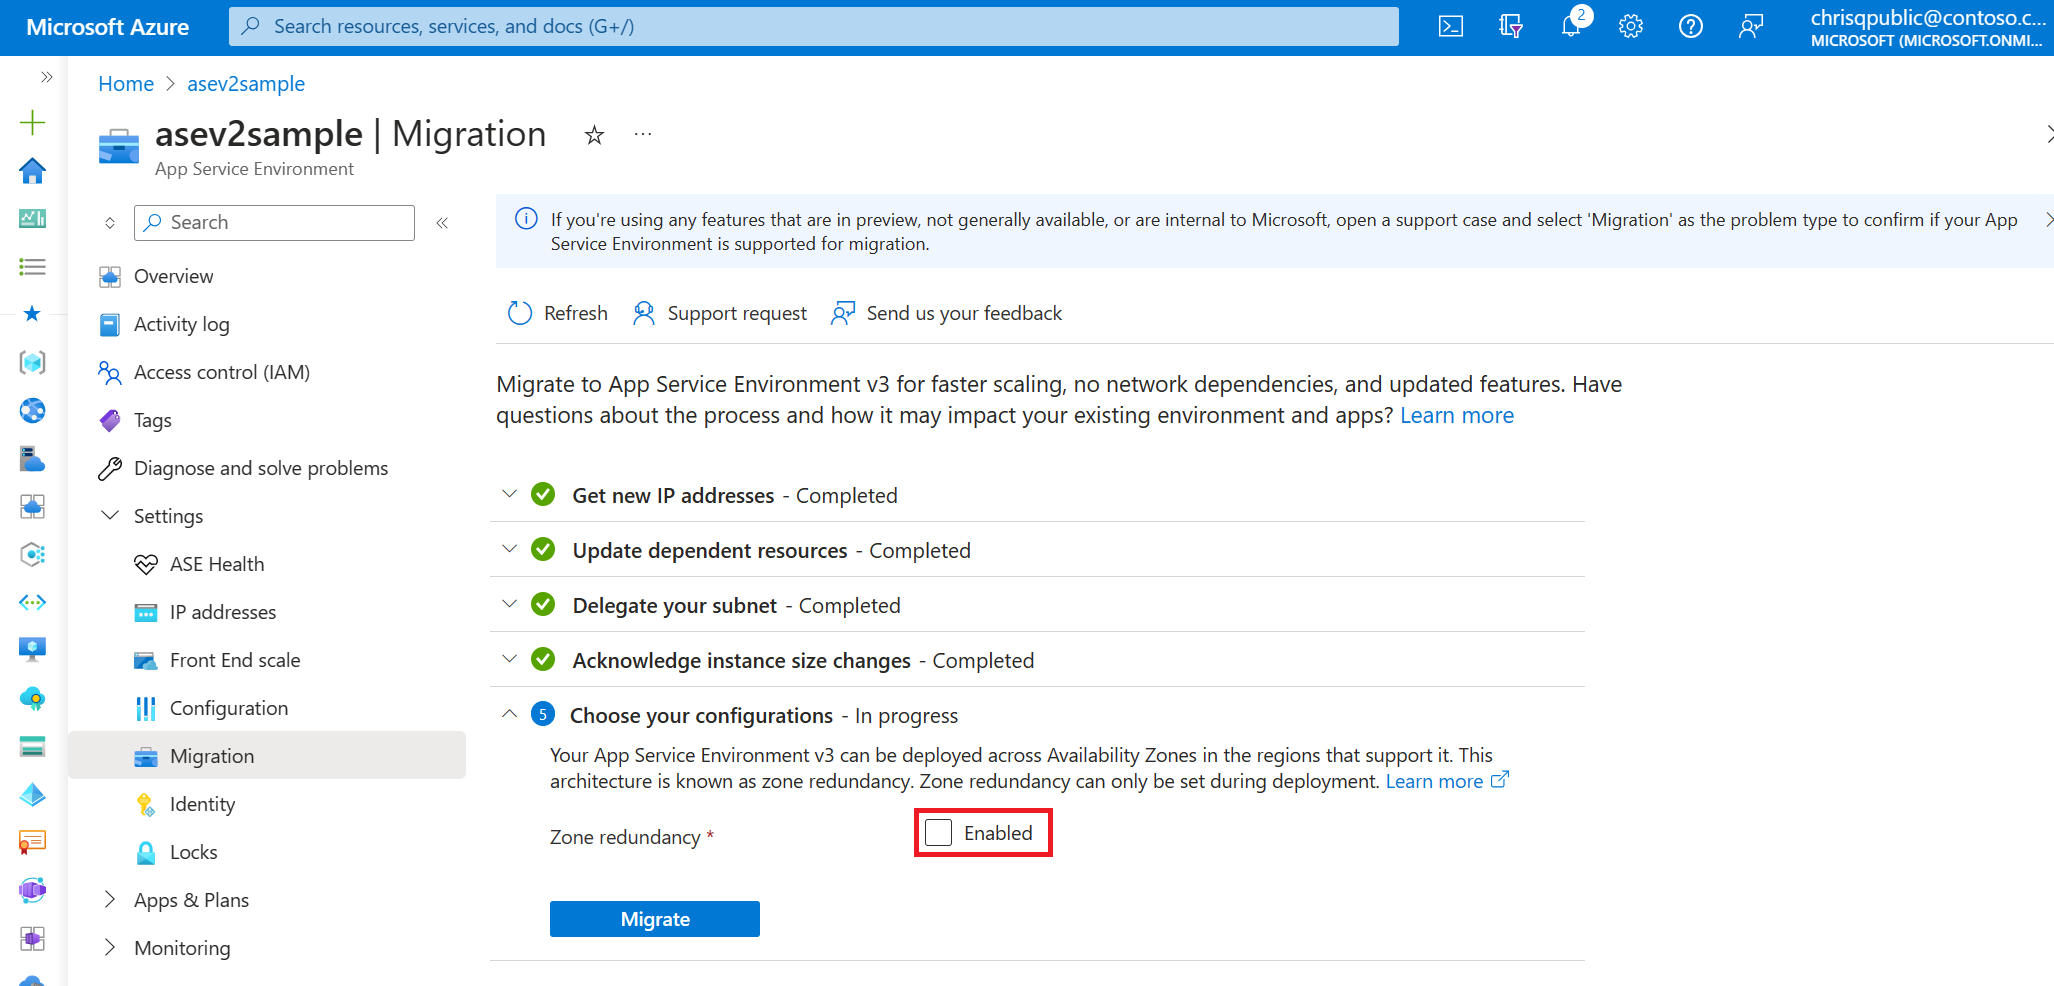
If your environment is in a region that doesn't support zone redundancy, the checkbox is unavailable. If you need a zone-redundant App Service Environment v3 resource, use one of the manual migration options and create the resource in one of the regions that supports zone redundancy.
If your existing App Service Environment uses a custom domain suffix, you must configure one for your new App Service Environment v3 resource. The configuration options for a custom domain suffix appear if this situation applies to you. You can't migrate until you provide the required information.
If you want to use a custom domain suffix but don't currently have one configured, you can configure one after migration is complete. For more information on App Service Environment v3 custom domain suffixes, including requirements, step-by-step instructions, and best practices, see Custom domain suffix for App Service Environments.
Note
If you're configuring a custom domain suffix, when you're adding the network permissions on your Azure key vault, be sure that your key vault allows access from your App Service Environment's new outbound IP addresses that were generated in step 2. If you're accessing your key vault using a private endpoint, ensure you've configured private access correctly.
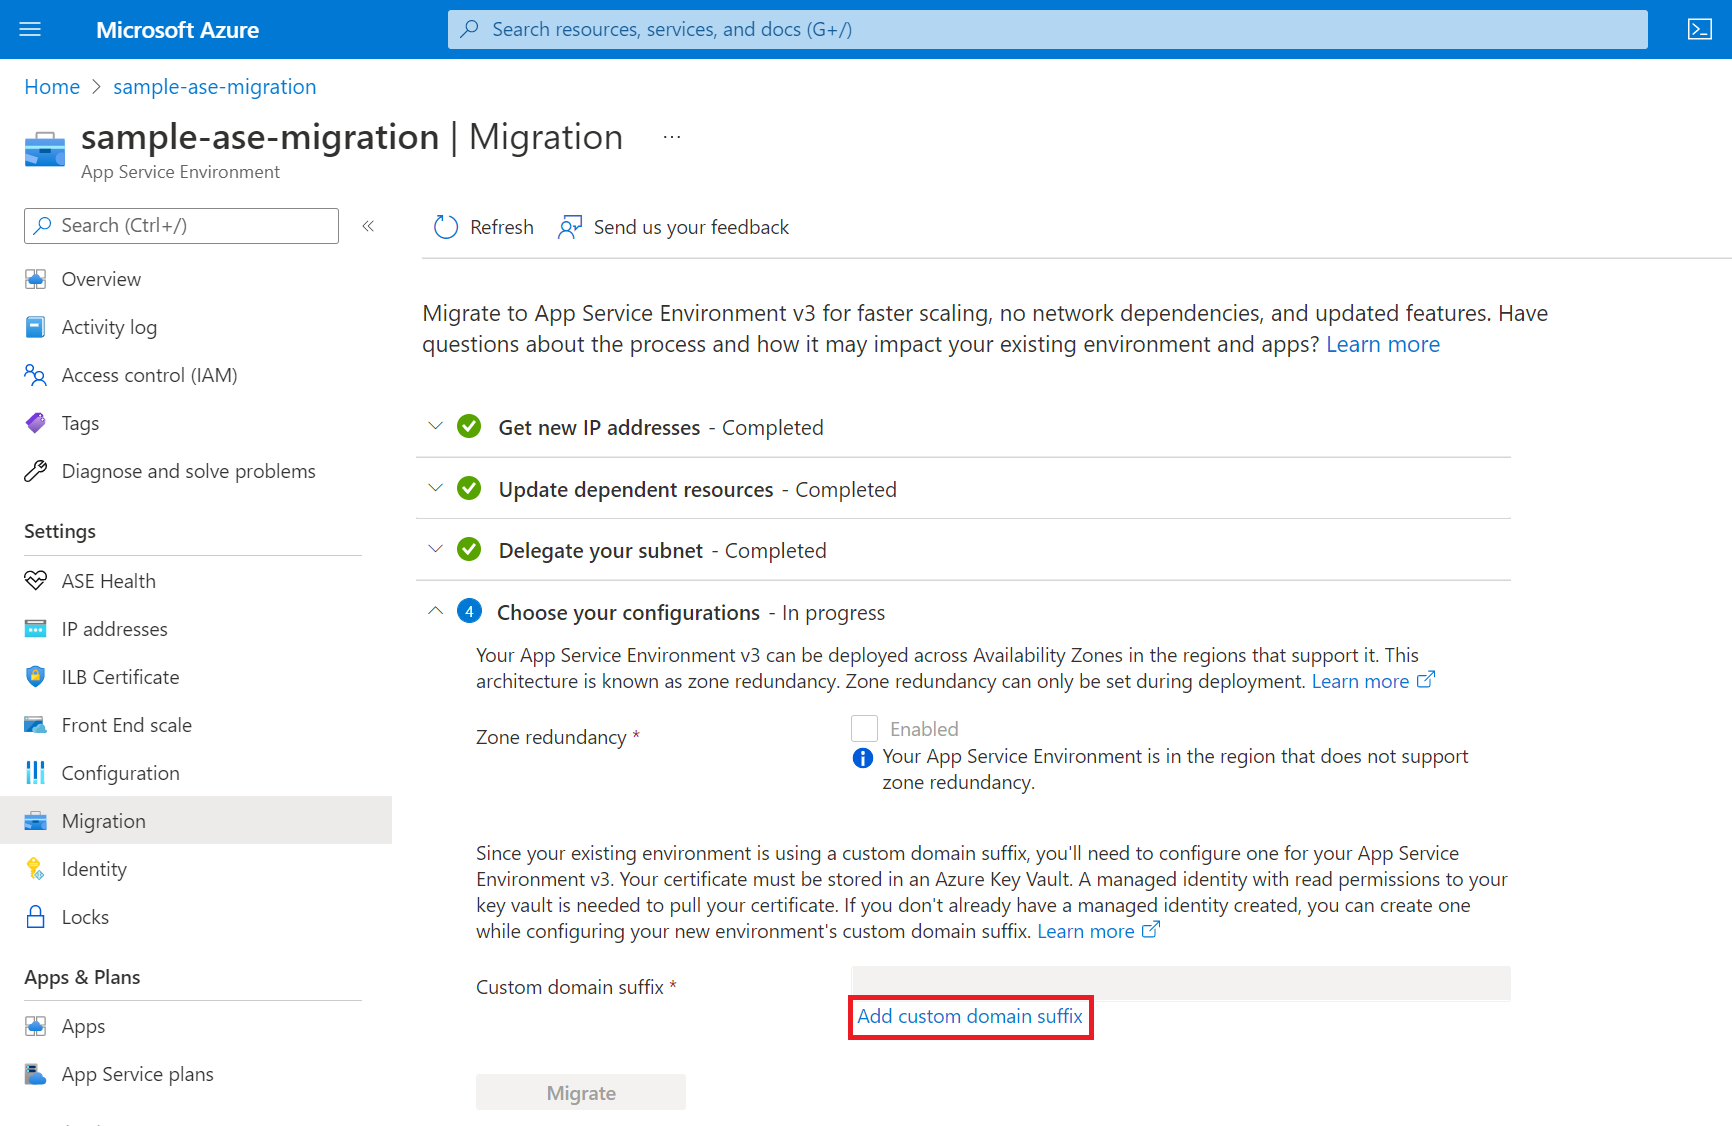
After you add the details for your custom domain suffix, the Migrate button is available.
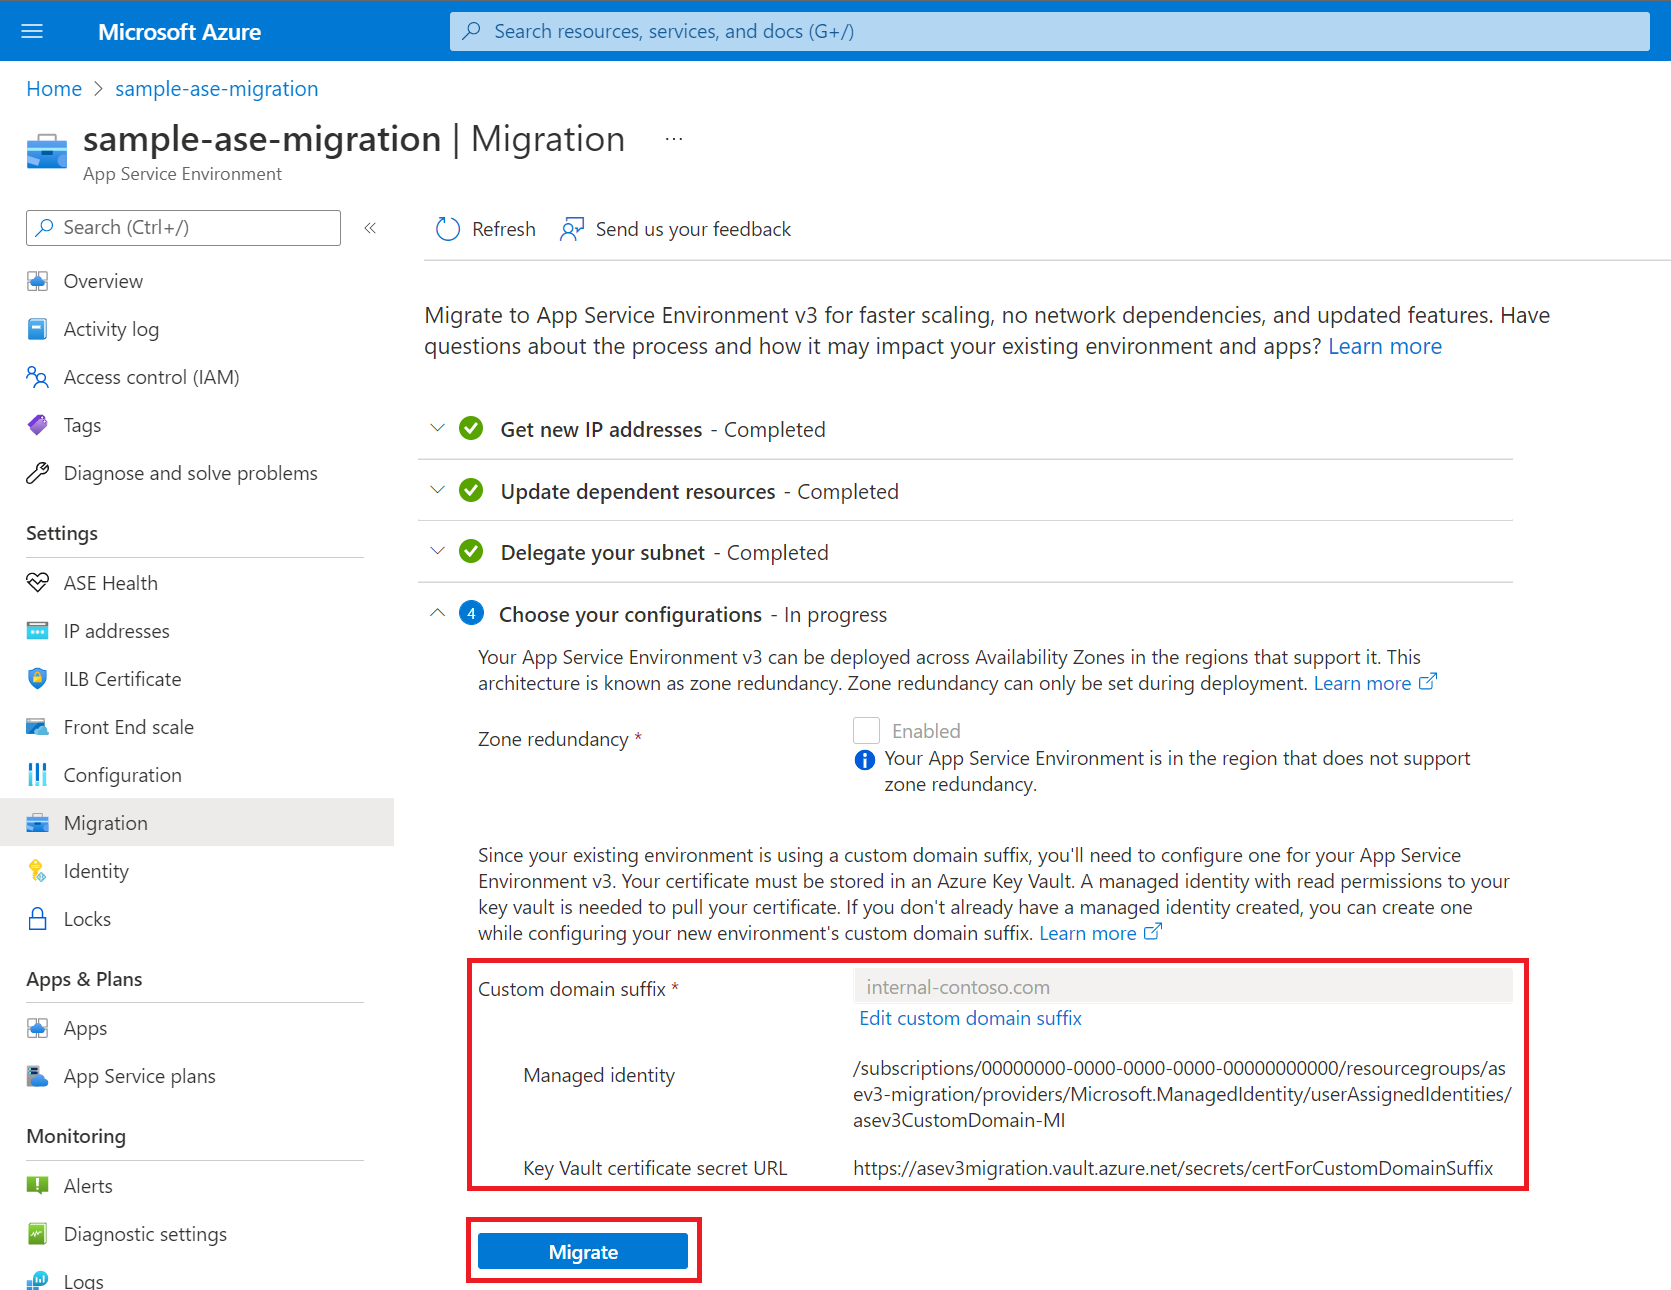
After you complete all of the preceding steps, you can start the migration. Make sure that you understand the implications of migration, including what happens during this time.
This step takes three to six hours for v2 to v3 migrations and up to six hours for v1 to v3 migrations, depending on the environment size. Scaling and modifications to your existing App Service Environment are blocked during this step.
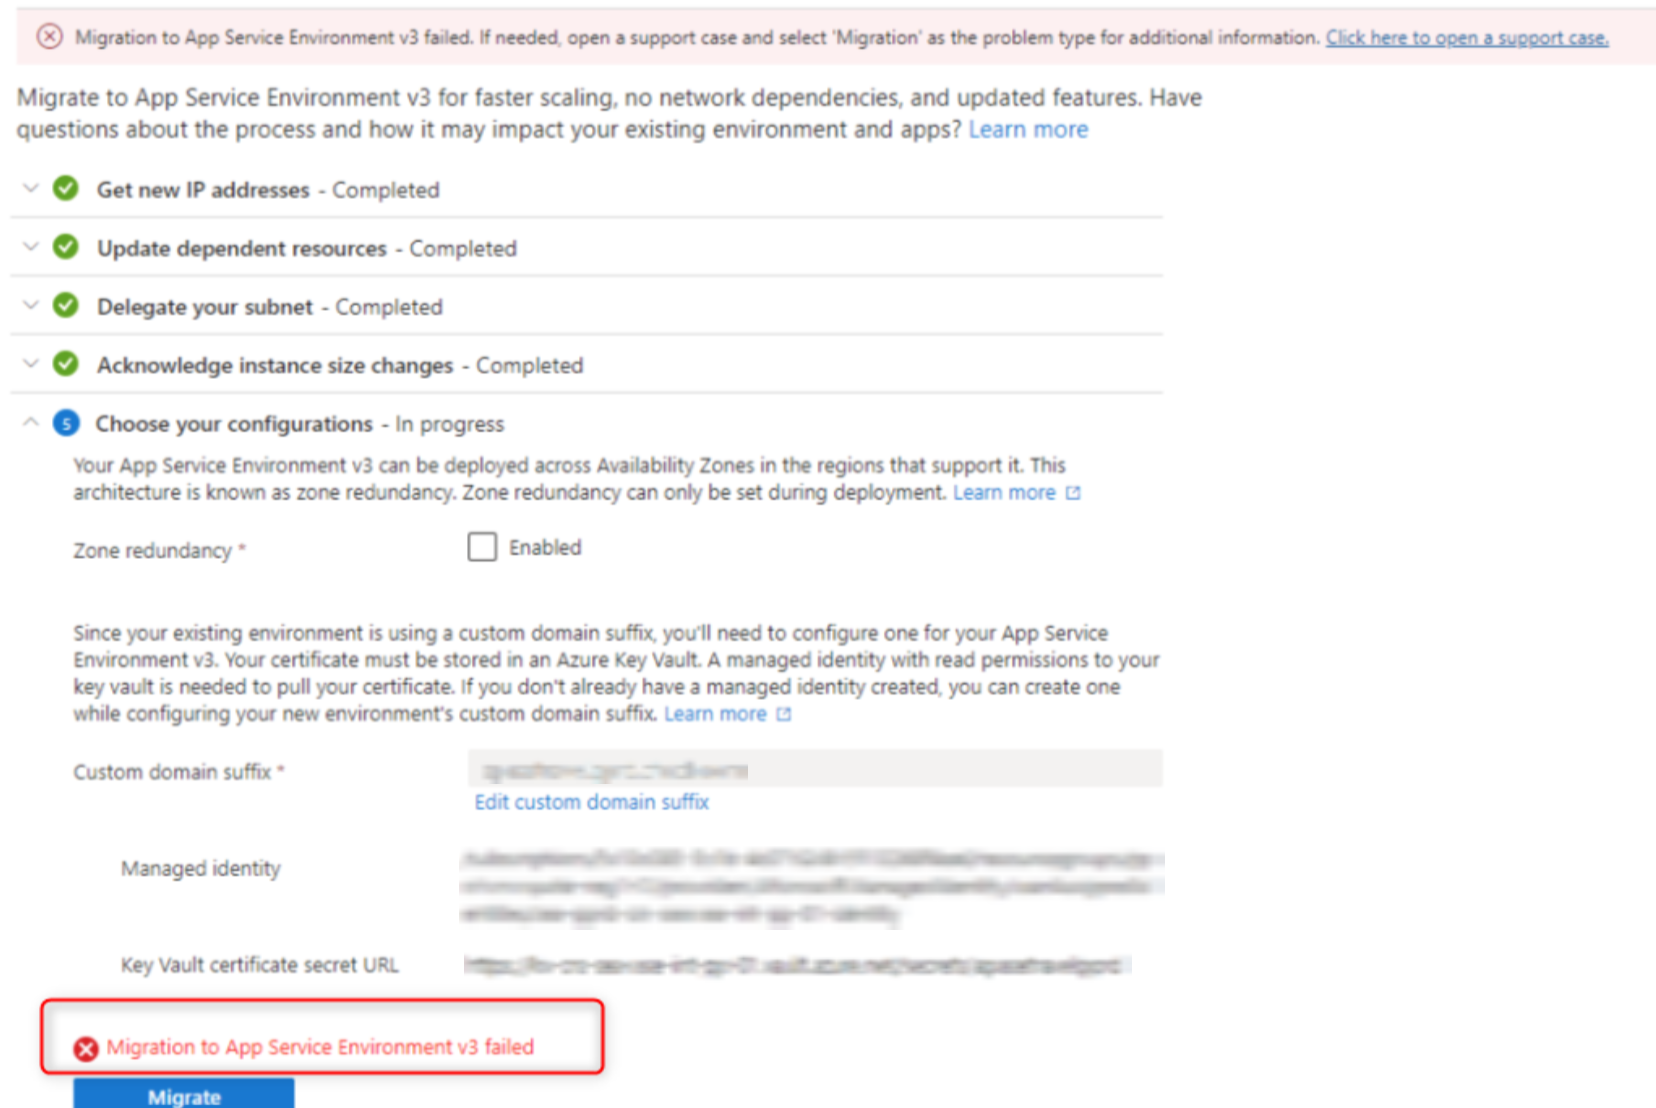
Note
In rare cases, you might see a notification in the portal that says "Migration to App Service Environment v3 failed" after you start the migration. There's a known bug that might trigger this notification even if the migration is progressing. Check the activity log for the App Service Environment to determine the validity of this error message. In most cases, refreshing the page resolves the issue, and the error message disappears. If the error message persists, contact support for assistance.
At this time, detailed migration statuses are available only when you're using the Azure CLI. For more information, see the Azure CLI section for migrating to App Service Environment v3. You can check the status of the migration with the CLI even if you use the portal to do the migration.
When migration is complete, you have an App Service Environment v3 resource, and all of your apps are running in your new environment. You can confirm the environment's version by checking the Configuration page for your App Service Environment.
Note
Due to a known bug, for ELB App Service Environment migrations, the inbound IP address may change once the migration step is complete. Check your App Service Environment v3's IP addresses and make any needed updates if there have been changes since the IP generation step. Open a support case if you have any questions or concerns about this issue or need help with the confirming the new IPs.
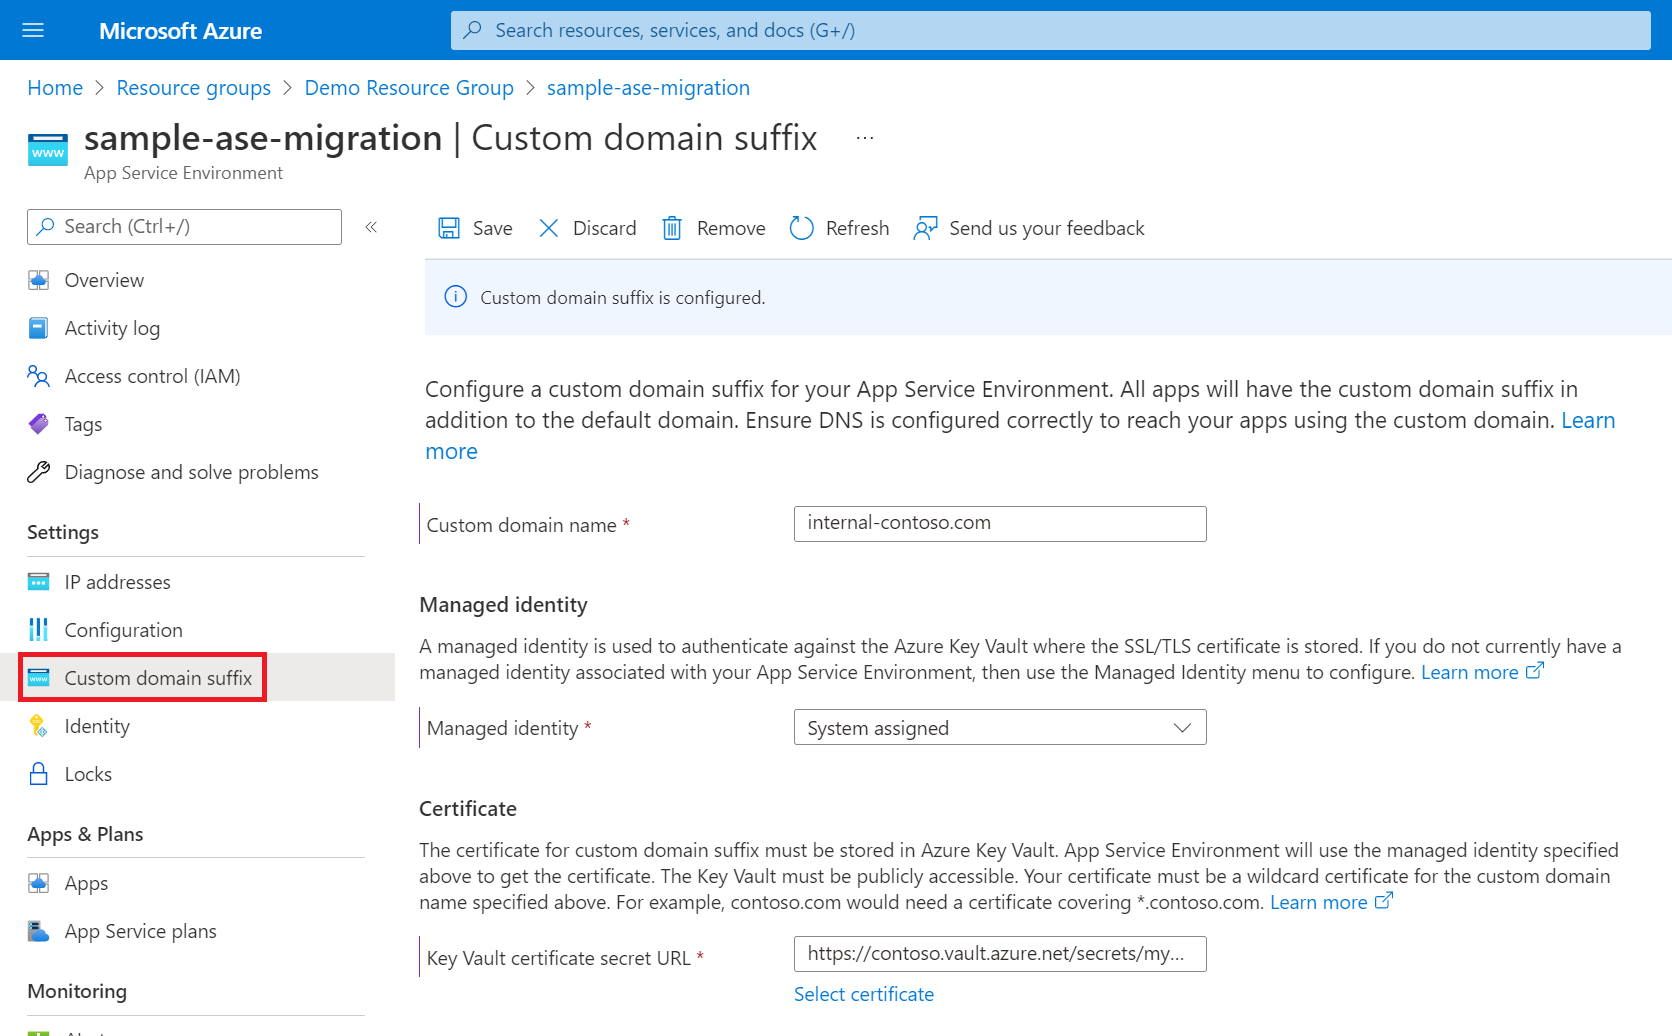
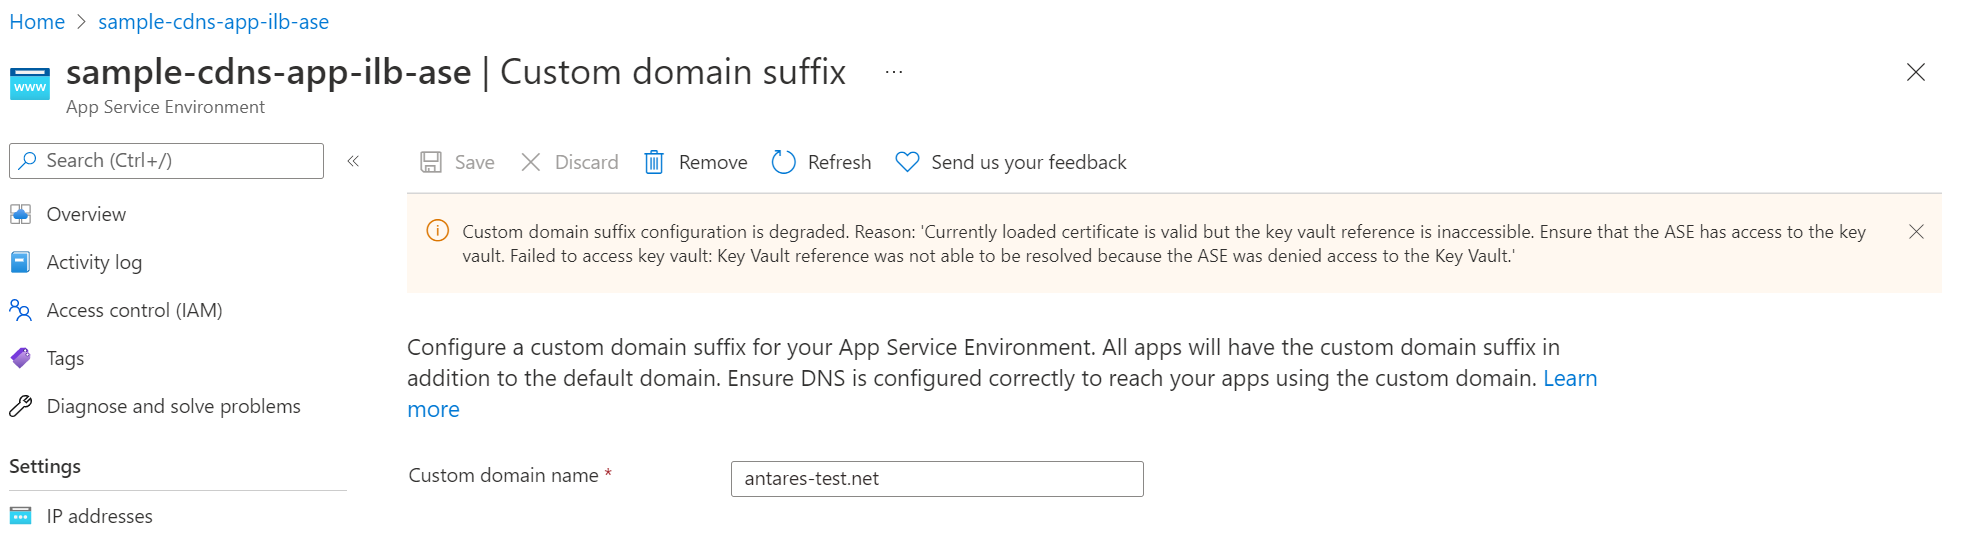
If your migration includes a custom domain suffix, the domain appeared in the Essentials section of the Overview page of the portal for App Service Environment v1/v2, but it no longer appears there in App Service Environment v3. Instead, for App Service Environment v3, go to the Custom domain suffix page to confirm that your custom domain suffix is configured correctly. You can also remove the configuration if you no longer need it or configure one if you didn't have one previously.
Note
If your migration includes a custom domain suffix, your custom domain suffix configuration might show as degraded once the migration is complete due to a known bug. Your App Service Environment should still function as expected. The degraded status should resolve itself within 6-8 hours. If the configuration is degraded after 8 hours or if your custom domain suffix isn't functioning, contact support.
Events
Sep 16, 11 PM - Oct 18, 11 PM
Join us on a learning journey combining AI, apps and cloud-scale data to build unique solutions.
Learn moreTraining
Learning path
Migrate an ASP.NET web application to Azure with Visual Studio - Training
Migrate an ASP.NET web application to Azure with Visual Studio
Certification
Microsoft Certified: Azure for SAP Workloads Specialty - Certifications
Demonstrate planning, migration, and operation of an SAP solution on Microsoft Azure while you leverage Azure resources.