Note
Access to this page requires authorization. You can try signing in or changing directories.
Access to this page requires authorization. You can try changing directories.
Overview
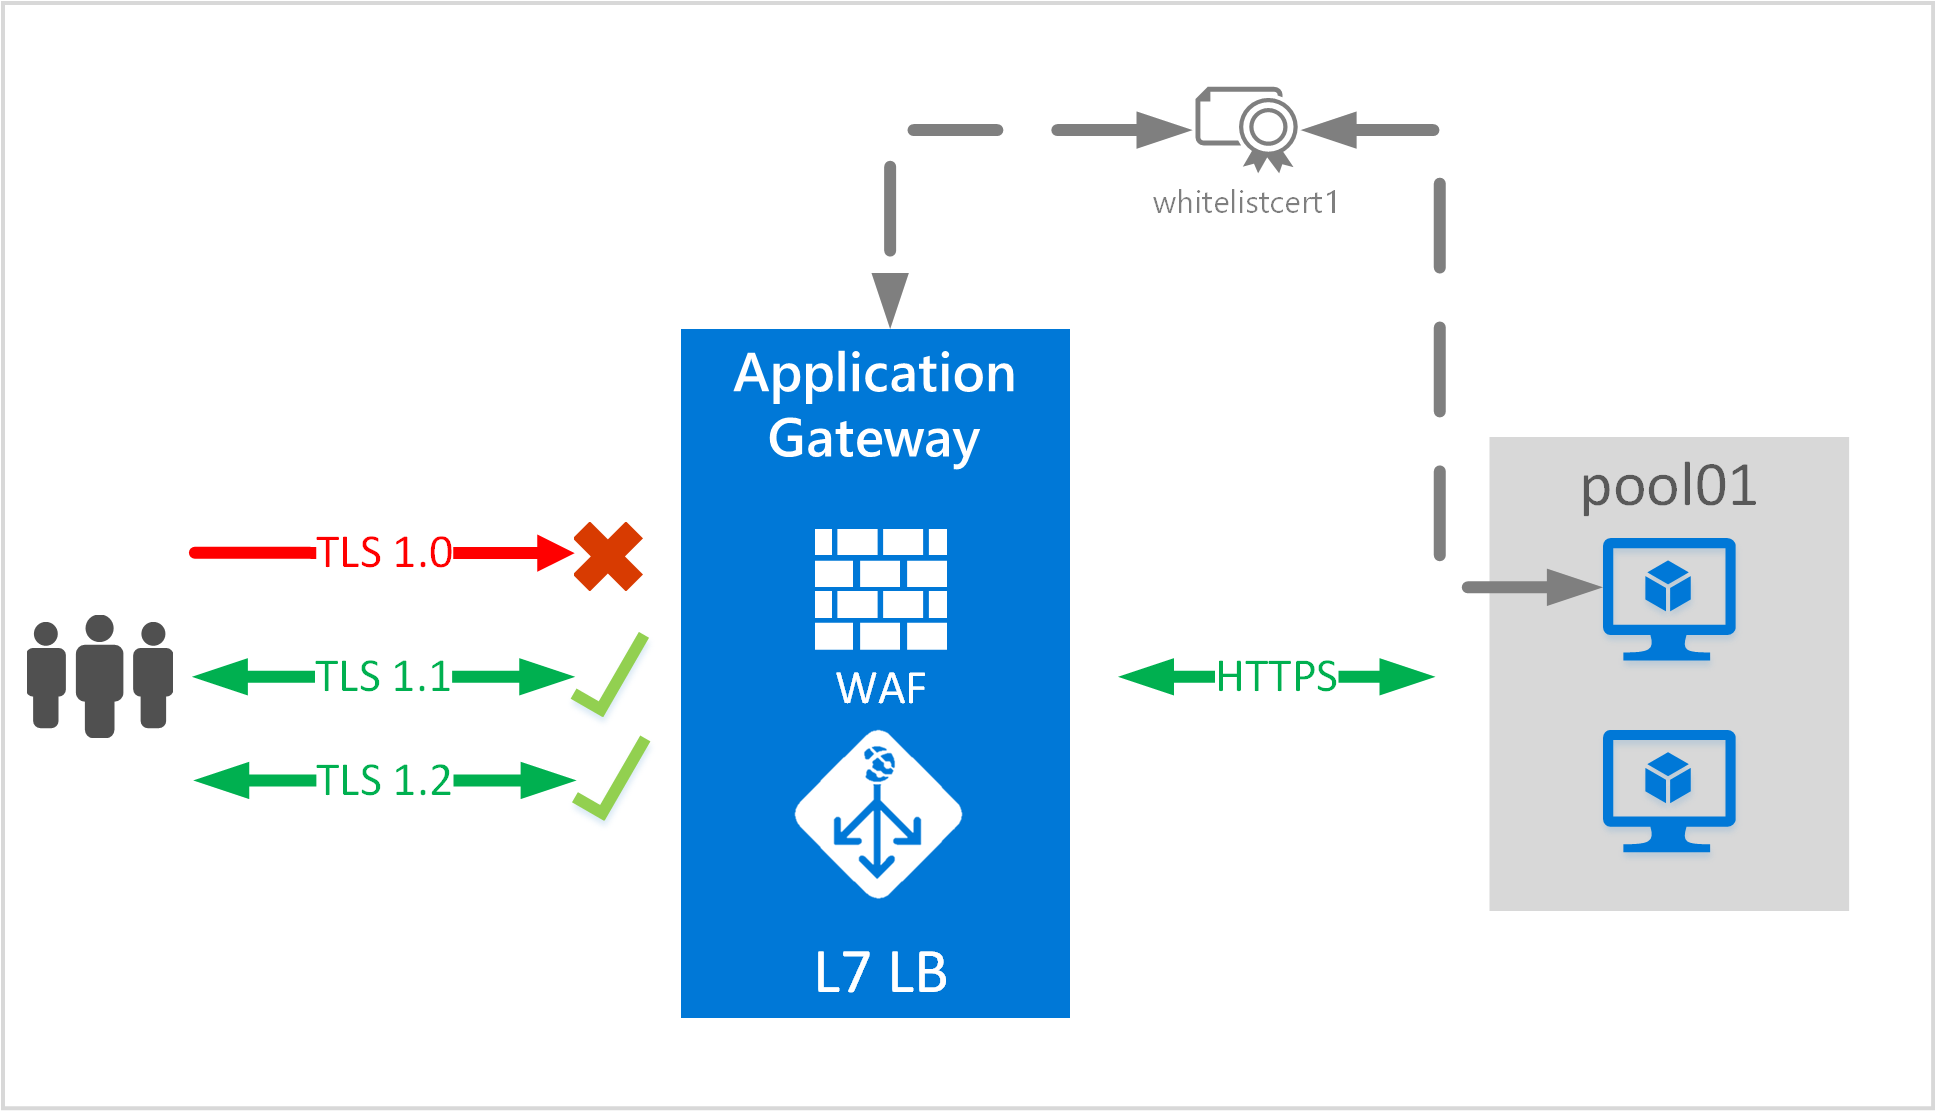
Azure Application Gateway supports end-to-end encryption of traffic. Application Gateway terminates the TLS/SSL connection at the application gateway. The gateway then applies the routing rules to the traffic, re-encrypts the packet, and forwards the packet to the appropriate backend server based on the routing rules defined. Any response from the web server goes through the same process back to the end user.
Application Gateway supports defining custom TLS options. It also supports disabling the following protocol versions: TLSv1.0, TLSv1.1, and TLSv1.2, as well defining which cipher suites to use and the order of preference. To learn more about configurable TLS options, see the TLS policy overview.
Note
SSL 2.0 and SSL 3.0 are disabled by default and cannot be enabled. They are considered unsecure and cannot be used with Application Gateway.
Scenario
In this scenario, you learn how to create an application gateway by using end-to-end TLS with PowerShell.
This scenario will:
- Create a resource group named appgw-rg.
- Create a virtual network named appgwvnet with an address space of 10.0.0.0/16.
- Create two subnets called appgwsubnet and appsubnet.
- Create a small application gateway supporting end-to-end TLS encryption that limits TLS protocol versions and cipher suites.
Before you begin
Note
We recommend that you use the Azure Az PowerShell module to interact with Azure. To get started, see Install Azure PowerShell. To learn how to migrate to the Az PowerShell module, see Migrate Azure PowerShell from AzureRM to Az.
To configure end-to-end TLS with an application gateway, a certificate is required for the gateway and certificates are required for the backend servers. The gateway certificate is used to derive a symmetric key as per TLS protocol specification. The symmetric key is then used encrypt and decrypt the traffic sent to the gateway. The gateway certificate needs to be in Personal Information Exchange (PFX) format. This file format allows you to export the private key that is required by the application gateway to perform the encryption and decryption of traffic.
For end-to-end TLS encryption, the back end must be explicitly allowed by the application gateway. Upload the public certificate of the backend servers to the application gateway. Adding the certificate ensures that the application gateway only communicates with known backend instances. This further secures the end-to-end communication.
The configuration process is described in the following sections.
Create the resource group
This section walks you through creating a resource group that contains the application gateway.
Sign in to your Azure account.
Connect-AzAccountSelect the subscription to use for this scenario.
Select-Azsubscription -SubscriptionName "<Subscription name>"Create a resource group. (Skip this step if you're using an existing resource group.)
New-AzResourceGroup -Name appgw-rg -Location "West US"
Create a virtual network and a subnet for the application gateway
The following example creates a virtual network and two subnets. One subnet is used to hold the application gateway. The other subnet is used for the back ends that host the web application.
Assign an address range for the subnet to be used for the application gateway.
$gwSubnet = New-AzVirtualNetworkSubnetConfig -Name 'appgwsubnet' -AddressPrefix 10.0.0.0/24Note
Subnets configured for an application gateway should be properly sized. An application gateway can be configured for up to 10 instances. Each instance takes one IP address from the subnet. Too small of a subnet can adversely affect scaling out an application gateway.
Assign an address range to be used for the backend address pool.
$nicSubnet = New-AzVirtualNetworkSubnetConfig -Name 'appsubnet' -AddressPrefix 10.0.2.0/24Create a virtual network with the subnets defined in the preceding steps.
$vnet = New-AzvirtualNetwork -Name 'appgwvnet' -ResourceGroupName appgw-rg -Location "West US" -AddressPrefix 10.0.0.0/16 -Subnet $gwSubnet, $nicSubnetRetrieve the virtual network resource and subnet resources to be used in the steps that follow.
$vnet = Get-AzvirtualNetwork -Name 'appgwvnet' -ResourceGroupName appgw-rg
$gwSubnet = Get-AzVirtualNetworkSubnetConfig -Name 'appgwsubnet' -VirtualNetwork $vnet
$nicSubnet = Get-AzVirtualNetworkSubnetConfig -Name 'appsubnet' -VirtualNetwork $vnet
Create a public IP address for the frontend configuration
Create a public IP resource to be used for the application gateway. This public IP address is used in one of the steps that follow.
$publicip = New-AzPublicIpAddress -ResourceGroupName appgw-rg -Name 'publicIP01' -Location "West US" -AllocationMethod Dynamic
Important
Application Gateway doesn't support the use of a public IP address created with a defined domain label. Only a public IP address with a dynamically created domain label is supported. If you require a friendly DNS name for the application gateway, we recommend you use a CNAME record as an alias.
Create an application gateway configuration object
All configuration items are set before creating the application gateway. The following steps create the configuration items that are needed for an application gateway resource.
Create an application gateway IP configuration. This setting configures which of the subnets the application gateway uses. When application gateway starts, it picks up an IP address from the configured subnet and routes network traffic to the IP addresses in the backend IP pool. Keep in mind that each instance takes one IP address.
$gipconfig = New-AzApplicationGatewayIPConfiguration -Name 'gwconfig' -Subnet $gwSubnetCreate a frontend IP configuration. This setting maps a private or public IP address to the front end of the application gateway. The following step associates the public IP address in the preceding step with the frontend IP configuration.
$fipconfig = New-AzApplicationGatewayFrontendIPConfig -Name 'fip01' -PublicIPAddress $publicipConfigure the backend IP address pool with the IP addresses of the backend web servers. These IP addresses are the IP addresses that receive the network traffic that comes from the frontend IP endpoint. Replace the IP addresses in the sample with your own application IP address endpoints.
$pool = New-AzApplicationGatewayBackendAddressPool -Name 'pool01' -BackendIPAddresses 203.0.113.1, 203.0.113.2, 203.0.113.3Note
A fully qualified domain name (FQDN) is also a valid value to use in place of an IP address for the backend servers. You enable it by using the -BackendFqdns switch.
Configure the frontend IP port for the public IP endpoint. This port is the port that end users connect to.
$fp = New-AzApplicationGatewayFrontendPort -Name 'port01' -Port 443Configure the certificate for the application gateway. This certificate is used to decrypt and reencrypt the traffic on the application gateway.
$passwd = ConvertTo-SecureString  <certificate file password> -AsPlainText -Force
$cert = New-AzApplicationGatewaySSLCertificate -Name cert01 -CertificateFile <full path to .pfx file> -Password $passwd
Note
This sample configures the certificate used for the TLS connection. The certificate needs to be in .pfx format.
Create the HTTP listener for the application gateway. Assign the frontend IP configuration, port, and TLS/SSL certificate to use.
$listener = New-AzApplicationGatewayHttpListener -Name listener01 -Protocol Https -FrontendIPConfiguration $fipconfig -FrontendPort $fp -SSLCertificate $certUpload the certificate to be used on the TLS-enabled backend pool resources.
Note
The default probe gets the public key from the default TLS binding on the backend's IP address and compares the public key value it receives to the public key value you provide here.
If you're using host headers and Server Name Indication (SNI) on the back end, the retrieved public key might not be the intended site to which traffic flows. If you're in doubt, visit https://127.0.0.1/ on the backend servers to confirm which certificate is used for the default TLS binding. Use the public key from that request in this section. If you're using host-headers and SNI on HTTPS bindings and you do not receive a response and certificate from a manual browser request to https://127.0.0.1/ on the backend servers, you must set up a default TLS binding on the them. If you do not do so, probes fail and the back end is not allowed.
For more information about SNI in Application Gateway, see Overview of TLS termination and end to end TLS with Application Gateway.
$authcert = New-AzApplicationGatewayAuthenticationCertificate -Name 'allowlistcert1' -CertificateFile C:\cert.cerNote
The certificate provided in the previous step should be the public key of the .pfx certificate present on the back end. Export the certificate (not the root certificate) installed on the backend server in Claim, Evidence, and Reasoning (CER) format and use it in this step. This step allows the back end with the application gateway.
If you're using the Application Gateway v2 SKU, then create a trusted root certificate instead of an authentication certificate. For more information, see Overview of end to end TLS with Application Gateway:
$trustedRootCert01 = New-AzApplicationGatewayTrustedRootCertificate -Name "test1" -CertificateFile <path to root cert file>Configure the HTTP settings for the application gateway back end. Assign the certificate uploaded in the preceding step to the HTTP settings.
$poolSetting = New-AzApplicationGatewayBackendHttpSettings -Name 'setting01' -Port 443 -Protocol Https -CookieBasedAffinity Enabled -AuthenticationCertificates $authcertFor the Application Gateway v2 SKU, use the following command:
$poolSetting01 = New-AzApplicationGatewayBackendHttpSettings -Name “setting01” -Port 443 -Protocol Https -CookieBasedAffinity Disabled -TrustedRootCertificate $trustedRootCert01 -HostName "test1"Create a load-balancer routing rule that configures the load balancer behavior. In this example, a basic round-robin rule is created.
$rule = New-AzApplicationGatewayRequestRoutingRule -Name 'rule01' -RuleType basic -BackendHttpSettings $poolSetting -HttpListener $listener -BackendAddressPool $poolConfigure the instance size of the application gateway. The available sizes are Standard_Small, Standard_Medium, and Standard_Large. For capacity, the available values are 1 through 10.
$sku = New-AzApplicationGatewaySku -Name Standard_Small -Tier Standard -Capacity 2Note
An instance count of 1 can be chosen for testing purposes. It is important to know that any instance count under two instances is not covered by the SLA and is therefore not recommended. Small gateways are to be used for dev test and not for production purposes.
Configure the TLS policy to be used on the application gateway. Application Gateway supports the ability to set a minimum version for TLS protocol versions.
The following values are a list of protocol versions that can be defined:
- TLSV1_0
- TLSV1_1
- TLSV1_2
The following example sets the minimum protocol version to TLSv1_2 and enables TLS_ECDHE_ECDSA_WITH_AES_128_GCM_SHA256, TLS_ECDHE_ECDSA_WITH_AES_256_GCM_SHA384, and TLS_RSA_WITH_AES_128_GCM_SHA256 only.
$SSLPolicy = New-AzApplicationGatewaySSLPolicy -MinProtocolVersion TLSv1_2 -CipherSuite "TLS_ECDHE_ECDSA_WITH_AES_128_GCM_SHA256", "TLS_ECDHE_ECDSA_WITH_AES_256_GCM_SHA384", "TLS_RSA_WITH_AES_128_GCM_SHA256" -PolicyType Custom
Create the application gateway
Using all the preceding steps, create the application gateway. The creation of the gateway is a process that takes a long time to run.
For V1 SKU use the below command
$appgw = New-AzApplicationGateway -Name appgateway -SSLCertificates $cert -ResourceGroupName "appgw-rg" -Location "West US" -BackendAddressPools $pool -BackendHttpSettingsCollection $poolSetting -FrontendIpConfigurations $fipconfig -GatewayIpConfigurations $gipconfig -FrontendPorts $fp -HttpListeners $listener -RequestRoutingRules $rule -Sku $sku -SSLPolicy $SSLPolicy -AuthenticationCertificates $authcert -Verbose
For V2 SKU use the below command
$appgw = New-AzApplicationGateway -Name appgateway -SSLCertificates $cert -ResourceGroupName "appgw-rg" -Location "West US" -BackendAddressPools $pool -BackendHttpSettingsCollection $poolSetting01 -FrontendIpConfigurations $fipconfig -GatewayIpConfigurations $gipconfig -FrontendPorts $fp -HttpListeners $listener -RequestRoutingRules $rule -Sku $sku -SSLPolicy $SSLPolicy -TrustedRootCertificate $trustedRootCert01 -Verbose
Apply a new certificate if the backend certificate is expired
Use this procedure to apply a new certificate if the backend certificate is expired.
Retrieve the application gateway to update.
$gw = Get-AzApplicationGateway -Name AdatumAppGateway -ResourceGroupName AdatumAppGatewayRGAdd the new certificate resource from the .cer file, which contains the public key of the certificate and can also be the same certificate added to the listener for TLS termination at the application gateway.
Add-AzApplicationGatewayAuthenticationCertificate -ApplicationGateway $gw -Name 'NewCert' -CertificateFile "appgw_NewCert.cer"Get the new authentication certificate object into a variable (TypeName: Microsoft.Azure.Commands.Network.Models.PSApplicationGatewayAuthenticationCertificate).
$AuthCert = Get-AzApplicationGatewayAuthenticationCertificate -ApplicationGateway $gw -Name NewCertAssign the new certificate into the BackendHttp Setting and refer it with the $AuthCert variable. (Specify the HTTP setting name that you want to change.)
$out= Set-AzApplicationGatewayBackendHttpSetting -ApplicationGateway $gw -Name "HTTP1" -Port 443 -Protocol "Https" -CookieBasedAffinity Disabled -AuthenticationCertificates $Authcert
- Commit the change into the application gateway and pass the new configuration contained into the $out variable.
Set-AzApplicationGateway -ApplicationGateway $gw
Remove an unused expired certificate from HTTP Settings
Use this procedure to remove an unused expired certificate from HTTP Settings.
Retrieve the application gateway to update.
$gw = Get-AzApplicationGateway -Name AdatumAppGateway -ResourceGroupName AdatumAppGatewayRGList the name of the authentication certificate that you want to remove.
Get-AzApplicationGatewayAuthenticationCertificate -ApplicationGateway $gw | select nameRemove the authentication certificate from an application gateway.
$gw=Remove-AzApplicationGatewayAuthenticationCertificate -ApplicationGateway $gw -Name ExpiredCertCommit the change.
Set-AzApplicationGateway -ApplicationGateway $gw
Limit TLS protocol versions on an existing application gateway
The preceding steps took you through creating an application with end-to-end TLS and disabling certain TLS protocol versions. The following example disables certain TLS policies on an existing application gateway.
Retrieve the application gateway to update.
$gw = Get-AzApplicationGateway -Name AdatumAppGateway -ResourceGroupName AdatumAppGatewayRGDefine a TLS policy. In the following example, TLSv1.0 and TLSv1.1 are disabled and the cipher suites TLS_ECDHE_ECDSA_WITH_AES_128_GCM_SHA256, TLS_ECDHE_ECDSA_WITH_AES_256_GCM_SHA384, and TLS_RSA_WITH_AES_128_GCM_SHA256 are the only ones allowed.
Set-AzApplicationGatewaySSLPolicy -MinProtocolVersion TLSv1_2 -PolicyType Custom -CipherSuite "TLS_ECDHE_ECDSA_WITH_AES_128_GCM_SHA256", "TLS_ECDHE_ECDSA_WITH_AES_256_GCM_SHA384", "TLS_RSA_WITH_AES_128_GCM_SHA256" -ApplicationGateway $gwFinally, update the gateway. This last step is a long-running task. When it is done, end-to-end TLS is configured on the application gateway.
$gw | Set-AzApplicationGateway
Get an application gateway DNS name
After the gateway is created, the next step is to configure the front end for communication. Application Gateway requires a dynamically assigned DNS name when using a public IP, which is not friendly. To ensure end users can hit the application gateway, you can use a CNAME record to point to the public endpoint of the application gateway. For more information, see Configuring a custom domain name for in Azure.
To configure an alias, retrieve details of the application gateway and its associated IP/DNS name by using the PublicIPAddress element attached to the application gateway. Use the application gateway's DNS name to create a CNAME record that points the two web applications to this DNS name. We don't recommend the use of A-records, because the VIP can change on restart of the application gateway.
Get-AzPublicIpAddress -ResourceGroupName appgw-RG -Name publicIP01
Name                     : publicIP01
ResourceGroupName        : appgw-RG
Location                 : westus
Id                       : /subscriptions/<subscription_id>/resourceGroups/appgw-RG/providers/Microsoft.Network/publicIPAddresses/publicIP01
Etag                     : W/"00000d5b-54ed-4907-bae8-99bd5766d0e5"
ResourceGuid             : 00000000-0000-0000-0000-000000000000
ProvisioningState        : Succeeded
Tags                     :
PublicIpAllocationMethod : Dynamic
IpAddress                : xx.xx.xxx.xx
PublicIpAddressVersion   : IPv4
IdleTimeoutInMinutes     : 4
IpConfiguration          : {
                                "Id": "/subscriptions/<subscription_id>/resourceGroups/appgw-RG/providers/Microsoft.Network/applicationGateways/appgwtest/frontendIP
                            Configurations/frontend1"
                            }
DnsSettings              : {
                                "Fqdn": "00000000-0000-xxxx-xxxx-xxxxxxxxxxxx.cloudapp.net"
                            }
Next steps
For more information about hardening the security of your web applications with Web Application Firewall through Application Gateway, see the Web application firewall overview.