Note
Access to this page requires authorization. You can try signing in or changing directories.
Access to this page requires authorization. You can try changing directories.
Azure Key Vault is a platform-managed secret store that you can use to safeguard secrets, keys, and TLS/SSL certificates. Azure Application Gateway supports integration with Key Vault for server certificates that are attached to HTTPS-enabled listeners. This support is limited to the Application Gateway v2 SKU.
For more information, see TLS termination with Key Vault certificates.
This article shows you how to use Azure portal to integrate your key vault with your application gateway for TLS/SSL termination certificates.
Prerequisites
Before you begin, you must have an Azure subscription. If not, create a free account before you begin.
Configuration steps
Create a resource group
Sign in to the Azure portal.
Select Resource groups
Select Add.
Enter the following values:
Subscription: Select your Azure subscription.
Resource group: Enter a new resource group name.
Region: Select an Azure location, such as East US.
Select Review + Create
Select Create. It takes a few seconds to create a resource group.
Select Refresh from the top menu to refresh the resource group list, and then select the newly created resource group to open it. Or select Notification (the bell icon) from the top, and then select Go to resource group to open the newly created resource group
Create a Key Vault
Important
The key vault name must be universally unique.
In the Search box, enter Key Vault.
From the results list, choose Key Vault.
On the Key Vault section, choose Create.
On the Create key vault section provide the following information:
- Name: A unique name is required.
- Subscription: Choose a subscription.
- Select Resource Group previously created.
- In the Location pull-down menu, choose a East US. Leave the other options to their defaults.
After providing the information above, select create.
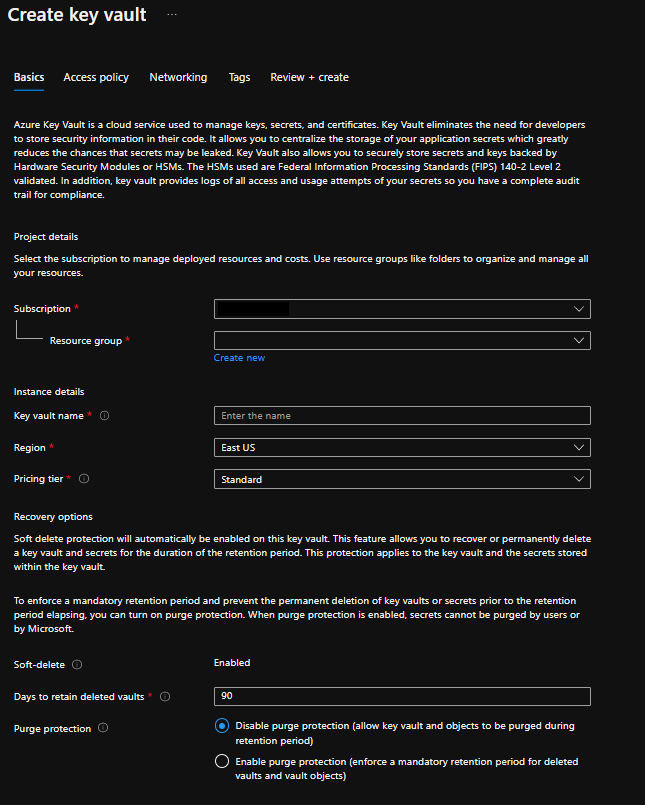
At this point, your Azure account is the only one authorized to perform operations on this new vault.
Create Certificate and Issuance Policy
Certificate
In the Key Vault that was created earlier, navigate to Certificate.
Under Certificate select your desired method of creation, whether you want to Import or Generate. If you choose to generate the certificate, you would need to create the issuance policy.
Input your Certificate name and complete all the required fields.
After providing the information above, select Create.
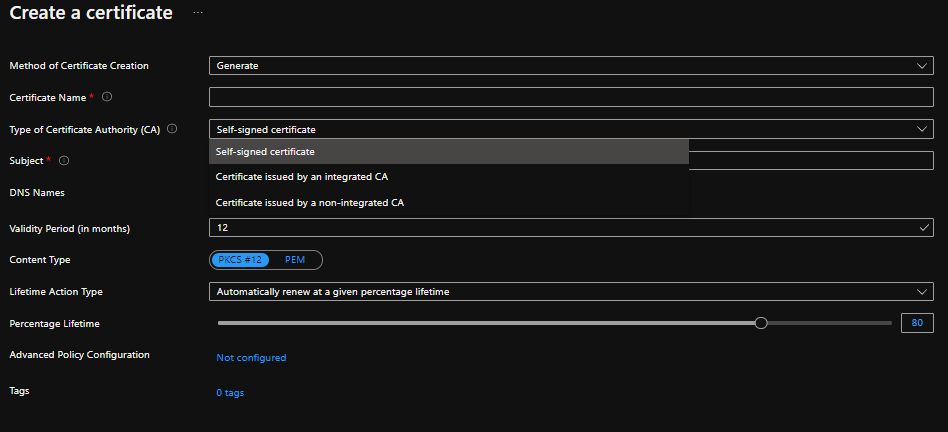
Important
Issuance policies only affect certificates that will be issued in the future. Modifying this issuance policy won't affect any existing certificates.
Create a Virtual Network
- In the Search box, enter Virtual Network.
- In the Virtual Network page, select Create.
- In Create virtual network, enter or select this information in the Basics tab:
- Subscription: Choose a subscription.
- Select Resource Group previously created.
- Name: A unique name is required.
- In the Location pull-down menu, choose a East US.
- Select OK.
- Select the IP Addresses tab, or select the Next: IP Addresses button at the bottom of the page.
- In IPv4 address space, select the existing address space and change it to 10.1.0.0/16.
- Select + Add subnet, then enter MySubnet for Subnet name and 10.1.0.0/24 for Subnet address range.
- Select Add.
- Select OK.
- Select the Review + create button.
Create an Application Gateway
You'll create the application gateway using the tabs on the Create an application gateway page.
- On the Azure portal menu or from the Home page, select Create a resource. The New window appears.
- Select Networking and then select Application Gateway in the Featured list.
Basics tab
On the Basics tab, enter these values for the following application gateway settings:
Resource group: Select myResourceGroupAG for the resource group. If it doesn't exist, select Create new to create it.
Application gateway name: Enter myAppGateway for the name of the application gateway.
For Azure to communicate between the resources that you create, it needs a virtual network. You can either create a new virtual network or use an existing one. In this example, you'll create a new virtual network at the same time that you create the application gateway. Application Gateway instances are created in separate subnets. You create two subnets in this example: one for the application gateway, and another for the backend servers.
Note
Virtual network service endpoint policies are currently not supported in an Application Gateway subnet.
Under Configure virtual network, create a new virtual network by selecting Create new. In the Create virtual network window that opens, enter the following values to create the virtual network and two subnets:
Name: Enter myVNet for the name of the virtual network.
Subnet name (Application Gateway subnet): The Subnets grid will show a subnet named Default. Change the name of this subnet to myAGSubnet. The application gateway subnet can contain only application gateways. No other resources are allowed.
Subnet name (backend server subnet): In the second row of the Subnets grid, enter myBackendSubnet in the Subnet name column.
Address range (backend server subnet): In the second row of the Subnets Grid, enter an address range that doesn't overlap with the address range of myAGSubnet. For example, if the address range of myAGSubnet is 10.0.0.0/24, enter 10.0.1.0/24 for the address range of myBackendSubnet.
Select OK to close the Create virtual network window and save the virtual network settings.
On the Basics tab, accept the default values for the other settings and then select Next: Frontends.
Frontends tab
On the Frontends tab, verify Frontend IP address type is set to Public. You can configure the Frontend IP to be Public or Private as per your use case. In this example, you'll choose a Public Frontend IP.
Note
For the Application Gateway v2 SKU, there must be a Public frontend IP configuration. You can still have both a Public and a Private frontend IP configuration, but Private only frontend IP configuration (Only ILB mode) is currently not enabled for the v2 SKU.
Select Add new for the Public IP address and enter myAGPublicIPAddress for the public IP address name, and then select OK.
Select Next: Backends.
Backends tab
The backend pool is used to route requests to the backend servers that serve the request. Backend pools can be composed of NICs, virtual machine scale sets, public IP addresses, internal IP addresses, fully qualified domain names (FQDN), and multi-tenant backends like Azure App Service. In this example, you'll create an empty backend pool with your application gateway and then add backend targets to the backend pool.
On the Backends tab, select Add a backend pool.
In the Add a backend pool window that opens, enter the following values to create an empty backend pool:
Name: Enter myBackendPool for the name of the backend pool.
Add backend pool without targets: Select Yes to create a backend pool with no targets. You'll add backend targets after creating the application gateway.
In the Add a backend pool window, select Add to save the backend pool configuration and return to the Backends tab.
On the Backends tab, select Next: Configuration.
Configuration tab
On the Configuration tab, you'll connect the frontend and backend pool you created using a routing rule.
Select Add a routing rule in the Routing rules column.
In the Add a routing rule window that opens, enter myRoutingRule for the Rule name.
A routing rule requires a listener. On the Listener tab within the Add a routing rule window, enter the following values for the listener:
Listener name: Enter myListener for the name of the listener.
Frontend IP: Select Public to choose the public IP you created for the frontend.
Accept the default values for the other settings on the Listener tab, then select the Backend targets tab to configure the rest of the routing rule.
On the Backend targets tab, select myBackendPool for the Backend target.
For the HTTP setting, select Add new to add a new HTTP setting. The HTTP setting will determine the behavior of the routing rule. In the Add an HTTP setting window that opens, enter myHTTPSetting for the HTTP setting name and 80 for the Backend port. Accept the default values for the other settings in the Add an HTTP setting window, then select Add to return to the Add a routing rule window.
On the Add a routing rule window, select Add to save the routing rule and return to the Configuration tab.
Select Next: Tags and then Next: Review + create.
Review + create tab
Review the settings on the Review + create tab, and then select Create to configure the virtual network, the public IP address, and the application gateway. It may take several minutes for Azure to create the application gateway. Wait until the deployment finishes successfully before moving on to the next section.
Add backend targets to your Backend Pool.
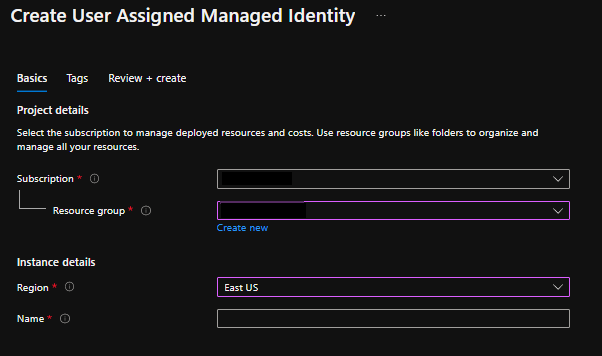
Create user-assigned managed identity
Search for Managed Identity
Create user assigned managed identity.
Go back to Key Vault previously created.
Select Access Policy.
Select Add access policy.
Fill in the required level of permissions you need.
Select principal - then choose None selected.
Search for the managed identity name previously created and use that one. Skip Application identity.
For additional information on configuring Access Policy permissions and Key Vault Firewall permissions, read below articles.
Delegate user-assigned managed identity to Key Vault
Verify Firewall Permissions to Key Vault
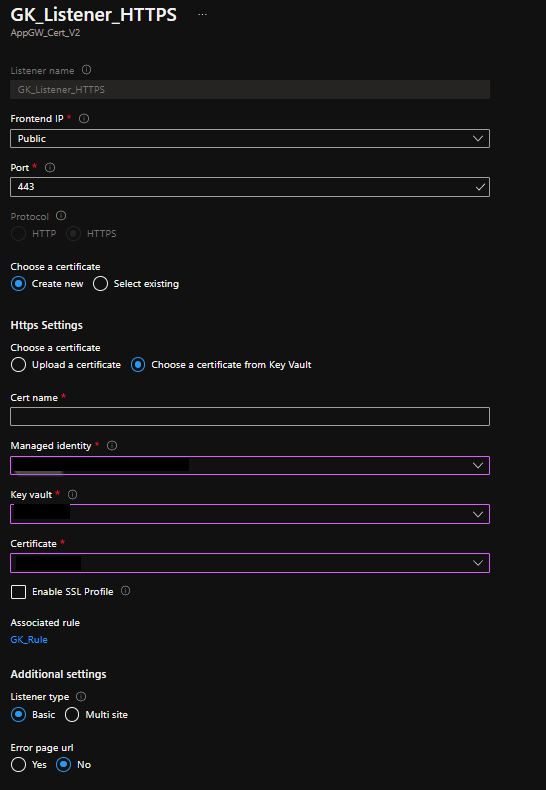
Point the TLS/SSL certificate to your key vault by assigning the user-managed identity to the application gateway
Go back to the application gateway previously configured
Select Listeners and then choose Add listener (this will add the HTTPS listener)
Complete the following fields:
- Listener name: unique-name
- Frontend IP: Public
- Port: 443
- Protocol: HTTPS
- Https Settings: Choose a certificate from Key Vault
- Cert name: unique-name
- Managed identity: select the name of the managed identity previously created from above
- Key vault: select name of key vault previously configured
- Certificate: auto-populates the certificate(s) found in key vault Leave remaining selections as default