Note
Access to this page requires authorization. You can try signing in or changing directories.
Access to this page requires authorization. You can try changing directories.
This tutorial walks you through the creation of a PowerShell Workflow runbook in Azure Automation. PowerShell Workflow runbooks are text runbooks based on Windows PowerShell Workflow. You can create and edit the code of the runbook using the text editor in the Azure portal.
Note
This article is applicable only for PowerShell 5.1. PowerShell 7+ versions do not support Workflows, and outdated runbooks cannot be updated. We recommend you to use PowerShell 7.2 textual runbooks for advanced features such as parallel job execution. Learn more about limitations of PowerShell Workflow runbooks.
In this tutorial, you learn how to:
- Create a PowerShell Workflow runbook
- Test and publish the runbook
- Run and track the status of the runbook job
- Add authentication to manage Azure resources
- Update the runbook parameters to start an Azure virtual machine
If you don't have an Azure subscription, create a free account before you begin.
Prerequisites
- An Azure Automation account with at least one user-assigned managed identity. For more information, see Enable managed identity.
- Az modules:
Az.AccountsandAz.Computeimported into the Automation account. For more information, see Import Az modules. - Two or more Azure virtual machines. Since you stop and start these machines, they shouldn't be production VMs.
- The Azure Az PowerShell module installed on your machine. To install or upgrade, see How to install the Azure Az PowerShell module.
Assign permissions to managed identities
Assign permissions to the appropriate managed identity to allow it to stop a virtual machine. The runbook can use either the Automation account system-assigned managed identity or a user-assigned managed identity. Steps are provided to assign permissions to each identity. The steps below use the Azure portal. If you prefer using PowerShell, see Assign Azure roles using Azure PowerShell.
Sign in to the Azure portal and navigate to your Automation account.
Under Account Settings, select Identity (Preview).
From the System assigned tab, under Permissions, select Azure role assignments to open the Azure role assignments page.
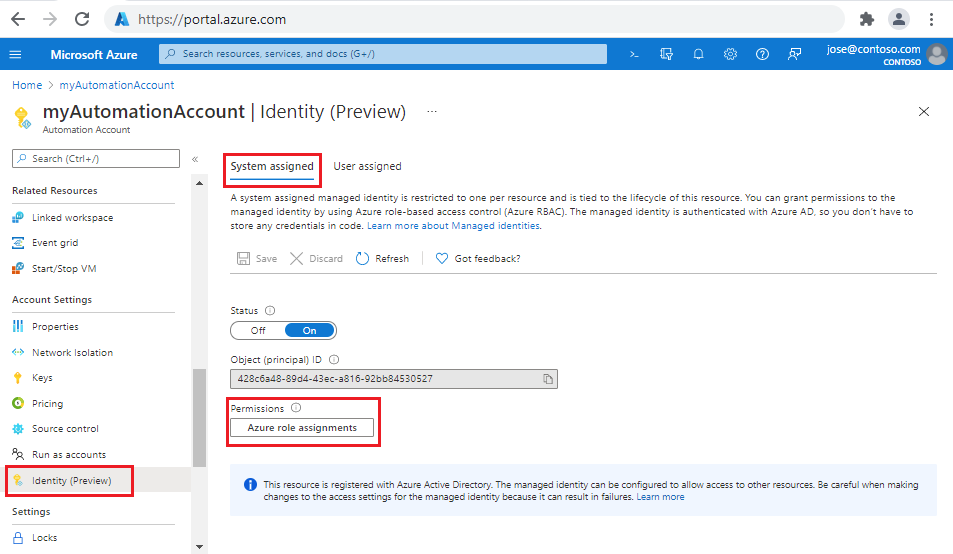
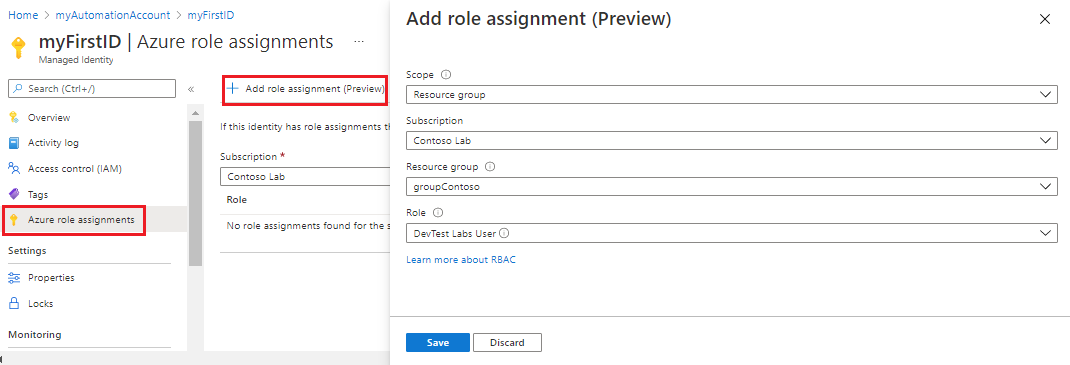
Select + Add role assignment (Preview) to open the Add role assignment (Preview) page.
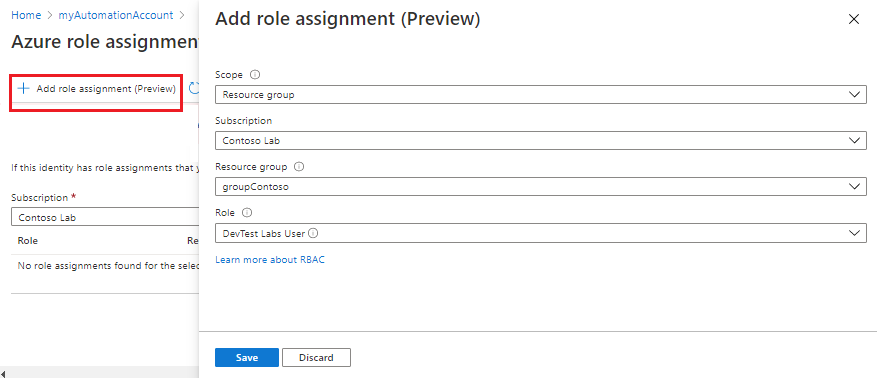
Select the appropriate values.
Property Description Scope Scope is a set of resources that the role assignment applies to. From the drop-down list, select Resource Group. Subscription This field should be auto-populated with your subscription. Resource Group From the drop-down list, select the resource group to give the identity permissions over. Role From the drop-down list, select DevTest Labs User. Select Save, and then close the Azure role assignments page to return to the System assigned tab.
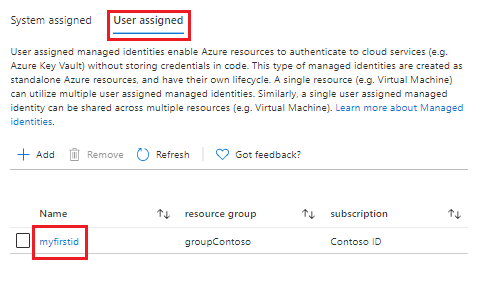
Select the User assigned tab.
Select your user-assigned managed identity from the list to open the Managed Identity page.
Take note of the Client ID for later use.
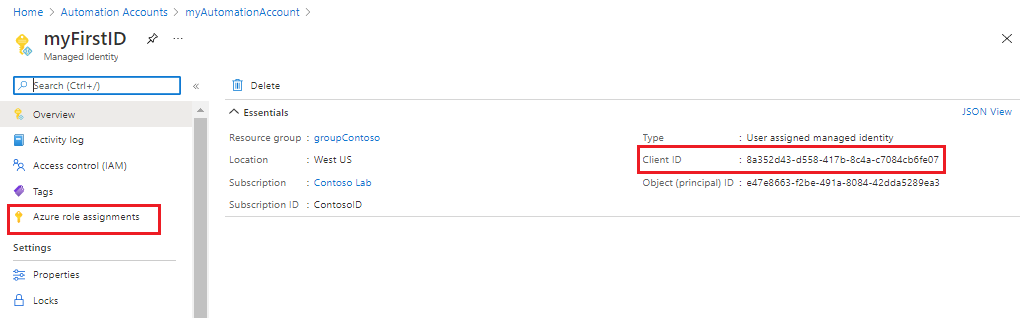
From the left menu, select Azure role assignments and then + Add role assignment (Preview) to open the Add role assignment (Preview) page.
Select the appropriate values.
Property Description Scope From the drop-down list, select Resource Group. Subscription This field should be auto-populated with your subscription. Resource Group From the drop-down list, select the resource group to give the identity permissions over. Role From the drop-down list, select DevTest Labs User. Select Save, and then close the Azure role assignments page to return to the User assigned tab.
Create new runbook
Start by creating a simple PowerShell Workflow runbook. One advantage of Windows PowerShell Workflows is the ability to perform a set of commands in parallel instead of sequentially as with a typical script.
Note
With release runbook creation has a new experience in the Azure portal. When you select Runbooks blade > Create a runbook, a new page Create a runbook opens with applicable options.
From your open Automation account page, under Process Automation, select Runbooks
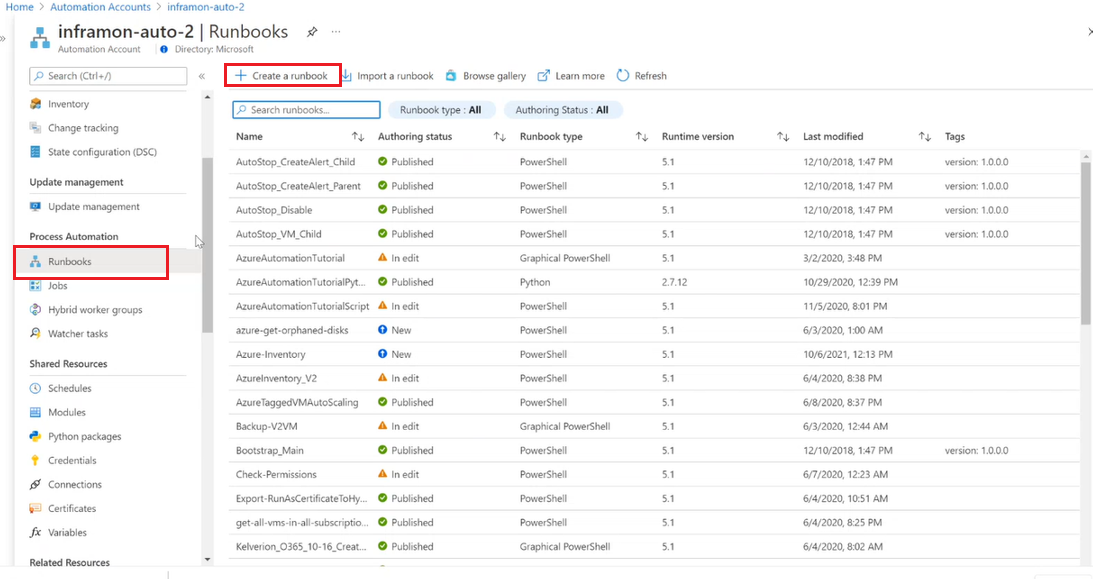
Select + Create a runbook.
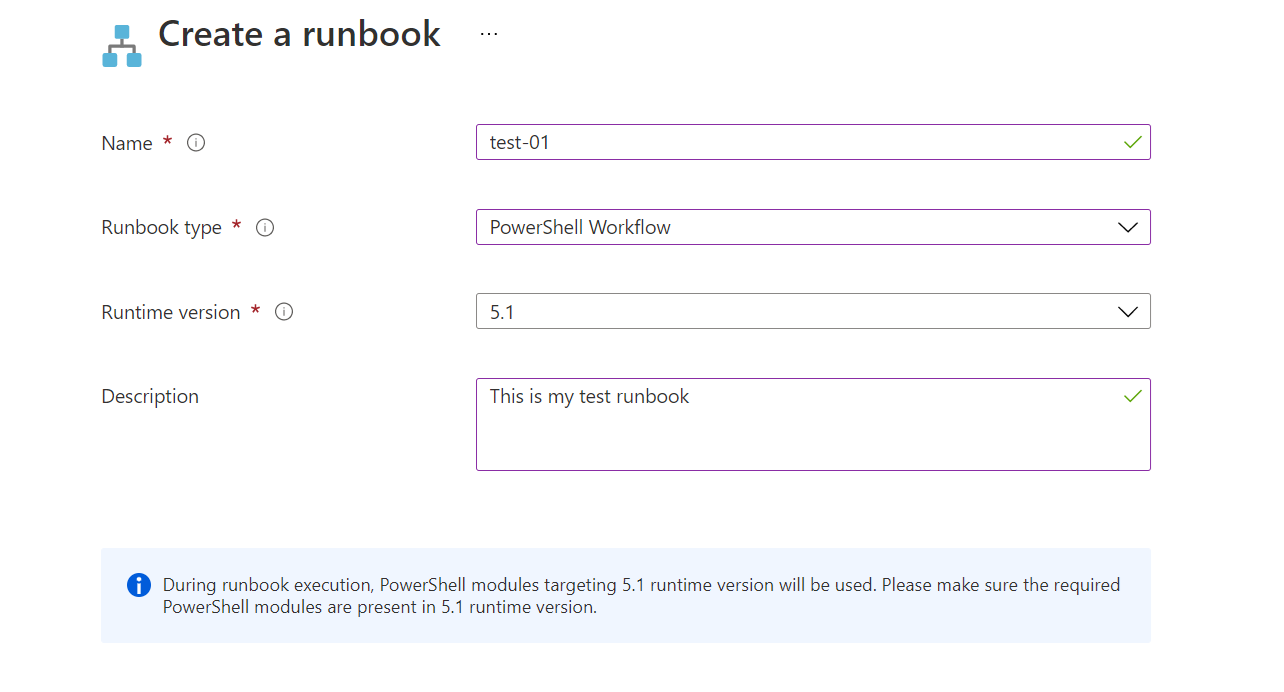
- Name the runbook. For example, test.
- From the Runbook type drop-down menu, select PowerShell Workflow.
- From the Runtime version drop-down, select 5.1.
- Enter applicable Description.
- Select Create.
Add code to the runbook
You can either type code directly into the runbook, or you can select cmdlets, runbooks, and assets from the Library control and add them to the runbook with any related parameters. For this tutorial, you type code directly into the runbook.
Your runbook is currently empty with only the required workflow keyword, the name of the runbook, and the braces that encase the entire workflow.
workflow MyFirstRunbook-Workflow
{
}
You can use the
Parallelkeyword to create a script block with multiple commands that will run concurrently. Enter the following code between the braces:parallel { Write-Output "Parallel" Get-Date Start-Sleep -Seconds 3 Get-Date } Write-Output " `r`n" Write-Output "Non-Parallel" Get-Date Start-Sleep -Seconds 3 Get-DateSave the runbook by selecting Save.
Test the runbook
Before you publish the runbook to make it available in production, you should test it to make sure that it works properly. Testing a runbook runs its Draft version and allows you to view its output interactively.
Select Test pane to open the Test page.
Select Start to start the test. A runbook job is created and its status is displayed in the pane.
The job status starts as Queued, indicating that the job is waiting for a runbook worker in the cloud to become available. The status changes to Starting when a worker claims the job. Finally, the status becomes Running when the runbook actually starts to run.
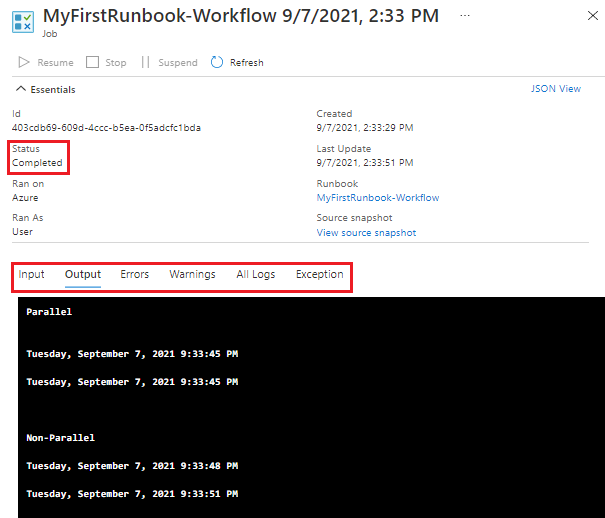
When the runbook job completes, the Test page displays its output. The output should look similar to the following image:
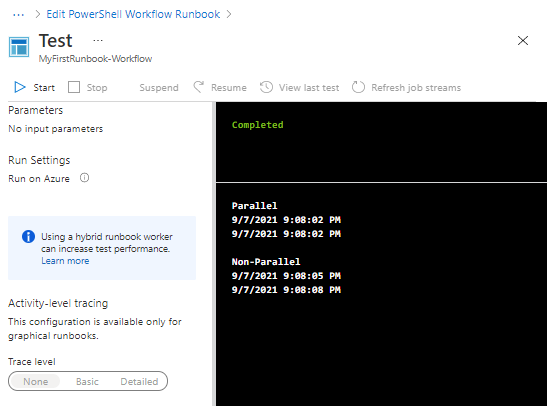
Review the output. Everything in the
Parallelblock, including theStart-Sleepcommand, executed at the same time. The same commands outside theParallelblock ran sequentially, as shown by the different date time stamps.Close the Test page to return to the canvas.
Publish and start the runbook
The runbook that you've created is still in Draft mode. You must publish it before you can run it in production. When you publish a runbook, you overwrite the existing Published version with the Draft version. In this case, you don't have a Published version yet because you just created the runbook.
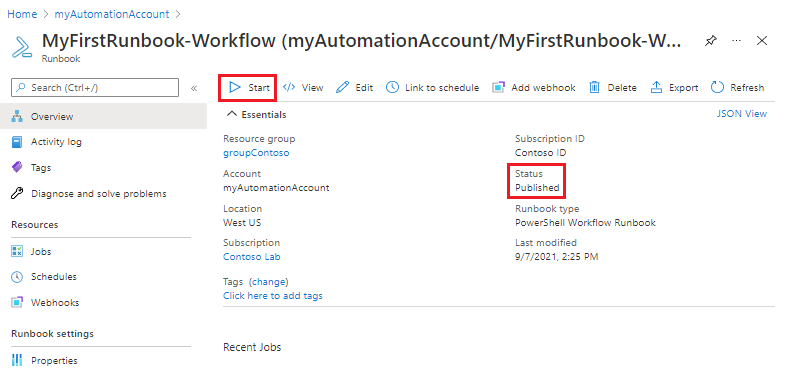
Select Publish to publish the runbook and then Yes when prompted.
The Status field now shows Published. Review the options across the top that allow you to start the runbook now, schedule a future start time, or create a webhook so that the runbook can be started through an HTTP call. Select Start and then Yes when prompted to start the runbook.
A Job page opens for the runbook job that has been created. In this case, leave the page open so you can watch the job's progress. The Status field matches the statuses that you saw when testing the runbook.
Once the runbook status shows Completed, select Output. The output should look similar as the test output.
Close the Job page to return to runbook Overview page.
Under Resources, select Jobs. This page lists all the jobs created by your runbook. You should only see one job listed, since you have run the job only once.
Select the job to open the same Job page that you viewed when you started the runbook. Use this page to view the details of any job created for the runbook. Close the Job page to return to runbook Overview page.
Add authentication to manage Azure resources
You've tested and published your runbook, but so far it doesn't do anything useful. You want to have it manage Azure resources. It can't do that unless it authenticates using the credentials for the subscription. The runbook uses the Automation account's system-assigned managed identity to authenticate with Azure to perform the management action against the VM. The runbook can be easily modified to use a user-assigned managed identity.
Select Overview and then Edit to open the textual editor.
Replace the existing code with the following:
workflow MyFirstRunbook-Workflow
{
 $resourceGroup = "resourceGroupName"

 # Ensures you do not inherit an AzContext in your runbook
 Disable-AzContextAutosave -Scope Process

 # Connect to Azure with system-assigned managed identity
 Connect-AzAccount -Identity

 # set and store context
 $AzureContext = Set-AzContext -SubscriptionId "<SubscriptionID>"
}
Edit the
$resourceGroupvariable with a valid value representing your resource group.If you want the runbook to execute with the system-assigned managed identity, leave the code as-is. If you prefer to use a user-assigned managed identity, then:
- From line 9, remove
Connect-AzAccount -Identity, - Replace it with
Connect-AzAccount -Identity -AccountId <ClientId>, and - Enter the Client ID you obtained earlier.
- From line 9, remove
Select Save and then Test pane.
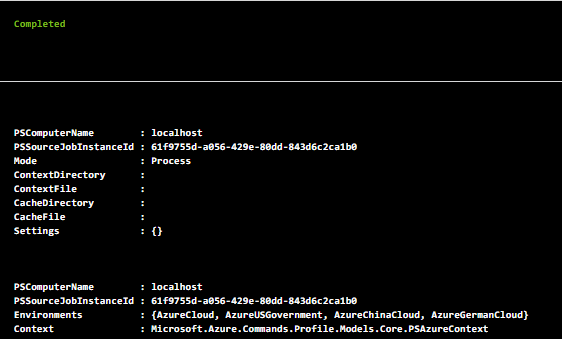
Select Start to start the test. Once it completes, you should see output similar to the following, displaying basic information from your account. This action confirms that the credential is valid.
Close the Test page to return to the canvas.
Add code to start a virtual machine
Now that your runbook is authenticating to the Azure subscription, you can manage resources. Add a command to start a virtual machine. You can pick any VM in your Azure subscription, and for now you're hardcoding that name in the runbook.
Add the code below as the last line immediately before the closing brace. Replace
VMNamewith the actual name of a VM.Start-AzVM -Name "VMName" -ResourceGroupName $resourceGroup -DefaultProfile $AzureContextTest the runbook and confirm that the VM has started. Then return to the canvas.
Add input parameters to the runbook
Your runbook currently starts the VM that you've hardcoded in the runbook. It will be more useful if you can specify the VM when the runbook is started. Add input parameters to the runbook to provide that functionality.
Replace line 3,
$resourceGroup = "resourceGroupName", with the following:Param( [string]$resourceGroup, [string]$VMName )Replace the previous
Start-AzVMcommand with the following:Start-AzVM -Name $VMName -ResourceGroupName $resourceGroup -DefaultProfile $AzureContextTest the runbook and confirm that the VM has started. Then return to the canvas.
Manage multiple VMs simultaneously
You can use the ForEach -Parallel construct to process commands for each item in a collection concurrently. Revise the code so that the runbook will now:
- Accept a collection of virtual machine names,
- Accept a parameter to stop or start the virtual machines, and
- Perform the actions in parallel against all virtual machines
Replace all of the existing code with the following:
workflow MyFirstRunbook-Workflow
{
	param
	(
		[string]$resourceGroup,
		[string[]]$VMs,
		[string]$action
	)

	# Ensures you do not inherit an AzContext in your runbook
	Disable-AzContextAutosave -Scope Process

	# Connect to Azure with system-assigned managed identity
	Connect-AzAccount -Identity

	# set and store context
	$AzureContext = Set-AzContext -SubscriptionId "<SubscriptionID>"

	# Start or stop VMs in parallel
	if ($action -eq "Start")
	{
		ForEach -Parallel ($vm in $VMs)
		{
			Start-AzVM -Name $vm -ResourceGroupName $resourceGroup -DefaultProfile $AzureContext
		}
	}
	elseif ($action -eq "Stop")
	{
		ForEach -Parallel ($vm in $VMs)
		{
			Stop-AzVM -Name $vm -ResourceGroupName $resourceGroup -DefaultProfile $AzureContext -Force
		}
	}
	else
	{
		Write-Output "`r`n Action not allowed. Please enter 'stop' or 'start'."
	}
}
If you want the runbook to execute with the system-assigned managed identity, leave the code as-is. If you prefer to use a user-assigned managed identity, then:
- From line 9, remove
Connect-AzAccount -Identity, - Replace it with
Connect-AzAccount -Identity -AccountId <ClientId>, and - Enter the Client ID you obtained earlier.
- From line 9, remove
Select Save, then Publish, and then Yes when prompted.
From the Overview page, select Start.
Populate the parameters and then select OK.
Parameter Description RESOURCEGROUP Enter the name of the resource group of the VMs. VMs Enter the names of the virtual machines using the following syntax: ["VM1","VM2","VM3"]Action Enter stoporstart.Navigate to your list of virtual machines and refresh the page every few seconds. Observe that the action for each VM happens in parallel. Without the
-Parallelkeyword, the actions would have performed sequentially. While the VMs will start in parallel, each VM may reach the Running phase at slightly different times based on the characteristics of each VM.
Clean up resources
If you're not going to continue to use this runbook, delete it with the following steps:
- Navigate to your Automation Account.
- Under Process Automation, select Runbooks.
- Select the runbook.
- From the runbook Overview page, select Delete.
Next steps
In this tutorial, you created a PowerShell workflow runbook. For a look at Python 3 runbooks, see: