Note
Access to this page requires authorization. You can try signing in or changing directories.
Access to this page requires authorization. You can try changing directories.
You can add a runbook to Azure Automation by either creating a new one or importing an existing one from a file or the Runbook Gallery. This article provides information for managing a runbook and recommended patterns and best practices with runbook design. You can find all the details of accessing community runbooks and modules in Runbook and module galleries for Azure Automation.
Create a runbook
Create a new runbook in Azure Automation using the Azure portal or PowerShell. Once the runbook has been created, you can edit it using information in:
- Edit textual runbook in Azure Automation
- Learn key PowerShell Workflow concepts for Automation runbooks
- Manage Python 2 packages in Azure Automation
- Manage Python 3 packages (preview) in Azure Automation
Create a runbook in the Azure portal
- Sign in to the Azure portal.
- Search for and select Automation Accounts.
- On the Automation Accounts page, select your Automation account from the list.
- From the Automation account, select Runbooks under Process Automation to open the list of runbooks.
- Click Create a runbook.
- Name the runbook.
- From the Runbook type drop-down. Select its type. The runbook name must start with a letter and can contain letters, numbers, underscores, and dashes
- Select the Runtime version
- Enter applicable Description
- Click Create to create the runbook.
Create a runbook with PowerShell
Use the New-AzAutomationRunbook cmdlet to create an empty runbook. Use the Type parameter to specify one of the runbook types defined for New-AzAutomationRunbook.
The following example shows how to create a new empty runbook.
$params = @{
    AutomationAccountName = 'MyAutomationAccount'
    Name                  = 'NewRunbook'
    ResourceGroupName     = 'MyResourceGroup'
    Type                  = 'PowerShell'
}
New-AzAutomationRunbook @params
Import a runbook
You can import a PowerShell or PowerShell Workflow (.ps1) script, a graphical runbook (.graphrunbook), or a Python 2 or Python 3 script (.py) to make your own runbook. You specify the type of runbook that is created during import, taking into account the following considerations.
You can import a .ps1 file that doesn't contain a workflow into either a PowerShell runbook or a PowerShell Workflow runbook. If you import it into a PowerShell Workflow runbook, it is converted to a workflow. In this case, comments are included in the runbook to describe the changes made.
You can import only a .ps1 file containing a PowerShell Workflow into a PowerShell Workflow runbook. If the file contains multiple PowerShell workflows, the import fails. You have to save each workflow to its own file and import each separately.
Do not import a .ps1 file containing a PowerShell Workflow into a PowerShell runbook, as the PowerShell script engine can't recognize it.
Only import a .graphrunbook file into a new graphical runbook.
Import a runbook from the Azure portal
You can use the following procedure to import a script file into Azure Automation.
Note
You can only import a .ps1 file into a PowerShell Workflow runbook using the portal.
- In the Azure portal, search for and select Automation Accounts.
- On the Automation Accounts page, select your Automation account from the list.
- From the Automation account, select Runbooks under Process Automation to open the list of runbooks.
- Click Import a runbook. You can select either of the following options:
- Browse for file - selects a file from your local machine.
- Browse from Gallery - You can browse and select an existing runbook from gallery.
- Select the file.
- If the Name field is enabled, you have the option of changing the runbook name. The name must start with a letter and can contain letters, numbers, underscores, and dashes.
- The Runbook type is automatically populated, but you can change the type after taking the applicable restrictions into account.
- The Runtime version is either auto-populated or pick the version from the drop-down list.
- Click Import. The new runbook appears in the list of runbooks for the Automation account.
- You have to publish the runbook before you can run it.
Note
After you import a graphical runbook, you can convert it to another type. However, you can't convert a graphical runbook to a textual runbook.
Import a runbook with PowerShell
Use the Import-AzAutomationRunbook cmdlet to import a script file as a draft runbook. If the runbook already exists, the import fails unless you use the Force parameter with the cmdlet.
The following example shows how to import a script file into a runbook.
$params = @{
    AutomationAccountName = 'MyAutomationAccount'
    Name                  = 'Sample_TestRunbook'
    ResourceGroupName     = 'MyResourceGroup'
    Type                  = 'PowerShell'
    Path                  = 'C:\Runbooks\Sample_TestRunbook.ps1'
}
Import-AzAutomationRunbook @params
Handle resources
If your runbook creates a resource, the script should check to see if the resource already exists before attempting to create it. Here's a basic example.
$vmName = 'WindowsVM1'
$rgName = 'MyResourceGroup'
$myCred = Get-AutomationPSCredential 'MyCredential'

$vmExists = Get-AzResource -Name $vmName -ResourceGroupName $rgName
if (-not $vmExists) {
    Write-Output "VM $vmName does not exist, creating"
    New-AzVM -Name $vmName -ResourceGroupName $rgName -Credential $myCred
} else {
    Write-Output "VM $vmName already exists, skipping"
}
Retrieve details from Activity log
You can retrieve runbook details, such as the person or account that started a runbook, from the Activity log for the Automation account. The following PowerShell example provides the last user to run the specified runbook.
$rgName = 'MyResourceGroup'
$accountName = 'MyAutomationAccount'
$runbookName = 'MyRunbook'
$startTime = (Get-Date).AddDays(-1)

$params = @{
    ResourceGroupName = $rgName
    StartTime         = $startTime
}
$JobActivityLogs = (Get-AzLog @params).Where( { $_.Authorization.Action -eq 'Microsoft.Automation/automationAccounts/jobs/write' })

$JobInfo = @{}
foreach ($log in $JobActivityLogs) {
    # Get job resource
    $JobResource = Get-AzResource -ResourceId $log.ResourceId

    if ($null -eq $JobInfo[$log.SubmissionTimestamp] -and $JobResource.Properties.Runbook.Name -eq $runbookName) {
        # Get runbook
        $jobParams = @{
            ResourceGroupName     = $rgName
            AutomationAccountName = $accountName
            Id                    = $JobResource.Properties.JobId
        }
        $Runbook = Get-AzAutomationJob @jobParams | Where-Object RunbookName -EQ $runbookName

        # Add job information to hashtable
        $JobInfo.Add($log.SubmissionTimestamp, @($Runbook.RunbookName, $Log.Caller, $JobResource.Properties.jobId))
    }
}
$JobInfo.GetEnumerator() | Sort-Object Key -Descending | Select-Object -First 1
Track progress
It's a good practice to author your runbooks to be modular in nature, with logic that can be reused and restarted easily. Tracking progress in a runbook ensures that the runbook logic executes correctly if there are issues.
You can track the progress of a runbook by using an external source, such as a storage account, a database, or shared files. Create logic in your runbook to first check the state of the last action taken. Then, based on the results of the check, the logic can either skip or continue specific tasks in the runbook.
Prevent concurrent jobs
Some runbooks behave strangely if they run across multiple jobs at the same time. In this case, it's important for a runbook to implement logic to determine if there is already a running job. Here's a basic example.
# Ensures you do not inherit an AzContext in your runbook
Disable-AzContextAutosave -Scope Process

# Connect to Azure with system-assigned managed identity
$AzureContext = (Connect-AzAccount -Identity).context

# set and store context
$AzureContext = Set-AzContext -SubscriptionName $AzureContext.Subscription -DefaultProfile $AzureContext

# Check for already running or new runbooks
$runbookName = "runbookName"
$resourceGroupName = "resourceGroupName"
$automationAccountName = "automationAccountName"

$jobs = Get-AzAutomationJob -ResourceGroupName $resourceGroupName -AutomationAccountName $automationAccountName -RunbookName $runbookName -DefaultProfile $AzureContext

# Ranking all the active jobs
$activeJobs = $jobs | where {$_.status -eq 'Running' -or $_.status -eq 'Queued' -or $_.status -eq 'New' -or $_.status -eq 'Activating' -or $_.status -eq 'Resuming'} | Sort-Object -Property CreationTime
$jobRanking = @()
$rank = 0
ForEach($activeJob in $activeJobs)
{
    $rank = $rank + 1
    $activeJob | Add-Member -MemberType NoteProperty -Name jobRanking -Value $rank -Force
    $jobRanking += $activeJob
}

$AutomationJobId = $PSPrivateMetadata.JobId.Guid
$currentJob = $activeJobs | where {$_.JobId -eq $AutomationJobId}
$currentJobRank = $currentJob.jobRanking

# Only allow the Job with Rank = 1 to start processing.
If($currentJobRank -ne "1")
{
    Write-Output "$(Get-Date -Format yyyy-MM-dd-hh-mm-ss.ffff) Concurrency check failed as Current Job Ranking is not 1 but $($currentJobRank) therefore exiting..."
    Exit
} Else
{
    Write-Output "$(Get-Date -Format yyyy-MM-dd-hh-mm-ss.ffff) Concurrency check passed. Start processing.."
}
If you want the runbook to execute with the system-assigned managed identity, leave the code as-is. If you prefer to use a user-assigned managed identity, then:
- From line 5, remove
$AzureContext = (Connect-AzAccount -Identity).context, - Replace it with
$AzureContext = (Connect-AzAccount -Identity -AccountId <ClientId>).context, and - Enter the Client ID.
Note
For PowerShell 7.2 hybrid jobs, make changes in line 28. Replace $PSPrivateMetadata.JobId.Guid with $env:PSPrivateMetaData.
Handle transient errors in a time-dependent script
Your runbooks must be robust and capable of handling errors, including transient errors that can cause them to restart or fail. If a runbook fails, Azure Automation retries it.
If your runbook normally runs within a time constraint, have the script implement logic to check the execution time. This check ensures the running of operations such as startup, shutdown, or scale-out only during specific times.
Note
The local time on the Azure sandbox process is set to UTC. Calculations for date and time in your runbooks must take this fact into consideration.
Retry logic in runbook to avoid transient failures
Runbooks often make calls to remote systems such as Azure via ARM, Azure Resource Graph, SQL services and other web services. When the system that the runbooks are calling is busy, temporary unavailable or implementing throttling under load, the calls are vulnerable to have runtime errors. To build resiliency in the runbooks, you must implement retry logic when making the calls so that the runbooks can handle a transient problem without failing.
For more information, refer Retry pattern and General REST and retry guidelines.
Example 1: If your runbook makes only one or two calls
$searchServiceURL = "https://$searchServiceName.search.windows.net"
$resource = Get-AzureRmResource -ResourceType "Microsoft.Search/searchServices" -ResourceGroupName $searchResourceGroupName -ResourceName  $searchServiceName -ApiVersion 2015-08-19
$searchAPIKey = (Invoke-AzureRmResourceAction -Action listAdminKeys -ResourceId $resource.ResourceId -ApiVersion 2015-08-19 -Force).PrimaryKey
When you call Invoke-AzureRmResourceAction, you may observe transient failures. In such scenario, we recommend that you implement the following basic pattern around the call to the cmdlet.
$searchServiceURL = "https://$searchServiceName.search.windows.net"
$resource = Get-AzureRmResource -ResourceType "Microsoft.Search/searchServices" -ResourceGroupName $searchResourceGroupName -ResourceName  $searchServiceName -ApiVersion 2015-08-19

    # Adding in a retry
    $Stoploop = $false
    $Retrycount = 0

    do {
        try   {
               $searchAPIKey = (Invoke-AzureRmResourceAction -Action listAdminKeys -ResourceId $resource.ResourceId -ApiVersion 2015-08-19 -Force).PrimaryKey
               write-verbose "Invoke-AzureRmResourceAction on $resource.ResourceId completed"
               $Stoploop = $true
              }
        catch {
               if ($Retrycount -gt 3)
                 {
                  Write-verbose "Could not Invoke-AzureRmResourceAction on $resource.ResourceId after 3 retrys."
                  $Stoploop = $true
                 }
               else
                 {
                  Write-verbose "Could not Invoke-AzureRmResourceAction on $resource.ResourceId retrying in 30 seconds..."
                  Start-Sleep -Seconds 30
                  $Retrycount = $Retrycount + 1
                 }
               }
        }
    While ($Stoploop -eq $false)
Note
The attempt to retry the call is up to three times, sleeping for 30 seconds each time.
Example 2 : If the runbook is making frequent remote calls
If the runbook is making frequent remote calls then it could experience transient runtime issues. Create a function that implements the retry logic for each call that is made and pass the call to be made in as a script block to execute.
Function ResilientRemoteCall {

         param(
               $scriptblock
               )

         $Stoploop = $false
         $Retrycount = 0

         do {
             try   {
                    Invoke-Command -scriptblock $scriptblock
                    write-verbose "Invoked $scriptblock completed"
                    $Stoploop = $true
                   }
             catch {
                    if ($Retrycount -gt 3)
                      {
                       Write-verbose "Invoked $scriptblock failed 3 times and we will not try again."
                       $Stoploop = $true
                      }
                    else
                      {
                       Write-verbose "Invoked $scriptblock failed  retrying in 30 seconds..."
                       Start-Sleep -Seconds 30
                       $Retrycount = $Retrycount + 1
                      }
                    }
             }
         While ($Stoploop -eq $false)
}
You can then pass each remote call into the function as
ResilientRemoteCall { Get-AzVm }
or
ResilientRemoteCall { $searchAPIKey = (Invoke-AzureRmResourceAction -Action listAdminKeys -ResourceId $resource.ResourceId -ApiVersion 2015-08-19 -Force).PrimaryKey}
Work with multiple subscriptions
Your runbook must be able to work with subscriptions. For example, to handle multiple subscriptions, the runbook uses the Disable-AzContextAutosave cmdlet. This cmdlet ensures that the authentication context isn't retrieved from another runbook running in the same sandbox.
# Ensures you do not inherit an AzContext in your runbook
Disable-AzContextAutosave -Scope Process

# Connect to Azure with system-assigned managed identity
$AzureContext = (Connect-AzAccount -Identity).context

# set and store context
$AzureContext = Set-AzContext -SubscriptionName $AzureContext.Subscription `
    -DefaultProfile $AzureContext

$childRunbookName = 'childRunbookDemo'
$resourceGroupName = "resourceGroupName"
$automationAccountName = "automationAccountName"

$startParams = @{
    ResourceGroupName     = $resourceGroupName
    AutomationAccountName = $automationAccountName
    Name                  = $childRunbookName
    DefaultProfile        = $AzureContext
}
Start-AzAutomationRunbook @startParams
If you want the runbook to execute with the system-assigned managed identity, leave the code as-is. If you prefer to use a user-assigned managed identity, then:
- From line 5, remove
$AzureContext = (Connect-AzAccount -Identity).context, - Replace it with
$AzureContext = (Connect-AzAccount -Identity -AccountId <ClientId>).context, and - Enter the Client ID.
Work with a custom script
Note
You can't normally run custom scripts and runbooks on the host with a Log Analytics agent installed.
To use a custom script:
- Create an Automation account.
- Deploy the Hybrid Runbook Worker role.
Test a runbook
When you test a runbook, the Draft version is executed and any actions that it performs are completed. No job history is created, but the output and warning and error streams are displayed in the Test output pane. Messages to the verbose stream are displayed in the Output pane only if the VerbosePreference variable is set to Continue.
Even though the Draft version is being run, the runbook still executes normally and performs any actions against resources in the environment. For this reason, you should only test runbooks on non-production resources.
Note
All runbook execution actions are logged in the Activity Log of the automation account with the operation name Create an Azure Automation job. However, runbook execution in a test pane where the draft version of the runbook is executed would be logged in the activity logs with the operation name Write an Azure Automation runbook draft. Select Operation and JSON tab to see the scope ending with ../runbooks/(runbook name)/draft/testjob.
The procedure to test each type of runbook is the same. There's no difference in testing between the textual editor and the graphical editor in the Azure portal.
- Open the Draft version of the runbook in either the textual editor or the graphical editor.
- Click Test to open the Test page.
- If the runbook has parameters, they're listed in the left pane, where you can provide values to be used for the test.
- If you want to run the test on a Hybrid Runbook Worker, change Run Settings to Hybrid Worker and select the name of the target group. Otherwise, keep the default Azure to run the test in the cloud.
- Click Start to begin the test.
- You can use the buttons under the Output pane to stop or suspend a PowerShell Workflow or graphical runbook while it's being tested. When you suspend the runbook, it completes the current activity before being suspended. Once the runbook is suspended, you can stop it or restart it.
- Inspect the output from the runbook in the Output pane.
Publish a runbook
When you create or import a new runbook, you have to publish it before you can run it. Each runbook in Azure Automation has a Draft version and a Published version. Only the Published version is available to be run, and only the Draft version can be edited. The Published version is unaffected by any changes to the Draft version. When the Draft version should be made available, you publish it, overwriting the current Published version with the Draft version.
Publish a runbook in the Azure portal
- In the Azure portal, search for and select Automation Accounts.
- On the Automation Accounts page, select your Automation account from the list.
- Open the runbook in your Automation account.
- Click Edit.
- Click Publish and then select Yes in response to the verification message.
Publish a runbook using PowerShell
Use the Publish-AzAutomationRunbook cmdlet to publish your runbook.
$accountName = "MyAutomationAccount"
$runbookName = "Sample_TestRunbook"
$rgName = "MyResourceGroup"

$publishParams = @{
    AutomationAccountName = $accountName
    ResourceGroupName     = $rgName
    Name                  = $runbookName
}
Publish-AzAutomationRunbook @publishParams
Schedule a runbook in the Azure portal
When your runbook has been published, you can schedule it for operation:
- In the Azure portal, search for and select Automation Accounts.
- On the Automation Accounts page, select your Automation account from the list.
- Select the runbook from your list of runbooks.
- Select Schedules under Resources.
- Select Add a schedule.
- In the Schedule Runbook pane, select Link a schedule to your runbook.
- Choose Create a new schedule in the Schedule pane.
- Enter a name, description, and other parameters in the New schedule pane.
- Once the schedule is created, highlight it and click OK. It should now be linked to your runbook.
- Look for an email in your mailbox to notify you of the runbook status.
Restore deleted runbook
You can recover a deleted runbook through PowerShell scripts. To recover a runbook, ensure that the following conditions are met:
- The runbooks to be restored were deleted in the past 29 days.
- The Automation account for that runbook exists.
- The Automation Contributor role permission is granted to the System-assigned managed identity of the Automation account.
PowerShell script
- Execute the PowerShell script as a job in your Automation account to restore the deleted runbooks.
- Download the PowerShell script from GitHub. Alternatively, you can import the PowerShell script named Restore Automation runbook from Runbook Gallery. Provide the name of the runbook that is to be restored and run it as a job in Azure Automation to restore the deleted runbooks.
- Download the script from GitHub or import the PowerShell script named List Deleted Automation Runbook from Runbook Gallery, to identify the names of the runbooks that were deleted in last 29 days.
Obtain job statuses
View statuses in the Azure portal
Details of job handling in Azure Automation are provided in Jobs. When you are ready to see your runbook jobs, use Azure portal and access your Automation account. On the right, you can see a summary of all the runbook jobs in Job Statistics.
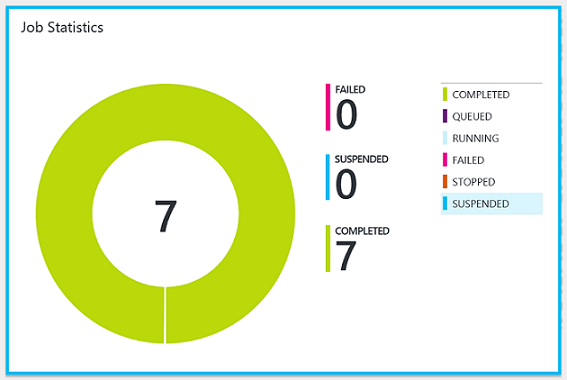
The summary displays a count and graphical representation of the job status for each job executed.
Clicking the tile presents the Jobs page, which includes a summarized list of all jobs executed. This page shows the status, runbook name, start time, and completion time for each job.
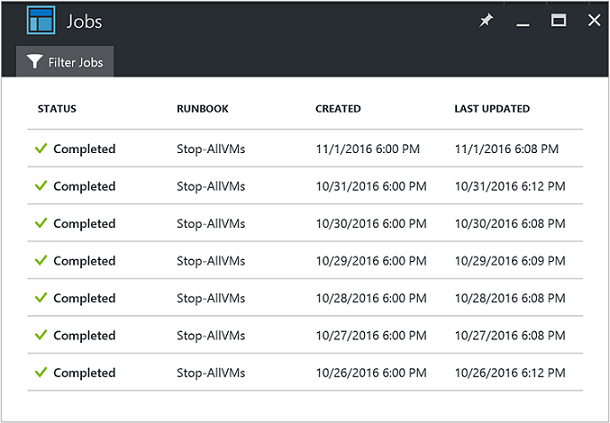
You can filter the list of jobs by selecting Filter jobs. Filter on a specific runbook, job status, or a choice from the dropdown list, and provide the time range for the search.

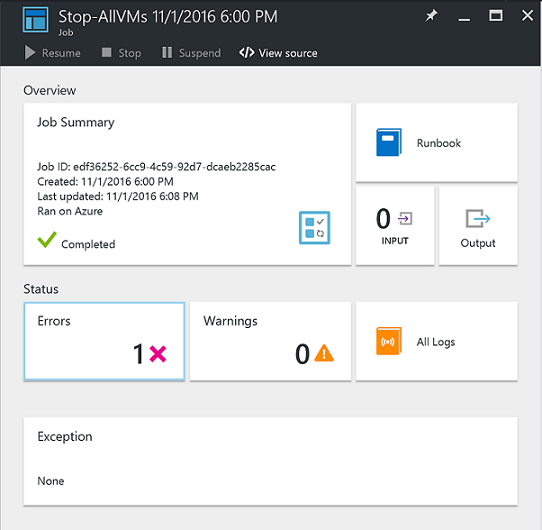
Alternatively, you can view job summary details for a specific runbook by selecting that runbook from the Runbooks page in your Automation account and then selecting Jobs. This action presents the Jobs page. From here, you can click a job record to view its details and output.
Retrieve job statuses using PowerShell
Use the Get-AzAutomationJob cmdlet to retrieve the jobs created for a runbook and the details of a particular job. If you start a runbook using Start-AzAutomationRunbook, it returns the resulting job. Use Get-AzAutomationJobOutput to retrieve job output.
The following example gets the last job for a sample runbook and displays its status, the values provided for the runbook parameters, and the job output.
$getJobParams = @{
    AutomationAccountName = 'MyAutomationAccount'
    ResourceGroupName     = 'MyResourceGroup'
    Runbookname           = 'Test-Runbook'
}
$job = (Get-AzAutomationJob @getJobParams | Sort-Object LastModifiedDate -Desc)[0]
$job | Select-Object JobId, Status, JobParameters

$getOutputParams = @{
    AutomationAccountName = 'MyAutomationAccount'
    ResourceGroupName     = 'MyResourceGroup'
    Id                    = $job.JobId
    Stream                = 'Output'
}
Get-AzAutomationJobOutput @getOutputParams
The following example retrieves the output for a specific job and returns each record. If there's an exception for one of the records, the script writes the exception instead of the value. This behavior is useful since exceptions can provide additional information that might not be logged normally during output.
$params = @{
    AutomationAccountName = 'MyAutomationAccount'
    ResourceGroupName     = 'MyResourceGroup'
    Stream                = 'Any'
}
$output = Get-AzAutomationJobOutput @params

foreach ($item in $output) {
    $jobOutParams = @{
        AutomationAccountName = 'MyAutomationAccount'
        ResourceGroupName     = 'MyResourceGroup'
        Id                    = $item.StreamRecordId
    }
    $fullRecord = Get-AzAutomationJobOutputRecord @jobOutParams

    if ($fullRecord.Type -eq 'Error') {
        $fullRecord.Value.Exception
    } else {
        $fullRecord.Value
    }
}
Next steps
- For sample queries, see Sample queries for job logs and job streams
- To learn details of runbook management, see Runbook execution in Azure Automation.
- To prepare a PowerShell runbook, see Edit textual runbooks in Azure Automation.
- To troubleshoot issues with runbook execution, see Troubleshoot runbook issues.