Note
Access to this page requires authorization. You can try signing in or changing directories.
Access to this page requires authorization. You can try changing directories.
Important
Azure Automation Run as accounts, including Classic Run as accounts have retired on 30 September 2023 and replaced with Managed Identities. You would no longer be able to create or renew Run as accounts through the Azure portal.
For more information about migration cadence and the support timeline for Run As account creation and certificate renewal, see the frequently asked questions.
Run As accounts in Azure Automation provide authentication for managing resources deployed through Azure Resource Manager or the classic deployment model. Whenever a Run As account is created, a Microsoft Entra application is registered, and a self-signed certificate is generated. The certificate is valid for one month. Renewing the certificate every month before it expires keeps the Automation account working but adds overhead.
You can now configure Automation accounts to use a managed identity, which is the default option when you create an Automation account. With this feature, an Automation account can authenticate to Azure resources without the need to exchange any credentials. A managed identity removes the overhead of renewing the certificate or managing the service principal.
A managed identity can be system assigned or user assigned. When a new Automation account is created, a system-assigned managed identity is enabled.
Prerequisites
Before you migrate from a Run As account or Classic Run As account to a managed identity:
Create a system-assigned or user-assigned managed identity, or create both types. To learn more about the differences between them, see Managed identity types.
Note
- User-assigned identities are supported for cloud jobs only. It isn't possible to use the Automation account's user-managed identity on a hybrid runbook worker. To use hybrid jobs, you must create system-assigned identities.
- There are two ways to use managed identities in hybrid runbook worker scripts: either the system-assigned managed identity for the Automation account or the virtual machine (VM) managed identity for an Azure VM running as a hybrid runbook worker.
- The VM's user-assigned managed identity and the VM's system-assigned managed identity will not work in an Automation account that's configured with an Automation account's managed identity. When you enable the Automation account's managed identity, you can use only the Automation account's system-assigned managed identity and not the VM managed identity. For more information, see Use runbook authentication with managed identities.
Assign the same role to the managed identity to access the Azure resources that match the Run As account. Use this script to enable the System assigned identity in an Automation account and assign the same set of permissions present in Azure Automation Run as account to System Assigned identity of the Automation account.
For example, if the Automation account is required only to start or stop an Azure VM, then the permissions assigned to the Run As account need to be only for starting or stopping the VM. Similarly, assign read-only permissions if a runbook is reading from Azure Blob Storage. For more information, see Azure Automation security guidelines.
If you're using Classic Run As accounts, ensure that you have migrated resources deployed through classic deployment model to Azure Resource Manager.
Use this script to find out which Automation accounts are using a Run As account. If your Azure Automation accounts contain a Run As account, it has the built-in contributor role assigned to it by default. You can use the script to check the Azure Automation Run As accounts and determine if their role assignment is the default one or if it has been changed to a different role definition.
Use this script to find out if all runbooks in your Automation account are using the Run As account.
Migrate from an Automation Run As account to a managed identity
To migrate from an Automation Run As account or Classic Run As account to a managed identity for your runbook authentication, follow these steps:
Change the runbook code to use a managed identity.
We recommend that you test the managed identity to verify if the runbook works as expected by creating a copy of your production runbook. Update your test runbook code to authenticate by using the managed identity. This method ensures that you don't override
AzureRunAsConnectionin your production runbook and break the existing Automation instance. After you're sure that the runbook code runs as expected via the managed identity, update your production runbook to use the managed identity.For managed identity support, use the
Connect-AzAccountcmdlet. To learn more about this cmdlet, see Connect-AzAccount in the PowerShell reference.- If you're using
Azmodules, update to the latest version by following the steps in the Update Azure PowerShell modules article. - If you're using AzureRM modules, update
AzureRM.Profileto the latest version and replace it by using theAdd-AzureRMAccountcmdlet withConnect-AzureRMAccount –Identity.
To understand the changes to the runbook code that are required before you can use managed identities, use the sample scripts.
- If you're using
When you're sure that the runbook is running successfully by using managed identities, you can safely delete the Run As account if no other runbook is using that account.
Sample scripts
The following examples of runbook scripts fetch the Resource Manager resources by using the Run As account (service principal) and the managed identity. You would notice the difference in runbook code at the beginning of the runbook, where it authenticates against the resource.
Note
Enable appropriate RBAC permissions for the system identity of this Automation account. Otherwise, the runbook might fail.
try
{
    "Logging in to Azure..."
    Connect-AzAccount -Identity
}
catch {
    Write-Error -Message $_.Exception
    throw $_.Exception
}

#Get all Resource Manager resources from all resource groups
$ResourceGroups = Get-AzResourceGroup

foreach ($ResourceGroup in $ResourceGroups)
{
    Write-Output ("Showing resources in resource group " + $ResourceGroup.ResourceGroupName)
    $Resources = Get-AzResource -ResourceGroupName $ResourceGroup.ResourceGroupName
    foreach ($Resource in $Resources)
    {
        Write-Output ($Resource.Name + " of type " +  $Resource.ResourceType)
    }
    Write-Output ("")
}
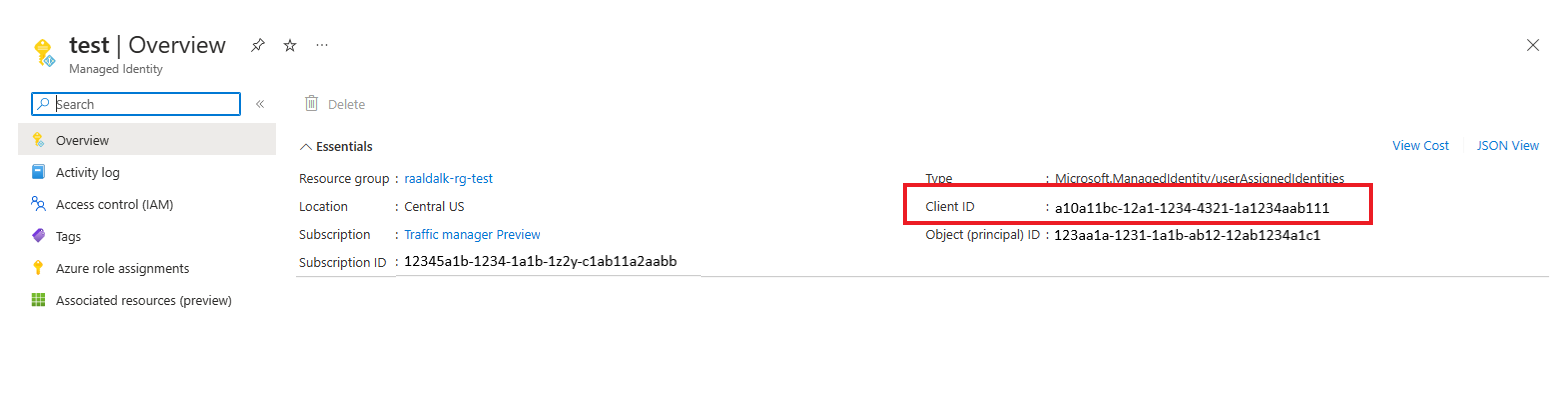
View client ID of user assigned identity
In your Automation account, under Account Settings, select Identity.
In User assigned tab, select user assigned identity.
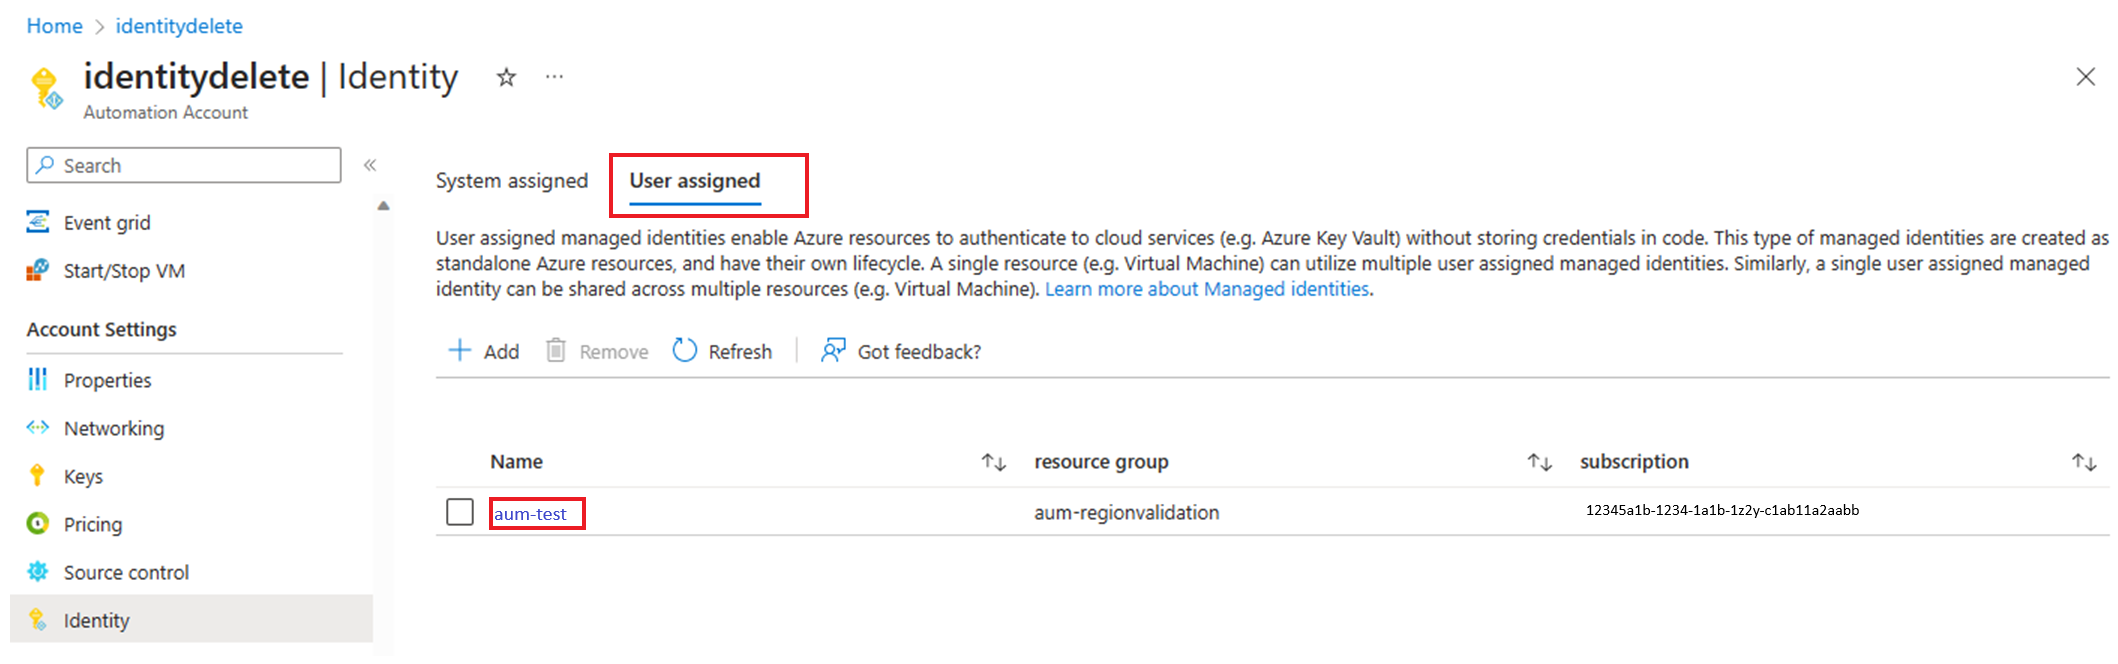
Go to Overview> Essentials, to view the Client ID.


Graphical runbooks
Check if a Run As account is used in graphical runbooks
Check each of the activities within the runbook to see if it uses the Run As account when it calls any logon cmdlets or aliases, such as
Add-AzRmAccount/Connect-AzRmAccount/Add-AzAccount/Connect-AzAccount.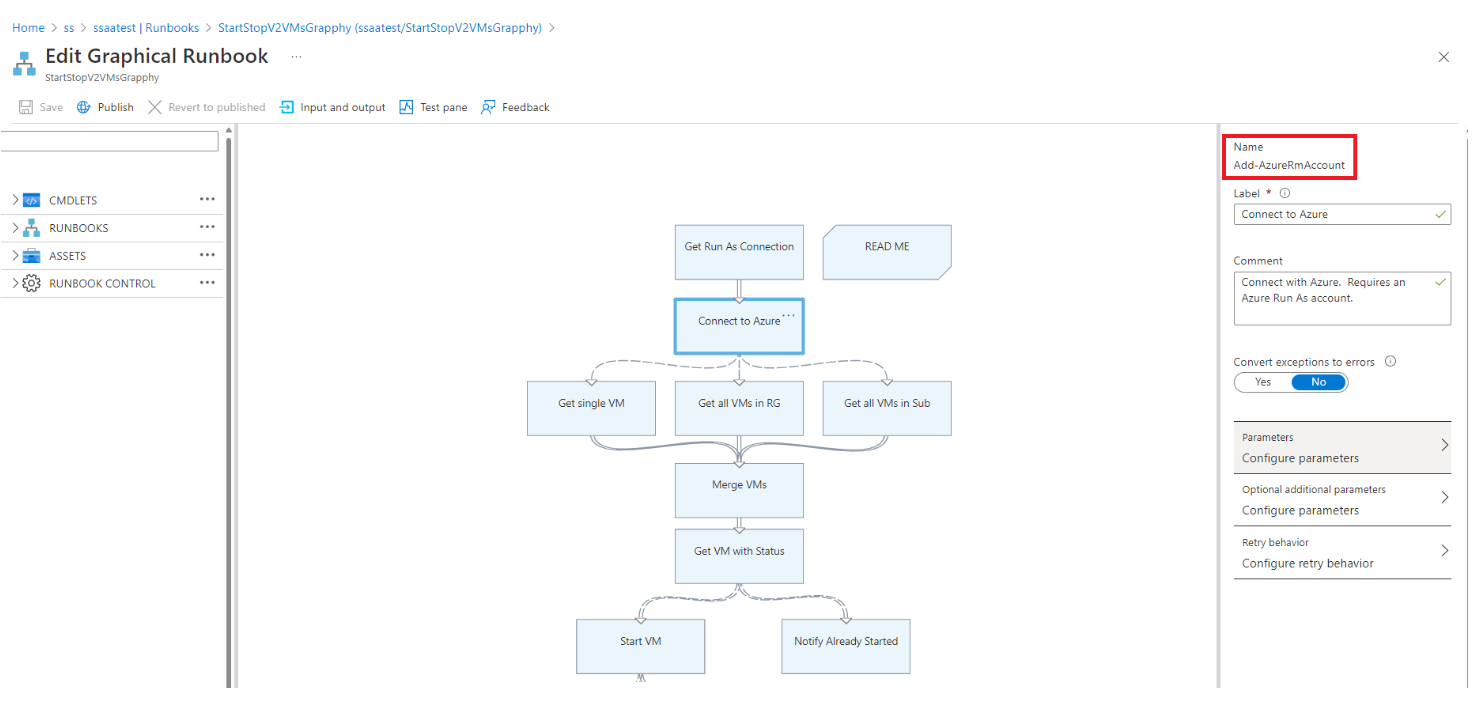
Examine the parameters that the cmdlet uses.
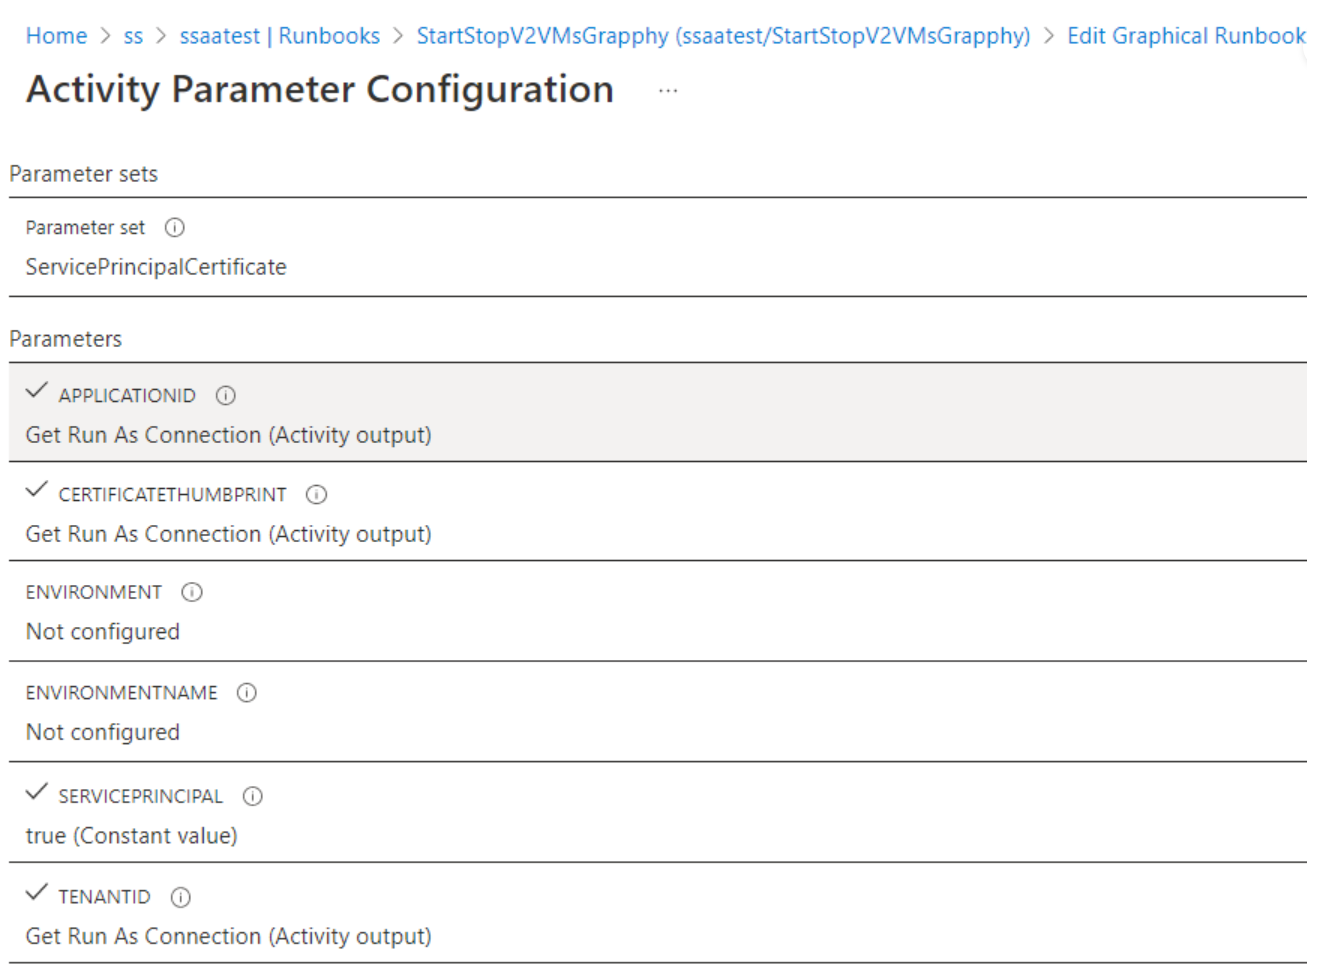
For use with the Run As account, the cmdlet uses the
ServicePrincipalCertificateparameter set toApplicationId.CertificateThumbprintwill be fromRunAsAccountConnection.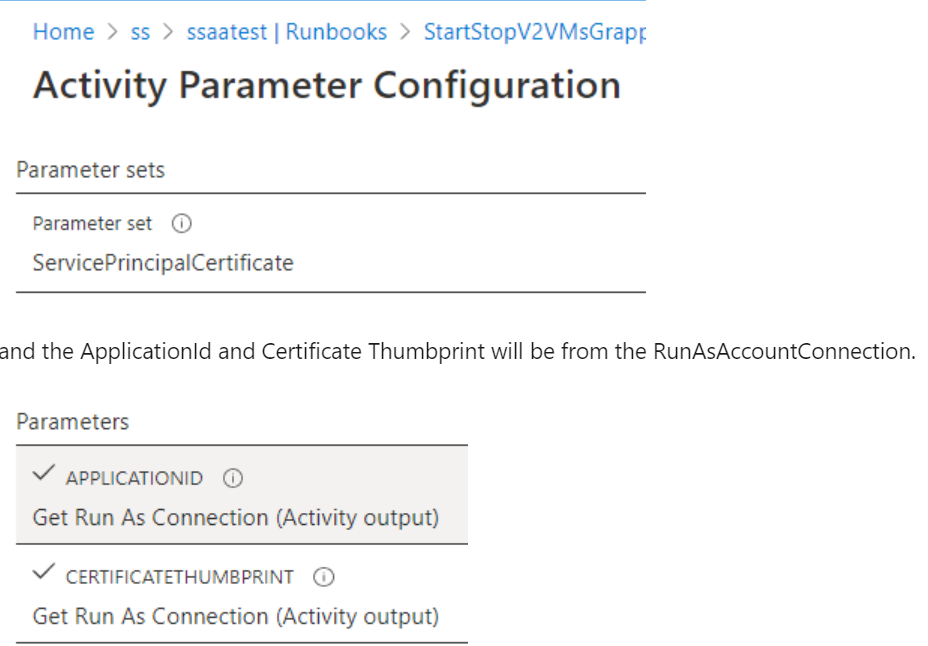


Edit a graphical runbook to use a managed identity
You must test the managed identity to verify that the graphical runbook is working as expected. Create a copy of your production runbook to use the managed identity, and then update your test graphical runbook code to authenticate by using the managed identity. You can add this functionality to a graphical runbook by adding the Connect-AzAccount cmdlet.
The following steps include an example to show how a graphical runbook that uses a Run As account can use managed identities:
Sign in to the Azure portal.
Open the Automation account, and then select Process Automation > Runbooks.
Select a runbook. For example, select the Start Azure V2 VMs runbook from the list, and then select Edit or go to Browse Gallery and select Start Azure V2 VMs.
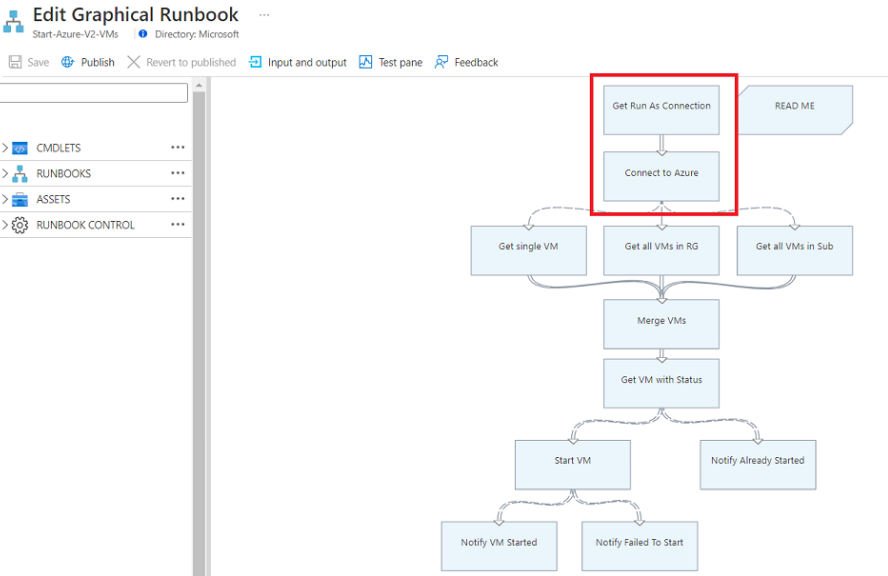
Replace the Run As connection that uses
AzureRunAsConnectionand the connection asset that internally uses the PowerShellGet-AutomationConnectioncmdlet with theConnect-AzAccountcmdlet.Select Delete to delete the
Get Run As ConnectionandConnect to Azureactivities.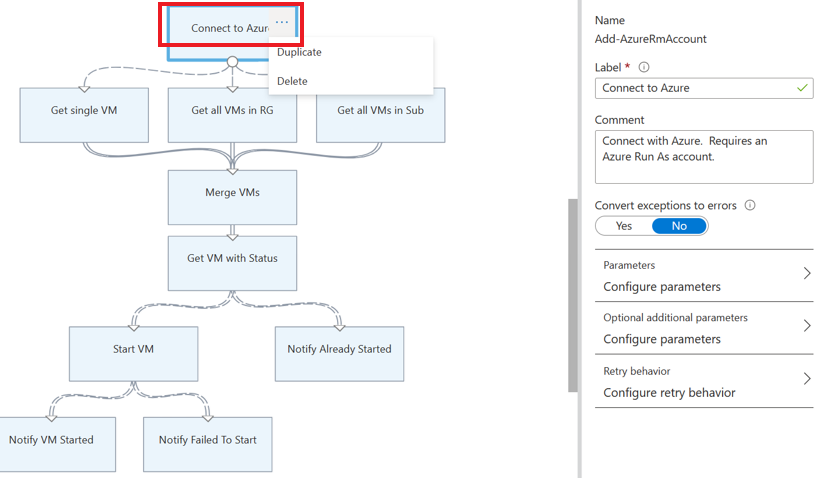
In the left panel, under RUNBOOK CONTROL, select Code and then select Add to canvas.
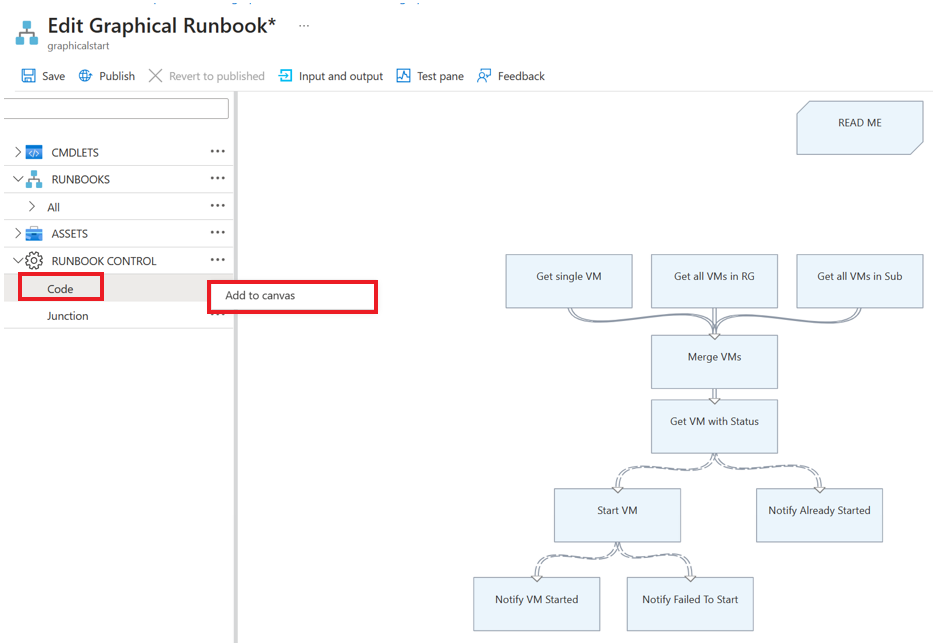
Edit the code activity, assign any appropriate label name, and select Author activity logic.

In the Code Editor page, enter the following PowerShell code and select OK.
try
{
   Write-Output ("Logging in to Azure...")
   Connect-AzAccount -Identity
}
catch {
   Write-Error -Message $_.Exception
   throw $_.Exception
}
Connect the new activity to the activities that were connected by Connect to Azure earlier and save the runbook.
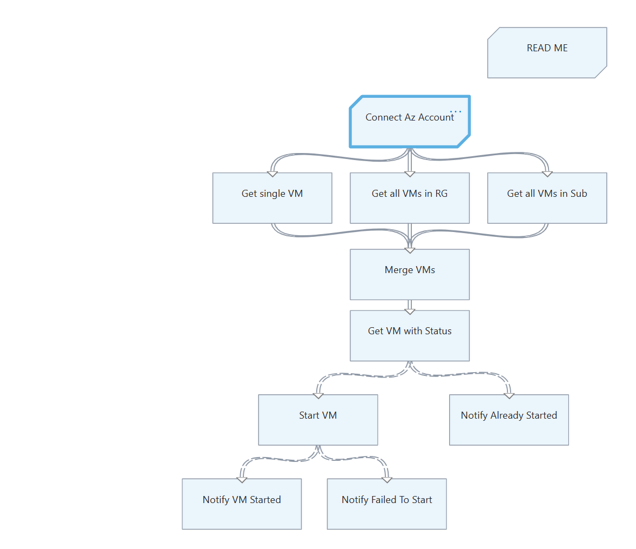


For example, in the runbook Start Azure V2 VMs in the runbook gallery, you must replace the Get Run As Connection and Connect to Azure activities with the code activity which uses Connect-AzAccount cmdlet as described above.
For more information, see the sample runbook name AzureAutomationTutorialWithIdentityGraphical that's created with the Automation account.
Note
AzureRM PowerShell modules are retiring on 29 February 2024. If you are using AzureRM PowerShell modules in Graphical runbooks, you must upgrade them to use Az PowerShell modules. Learn more.
Next steps
Review the frequently asked questions for migrating to managed identities
If your runbooks aren't finishing successfully, review Troubleshoot Azure Automation managed identity issues.
To learn more about system-assigned managed identities, see Using a system-assigned managed identity for an Azure Automation account.
To learn more about user-assigned managed identities, see Using a user-assigned managed identity for an Azure Automation account.
For information about Azure Automation account security, see Azure Automation account authentication overview.