Note
Access to this page requires authorization. You can try signing in or changing directories.
Access to this page requires authorization. You can try changing directories.
Note
Azure Automation State Configuration will be retired on September 30, 2027, please transition to Azure Machine Configuration by that date. For more information, see the blog post announcement. The Azure Machine Configuration service combines features of DSC Extension, Azure Automation State Configuration, and the most commonly requested features from customer feedback. Azure Machine Configuration also includes hybrid machine support through Arc-enabled servers.
Important
The Add, Compose configuration, and Gallery navigation links will be removed from the portal on March 31, 2025.
Caution
Azure Automation DSC for Linux has retired. For more information, see the announcement.
By enabling Azure Automation State Configuration, you can manage and monitor the configurations of your Windows servers using Desired State Configuration (DSC). Configurations that drift from a desired configuration can be identified or auto-corrected. This quickstart steps through enabling an Azure VM and deploying a LAMP stack using Azure Automation State Configuration.
Prerequisites
To complete this quickstart, you need:
- An Azure subscription. If you don't have an Azure subscription, create a free account.
- An Azure Resource Manager virtual machine.
Sign in to Azure
Sign in to the Azure portal.
Enable a virtual machine
There are many different methods to enable a machine for Automation State Configuration. This quickstart tells how to enable the feature for an Azure VM using an Automation account. You can learn more about different methods to enable your machines for State Configuration by reading Enable machines for management by Azure Automation State Configuration.
- In the Azure portal, navigate to Automation accounts.
- From the list of Automation accounts, select an account.
- From the left pane of the Automation account, select State configuration (DSC).
- Click Add to open the VM select page.
- Find the virtual machine for which to enable DSC. You can use the search field and filter options to find a specific virtual machine.
- Click on the virtual machine, and then click Connect.
- Select the DSC settings appropriate for the virtual machine. If you have already prepared a configuration, you can specify it as
Node Configuration Name. You can set the configuration mode to control the configuration behavior for the machine. - Click OK. While the DSC extension is deployed to the virtual machine, the status reported is
Connecting.
Import modules
Modules contain DSC resources and many can be found in the PowerShell Gallery. Any resources that are used in your configurations must be imported to the Automation account before compiling. For this quickstart, the module named nx is required.
- From the left pane of the Automation account, select Modules Gallery under Shared Resources.
- Search for the module to import by typing part of its name:
nx. - Click on the module to import.
- Click Import.
Import the configuration
This quickstart uses a DSC configuration that configures Apache HTTP Server, MySQL, and PHP on the machine. See DSC configurations.
In a text editor, type the following and save it locally as AMPServer.ps1.
configuration 'LAMPServer' {
   Import-DSCResource -module "nx"

   Node localhost {

        $requiredPackages = @("httpd","mod_ssl","php","php-mysql","mariadb","mariadb-server")
        $enabledServices = @("httpd","mariadb")

        #Ensure packages are installed
        ForEach ($package in $requiredPackages){
            nxPackage $Package{
                Ensure = "Present"
                Name = $Package
                PackageManager = "yum"
            }
        }

        #Ensure daemons are enabled
        ForEach ($service in $enabledServices){
            nxService $service{
                Enabled = $true
                Name = $service
                Controller = "SystemD"
                State = "running"
            }
        }
   }
}
To import the configuration:
- In the left pane of the Automation account, select State configuration (DSC) and then click the Configurations tab.
- Click + Add.
- Select the configuration file that you saved in the prior step.
- Click OK.
Compile a configuration
You must compile a DSC configuration to a node configuration (MOF document) before it can be assigned to a node. Compilation validates the configuration and allows for the input of parameter values. To learn more about compiling a configuration, see Compiling configurations in State Configuration.
- In the left pane of the Automation account, select State Configuration (DSC) and then click the Configurations tab.
- Select the configuration
LAMPServer. - From the menu options, select Compile and then click Yes.
- In the Configuration view, you see a new compilation job queued. When the job has completed successfully, you are ready to move on to the next step. If there are any failures, you can click on the compilation job for details.
Assign a node configuration
You can assign a compiled node configuration to a DSC node. Assignment applies the configuration to the machine and monitors or auto-corrects for any drift from that configuration.
- In the left pane of the Automation account, select State Configuration (DSC) and then click the Nodes tab.
- Select the node to which to assign a configuration.
- Click Assign Node Configuration
- Select the node configuration
LAMPServer.localhostand click OK. State Configuration now assigns the compiled configuration to the node, and the node status changes toPending. On the next periodic check, the node retrieves the configuration, applies it, and reports status.
It can take up to 30 minutes for the node to retrieve the configuration, depending on the node settings.
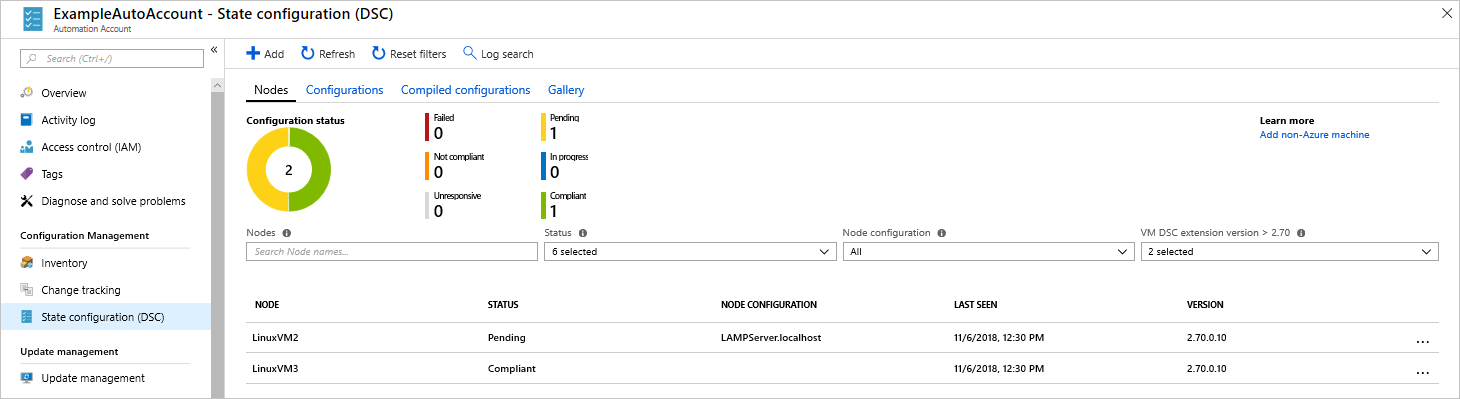
View node status
You can view the status of all State Configuration-managed nodes in your Automation account. The information is displayed by choosing State Configuration (DSC) and clicking the Nodes tab. You can filter the display by status, node configuration, or name search.
Next steps
In this quickstart, you enabled an Azure VM for State Configuration, created a configuration for a LAMP stack, and deployed the configuration to the VM. To learn how you can use Azure Automation State Configuration to enable continuous deployment, continue to the article: