Note
Access to this page requires authorization. You can try signing in or changing directories.
Access to this page requires authorization. You can try changing directories.
To schedule a runbook in Azure Automation to start at a specified time, you link it to one or more schedules. A schedule can be configured to either run once or on a recurring hourly or daily schedule for runbooks in the Azure portal. You can also schedule them for weekly, monthly, specific days of the week or days of the month, or a particular day of the month. A runbook can be linked to multiple schedules, and a schedule can have multiple runbooks linked to it.
Note
Azure Automation supports Daylight Savings Time and schedules it appropriately for automation operations.
Note
Schedules currently are not enabled for Azure Automation DSC configurations.
PowerShell cmdlets used to access schedules
The cmdlets in the following table create and manage Automation schedules with PowerShell. They ship as part of the Az modules.
| Cmdlets | Description |
|---|---|
| Get-AzAutomationSchedule | Retrieves a schedule. |
| Get-AzAutomationScheduledRunbook | Retrieves scheduled runbooks. |
| New-AzAutomationSchedule | Creates a new schedule. |
| Register-AzAutomationScheduledRunbook | Associates a runbook with a schedule. |
| Remove-AzAutomationSchedule | Removes a schedule. |
| Set-AzAutomationSchedule | Sets the properties for an existing schedule. |
| Unregister-AzAutomationScheduledRunbook | Dissociates a runbook from a schedule. |
Create a schedule
You can create a new schedule for your runbooks from the Azure portal, with PowerShell, or using an Azure Resource Manager (ARM) template. To avoid affecting your runbooks and the processes they automate, you should first test any runbooks that have linked schedules with an Automation account dedicated for testing. A test validates that your scheduled runbooks continue to work correctly. If you see a problem, you can troubleshoot and apply any changes required before you migrate the updated runbook version to production.
Note
Your Automation account doesn't automatically get any new versions of modules unless you've updated them manually by selecting the Update Azure modules option from Modules. Azure Automation uses the latest modules in your Automation account when a new scheduled job is run.
Create a new schedule in the Azure portal
From your Automation account, on the left-hand pane select Schedules under Shared Resources.
On the Schedules page, select Add a schedule.
On the New schedule page, enter a name and optionally enter a description for the new schedule.
Note
Automation schedules do not currently support using special characters in the schedule name.
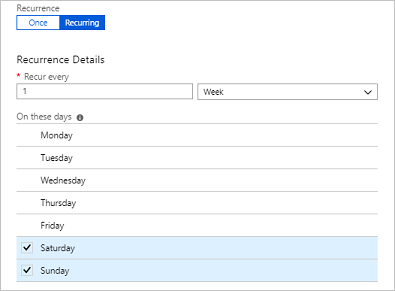
Select whether the schedule runs once or on a reoccurring schedule by selecting Once or Recurring. If you select Once, specify a start time and then select Create. If you select Recurring, specify a start time. For Recur every, select how often you want the runbook to repeat. Select by hour, day, week, or month.
- If you select Week, the days of the week are presented for you to choose from. Select as many days as you want. The first run of your schedule will happen on the first day selected after the start time. For example, to choose a weekend schedule, select Saturday and Sunday.
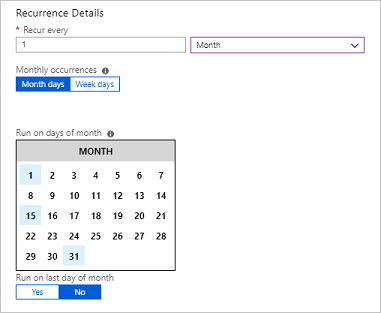
- If you select Month, you're given different options. For the Monthly occurrences option, select either Month days or Week days. If you select Month days, a calendar appears so that you can choose as many days as you want. If you choose a date such as the 31st that doesn't occur in the current month, the schedule won't run. If you want the schedule to run on the last day, select Yes under Run on last day of month. If you select Week days, the Recur every option appears. Choose First, Second, Third, Fourth, or Last. Finally, choose a day to repeat on.
When you're finished, select Create.
Create a new schedule with PowerShell
Use the New-AzAutomationSchedule cmdlet to create schedules. You specify the start time for the schedule and the frequency it should run. The following examples show how to create many different schedule scenarios.
Note
Automation schedules do not currently support using special characters in the schedule name.
Create a one-time schedule
The following example creates a one-time schedule.
$TimeZone = ([System.TimeZoneInfo]::Local).Id
New-AzAutomationSchedule -AutomationAccountName "ContosoAutomation" -Name "Schedule01" -StartTime "23:00" -OneTime -ResourceGroupName "ResourceGroup01" -TimeZone $TimeZone
Create a recurring schedule
The following example shows how to create a recurring schedule that runs every day at 1:00 PM for a year.
$StartTime = Get-Date "13:00:00"
$EndTime = $StartTime.AddYears(1)
New-AzAutomationSchedule -AutomationAccountName "ContosoAutomation" -Name "Schedule02" -StartTime $StartTime -ExpiryTime $EndTime -DayInterval 1 -ResourceGroupName "ResourceGroup01"
Create a weekly recurring schedule
The following example shows how to create a weekly schedule that runs on weekdays only.
$StartTime = (Get-Date "13:00:00").AddDays(1)
[System.DayOfWeek[]]$WeekDays = @([System.DayOfWeek]::Monday..[System.DayOfWeek]::Friday)
New-AzAutomationSchedule -AutomationAccountName "ContosoAutomation" -Name "Schedule03" -StartTime $StartTime -WeekInterval 1 -DaysOfWeek $WeekDays -ResourceGroupName "ResourceGroup01"
Create a weekly recurring schedule for weekends
The following example shows how to create a weekly schedule that runs on weekends only.
$StartTime = (Get-Date "18:00:00").AddDays(1)
[System.DayOfWeek[]]$WeekendDays = @([System.DayOfWeek]::Saturday,[System.DayOfWeek]::Sunday)
New-AzAutomationSchedule -AutomationAccountName "ContosoAutomation" -Name "Weekends 6PM" -StartTime $StartTime -WeekInterval 1 -DaysOfWeek $WeekendDays -ResourceGroupName "ResourceGroup01"
Create a recurring schedule for the first, fifteenth, and last days of the month
The following example shows how to create a recurring schedule that runs on the first, fifteenth, and last day of a month.
$StartTime = (Get-Date "18:00:00").AddDays(1)
New-AzAutomationSchedule -AutomationAccountName "TestAzureAuto" -Name "1st, 15th and Last" -StartTime $StartTime -DaysOfMonth @("One", "Fifteenth", "Last") -ResourceGroupName "TestAzureAuto" -MonthInterval 1
Create a schedule with a Resource Manager template
In this example, we use an Automation Resource Manager (ARM) template that creates a new job schedule. For general information about this template to manage Automation job schedules, see Microsoft.Automation automationAccounts/jobSchedules template reference.
Copy this template file into a text editor:
{
  "name": "5d5f3a05-111d-4892-8dcc-9064fa591b96",
  "type": "Microsoft.Automation/automationAccounts/jobSchedules",
  "apiVersion": "2015-10-31",
  "properties": {
    "schedule": {
      "name": "scheduleName"
    },
    "runbook": {
      "name": "runbookName"
    },
    "runOn": "hybridWorkerGroup",
    "parameters": {}
  }
}
Edit the following parameter values and save the template as a JSON file:
Job schedule object name: A GUID (Globally Unique Identifier) is used as the name of the job schedule object.
Important
For each job schedule deployed with an ARM template, the GUID must be unique. Even if you're rescheduling an existing schedule, you'll need to change the GUID. This applies even if you've previously deleted an existing job schedule that was created with the same template. Reusing the same GUID results in a failed deployment.
There are services online that can generate a new GUID for you, such as this Free Online GUID Generator.Schedule name: Represents the name of the Automation job schedule that will be linked to the specified runbook.
Runbook name: Represents the name of the Automation runbook the job schedule is to be associated with.
Once the file has been saved, you can create the runbook job schedule with the following PowerShell command. The command uses the TemplateFile parameter to specify the path and filename of the template.
New-AzResourceGroupDeployment -ResourceGroupName "ContosoEngineering" -TemplateFile "<path>\RunbookJobSchedule.json"
Link a schedule to a runbook
A runbook can be linked to multiple schedules, and a schedule can have multiple runbooks linked to it. If a runbook has parameters, you can provide values for them. You must provide values for any mandatory parameters, and you also can provide values for any optional parameters. These values are used each time the runbook is started by this schedule. You can attach the same runbook to another schedule and specify different parameter values.
Link a schedule to a runbook with the Azure portal
- In the Azure portal, from your automation account, select Runbooks under Process Automation.
- Select the name of the runbook to schedule.
- If the runbook isn't currently linked to a schedule, you're offered the option to create a new schedule or link to an existing schedule.
- If the runbook has parameters, you can select the option Modify run settings (Default:Azure) and the Parameters pane appears. You can enter parameter information here.
Link a schedule to a runbook with PowerShell
Use the Register-AzAutomationScheduledRunbook cmdlet to link a schedule. You can specify values for the runbook’s parameters with the Parameters parameter. For more information on how to specify parameter values, see Starting a Runbook in Azure Automation. The following example shows how to link a schedule to a runbook by using an Azure Resource Manager cmdlet with parameters.
$automationAccountName = "MyAutomationAccount"
$runbookName = "Test-Runbook"
$scheduleName = "Sample-DailySchedule"
$params = @{"FirstName"="Joe";"LastName"="Smith";"RepeatCount"=2;"Show"=$true}
Register-AzAutomationScheduledRunbook -AutomationAccountName $automationAccountName `
-Name $runbookName -ScheduleName $scheduleName -Parameters $params `
-ResourceGroupName "ResourceGroup01"
Schedule runbooks to run more frequently
The most frequent interval for which a schedule in Azure Automation can be configured is one hour. If you require schedules to run more frequently than that, there are two options:
Create a webhook for the runbook, and use Azure Logic Apps to call the webhook. Azure Logic Apps provides more fine-grained granularity to define a schedule.
Create four schedules that all start within 15 minutes of each other and run once every hour. This scenario allows the runbook to run every 15 minutes with the different schedules.
Disable a schedule
When you disable a schedule, any runbook linked to it no longer runs on that schedule. You can manually disable a schedule or set an expiration time for schedules with a frequency when you create them. When the expiration time is reached, the schedule is disabled.
Disable a schedule from the Azure portal
- In your Automation account, on the left-hand pane select Schedules under Shared Resources.
- Select the name of a schedule to open the details pane.
- Change Enabled to No.
Note
If you want to disable a schedule that has a start time in the past, you must change the start date to a time in the future before you save it.
Disable a schedule with PowerShell
Use the Set-AzAutomationSchedule cmdlet to change the properties of an existing schedule. To disable the schedule, specify False for the IsEnabled parameter.
The following example shows how to disable a schedule for a runbook by using an Azure Resource Manager cmdlet.
$automationAccountName = "MyAutomationAccount"
$scheduleName = "Sample-MonthlyDaysOfMonthSchedule"
Set-AzAutomationSchedule -AutomationAccountName $automationAccountName `
-Name $scheduleName -IsEnabled $false -ResourceGroupName "ResourceGroup01"
Remove a schedule
When you're ready to remove your schedules, you can either use the Azure portal or PowerShell. Remember that you can only remove a schedule that has been disabled as described in the previous section.
Remove a schedule using the Azure portal
- In your Automation account, on the left-hand pane select Schedules under Shared Resources.
- Select the name of a schedule to open the details pane.
- Click Delete.
Remove a schedule with PowerShell
You can use the Remove-AzAutomationSchedule cmdlet as shown below to delete an existing schedule.
$automationAccountName = "MyAutomationAccount"
$scheduleName = "Sample-MonthlyDaysOfMonthSchedule"
Remove-AzAutomationSchedule -AutomationAccountName $automationAccountName `
-Name $scheduleName -ResourceGroupName "ResourceGroup01"
Next steps
- To learn more about the cmdlets used to access schedules, see Manage modules in Azure Automation.
- For general information about runbooks, see Runbook execution in Azure Automation.