Note
Access to this page requires authorization. You can try signing in or changing directories.
Access to this page requires authorization. You can try changing directories.
Applications hosted in Kubernetes can access data in App Configuration using the App Configuration provider library. The App Configuration provider has built-in caching and refreshing capabilities so applications can have dynamic configuration without redeployment. If you prefer not to update your application, this tutorial shows how to bring data from App Configuration to your Kubernetes using Helm via deployment. This way, your application can continue accessing configuration from Kubernetes variables and secrets. You run Helm upgrade when you want your application to pick up new configuration changes.
Tip
See options for workloads hosted in Kubernetes to access Azure App Configuration.
Helm provides a way to define, install, and upgrade applications running in Kubernetes. A Helm chart contains the information necessary to create an instance of a Kubernetes application. Configuration is stored outside of the chart itself, in a file called values.yaml.
During the release process, Helm merges the chart with the proper configuration to run the application. For example, variables defined in values.yaml can be referenced as environment variables inside the running containers. Helm also supports creation of Kubernetes Secrets, which can be mounted as data volumes or exposed as environment variables.
You can override the values stored in values.yaml by providing additional YAML-based configuration files on the command line when running Helm. Azure App Configuration supports exporting configuration values to YAML files. Integrating this export capability into your deployment allows your Kubernetes applications to leverage configuration values stored in App Configuration.
In this tutorial, you learn how to:
- Use values from App Configuration when deploying an application to Kubernetes using Helm.
- Create a Kubernetes Secret based on a Key Vault reference in App Configuration.
This tutorial assumes basic understanding of managing Kubernetes with Helm. Learn more about installing applications with Helm in Azure Kubernetes Service.
Prerequisites
- An Azure account with an active subscription. Create one for free.
- Install Azure CLI (version 2.4.0 or later)
- Install Helm (version 2.14.0 or later)
- An App Configuration store, as shown in the tutorial for creating a store.
- A Kubernetes cluster.
Add key-values
Add the following key-values to the App Configuration store and leave Label and Content Type with their default values. For more information about how to add key-values to a store using the Azure portal or the CLI, go to Create a key-value.
| Key | Value |
|---|---|
| settings.color | White |
| settings.message | Data from Azure App Configuration |
Add a Key Vault reference to App Configuration
Sign in to the Azure portal and add a secret to Key Vault with name Password and value myPassword.
Select the App Configuration store instance that you created in previous section.
Select Configuration Explorer.
Select + Create > Key vault reference, and then specify the following values:
- Key: Select secrets.password.
- Label: Leave this value blank.
- Subscription, Resource group, and Key vault: Enter the values corresponding to those in the key vault you created in previous step.
- Secret: Select the secret named Password that you created in the previous section.
Create Helm chart
First, create a sample Helm chart with the following command:
helm create mychart
Helm creates a new directory called mychart with the structure shown below.
Tip
Follow this charts guide to learn more.
mychart
|-- Chart.yaml
|-- charts
|-- templates
|   |-- NOTES.txt
|   |-- _helpers.tpl
|   |-- deployment.yaml
|   |-- ingress.yaml
|   `-- service.yaml
`-- values.yaml
Next, update the spec:template:spec:containers section of the deployment.yaml file. The following snippet adds two environment variables to the container. You'll set their values dynamically at deployment time.
env:
- name: Color
    value: {{ .Values.settings.color }}
- name: Message
    value: {{ .Values.settings.message }}
The complete deployment.yaml file after the update should look like below.
apiVersion: apps/v1beta2
kind: Deployment
metadata:
  name: {{ include "mychart.fullname" . }}
  labels:
    app.kubernetes.io/name: {{ include "mychart.name" . }}
    helm.sh/chart: {{ include "mychart.chart" . }}
    app.kubernetes.io/instance: {{ .Release.Name }}
    app.kubernetes.io/managed-by: {{ .Release.Service }}
spec:
  replicas: {{ .Values.replicaCount }}
  selector:
    matchLabels:
      app.kubernetes.io/name: {{ include "mychart.name" . }}
      app.kubernetes.io/instance: {{ .Release.Name }}
  template:
    metadata:
      labels:
        app.kubernetes.io/name: {{ include "mychart.name" . }}
        app.kubernetes.io/instance: {{ .Release.Name }}
    spec:
      containers:
        - name: {{ .Chart.Name }}
          image: "{{ .Values.image.repository }}:{{ .Values.image.tag }}"
          imagePullPolicy: {{ .Values.image.pullPolicy }}
          env:
            - name: Color
              value: {{ .Values.settings.color }}
            - name: Message
              value: {{ .Values.settings.message }}
          ports:
            - name: http
              containerPort: 80
              protocol: TCP
          livenessProbe:
            httpGet:
              path: /
              port: http
          readinessProbe:
            httpGet:
              path: /
              port: http
          resources:
{{ toYaml .Values.resources | indent 12 }}
    {{- with .Values.nodeSelector }}
      nodeSelector:
{{ toYaml . | indent 8 }}
    {{- end }}
    {{- with .Values.affinity }}
      affinity:
{{ toYaml . | indent 8 }}
    {{- end }}
    {{- with .Values.tolerations }}
      tolerations:
{{ toYaml . | indent 8 }}
    {{- end }}
To store sensitive data as Kubernetes Secrets, add a secrets.yaml file under the templates folder.
Tip
Learn more about how to use Kubernetes Secrets.
apiVersion: v1
kind: Secret
metadata:
  name: mysecret
type: Opaque
data:
  password: {{ .Values.secrets.password | b64enc }}
Finally, update the values.yaml file with the following content to optionally provide default values of the configuration settings and secrets that referenced in the deployment.yaml and secrets.yaml files. Their actual values will be overwritten by configuration pulled from App Configuration.
# settings will be overwritten by App Configuration
settings:
  color: red
  message: myMessage
Pass configuration from App Configuration in Helm install
First, download the configuration from App Configuration to a myConfig.yaml file. Use a key filter to only download those keys that start with settings.. If in your case the key filter is not sufficient to exclude keys of Key Vault references, you may use the argument --skip-keyvault to exclude them.
Tip
Learn more about the export command.
az appconfig kv export -n myAppConfiguration -d file --path myConfig.yaml --key "settings.*" --separator "." --format yaml
Next, download secrets to a file called mySecrets.yaml. The command-line argument --resolve-keyvault resolves the Key Vault references by retrieving the actual values in Key Vault. You'll need to run this command with credentials that have access permissions to the corresponding Key Vault.
Warning
As this file contains sensitive information, keep the file with care and clean up when it's not needed anymore.
az appconfig kv export -n myAppConfiguration -d file --path mySecrets.yaml --key "secrets.*" --separator "." --resolve-keyvault --format yaml
Use helm upgrade's -f argument to pass in the two configuration files you've created. They'll override the configuration values defined in values.yaml with the values exported from App Configuration.
helm upgrade --install -f myConfig.yaml -f mySecrets.yaml "example" ./mychart
You can also use the --set argument for helm upgrade to pass literal key-values. Using the --set argument is a good way to avoid persisting sensitive data to disk.
$secrets = az appconfig kv list -n myAppConfiguration --key "secrets.*" --resolve-keyvault --query "[*].{name:key, value:value}" | ConvertFrom-Json

foreach ($secret in $secrets) {
  $keyvalues += $secret.name + "=" + $secret.value + ","
}

if ($keyvalues){
  $keyvalues = $keyvalues.TrimEnd(',')
  helm upgrade --install --set $keyvalues "example" ./mychart
}
else{
  helm upgrade --install "example" ./mychart
}
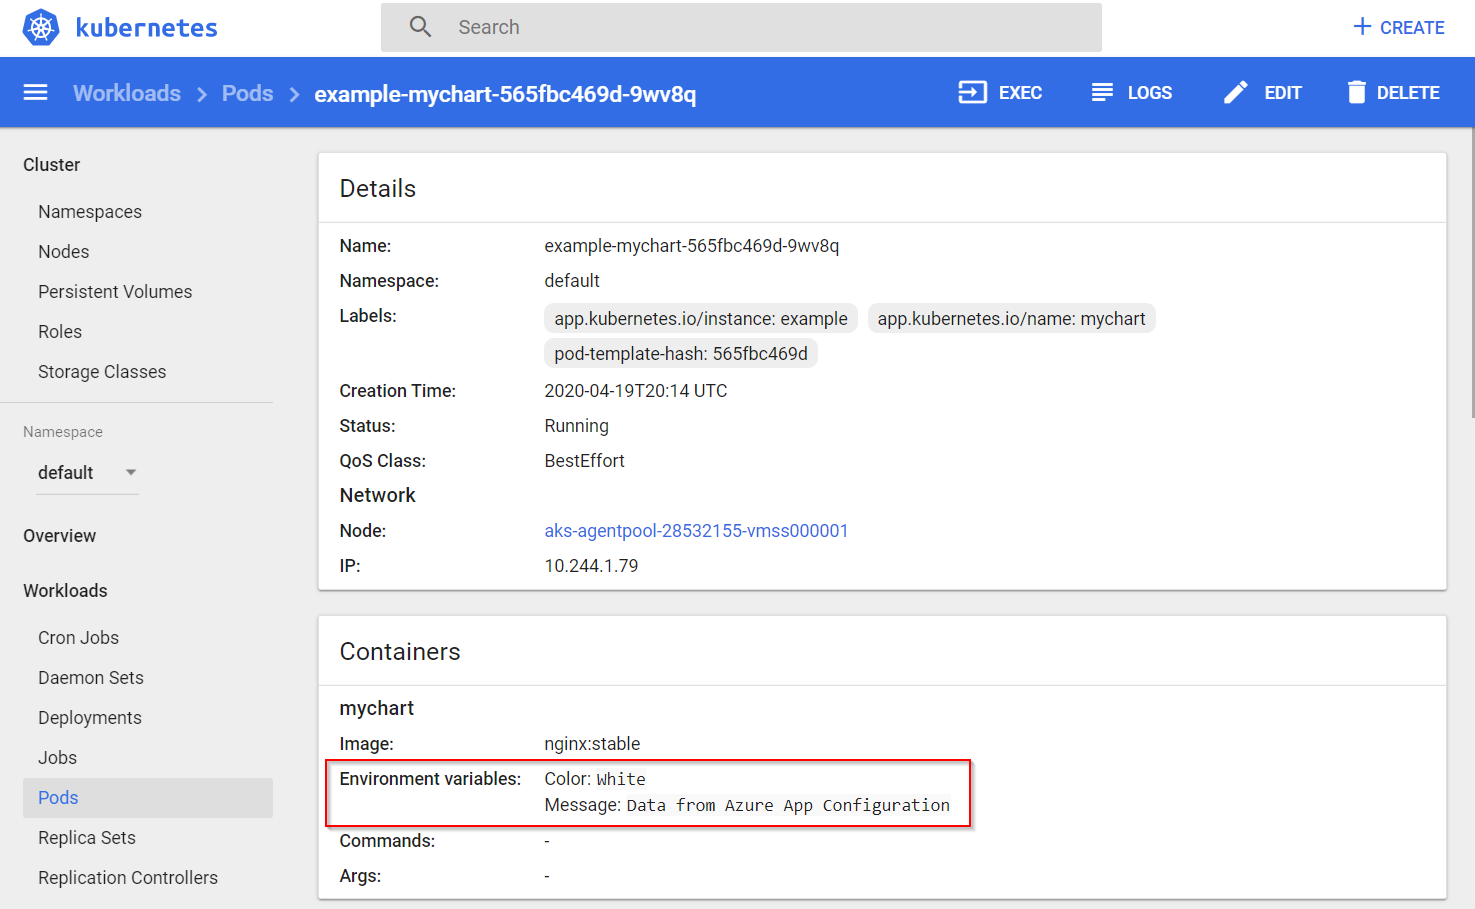
Verify that configurations and secrets were set successfully by accessing the Kubernetes Dashboard. You'll see that the color and message values from App Configuration were populated into the container's environment variables.
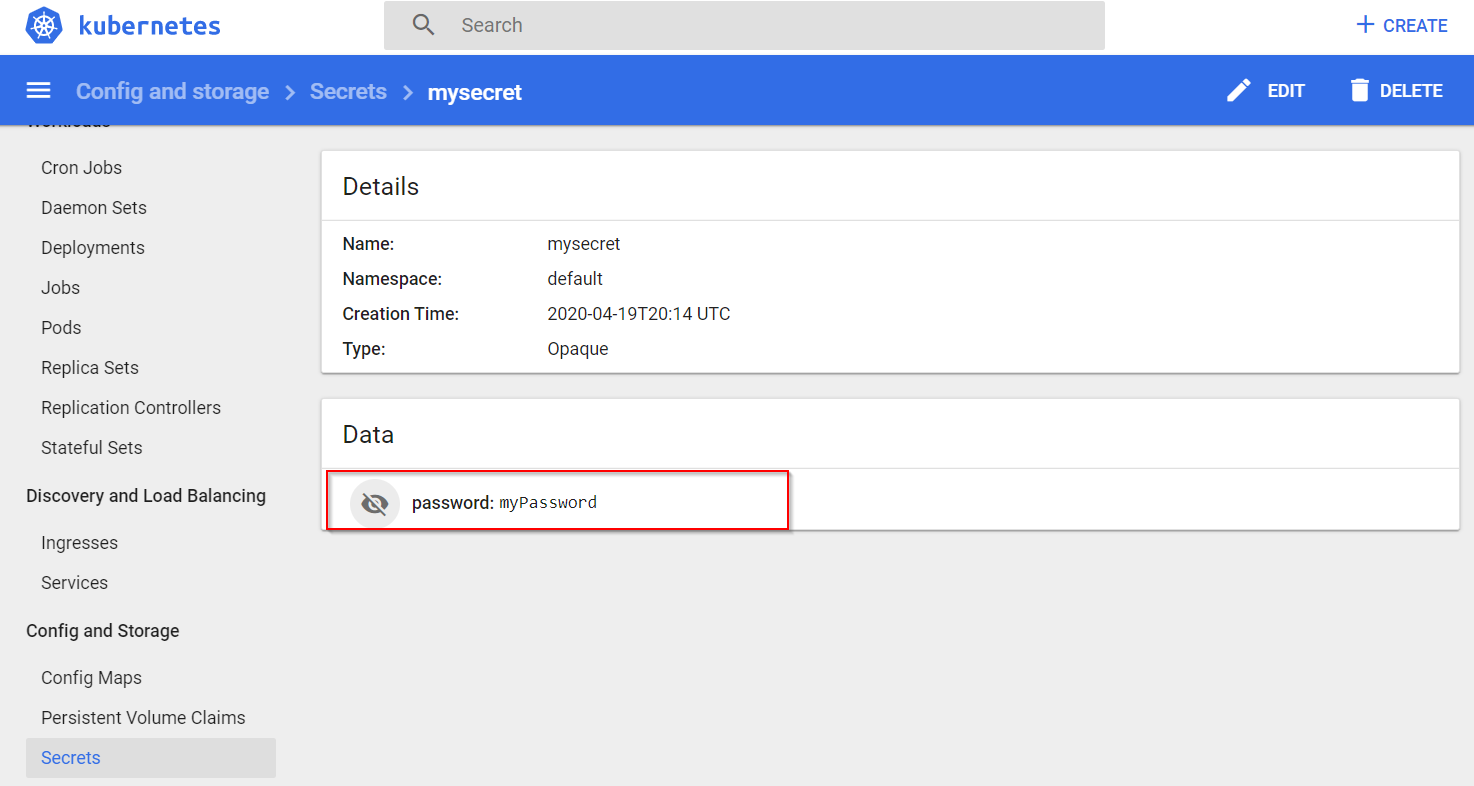
One secret, password, stores as Key Vault reference in App Configuration was also added into Kubernetes Secrets.
Clean up resources
If you don't want to continue using the resources created in this article, delete the resource group you created here to avoid charges.
Important
Deleting a resource group is irreversible. The resource group and all the resources in it are permanently deleted. Ensure that you don't accidentally delete the wrong resource group or resources. If you created the resources for this article inside a resource group that contains other resources you want to keep, delete each resource individually from its respective pane instead of deleting the resource group.
- Sign in to the Azure portal, and select Resource groups.
- In the Filter by name box, enter the name of your resource group.
- In the result list, select the resource group name to see an overview.
- Select Delete resource group.
- You're asked to confirm the deletion of the resource group. Enter the name of your resource group to confirm, and select Delete.
After a few moments, the resource group and all its resources are deleted.
Next steps
In this tutorial, you exported Azure App Configuration data to be used in a Kubernetes deployment with Helm. To learn more about how to use App Configuration, continue to the Azure CLI samples.