Note
Access to this page requires authorization. You can try signing in or changing directories.
Access to this page requires authorization. You can try changing directories.
Microsoft Configuration Manager facilitates comprehensive management of servers supporting the secure and scalable deployment of applications, software updates, and operating systems. Configuration Manager offers the custom task sequence as a flexible paradigm for application deployment.
You can use a custom task sequence that can deploy the Connected Machine Agent to onboard a collection of devices to Azure Arc-enabled servers.
Before you get started, be sure to review the prerequisites and verify that your subscription and resources meet the requirements. For information about supported regions and other related considerations, see supported Azure regions. Also review our at-scale planning guide to understand the design and deployment criteria, as well as our management and monitoring recommendations.
If you don't have an Azure subscription, create a free account before you begin.
Automatic connection for SQL Server
When you connect a Windows or Linux server to Azure Arc that also has Microsoft SQL Server installed, the SQL Server instances are automatically connected to Azure Arc as well. SQL Server enabled by Azure Arc provides a detailed inventory and additional management capabilities for your SQL Server instances and databases. As part of the connection process, an extension is deployed to your Azure Arc-enabled server, and new roles are applied to your SQL Server and databases. If you don't want to automatically connect your SQL Servers to Azure Arc, you can opt out by adding a tag to the Windows or Linux server with the name ArcSQLServerExtensionDeployment and value Disabled when connecting it to Azure Arc.
For more information, see Manage automatic connection for SQL Server enabled by Azure Arc.
Generate a service principal
Follow the steps to create a service principal for onboarding at scale. Assign the Azure Connected Machine Onboarding role to your service principal, and limit the scope of the role to the target Azure landing zone. Make a note of the Service Principal ID and Service Principal Secret, as you'll need these values later.
Download the agent and create the application
First, download the Azure Connected Machine agent package (AzureConnectedMachineAgent.msi) for Windows from the Microsoft Download Center. The Azure Connected Machine agent for Windows can be upgraded to the latest release manually or automatically, depending on your requirements. The .msi must be saved in a server share for the custom task sequence.
Next, create an application in Configuration Manager using the installed Azure Connected Machine agent package:
- In the Configuration Manager console, select Software Library > Application Management > Applications.
- On the Home tab, in the Create group, select Create Application.
- On the General page of the Create Application Wizard, select Automatically detect information about this application from installation files. This action pre-populates some of the information in the wizard with information that is extracted from the installation .msi file. Then, specify the following information:
- Type: Select Windows Installer (*.msi file)
- Location: Select Browse to choose the location where you saved the installation file AzureConnectedMachineAgent.msi.

- Select Next, and on the Import Information page, select Next again.
- On the General Information page, you can supply further information about the application to help you sort and locate it in the Configuration Manager console. Once complete, select Next.
- On the Installation program page, select Next.
- On the Summary page, confirm your application settings and then complete the wizard.
You have finished creating the application. To find it, in the Software Library workspace, expand Application Management, and then choose Applications.
Create a task sequence
The next step is to define a custom task sequence that installs the Azure Connected Machine Agent on a machine, then connects it to Azure Arc.
In the Configuration Manager console, go to the Software Library workspace, expand Operating Systems, and then select the Task Sequences node.
On the Home tab of the ribbon, in the Create group, select Create Task Sequence. This will launch the Create Task Sequence Wizard.
On the Create a New Task Sequence page, select Create a new custom task sequence.
On the Task Sequence Information page, specify a name for the task sequence and optionally a description of the task sequence.

After you complete the Create Task Sequence Wizard, Configuration Manager adds the custom task sequence to the Task Sequences node. You can now edit this task sequence to add steps to it.
In the Configuration Manager console, go to the Software Library workspace, expand Operating Systems, and then select the Task Sequences node.
In the Task Sequence list, select the task sequence that you want to edit.
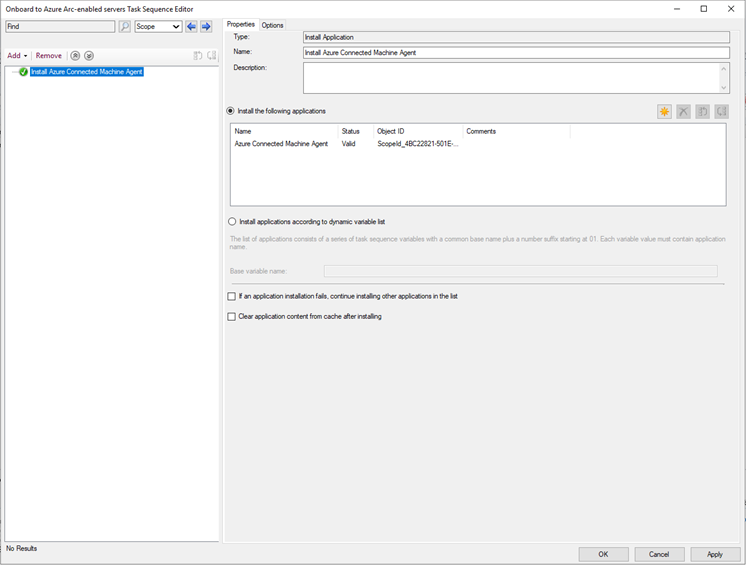
Define Install Application as the first task in the task sequence.
- On the Home tab of the ribbon, in theTask Sequence group, select Edit. Then, select Add, select Software, and select Install Application.
- Set the name to
Install Connected Machine Agent. - Select the Azure Connected Machine Agent.
Define Run PowerShell Script as the second task in the task sequence.
- Select Add, select General, and select Run PowerShell Script.
- Set the name to
Connect to Azure Arc. - Select Enter a PowerShell script.
- Select Add Script, and then edit the script to connect to Arc as shown below. Note that this template script has placeholder values for the service principal, tenant, subscription, resource group, and location, which you should update to the appropriate values.
& "$env:ProgramW6432\AzureConnectedMachineAgent\azcmagent.exe" connect --service-principal-id <serviceprincipalAppID> --service-principal-secret <serviceprincipalPassword> --tenant-id <tenantID> --subscription-id <subscriptionID> --resource-group <ResourceGroupName> --location <resourceLocation>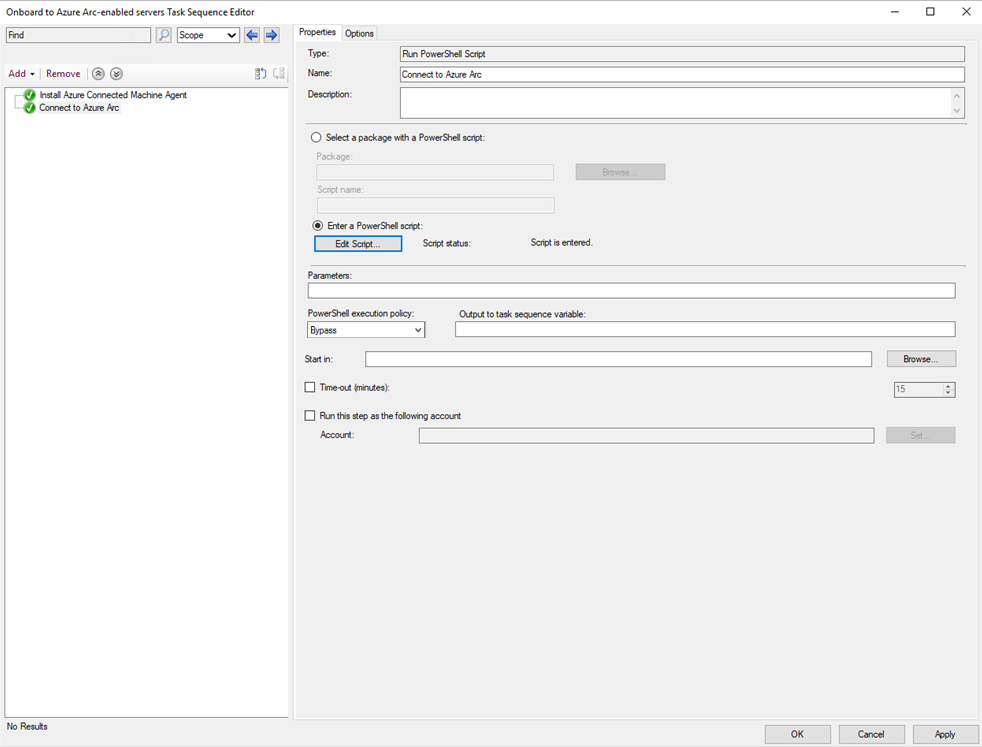
Set PowerShell execution policy to Bypass (if not already set by default).
Select OK to save the changes to your custom task sequence.
Deploy the custom task sequence and verify connection to Azure Arc
Follow the steps outlined in Deploy a task sequence to deploy the task sequence to the target collection of devices. Choose the following parameter settings.
- Under Deployment Settings, set Purpose as Required so that Configuration Manager automatically runs the task sequence according to the configured schedule. If Purpose is set to Available instead, the task sequence will need to be installed on demand from Software Center.
- Under Scheduling, set Rerun Behavior to Rerun if failed previous attempt.
Verify successful connection to Azure Arc
To verify that the machines have been successfully connected to Azure Arc, verify that they are visible in the Azure portal.

Next steps
- Review the Planning and deployment guide to plan for deploying Azure Arc-enabled servers at any scale and implement centralized management and monitoring.
- Review connection troubleshooting information in the Troubleshoot Connected Machine agent guide.
- Learn how to manage your machine using Azure Policy for such things as VM guest configuration, verifying that the machine is reporting to the expected Log Analytics workspace, enabling monitoring with VM insights, and much more.