Events
Take the Microsoft Learn AI Skills Challenge
Sep 24, 11 PM - Nov 1, 11 PM
Elevate your skills in Microsoft Fabric and earn a digital badge by November 1.
Register nowThis browser is no longer supported.
Upgrade to Microsoft Edge to take advantage of the latest features, security updates, and technical support.
In this tutorial, you adapt the AKS sample voting application to use with an Azure Cache for Redis instance instead. The original sample uses a Redis cache deployed as a container to your AKS cluster. Following some simple steps, you can configure the AKS sample voting application to connect to your Azure Cache for Redis instance.
Important
This tutorial assumes that you are familiar with basic Kubernetes concepts like containers, pods and service.
Create a new Azure Cache for Redis instance by using the Azure portal or your preferred CLI tool. Use the quickstart guide to get started.
For this tutorial, use a Standard C1 cache.

On the Advanced tab, enable Non-TLS port.

Follow the steps through to create the cache.
Important
This tutorial uses a non-TLS port for demonstration, but we highly recommend that you use a TLS port for anything in production.
Creating the cache can take a few minutes. You can move to the next section while the process finishes.
In this section, you first install the Kubernetes CLI and then connect to an AKS cluster.
Use the Kubernetes CLI, kubectl, to connect to the Kubernetes cluster from your local computer. If you're running locally, then you can use the following command to install kubectl.
az aks install-cli
If you use Azure Cloud Shell, kubectl is already installed, and you can skip this step.
Use the portal to copy the resource group and cluster name for your AKS cluster. To configure kubectl to connect to your AKS cluster, use the following command with your resource group and cluster name:
az aks get-credentials --resource-group myResourceGroup --name myClusterName
Verify that you're able to connect to your cluster by running the following command:
kubectl get nodes
You should see similar output showing the list of your cluster nodes.
NAME                                STATUS   ROLES   AGE   VERSION
aks-agentpool-21274953-vmss000001   Ready    agent   1d    v1.24.15
aks-agentpool-21274953-vmss000003   Ready    agent   1d    v1.24.15
aks-agentpool-21274953-vmss000006   Ready    agent   1d    v1.24.15
Use the .yml file in the sample for reference.
Make the following changes to the deployment file before you save the file as azure-vote-sample.yaml.
Remove the deployment and service named azure-vote-back. This deployment is used to deploy a Redis container to your cluster that is not required when using Azure Cache for Redis.
Replace the value REDIS variable from "azure-vote-back" to the hostname of the Azure Cache for Redis instance that you created earlier. This change indicates that your application should use Azure Cache for Redis instead of a Redis container.
Define variable named REDIS_PWD, and set the value to the access key for the Azure Cache for Redis instance that you created earlier.
After all the changes, the deployment file should look like following file with your hostname and access key. Save your file as azure-vote-sample.yaml.
apiVersion: apps/v1
kind: Deployment
metadata:
  name: azure-vote-front
spec:
  replicas: 1
  selector:
    matchLabels:
      app: azure-vote-front
  strategy:
    rollingUpdate:
      maxSurge: 1
      maxUnavailable: 1
  minReadySeconds: 5
  template:
    metadata:
      labels:
        app: azure-vote-front
    spec:
      nodeSelector:
        "kubernetes.io/os": linux
      containers:
      - name: azure-vote-front
        image: mcr.microsoft.com/azuredocs/azure-vote-front:v1
        ports:
        - containerPort: 80
        resources:
          requests:
            cpu: 250m
          limits:
            cpu: 500m
        env:
        - name: REDIS
          value: myrediscache.redis.cache.windows.net
        - name: REDIS_PWD
          value: myrediscacheaccesskey
---
apiVersion: v1
kind: Service
metadata:
  name: azure-vote-front
spec:
  type: LoadBalancer
  ports:
  - port: 80
  selector:
    app: azure-vote-front
Run the following command to deploy this application to your AKS cluster:
kubectl apply -f azure-vote-sample.yaml
You get a response indicating your deployment and service was created:
deployment.apps/azure-vote-front created
service/azure-vote-front created
To test the application, run the following command to check if the pod is running:
kubectl get pods
You see your pod running successfully like:
NAME                                READY   STATUS                       RESTARTS   AGE
azure-vote-front-7dd44597dd-p4cnq   1/1     Running                      0          68s
Run the following command to get the endpoint for your application:
kubectl get service azure-vote-front
You might see that the EXTERNAL-IP has status <pending> for a few minutes. Keep retrying until the status is replaced by an IP address.
NAME                   TYPE           CLUSTER-IP     EXTERNAL-IP     PORT(S)        AGE
azure-vote-front       LoadBalancer   10.0.166.147   20.69.136.105   80:30390/TCP   90s
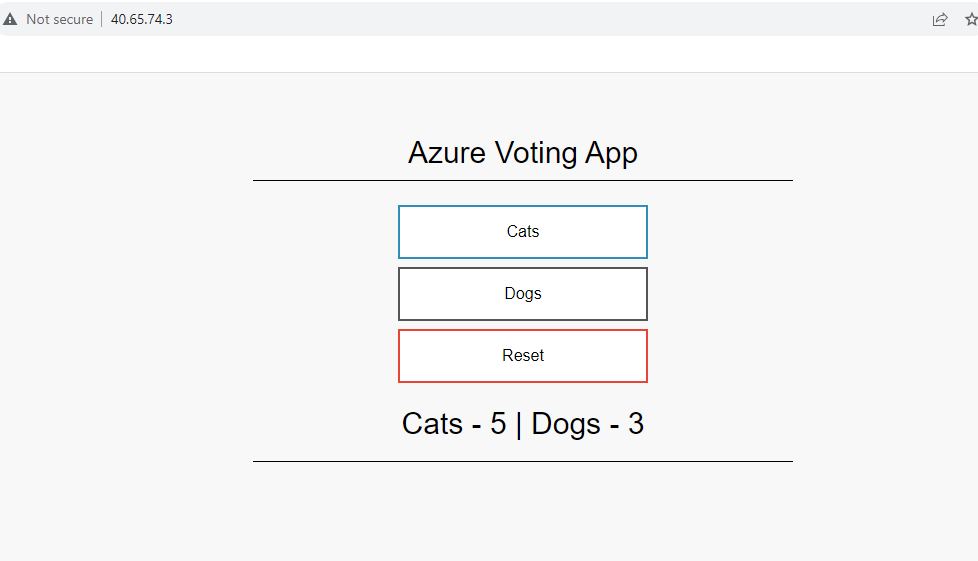
Once the External-IP is available, open a web browser to the External-IP address of your service and you see the application running as follows:
To clean up your cluster, run the following commands:
kubectl delete deployment azure-vote-front
kubectl delete service azure-vote-front
If you want to continue to use the resources you created in this article, keep the resource group.
Otherwise, to avoid charges related to the resources, if you're finished using the resources, you can delete the Azure resource group that you created.
Warning
Deleting a resource group is irreversible. When you delete a resource group, all the resources in the resource group are permanently deleted. Make sure that you do not accidentally delete the wrong resource group or resources. If you created the resources inside an existing resource group that has resources you want to keep, you can delete each resource individually instead of deleting the resource group.
Sign in to the Azure portal, and then select Resource groups.
Select the resource group to delete.
If there are many resource groups, in Filter for any field, enter the name of the resource group you created to complete this article. In the list of search results, select the resource group.
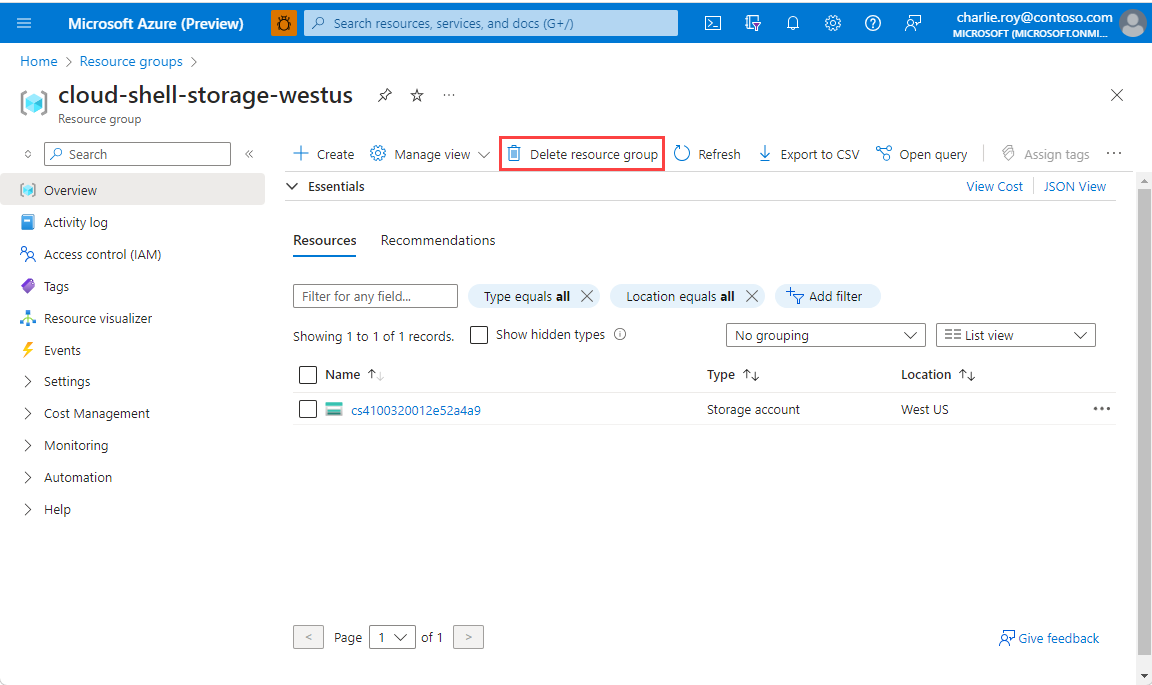
Select Delete resource group.
In the Delete a resource group pane, enter the name of your resource group to confirm, and then select Delete.

Within a few moments, the resource group and all of its resources are deleted.
Events
Take the Microsoft Learn AI Skills Challenge
Sep 24, 11 PM - Nov 1, 11 PM
Elevate your skills in Microsoft Fabric and earn a digital badge by November 1.
Register nowTraining
Module
Optimize your web applications by caching read-only data with Redis - Training
Use Redis caching in Azure to reduce the load on databases. Apply different caching architectures to support larger loads in distributed and high-volume environments.
Certification
Microsoft Certified: Azure Developer Associate - Certifications
Build end-to-end solutions in Microsoft Azure to create Azure Functions, implement and manage web apps, develop solutions utilizing Azure storage, and more.