Note
Access to this page requires authorization. You can try signing in or changing directories.
Access to this page requires authorization. You can try changing directories.
In this quickstart, you use Visual Studio Code to create and test a PowerShell Durable Functions app that orchestrates and chains together calls to other functions. You then publish it to Azure.
Durable Functions manages state, checkpoints, and restarts in your application, letting you write stateful workflows in a serverless environment.
Prerequisites
To complete this quickstart, you need:
Visual Studio Code installed.
The Visual Studio Code extension Azure Functions installed.
The latest version of Azure Functions Core Tools installed.
An HTTP test tool that keeps your data secure. For more information, see HTTP test tools.
An Azure subscription. To use Durable Functions, you must have an Azure Storage account.
If you don't have an Azure account, create a free account before you begin.
Create your local project
In this section, you use Visual Studio Code to create a local Azure Functions project.
In Visual Studio Code, select F1 (or select Ctrl/Cmd+Shift+P) to open the command palette. At the prompt (
>), enter and then select Azure Functions: Create New Project.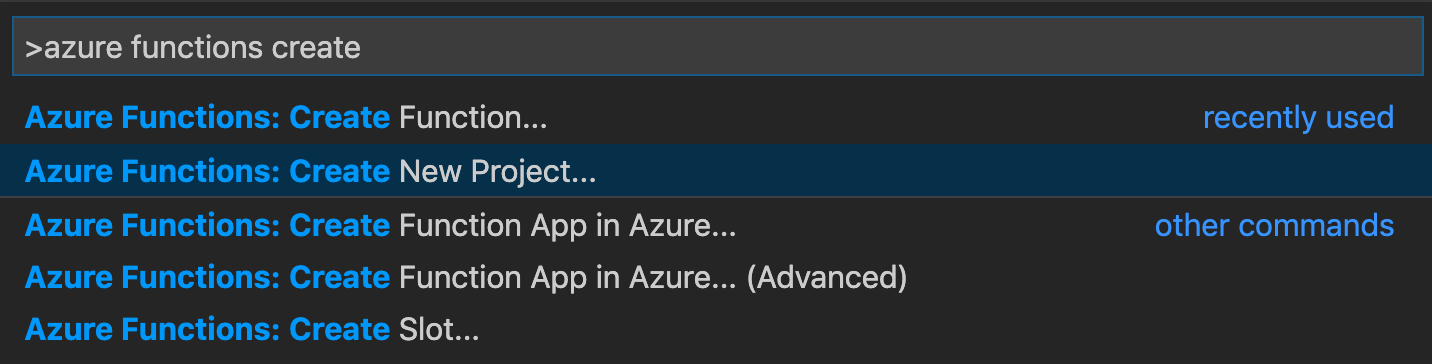
Select Browse. In the Select Folder dialog, go to a folder to use for your project, and then choose Select.
At the prompts, provide the following information:
Prompt Action Description Select a language for your function app project Select PowerShell. Creates a local PowerShell Functions project. Select a version Select Azure Functions v4. You see this option only when Core Tools isn't already installed. In this case, Core Tools is installed the first time you run the app. Select a template for your project's first function Select Skip for now. Select how you would like to open your project Select Open in current window. Opens Visual Studio Code in the folder you selected.
Visual Studio Code installs Azure Functions Core Tools if it's required to create a project. It also creates a function app project in a folder. This project contains the host.json and local.settings.json configuration files.
A package.json file is also created in the root folder.
Configure the standalone Durable Functions SDK
The standalone SDK provides the best performance and latest features for PowerShell Durable Functions. Configure it in three steps:
Step 1: Open local.settings.json and verify the following settings are present. Add or update them if needed:
{
  "IsEncrypted": false,
  "Values": {
    "AzureWebJobsStorage": "",
    "FUNCTIONS_WORKER_RUNTIME": "powershell",
    "FUNCTIONS_WORKER_RUNTIME_VERSION" : "7.4",
    "ExternalDurablePowerShellSDK": "true"
  }
}
Step 2: Open requirements.psd1 and add the SDK dependency:
@{
    'AzureFunctions.PowerShell.Durable.SDK' = '2.*'
}
The 2.* specifier ensures you get the latest stable 2.x version from the PowerShell Gallery.
Step 3: Add the following line to the end of your profile.ps1 file:
Import-Module AzureFunctions.PowerShell.Durable.SDK -ErrorAction Stop
Create your functions
A basic Durable Functions app has three functions:
| Function type | Purpose |
|---|---|
| Orchestrator | A workflow that orchestrates other functions. |
| Activity | Called by the orchestrator to perform work and return a value. |
| Client (HTTP starter) | An HTTP-triggered function that starts an orchestrator. |
For each function, open the command palette and select Azure Functions: Create Function, then provide the prompted values:
1. Orchestrator function
| Prompt | Value |
|---|---|
| Select a template | Durable Functions orchestrator |
| Function name | HelloOrchestrator |
Open HelloOrchestrator/run.ps1 to see the orchestrator. Each call to Invoke-ActivityFunction invokes the Hello activity function.
2. Activity function
| Prompt | Value |
|---|---|
| Select a template | Durable Functions activity |
| Function name | Hello |
Open Hello/run.ps1 to see that it takes a name as input and returns a greeting. Activity functions are where you perform actions such as database calls or computations.
3. Client function (HTTP starter)
| Prompt | Value |
|---|---|
| Select a template | Durable Functions HTTP starter |
| Function name | HttpStart |
| Authorization level | Anonymous (for demo purposes) |
Open HttpStart/run.ps1 to verify it uses Start-NewOrchestration to start a new orchestration and New-OrchestrationCheckStatusResponse to return an HTTP response with monitoring URLs.
You now have a Durable Functions app that you can run locally and deploy to Azure.
Tip
This quickstart uses the standalone Durable Functions PowerShell SDK. For more information about the SDK and migration from the legacy built-in version, see the standalone PowerShell SDK guide.
Test the function locally
Azure Functions Core Tools gives you the capability to run an Azure Functions project on your local development computer. You're prompted to install these tools the first time you start a function in Visual Studio.
To test your function, set a breakpoint in the
Helloactivity function code (in Hello/run.ps1). Select F5 or select Debug: Start Debugging in the command palette to start the function app project. Output from Core Tools appears in the terminal panel.Note
For more information about debugging, see Durable Functions diagnostics.
Durable Functions requires a storage account to run. You can use the Azurite storage emulator for local development, or create an Azure storage account when prompted. If Visual Studio Code prompts you to select a storage account, choose Select storage account.
At the prompts, provide the following information to create a new storage account in Azure.
Prompt Action Description Select subscription Select the name of your subscription. Your Azure subscription. Select a storage account Select Create a new storage account. Enter the name of the new storage account Enter a unique name. The name of the storage account to create. Select a resource group Enter a unique name. The name of the resource group to create. Select a location Select an Azure region. Select a region that is close to you. In the terminal panel, copy the URL endpoint of your HTTP-triggered function.
Use your browser or an HTTP test tool to send an HTTP POST request to the URL endpoint.
Replace the last segment with the name of the orchestrator function (
HelloOrchestrator). The URL should be similar tohttp://localhost:7071/api/orchestrators/HelloOrchestrator.The response is the HTTP function's initial result. It lets you know that the durable orchestration started successfully. It doesn't yet display the end result of the orchestration. The response includes a few useful URLs. For now, query the status of the orchestration.
Copy the URL value for
statusQueryGetUri, paste it in the browser's address bar, and execute the request. You can also continue to use your HTTP test tool to issue the GET request.The request queries the orchestration instance for the status. You should see a response showing the instance completed, with the outputs of the durable function:
{
    "name": "HelloOrchestrator",
    "instanceId": "9a528a9e926f4b46b7d3deaa134b7e8a",
    "runtimeStatus": "Completed",
    "input": null,
    "customStatus": null,
    "output": [
        "Hello Tokyo!",
        "Hello Seattle!",
        "Hello London!"
    ],
    "createdTime": "2020-03-18T21:54:49Z",
    "lastUpdatedTime": "2020-03-18T21:54:54Z"
}
To stop debugging, in Visual Studio Code, select Shift+F5.
After you verify that the function runs correctly on your local computer, it's time to publish the project to Azure.
Sign in to Azure
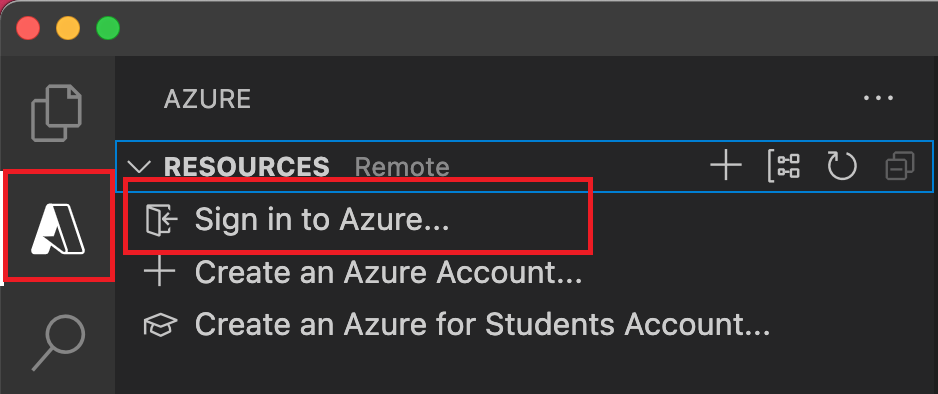
Before you can create Azure resources or publish your app, you must sign in to Azure.
If you aren't already signed in, in the Activity bar, select the Azure icon. Then under Resources, select Sign in to Azure.
If you're already signed in and can see your existing subscriptions, go to the next section. If you don't yet have an Azure account, select Create an Azure Account. Students can select Create an Azure for Students Account.
When you are prompted in the browser, select your Azure account and sign in by using your Azure account credentials. If you create a new account, you can sign in after your account is created.
After you successfully sign in, you can close the new browser window. The subscriptions that belong to your Azure account are displayed in the side bar.
Create the function app in Azure
In this section, you create a function app in the Flex Consumption plan along with related resources in your Azure subscription. Many of the resource creation decisions are made for you based on default behaviors. For more control over the created resources, you must instead create your function app with advanced options.
In Visual Studio Code, select F1 to open the command palette. At the prompt (
>), enter and then select Azure Functions: Create Function App in Azure.At the prompts, provide the following information:
Prompt Action Select subscription Select the Azure subscription to use. The prompt doesn't appear when you have only one subscription visible under Resources. Enter a new function app name Enter a globally unique name that's valid in a URL path. The name you enter is validated to make sure that it's unique in Azure Functions. Select a location for new resources Select an Azure region. For better performance, select a region near you. Only regions supported by Flex Consumption plans are displayed. Select a runtime stack Select the language version you currently run locally. Select resource authentication type Select Managed identity, which is the most secure option for connecting to the default host storage account. In the Azure: Activity Log panel, the Azure extension shows the status of individual resources as they're created in Azure.

When the function app is created, the following related resources are created in your Azure subscription. The resources are named based on the name you entered for your function app.
- A resource group, which is a logical container for related resources.
- A function app, which provides the environment for executing your function code. A function app lets you group functions as a logical unit for easier management, deployment, and sharing of resources within the same hosting plan.
- An Azure App Service plan, which defines the underlying host for your function app.
- A standard Azure Storage account, which is used by the Functions host to maintain state and other information about your function app.
- An Application Insights instance that's connected to the function app, and which tracks the use of your functions in the app.
- A user-assigned managed identity that's added to the Storage Blob Data Contributor role in the new default host storage account.
A notification is displayed after your function app is created and the deployment package is applied.
Tip
By default, the Azure resources required by your function app are created based on the name you enter for your function app. By default, the resources are created with the function app in the same, new resource group. If you want to customize the names of the associated resources or reuse existing resources, publish the project with advanced create options.
Deploy the project to Azure
Important
Deploying to an existing function app always overwrites the contents of that app in Azure.
In the command palette, enter and then select Azure Functions: Deploy to Function App.
Select the function app you just created. When prompted about overwriting previous deployments, select Deploy to deploy your function code to the new function app resource.
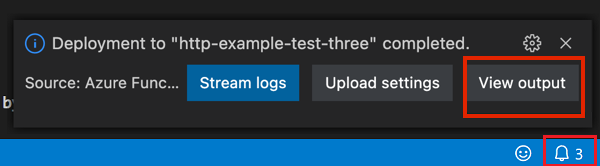
When deployment is completed, select View Output to view the creation and deployment results, including the Azure resources that you created. If you miss the notification, select the bell icon in the lower-right corner to see it again.
Test your function in Azure
In the Azure portal (or using the Azure CLI), verify the app setting
ExternalDurablePowerShellSDKis set totrue. If it's missing, add it under Settings > Environment variables and restart the function app.Copy the URL of the HTTP trigger from the output panel. The URL should be in this format:
https://<functionappname>.azurewebsites.net/api/orchestrators/HelloOrchestratorSend an HTTP POST request to the URL. You should get the same status response that you got when you tested locally.
If the orchestration doesn't start, check the function app logs in the Azure portal under Monitor > Log stream for errors related to the SDK import or storage connectivity.
Clean up resources
If you no longer need the resources that you created to complete the quickstart, to avoid related costs in your Azure subscription, delete the resource group and all related resources.