Note
Access to this page requires authorization. You can try signing in or changing directories.
Access to this page requires authorization. You can try changing directories.
This article shows you how to use Visual Studio Code to add an HTTP endpoint to the function app you created in the previous quickstart article. When triggered, this new HTTP endpoint uses an Azure OpenAI text completion input binding to get text completion hints from your data model.
During this tutorial, you learn how to accomplish these tasks:
- Create resources in Azure OpenAI.
- Deploy a model in the OpenAI resource.
- Set access permissions to the model resource.
- Enable your function app to connect to OpenAI.
- Add OpenAI bindings to your HTTP triggered function.
1. Check prerequisites
- Complete the steps in part 1 of Create a function in Azure using Visual Studio Code.
- Obtain access to Azure OpenAI in your Azure subscription. If you haven't already been granted access, complete this form to request access.
- Install .NET Core CLI tools.
- The Azurite storage emulator. While you can also use an actual Azure Storage account, the article assumes you're using this emulator.
2. Create your Azure OpenAI resources
The following steps show how to create an Azure OpenAI data model in the Azure portal.
Sign in with your Azure subscription in the Azure portal.
Select Create a resource and search for the Azure OpenAI. When you locate the service, select Create.
On the Create Azure OpenAI page, provide the following information for the fields on the Basics tab:
Field Description Subscription Your subscription, which has been onboarded to use Azure OpenAI. Resource group The resource group you created for the function app in the previous article. You can find this resource group name by right-clicking the function app in the Azure Resources browser, selecting properties, and then searching for the resourceGroupsetting in the returned JSON resource file.Region Ideally, the same location as the function app. Name A descriptive name for your Azure OpenAI Service resource, such as mySampleOpenAI. Pricing Tier The pricing tier for the resource. Currently, only the Standard tier is available for the Azure OpenAI Service. For more info on pricing visit the Azure OpenAI pricing page 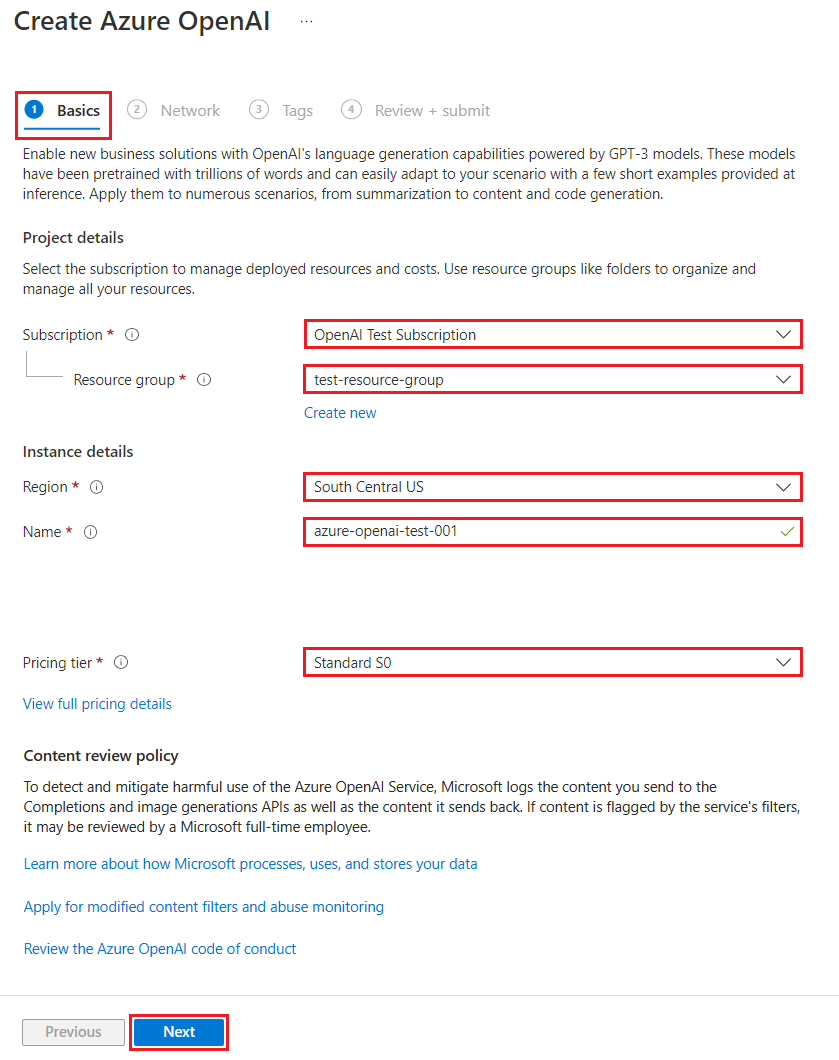
Select Next twice to accept the default values for both the Network and Tags tabs. The service you create doesn't have any network restrictions, including from the internet.
Select Next a final time to move to the final stage in the process: Review + submit.
Confirm your configuration settings, and select Create.
The Azure portal displays a notification when the new resource is available. Select Go to resource in the notification or search for your new Azure OpenAI resource by name.
In the Azure OpenAI resource page for your new resource, select Click here to view endpoints under Essentials > Endpoints. Copy the endpoint URL and the keys. Save these values, you need them later.
Now that you have the credentials to connect to your model in Azure OpenAI, you need to set these access credentials in application settings.
3. Deploy a model
Now you can deploy a model. You can select from one of several available models in Azure OpenAI Studio.
To deploy a model, follow these steps:
Sign in to Azure OpenAI Studio.
Choose the subscription and the Azure OpenAI resource you created, and select Use resource.
Under Management select Deployments.
Select Create new deployment and configure the following fields:
Field Description Deployment name Choose a name carefully. The deployment name is used in your code to call the model by using the client libraries and the REST APIs, so you must save for use later on. Select a model Model availability varies by region. For a list of available models per region, see Model summary table and region availability. Important
When you access the model via the API, you need to refer to the deployment name rather than the underlying model name in API calls, which is one of the key differences between OpenAI and Azure OpenAI. OpenAI only requires the model name. Azure OpenAI always requires deployment name, even when using the model parameter. In our docs, we often have examples where deployment names are represented as identical to model names to help indicate which model works with a particular API endpoint. Ultimately your deployment names can follow whatever naming convention is best for your use case.
Accept the default values for the rest of the setting and select Create.
The deployments table shows a new entry that corresponds to your newly created model.
You now have everything you need to add Azure OpenAI-based text completion to your function app.
4. Update application settings
In Visual Studio Code, open the local code project you created when you completed the previous article.
In the local.settings.json file in the project root folder, update the
AzureWebJobsStoragesetting toUseDevelopmentStorage=true. You can skip this step if theAzureWebJobsStoragesetting in local.settings.json is set to the connection string for an existing Azure Storage account instead ofUseDevelopmentStorage=true.In the local.settings.json file, add these settings values:
AZURE_OPENAI_ENDPOINT: required by the binding extension. Set this value to the endpoint of the Azure OpenAI resource you created earlier.AZURE_OPENAI_KEY: required by the binding extension. Set this value to the key for the Azure OpenAI resource.CHAT_MODEL_DEPLOYMENT_NAME: used to define the input binding. Set this value to the name you chose for your model deployment.
Save the file. When you deploy to Azure, you must also add these settings to your function app.
5. Register binding extensions
Because you're using an Azure OpenAI output binding, you must have the corresponding bindings extension installed before you run the project.
Except for HTTP and timer triggers, bindings are implemented as extension packages. To add the Azure OpenAI extension package to your project, run this dotnet add package command in the Terminal window:
dotnet add package Microsoft.Azure.Functions.Worker.Extensions.OpenAI --prerelease
5. Update the extension bundle
To access the preview Azure OpenAI bindings, you must use a preview version of the extension bundle that contains this extension.
Replace the extensionBundle setting in your current host.json file with this JSON:
 "extensionBundle": {
   "id": "Microsoft.Azure.Functions.ExtensionBundle.Preview",
   "version": "[4.*, 5.0.0)"
 }
Now, you can use the Azure OpenAI output binding in your project.
6. Return text completion from the model
The code you add creates a whois HTTP function endpoint in your existing project. In this function, data passed in a URL name parameter of a GET request is used to dynamically create a completion prompt. This dynamic prompt is bound to a text completion input binding, which returns a response from the model based on the prompt. The completion from the model is returned in the HTTP response.
In your existing
HttpExampleclass file, add thisusingstatement:using Microsoft.Azure.Functions.Worker.Extensions.OpenAI.TextCompletion;In the same file, add this code that defines a new HTTP trigger endpoint named
whois:[Function(nameof(WhoIs))] public IActionResult WhoIs([HttpTrigger(AuthorizationLevel.Function, Route = "whois/{name}")] HttpRequest req, [TextCompletionInput("Who is {name}?", ChatModel = "%CHAT_MODEL_DEPLOYMENT_NAME%")] TextCompletionResponse response) { if(!String.IsNullOrEmpty(response.Content)) { return new OkObjectResult(response.Content); } else { return new NotFoundObjectResult("Something went wrong."); } }
Update the
pom.xmlproject file to add this reference to thepropertiescollection:<azure-functions-java-library-openai>0.5.0-preview</azure-functions-java-library-openai>In the same file, add this dependency to the
dependenciescollection:<dependency> <groupId>com.microsoft.azure.functions</groupId> <artifactId>azure-functions-java-library-openai</artifactId> <version>${azure-functions-java-library-openai}</version> </dependency>In the existing
Function.javaproject file, add theseimportstatements:import com.microsoft.azure.functions.openai.annotation.textcompletion.TextCompletion; import com.microsoft.azure.functions.openai.annotation.textcompletion.TextCompletionResponse;In the same file, add this code that defines a new HTTP trigger endpoint named
whois:@FunctionName("WhoIs") public HttpResponseMessage whoIs( @HttpTrigger( name = "req", methods = {HttpMethod.GET}, authLevel = AuthorizationLevel.ANONYMOUS, route = "whois/{name}") HttpRequestMessage<Optional<String>> request, @BindingName("name") String name, @TextCompletion(prompt = "Who is {name}?", chatModel = "%CHAT_MODEL_DEPLOYMENT_NAME%", name = "response", isReasoningModel = false) TextCompletionResponse response, final ExecutionContext context) { return request.createResponseBuilder(HttpStatus.OK) .header("Content-Type", "application/json") .body(response.getContent()) .build(); }
In Visual Studio Code, Press F1 and in the command palette type
Azure Functions: Create Function..., select HTTP trigger, type the function namewhois, and press Enter.In the new
whois.jscode file, replace the contents of the file with this code:const { app, input } = require("@azure/functions"); // This OpenAI completion input requires a {name} binding value. const openAICompletionInput = input.generic({ prompt: 'Who is {name}?', maxTokens: '100', type: 'textCompletion', chatModel: '%CHAT_MODEL_DEPLOYMENT_NAME%' }) app.http('whois', { methods: ['GET'], route: 'whois/{name}', authLevel: 'function', extraInputs: [openAICompletionInput], handler: async (_request, context) => { var response = context.extraInputs.get(openAICompletionInput) return { body: response.content.trim() } } });
In Visual Studio Code, Press F1 and in the command palette type
Azure Functions: Create Function..., select HTTP trigger, type the function namewhois, and press Enter.In the new
whois.tscode file, replace the contents of the file with this code:import { app, input } from "@azure/functions"; // This OpenAI completion input requires a {name} binding value. const openAICompletionInput = input.generic({ prompt: 'Who is {name}?', maxTokens: '100', type: 'textCompletion', chatModel: '%CHAT_MODEL_DEPLOYMENT_NAME%' }) app.http('whois', { methods: ['GET'], route: 'whois/{name}', authLevel: 'function', extraInputs: [openAICompletionInput], handler: async (_request, context) => { var response: any = context.extraInputs.get(openAICompletionInput) return { body: response.content.trim() } } });
In the existing
function_app.pyproject file, add thisimportstatement:import jsonIn the same file, add this code that defines a new HTTP trigger endpoint named
whois:@app.route(route="whois/{name}", methods=["GET"]) @app.text_completion_input( arg_name="response", prompt="Who is {name}?", max_tokens="100", chat_model="%CHAT_MODEL_DEPLOYMENT_NAME%", ) def whois(req: func.HttpRequest, response: str) -> func.HttpResponse: response_json = json.loads(response) return func.HttpResponse(response_json["content"], status_code=200)
In Visual Studio Code, Press F1 and in the command palette type
Azure Functions: Create Function..., select HTTP trigger, type the function namewhois, select Anonymous, and press Enter.Open the new
whois/function.jsoncode file and replace its contents with this code, which adds a definition for theTextCompletionResponseinput binding:{ "bindings": [ { "authLevel": "function", "type": "httpTrigger", "direction": "in", "name": "Request", "route": "whois/{name}", "methods": [ "get" ] }, { "type": "http", "direction": "out", "name": "Response" }, { "type": "textCompletion", "direction": "in", "name": "TextCompletionResponse", "prompt": "Who is {name}?", "maxTokens": "100", "chatModel": "%CHAT_MODEL_DEPLOYMENT_NAME%" } ] }Replace the content of the
whois/run.ps1code file with this code, which returns the input binding response:using namespace System.Net param($Request, $TriggerMetadata, $TextCompletionResponse) Push-OutputBinding -Name Response -Value ([HttpResponseContext]@{ StatusCode = [HttpStatusCode]::OK Body = $TextCompletionResponse.Content })
7. Run the function
In Visual Studio Code, Press F1 and in the command palette type
Azurite: Startand press Enter to start the Azurite storage emulator.Press F5 to start the function app project and Core Tools in debug mode.
With the Core Tools running, send a GET request to the
whoisendpoint function, with a name in the path, like this URL:http://localhost:7071/api/whois/<NAME>Replace the
<NAME>string with the value you want passed to the"Who is {name}?"prompt. The<NAME>must be the URL-encoded name of a public figure, likeAbraham%20Lincoln.The response you see is the text completion response from your Azure OpenAI model.
After a response is returned, press Ctrl + C to stop Core Tools.
8. Clean up resources
In Azure, resources refer to function apps, functions, storage accounts, and so forth. They're grouped into resource groups, and you can delete everything in a group by deleting the group.
You created resources to complete these quickstarts. You could be billed for these resources, depending on your account status and service pricing. If you don't need the resources anymore, here's how to delete them:
In Visual Studio Code, press F1 to open the command palette. In the command palette, search for and select
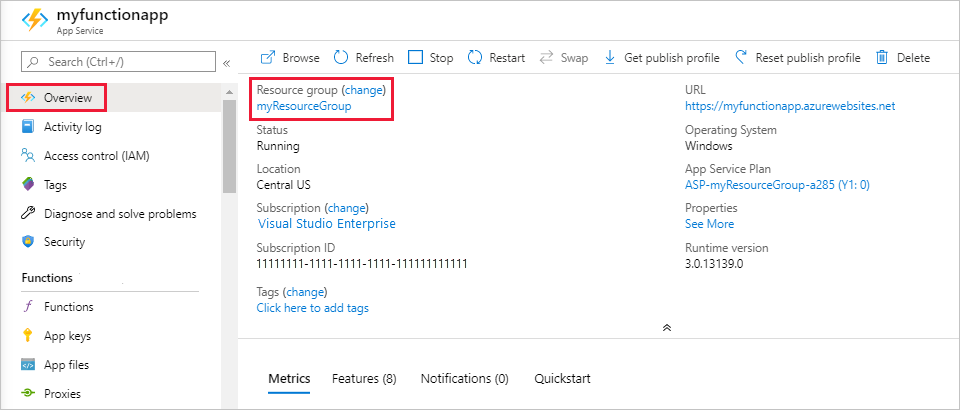
Azure: Open in portal.Choose your function app and press Enter. The function app page opens in the Azure portal.
In the Overview tab, select the named link next to Resource group.
On the Resource group page, review the list of included resources, and verify that they're the ones you want to delete.
Select Delete resource group, and follow the instructions.
Deletion may take a couple of minutes. When it's done, a notification appears for a few seconds. You can also select the bell icon at the top of the page to view the notification.