Note
Access to this page requires authorization. You can try signing in or changing directories.
Access to this page requires authorization. You can try changing directories.
The Azure Functions extension for Visual Studio Code lets you develop functions locally and deploy them to Azure. If this experience is your first with Azure Functions, you can learn more at An introduction to Azure Functions.
The Azure Functions extension provides these benefits:
- Edit, build, and run functions on your local development computer.
- Publish your Azure Functions project directly to Azure.
- Write your functions in various languages while taking advantage of the benefits of Visual Studio Code.
You're viewing the C# version of this article. Make sure to select your preferred Functions programming language at the start of the article.
If you're new to Functions, you might want to first complete the Visual Studio Code quickstart article.
You're viewing the Java version of this article. Make sure to select your preferred Functions programming language at the start of the article.
If you're new to Functions, you might want to first complete the Visual Studio Code quickstart article.
You're viewing the JavaScript version of this article. Make sure to select your preferred Functions programming language at the start of the article.
If you're new to Functions, you might want to first complete the Visual Studio Code quickstart article.
You're viewing the PowerShell version of this article. Make sure to select your preferred Functions programming language at the start of the article.
If you're new to Functions, you might want to first complete the Visual Studio Code quickstart article.
You're viewing the Python version of this article. Make sure to select your preferred Functions programming language at the start of the article.
If you're new to Functions, you might want to first complete the Visual Studio Code quickstart article.
You're viewing the TypeScript version of this article. Make sure to select your preferred Functions programming language at the start of the article.
If you're new to Functions, you might want to first complete the Visual Studio Code quickstart article.
Important
Don't mix local development and portal development for a single function app. When you publish from a local project to a function app, the deployment process overwrites any functions that you developed in the portal.
Prerequisites
Visual Studio Code installed on one of the supported platforms.
Azure Functions extension. You can also install the Azure Tools extension pack, which is recommended for working with Azure resources.
An active Azure subscription. If you don't yet have an account, you can create one from the extension in Visual Studio Code.
You also need these prerequisites to run and debug your functions locally. They're not required to just create or publish projects to Azure Functions.
- The Azure Functions Core Tools, which enables an integrated local debugging experience. When you have the Azure Functions extension installed, the easiest way to install or update Core Tools is by running the
Azure Functions: Install or Update Azure Functions Core Toolscommand from the command palette.
The C# extension for Visual Studio Code.
.NET (CLI), which is included in the .NET SDK.
Java, one of the supported versions.
- Node.js, one of the supported versions. Use the
node --versioncommand to check your version.
PowerShell 7.4 recommended. For version information, see PowerShell versions.
Python, one of the supported versions.
Python extension for Visual Studio Code.
Create an Azure Functions project
The Functions extension lets you create the required function app project at the same time you create your first function. Use these steps to create an HTTP-triggered function in a new project. An HTTP trigger is the simplest function trigger template to demonstrate.
In Visual Studio Code, press F1 to open the command palette. Search for and run the command
Azure Functions: Create New Project.... Select the directory location for your project workspace, then choose Select.You can either create a new folder or choose an empty folder for the project workspace, but don't choose a project folder that's already part of a workspace.
You can instead run the command
Azure Functions: Create New Containerized Project...to also get a Dockerfile generated for the project.When prompted, Select a language for your project. If necessary, choose a specific language version.
Select the HTTP trigger function template, or select Skip for now to create a project without a function. You can always add a function to your project later.
Tip
To view additional templates, select the Change template filter option and set the value to Core or All.
For the function name, enter HttpExample, select Enter, then select Function authorization.
This authorization level requires that you provide a function key when you call the function endpoint.
From the dropdown list, select Add to workspace.
In the Do you trust the authors of the files in this folder? window, select Yes.
Visual Studio Code creates a function in your chosen language and in the template for an HTTP-triggered function.
Generated project files
The project template creates a project in your chosen language and installs the required dependencies. For any language, the new project has these files:
host.json: Lets you configure the Functions host. These settings apply when you're running functions locally and when you're running them in Azure. For more information, see host.json reference.
local.settings.json: Maintains settings used when you're locally running functions. These settings are used only when you're running functions locally. For more information, see Local settings file.
Important
Because the local.settings.json file can contain secrets, make sure to exclude the file from your project source control.
Dockerfile (optional): Lets you create a containerized function app from your project by using an approved base image for your project. You only get this file when you run the command
Azure Functions: Create New Containerized Project.... You can add a Dockerfile to an existing project by using thefunc init --docker-onlycommand in Core Tools.
An HttpExample.cs class library file, the contents of which vary depending on whether your project runs in an isolated worker process or in-process with the Functions host.
These files are created:
A pom.xml file in the root folder that defines the project and deployment parameters, including project dependencies and the Java version. The pom.xml also contains information about the Azure resources that are created during a deployment.
A Functions.java file in your src path that implements the function.
Files generated depend on the chosen Node.js programming model for Functions:
An HttpExample folder is created that contains:
- The function.json definition file
- A run.ps1 file, which contains the function code.
Files generated depend on the chosen Python programming model for Functions:
At this point, you can run your HTTP trigger function locally.
Add a function to your project
You can add a new function to an existing project by using one of the predefined Functions trigger templates. To add a new function trigger, select F1 to open the command palette, then find and run the command Azure Functions: Create Function. Follow the prompts to choose your trigger type and define the required attributes of the trigger. If your trigger requires an access key or connection string to connect to a service, get that item ready before you create the function trigger.
This action adds a new C# class library (.cs) file to your project.
This action adds a new Java (.java) file to your project.
This action's results depend on the Node.js model version.
This action creates a new folder in the project. The folder contains a new function.json file and the new PowerShell code file.
This action's results depend on the Python model version.
Connect to services
You can connect your function to other Azure services by adding input and output bindings. Bindings connect your function to other services without you having to write the connection code.
For example, the way that you define an output binding that writes data to a storage queue depends on your process model:
If necessary, add a reference to the package that supports your binding extension.
Update the function method to add an attribute that defines the binding parameter, like
QueueOutputfor a queue output binding. You can use aMultiResponseobject to return multiple messages or multiple output streams.
For example, to add an output binding that writes data to a storage queue, update the function method to add a binding parameter defined by using the QueueOutput annotation. The OutputBinding<T> object represents the messages that are written to an output binding when the function completes.
For example, the way that you define the output binding that writes data to a storage queue depends on your Node.js model version:
Visual Studio Code lets you add bindings to your function.json file by following a convenient set of prompts.
To add a binding, open the command pallet (F1) and type Azure Functions: add binding..., choose the function for the new binding, and then follow the prompts, which vary depending on the type of binding being added to the function.
The following are example prompts to define a new storage output binding:
| Prompt | Value | Description |
|---|---|---|
| Select binding direction | out |
The binding is an output binding. |
| Select binding with direction | Azure Queue Storage |
The binding is an Azure Storage queue binding. |
| The name used to identify this binding in your code | msg |
Name that identifies the binding parameter referenced in your code. |
| The queue to which the message will be sent | outqueue |
The name of the queue that the binding writes to. When the queueName doesn't exist, the binding creates it on first use. |
| Select setting from "local.settings.json" | MyStorageConnection |
The name of an application setting that contains the connection string for the storage account. The AzureWebJobsStorage setting contains the connection string for the storage account you created with the function app. |
You can also right-click (Ctrl+click on macOS) directly on the function.json file in your function folder, select Add binding, and follow the same prompts.
In this example, the following binding is added to the bindings array in your function.json file:
{
    "type": "queue",
    "direction": "out",
    "name": "msg",
    "queueName": "outqueue",
    "connection": "MyStorageConnection"
}
For example, the way you define the output binding that writes data to a storage queue depends on your Python model version:
The following example shows the function definition after adding a Queue Storage output binding to an HTTP triggered function:
Because an HTTP triggered function also returns an HTTP response, the function returns a MultiResponse object, which represents both the HTTP and queue output.
[Function("HttpExample")]
public MultiResponse Run([HttpTrigger(AuthorizationLevel.Function, "get", "post")] HttpRequest req)
This example is the definition of the MultiResponse object that includes the output binding:
public class MultiResponse
{
    [QueueOutput("outqueue",Connection = "AzureWebJobsStorage")]
    public string[] Messages { get; set; }
    public IActionResult HttpResponse { get; set; }
}
This example uses ASP.NET Core integration. If you aren't using ASP.NET Core integration, you need to change HttpRequest to HttpRequestData and IActionResult to HttpResponseData.
Messages are sent to the queue when the function completes. The way you define the output binding depends on your process model. For more information, including links to example binding code that you can refer to, see Add bindings to a function.
@FunctionName("HttpExample")
public HttpResponseMessage run(
        @HttpTrigger(name = "req", methods = {HttpMethod.GET, HttpMethod.POST}, authLevel = AuthorizationLevel.ANONYMOUS)
        HttpRequestMessage<Optional<String>> request,
        @QueueOutput(name = "msg", queueName = "outqueue",
        connection = "AzureWebJobsStorage") OutputBinding<String> msg,
        final ExecutionContext context) {
For more information, including links to example binding code that you can refer to, see Add bindings to a function.
const { app, output } = require('@azure/functions');

const sendToQueue = output.storageQueue({
  queueName: 'outqueue',
  connection: 'AzureWebJobsStorage',
});

app.http('HttpExample', {
  methods: ['GET', 'POST'],
  authLevel: 'anonymous',
  extraOutputs: [sendToQueue],
  handler: async (request, context) => {
    try {
      context.log(`Http function processed request for url "${request.url}"`);

      const name = request.query.get('name') || (await request.text());
      context.log(`Name: ${name}`);

      if (name) {
        const msg = `Name passed to the function ${name}`;
        context.extraOutputs.set(sendToQueue, [msg]);
        return { body: msg };
      } else {
        context.log('Missing required data');
        return { status: 404, body: 'Missing required data' };
      }
    } catch (error) {
      context.log(`Error: ${error}`);
      return { status: 500, body: 'Internal Server Error' };
    }
  },
});
The way you define the output binding depends on the version of your Node.js model. For more information, including links to example binding code that you can refer to, see Add bindings to a function.
$outputMsg = $name
Push-OutputBinding -name msg -Value $outputMsg
For more information, including links to example binding code that you can refer to, see Add bindings to a function.
@app.route(route="HttpExample")
@app.queue_output(arg_name="msg", queue_name="outqueue", connection="AzureWebJobsStorage")
def HttpExample(req: func.HttpRequest, msg: func.Out[func.QueueMessage]) -> func.HttpResponse:
    logging.info('Python HTTP trigger function processed a request.')
The way you define the output binding depends on the version of your Python model. For more information, including links to example binding code that you can refer to, see Add bindings to a function.
import {
  app,
  output,
  HttpRequest,
  HttpResponseInit,
  InvocationContext,
  StorageQueueOutput,
} from '@azure/functions';

const sendToQueue: StorageQueueOutput = output.storageQueue({
  queueName: 'outqueue',
  connection: 'AzureWebJobsStorage',
});

export async function HttpExample(
  request: HttpRequest,
  context: InvocationContext,
): Promise<HttpResponseInit> {
  try {
    context.log(`Http function processed request for url "${request.url}"`);

    const name = request.query.get('name') || (await request.text());
    context.log(`Name: ${name}`);

    if (name) {
      const msg = `Name passed to the function ${name}`;
      context.extraOutputs.set(sendToQueue, [msg]);
      return { body: msg };
    } else {
      context.log('Missing required data');
      return { status: 404, body: 'Missing required data' };
    }
  } catch (error) {
    context.log(`Error: ${error}`);
    return { status: 500, body: 'Internal Server Error' };
  }
}

app.http('HttpExample', {
  methods: ['GET', 'POST'],
  authLevel: 'anonymous',
  handler: HttpExample,
});
The way you define the output binding depends on the version of your Node.js model. For more information, including links to example binding code that you can refer to, see Add bindings to a function.
Sign in to Azure
Before you can create Azure resources or publish your app, you must sign in to Azure.
If you aren't already signed in, in the Activity bar, select the Azure icon. Then under Resources, select Sign in to Azure.
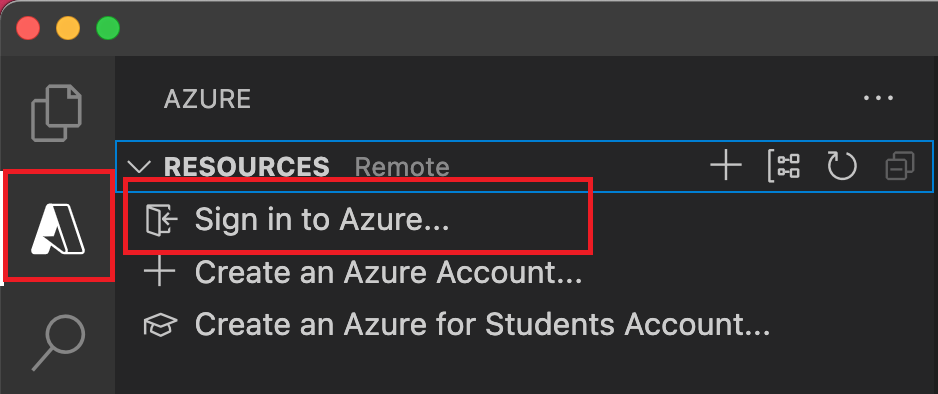
If you're already signed in and can see your existing subscriptions, go to the next section. If you don't yet have an Azure account, select Create an Azure Account. Students can select Create an Azure for Students Account.
When you are prompted in the browser, select your Azure account and sign in by using your Azure account credentials. If you create a new account, you can sign in after your account is created.
After you successfully sign in, you can close the new browser window. The subscriptions that belong to your Azure account are displayed in the side bar.
Create Azure resources
Before you can publish your Functions project to Azure, you must have a function app and related resources in your Azure subscription to run your code. The function app provides an execution context for your functions. When you publish from Visual Studio Code to a function app in Azure, the project is packaged and deployed to the selected function app in your Azure subscription.
When you create a function app in Azure, you can choose either a quick function app create path using defaults or a path that gives you advanced options, such as using existing Azure resources. This way, you have more control over creating the remote resources.
In this section, you create a function app in the Flex Consumption plan along with related resources in your Azure subscription. Many of the resource creation decisions are made for you based on default behaviors. For more control over the created resources, you must instead create your function app with advanced options.
In Visual Studio Code, select F1 to open the command palette. At the prompt (
>), enter and then select Azure Functions: Create Function App in Azure.At the prompts, provide the following information:
Prompt Action Select subscription Select the Azure subscription to use. The prompt doesn't appear when you have only one subscription visible under Resources. Enter a new function app name Enter a globally unique name that's valid in a URL path. The name you enter is validated to make sure that it's unique in Azure Functions. Select a location for new resources Select an Azure region. For better performance, select a region near you. Only regions supported by Flex Consumption plans are displayed. Select a runtime stack Select the language version you currently run locally. Select resource authentication type Select Managed identity, which is the most secure option for connecting to the default host storage account. In the Azure: Activity Log panel, the Azure extension shows the status of individual resources as they're created in Azure.

When the function app is created, the following related resources are created in your Azure subscription. The resources are named based on the name you entered for your function app.
- A resource group, which is a logical container for related resources.
- A function app, which provides the environment for executing your function code. A function app lets you group functions as a logical unit for easier management, deployment, and sharing of resources within the same hosting plan.
- An Azure App Service plan, which defines the underlying host for your function app.
- A standard Azure Storage account, which is used by the Functions host to maintain state and other information about your function app.
- An Application Insights instance that's connected to the function app, and which tracks the use of your functions in the app.
- A user-assigned managed identity that's added to the Storage Blob Data Contributor role in the new default host storage account.
A notification is displayed after your function app is created and the deployment package is applied.
Tip
By default, the Azure resources required by your function app are created based on the name you enter for your function app. By default, the resources are created with the function app in the same, new resource group. If you want to customize the names of the associated resources or reuse existing resources, publish the project with advanced create options.
Create an Azure Container Apps deployment
Important
A new hosting method for running Azure Functions directly in Azure Container Apps is now available. See Native Azure Functions Support in Azure Container Apps. This integration allows you to use the full features and capabilities of Azure Container Apps. You also benefit from the functions programming model and simplicity of autoscaling provided by Azure Functions.
We recommend this approach for most new workloads. For more information, see Azure Functions on Azure Container Apps.
Use Visual Studio Code to create Azure resources for a containerized code project. When the extension detects the presence of a Dockerfile during resource creation, it asks if you want to deploy the container image instead of just the code. Visual Studio Code creates an Azure Container Apps environment for your containerized code project that's integrated with Azure Functions. For more information, see Azure Container Apps hosting of Azure Functions.
Note
Container deployment requires the Azure Container Apps extension for Visual Studio Code. This extension is currently in preview.
The create process depends on whether you choose a quick create or you need to use advanced options:
In Visual Studio Code, press F1 to open the command palette. Search for and run the command
Azure Functions: Create Function App in Azure....When prompted, choose Container image.
Provide the following information at the prompts:
Prompt Selection Select subscription (optional) Choose the subscription to use. You won't see this prompt when you have only one subscription visible under Resources. Enter a name for the new function app Type a name that's valid in a URL path. The name you type is validated to make sure that it's globally unique in Functions. Select resource authentication type Select Managed identity so that your app connects to remote resources by using Microsoft Entra ID authentication instead of using shared secrets (connection strings and keys), which are less secure. Select a location for new resources For better performance, choose a region near you. When prompted, Enter a name for the container app environment.
The extension shows the status of individual resources as they're being created in Azure in the Azure: Activity Log panel.
For more information about the resources required to run your containerized functions in Container Apps, see Required resources.
Note
You can't currently use Visual Studio Code to deploy a containerized function app to an Azure Functions-integrated Container Apps environment. You must instead publish your container image to a container registry and then set that registry image as the deployment source for your Container Apps-hosted function app. For more information, see Create your function app in a container and Update an image in the registry.
Deploy project files
Set up continuous deployment so that your function app in Azure updates when you update source files in the connected source location. You can also deploy your project files from Visual Studio Code. When you publish from Visual Studio Code, you can take advantage of the Zip deploy technology.
Important
Deploying to an existing function app always overwrites the contents of that app in Azure.
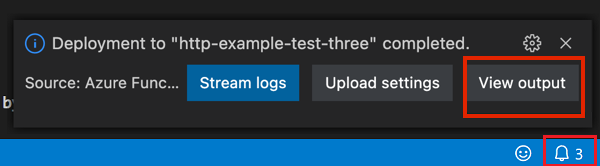
In the command palette, enter and then select Azure Functions: Deploy to Function App.
Select the function app you just created. When prompted about overwriting previous deployments, select Deploy to deploy your function code to the new function app resource.
When deployment is completed, select View Output to view the creation and deployment results, including the Azure resources that you created. If you miss the notification, select the bell icon in the lower-right corner to see it again.
Get the URL of an HTTP triggered function in Azure
To call an HTTP-triggered function from a client, you need the function's URL, which is available after deployment to your function app. This URL includes any required function keys. You can use the extension to get these URLs for your deployed functions. If you just want to run the remote function in Azure, use the Execute function now functionality of the extension.
Select F1 to open the command palette, and then find and run the command Azure Functions: Copy Function URL.
Follow the prompts to select your function app in Azure and then the specific HTTP trigger that you want to invoke.
The function URL is copied to the clipboard, along with any required keys passed by the code query parameter. Use an HTTP tool to submit POST requests, or a browser to submit GET requests to the remote function.
When the extension gets the URL of a function in Azure, it uses your Azure account to automatically retrieve the keys needed to start the function. Learn more about function access keys. Starting non-HTTP triggered functions requires using the admin key.
Run functions
The Azure Functions extension lets you run individual functions. You can run functions either in your project on your local development computer or in your Azure subscription.
For HTTP trigger functions, the extension calls the HTTP endpoint. For other kinds of triggers, the extension calls administrator APIs to start the function. The message body of the request sent to the function depends on the trigger type. When a trigger requires test data, you're prompted to enter data in a specific JSON format.
Run functions in Azure
To execute a function in Azure from Visual Studio Code, follow these steps:
In the command palette, enter Azure Functions: Execute function now, and select your Azure subscription.
From the list, choose your function app in Azure. If you don't see your function app, make sure you're signed in to the correct subscription.
From the list, choose the function that you want to run. In Enter request body, type the message body of the request, and press Enter to send this request message to your function.
The default text in Enter request body indicates the body's format. If your function app has no functions, a notification error is shown with this error.
When the function executes in Azure and returns a response, Visual Studio Code shows a notification.
You can also run your function from the Azure: Functions area by opening the shortcut menu for the function that you want to run from your function app in your Azure subscription, and then selecting Execute Function Now....
When you run your functions in Azure from Visual Studio Code, the extension uses your Azure account to automatically retrieve the keys needed to start the function. Learn more about function access keys. Starting non-HTTP triggered functions requires using the admin key.
Run functions locally
The local runtime is the same runtime that hosts your function app in Azure. The runtime reads local settings from the local.settings.json file. To run your Functions project locally, you must meet more requirements.
Configure the project to run locally
The Functions runtime uses an Azure Storage account internally for all trigger types except HTTP and webhooks. Set the Values.AzureWebJobsStorage key to a valid Azure Storage account connection string.
This section uses the Azure Storage extension for Visual Studio Code with Azure Storage Explorer to connect to and retrieve the storage connection string.
To set the storage account connection string:
In Visual Studio, open Cloud Explorer, expand Storage Account > Your Storage Account, then select Properties and copy the Primary Connection String value.
In your project, open the local.settings.json file and set the value of the AzureWebJobsStorage key to the connection string you copied.
Repeat the previous step to add unique keys to the Values array for any other connections required by your functions.
For more information, see Local settings file.
Debug functions locally
To debug your functions, select F5. If Core Tools isn't available, you're prompted to install it. When Core Tools is installed and running, output is shown in the Terminal. This step is the same as running the func start Core Tools command from the Terminal, but with extra build tasks and an attached debugger.
When the project is running, you can use the Execute Function Now... feature of the extension to trigger your functions as you would when the project is deployed to Azure. With the project running in debug mode, breakpoints are hit in Visual Studio Code as you would expect.
In the command palette, enter Azure Functions: Execute function now and choose Local project.
Choose the function you want to run in your project and type the message body of the request in Enter request body. Press Enter to send this request message to your function. The default text in Enter request body should indicate the format of the body. If your function app has no functions, a notification error is shown with this error.
When the function runs locally and after the response is received, a notification is raised in Visual Studio Code. Information about the function execution is shown in Terminal panel.
Keys aren't required when running locally. This rule applies to both function keys and admin-level keys.
Work with app settings locally
When your function app runs in Azure, settings required by your functions are stored encrypted in app settings. During local development, these settings are instead added to the Values collection in the local.settings.json file. The local.settings.json file also stores settings used by local development tools.
Items in the Values collection in your project's local.settings.json file are intended to mirror items in your function app's application settings in Azure.
By default, these settings aren't migrated automatically when you publish the project to Azure. After publishing finishes, you can choose to publish settings from local.settings.json to your function app in Azure. To learn more, see Publish application settings.
Values in ConnectionStrings are never published.
Your code can read the function application settings values as environment variables. For more information, see Environment variables.
- Your code can read the function app settings values as environment variables. For more information, see Environment variables.
- Your code can read the function app settings values as environment variables. For more information, see Environment variables.
- Your code can read the function app settings values as environment variables. For more information, see Environment variables.
- Your code can read the function app settings values as environment variables. For more information, see Environment variables.
Application settings in Azure
The settings in the local.settings.json file in your project should match the application settings in the function app in Azure. You must add any new settings to both local.settings.json and the function app in Azure. These settings aren't uploaded automatically when you publish the project. Likewise, you must download any settings that you create in your function app in the portal to your local project.
Publish application settings
The easiest way to publish the required settings to your function app in Azure is to use the Upload settings link that appears after you publish your project:

You can also publish settings by using the Azure Functions: Upload Local Setting command in the command palette. You can add individual settings to application settings in Azure by using the Azure Functions: Add New Setting command.
Tip
Be sure to save your local.settings.json file before you publish it.
If the local file is encrypted, the process decrypts it, publishes it, and encrypts it again. If conflicting values exist in the two locations, you're prompted to choose how to proceed.
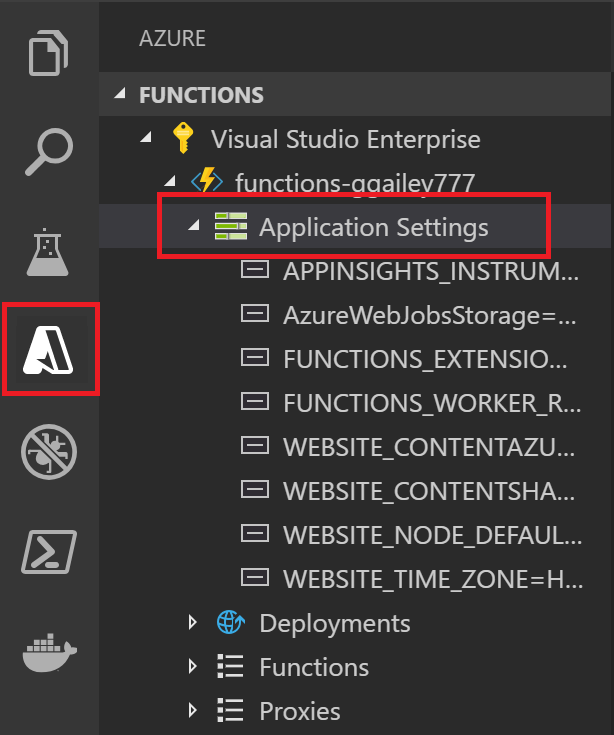
View existing app settings in the Azure: Functions area by expanding your subscription, your function app, and Application Settings.
Download settings from Azure
If you create application settings in Azure, you can download them into your local.settings.json file by using the Azure Functions: Download Remote Settings command.
As with uploading, if the local file is encrypted, the process decrypts it, updates it, and encrypts it again. If conflicting values exist in the two locations, you're prompted to choose how to proceed.
Install binding extensions
Except for HTTP and timer triggers, bindings are implemented in extension packages.
You must explicitly install the extension packages for the triggers and bindings that need them. The specific package you install depends on your project's process model.
Run the dotnet add package command in the Terminal window to install the extension packages that you need in your project. This template demonstrates how you add a binding for an isolated-process class library:
dotnet add package Microsoft.Azure.Functions.Worker.Extensions.<BINDING_TYPE_NAME> --version <TARGET_VERSION>
Replace <BINDING_TYPE_NAME> with the name of the package that contains the binding you need. You can find the desired binding reference article in the list of supported bindings.
Replace <TARGET_VERSION> in the example with a specific version of the package, such as 3.0.0-beta5. Valid versions are listed on the individual package pages at NuGet.org. The major versions that correspond to the current Functions runtime are specified in the reference article for the binding.
Tip
You can also use the NuGet commands in the C# Dev Kit to install binding extension packages.
C# script uses extension bundles.
The easiest way to install binding extensions is to enable extension bundles. When you enable bundles, a predefined set of extension packages is automatically installed.
To enable extension bundles, open the host.json file and update its contents to match the following code:
{
    "version": "2.0",
    "extensionBundle": {
        "id": "Microsoft.Azure.Functions.ExtensionBundle",
        "version": "[3.*, 4.0.0)"
    }
}
If for some reason you can't use an extension bundle to install binding extensions for your project, see Explicitly install extensions.
Monitoring functions
When you run functions locally, Core Tools streams log data to the Terminal console. You can also get log data when your Functions project runs in a function app in Azure. You can connect to streaming logs in Azure to see near-real-time log data. You should enable Application Insights for a more complete understanding of how your function app behaves.
Streaming logs
When you're developing an application, it's often useful to see logging information in near-real time. You can view a stream of log files generated by your functions. Turn on logs from the command pallet with the Azure Functions: Start streaming logs command. This output is an example of streaming logs for a request to an HTTP-triggered function:
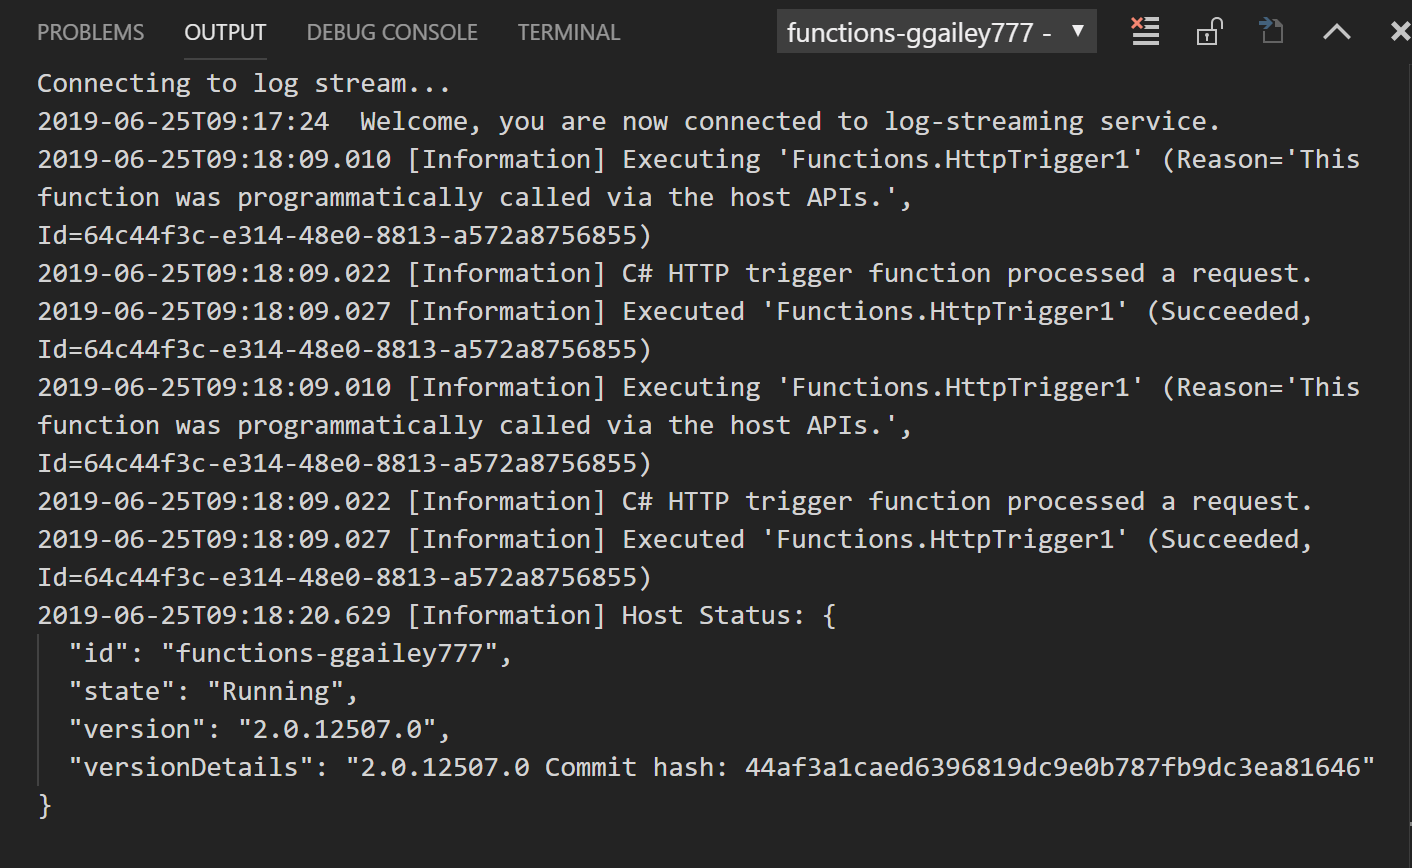
To learn more, see Streaming logs.
Application Insights
You should monitor the execution of your functions by integrating your function app with Application Insights. When you create a function app in the Azure portal, this integration occurs by default. When you create your function app during Visual Studio publishing, you need to integrate Application Insights yourself. To learn how, see Enable Application Insights integration.
To learn more about monitoring using Application Insights, see Monitor Azure Functions.
C# script projects
By default, all C# projects are created as C# compiled class library projects. If you prefer to work with C# script projects instead, you must select C# script as the default language in the Azure Functions extension settings:
Select File > Preferences > Settings.
Go to User Settings > Extensions > Azure Functions.
Select C#Script from Azure Function: Project Language.
After you complete these steps, calls made to the underlying Core Tools include the --csx option, which generates and publishes C# script (.csx) project files. When you specify this default language, all projects that you create default to C# script projects. You're not prompted to choose a project language when a default is set. To create projects in other languages, you must change this setting or remove it from the user settings.json file. After you remove this setting, you're again prompted to choose your language when you create a project.
Command palette reference
The Azure Functions extension provides a useful graphical interface for interacting with your function apps in Azure. The same functionality is also available as commands in the command palette (F1). These Azure Functions commands are available:
| Azure Functions command | Description |
|---|---|
| Add New Settings | Creates a new application setting in Azure. To learn more, see Publish application settings. You might also need to download this setting to your local settings. |
| Configure Deployment Source | Connects your function app in Azure to a local Git repository. To learn more, see Continuous deployment for Azure Functions. |
| Connect to GitHub Repository | Connects your function app to a GitHub repository. |
| Copy Function URL | Gets the remote URL of an HTTP-triggered function that's running in Azure. To learn more, see Get the URL of the deployed function. |
| Create function app in Azure | Creates a new function app in your subscription in Azure. To learn more, see the section on how to publish to a new function app in Azure. |
| Decrypt Settings | Decrypts local settings that the Azure Functions: Encrypt Settings command encrypted. |
| Delete Function App | Removes a function app from your subscription in Azure. When there are no other apps in the App Service plan, you're given the option to delete that plan too. Other resources, like storage accounts and resource groups, aren't deleted. To remove all resources, you should instead delete the resource group. Your local project isn't affected. |
| Delete Function | Removes an existing function from a function app in Azure. Because this deletion doesn't affect your local project, instead consider removing the function locally and then republishing your project. |
| Delete Proxy | Removes an Azure Functions proxy from your function app in Azure. To learn more about proxies, see Work with Azure Functions Proxies. |
| Delete Setting | Deletes a function app setting in Azure. This deletion doesn't affect settings in your local.settings.json file. |
| Disconnect from Repo | Removes the continuous deployment connection between a function app in Azure and a source control repository. |
| Download Remote Settings | Downloads settings from the chosen function app in Azure into your local.settings.json file. If the local file is encrypted, it's decrypted, updated, and encrypted again. If there are settings that have conflicting values in the two locations, you're prompted to choose how to proceed. Be sure to save changes to your local.settings.json file before you run this command. |
| Edit settings | Changes the value of an existing function app setting in Azure. This command doesn't affect settings in your local.settings.json file. |
| Encrypt settings | Encrypts individual items in the Values array in the local settings. In this file, IsEncrypted is also set to true, which specifies that the local runtime decrypt settings before using them. Encrypt local settings to reduce the risk of leaking valuable information. In Azure, application settings are always stored encrypted. |
| Execute Function Now | Manually starts a function by using admin APIs. Use this command for testing, both locally during debugging and against functions running in Azure. When a function in Azure starts, the extension first automatically obtains an admin key, which it uses to call the remote admin APIs that start functions in Azure. The body of the message sent to the API depends on the type of trigger. Timer triggers don't require you to pass any data. |
| Initialize Project for Use with VS Code | Adds the required Visual Studio Code project files to an existing Functions project. Use this command to work with a project that you created by using Core Tools. |
| Install or Update Azure Functions Core Tools | Installs or updates Azure Functions Core Tools, which is used to run functions locally. |
| Redeploy | Lets you redeploy project files from a connected Git repository to a specific deployment in Azure. To republish local updates from Visual Studio Code, republish your project. |
| Rename Settings | Changes the key name of an existing function app setting in Azure. This command doesn't affect settings in your local.settings.json file. After you rename settings in Azure, you should download those changes to the local project. |
| Restart | Restarts the function app in Azure. Deploying updates also restarts the function app. |
| Set AzureWebJobsStorage | Sets the value of the AzureWebJobsStorage application setting. This setting is required by Azure Functions. It's set when a function app is created in Azure. |
| Start | Starts a stopped function app in Azure. |
| Start Streaming Logs | Starts the streaming logs for the function app in Azure. Use streaming logs during remote troubleshooting in Azure if you need to see logging information in near-real time. To learn more, see Streaming logs. |
| Stop | Stops a function app that's running in Azure. |
| Stop Streaming Logs | Stops the streaming logs for the function app in Azure. |
| Toggle as Slot Setting | When enabled, ensures that an application setting persists for a given deployment slot. |
| Uninstall Azure Functions Core Tools | Removes Azure Functions Core Tools, which is required by the extension. |
| Upload Local Settings | Uploads settings from your local.settings.json file to the chosen function app in Azure. If the local file is encrypted, it's decrypted, uploaded, and encrypted again. If there are settings that have conflicting values in the two locations, you're prompted to choose how to proceed. Be sure to save changes to your local.settings.json file before you run this command. |
| View Commit in GitHub | Shows you the latest commit in a specific deployment when your function app is connected to a repository. |
| View Deployment Logs | Shows you the logs for a specific deployment to the function app in Azure. |
Next steps
To learn more about Azure Functions Core Tools, see Work with Azure Functions Core Tools.
To learn more about developing functions as .NET class libraries, see Azure Functions C# developer reference. This article also provides links to examples of how to use attributes to declare the various types of bindings supported by Azure Functions.