Note
Access to this page requires authorization. You can try signing in or changing directories.
Access to this page requires authorization. You can try changing directories.
This tutorial shows you how to use Azure Functions to create a Java function that analyzes a continuous stream of temperature and pressure data. Event hub events that represent sensor readings trigger the function. The function processes the event data, then adds status entries to an Azure Cosmos DB instance.
In this tutorial, you'll:
- Create and configure Azure resources using the Azure CLI.
- Create and test Java functions that interact with these resources.
- Deploy your functions to Azure and monitor them with Application Insights.
If you don't have an Azure account, create a free account before you begin.
Prerequisites
To complete this tutorial, you must have the following installed:
- Java Developer Kit, version 8
- Apache Maven, version 3.0 or above
- Azure Functions Core Tools version 2.6.666 or above
Use the Bash environment in Azure Cloud Shell. For more information, see Get started with Azure Cloud Shell.

If you prefer to run CLI reference commands locally, install the Azure CLI. If you're running on Windows or macOS, consider running Azure CLI in a Docker container. For more information, see How to run the Azure CLI in a Docker container.
If you're using a local installation, sign in to the Azure CLI by using the az login command. To finish the authentication process, follow the steps displayed in your terminal. For other sign-in options, see Authenticate to Azure using Azure CLI.
When you're prompted, install the Azure CLI extension on first use. For more information about extensions, see Use and manage extensions with the Azure CLI.
Run az version to find the version and dependent libraries that are installed. To upgrade to the latest version, run az upgrade.
Important
The JAVA_HOME environment variable must be set to the install location of the JDK to complete this tutorial.
If you prefer to use the code for this tutorial directly, see the java-functions-eventhub-cosmosdb sample repo.
Create Azure resources
In this tutorial, you'll need these resources:
- A resource group to contain the other resources
- An Event Hubs namespace, event hub, and authorization rule
- An Azure Cosmos DB account, database, and collection
- A function app and a storage account to host it
The following sections show you how to create these resources using the Azure CLI.
Set environment variables
Next, create some environment variables for the names and location of the resources you'll create. Use the following commands, replacing the <value> placeholders with values of your choosing. Values should conform to the naming rules and restrictions for Azure resources. For the LOCATION variable, use one of the values produced by the az functionapp list-consumption-locations command.
RESOURCE_GROUP=<value>
EVENT_HUB_NAMESPACE=<value>
EVENT_HUB_NAME=<value>
EVENT_HUB_AUTHORIZATION_RULE=<value>
COSMOS_DB_ACCOUNT=<value>
STORAGE_ACCOUNT=<value>
FUNCTION_APP=<value>
LOCATION=<value>
The rest of this tutorial uses these variables. Be aware that these variables persist only for the duration of your current Azure CLI or Cloud Shell session. You will need to run these commands again if you use a different local terminal window or your Cloud Shell session times out.
Create a resource group
Azure uses resource groups to collect all related resources in your account. That way, you can view them as a unit and delete them with a single command when you're done with them.
Use the following command to create a resource group:
Create an event hub
Next, create an Azure Event Hubs namespace, event hub, and authorization rule using the following commands:
az eventhubs namespace create \
    --resource-group $RESOURCE_GROUP \
    --name $EVENT_HUB_NAMESPACE
az eventhubs eventhub create \
    --resource-group $RESOURCE_GROUP \
    --name $EVENT_HUB_NAME \
    --namespace-name $EVENT_HUB_NAMESPACE \
    --retention-time 1 \
    --cleanup-policy Delete
az eventhubs eventhub authorization-rule create \
    --resource-group $RESOURCE_GROUP \
    --name $EVENT_HUB_AUTHORIZATION_RULE \
    --eventhub-name $EVENT_HUB_NAME \
    --namespace-name $EVENT_HUB_NAMESPACE \
    --rights Listen Send
The Event Hubs namespace contains the actual event hub and its authorization rule. The authorization rule enables your functions to send messages to the hub and listen for the corresponding events. One function sends messages that represent telemetry data. Another function listens for events, analyzes the event data, and stores the results in Azure Cosmos DB.
Create an Azure Cosmos DB
Next, create an Azure Cosmos DB account, database, and collection using the following commands:
az cosmosdb create \
    --resource-group $RESOURCE_GROUP \
    --name $COSMOS_DB_ACCOUNT
az cosmosdb sql database create \
    --resource-group $RESOURCE_GROUP \
    --account-name $COSMOS_DB_ACCOUNT \
    --name TelemetryDb
az cosmosdb sql container create \
    --resource-group $RESOURCE_GROUP \
    --account-name $COSMOS_DB_ACCOUNT \
    --database-name TelemetryDb \
    --name TelemetryInfo \
    --partition-key-path '/temperatureStatus'
The partition-key-path value partitions your data based on the temperatureStatus value of each item. The partition key enables Azure Cosmos DB to increase performance by dividing your data into distinct subsets that it can access independently.
Create a storage account and function app
Next, create an Azure Storage account, which is required by Azure Functions, then create the function app. Use the following commands:
az storage account create \
    --resource-group $RESOURCE_GROUP \
    --name $STORAGE_ACCOUNT \
    --sku Standard_LRS
az functionapp create \
    --resource-group $RESOURCE_GROUP \
    --name $FUNCTION_APP \
    --storage-account $STORAGE_ACCOUNT \
    --consumption-plan-location $LOCATION \
    --runtime java \
    --functions-version 4
When the az functionapp create command creates your function app, it also creates an Application Insights resource with the same name. The function app is automatically configured with a setting named APPINSIGHTS_INSTRUMENTATIONKEY that connects it to Application Insights. You can view app telemetry after you deploy your functions to Azure, as described later in this tutorial.
Configure your function app
Your function app will need to access the other resources to work correctly. The following sections show you how to configure your function app so that it can run on your local machine.
Retrieve resource connection strings
Use the following commands to retrieve the storage, event hub, and Azure Cosmos DB connection strings and save them in environment variables:
Note
Microsoft recommends using the most secure authentication flow available. The authentication flow described in this procedure, such as for databases, caches, messaging, or AI services, requires a very high degree of trust in the application and carries risks not present in other flows. Use this flow only when more secure options, like managed identities for passwordless or keyless connections, are not viable. For local machine operations, prefer user identities for passwordless or keyless connections.
AZURE_WEB_JOBS_STORAGE=$( \
    az storage account show-connection-string \
        --name $STORAGE_ACCOUNT \
        --query connectionString \
        --output tsv)
echo $AZURE_WEB_JOBS_STORAGE
EVENT_HUB_CONNECTION_STRING=$( \
    az eventhubs eventhub authorization-rule keys list \
        --resource-group $RESOURCE_GROUP \
        --name $EVENT_HUB_AUTHORIZATION_RULE \
        --eventhub-name $EVENT_HUB_NAME \
        --namespace-name $EVENT_HUB_NAMESPACE \
        --query primaryConnectionString \
        --output tsv)
echo $EVENT_HUB_CONNECTION_STRING
COSMOS_DB_CONNECTION_STRING=$( \
    az cosmosdb keys list \
        --resource-group $RESOURCE_GROUP \
        --name $COSMOS_DB_ACCOUNT \
        --type connection-strings \
        --query 'connectionStrings[0].connectionString' \
        --output tsv)
echo $COSMOS_DB_CONNECTION_STRING
These variables are set to values retrieved from Azure CLI commands. Each command uses a JMESPath query to extract the connection string from the JSON payload returned. The connection strings are also displayed using echo so you can confirm that they've been retrieved successfully.
Update your function app settings
Next, use the following command to transfer the connection string values to app settings in your Azure Functions account:
az functionapp config appsettings set \
    --resource-group $RESOURCE_GROUP \
    --name $FUNCTION_APP \
    --settings \
        AzureWebJobsStorage=$AZURE_WEB_JOBS_STORAGE \
        EventHubConnectionString=$EVENT_HUB_CONNECTION_STRING \
        CosmosDBConnectionSetting=$COSMOS_DB_CONNECTION_STRING
Your Azure resources have now been created and configured to work properly together.
Create and test your functions
Next, you'll create a project on your local machine, add Java code, and test it. You'll use commands that work with the Azure Functions Plugin for Maven and the Azure Functions Core Tools. Your functions will run locally, but will use the cloud-based resources you've created. After you get the functions working locally, you can use Maven to deploy them to the cloud and watch your data and analytics accumulate.
If you used Cloud Shell to create your resources, then you won't be connected to Azure locally. In this case, use the az login command to launch the browser-based login process. Then if necessary, set the default subscription with az account set --subscription followed by the subscription ID. Finally, run the following commands to recreate some environment variables on your local machine. Replace the <value> placeholders with the same values you used previously.
Create a local functions project
Use the following Maven command to create a functions project and add the required dependencies.
mvn archetype:generate --batch-mode \
    -DarchetypeGroupId=com.microsoft.azure \
    -DarchetypeArtifactId=azure-functions-archetype \
    -DappName=$FUNCTION_APP \
    -DresourceGroup=$RESOURCE_GROUP \
    -DappRegion=$LOCATION \
    -DgroupId=com.example \
    -DartifactId=telemetry-functions
This command generates several files inside a telemetry-functions folder:
- A
pom.xmlfile for use with Maven - A
local.settings.jsonfile to hold app settings for local testing - A
host.jsonfile that enables the Azure Functions Extension Bundle, required for Azure Cosmos DB output binding in your data analysis function - A
Function.javafile that includes a default function implementation - A few test files that this tutorial doesn't need
To avoid compilation errors, you'll need to delete the test files. Run the following commands to navigate to the new project folder and delete the test folder:
Retrieve your function app settings for local use
For local testing, your function project will need the connection strings that you added to your function app in Azure earlier in this tutorial. Use the following Azure Functions Core Tools command, which retrieves all the function app settings stored in the cloud and adds them to your local.settings.json file:
Note
Microsoft recommends using the most secure authentication flow available. The authentication flow described in this procedure, such as for databases, caches, messaging, or AI services, requires a very high degree of trust in the application and carries risks not present in other flows. Use this flow only when more secure options, like managed identities for passwordless or keyless connections, are not viable. For local machine operations, prefer user identities for passwordless or keyless connections.
Add Java code
Next, open the Function.java file and replace the contents with the following code.
package com.example;

import com.example.TelemetryItem.status;
import com.microsoft.azure.functions.annotation.Cardinality;
import com.microsoft.azure.functions.annotation.CosmosDBOutput;
import com.microsoft.azure.functions.annotation.EventHubOutput;
import com.microsoft.azure.functions.annotation.EventHubTrigger;
import com.microsoft.azure.functions.annotation.FunctionName;
import com.microsoft.azure.functions.annotation.TimerTrigger;
import com.microsoft.azure.functions.ExecutionContext;
import com.microsoft.azure.functions.OutputBinding;

public class Function {

    @FunctionName("generateSensorData")
    @EventHubOutput(
        name = "event",
        eventHubName = "", // blank because the value is included in the connection string
        connection = "EventHubConnectionString")
    public TelemetryItem generateSensorData(
        @TimerTrigger(
            name = "timerInfo",
            schedule = "*/10 * * * * *") // every 10 seconds
            String timerInfo,
        final ExecutionContext context) {

        context.getLogger().info("Java Timer trigger function executed at: "
            + java.time.LocalDateTime.now());
        double temperature = Math.random() * 100;
        double pressure = Math.random() * 50;
        return new TelemetryItem(temperature, pressure);
    }

    @FunctionName("processSensorData")
    public void processSensorData(
        @EventHubTrigger(
            name = "msg",
            eventHubName = "", // blank because the value is included in the connection string
            cardinality = Cardinality.ONE,
            connection = "EventHubConnectionString")
            TelemetryItem item,
        @CosmosDBOutput(
            name = "databaseOutput",
            databaseName = "TelemetryDb",
            collectionName = "TelemetryInfo",
            connectionStringSetting = "CosmosDBConnectionSetting")
            OutputBinding<TelemetryItem> document,
        final ExecutionContext context) {

        context.getLogger().info("Event hub message received: " + item.toString());

        if (item.getPressure() > 30) {
            item.setNormalPressure(false);
        } else {
            item.setNormalPressure(true);
        }

        if (item.getTemperature() < 40) {
            item.setTemperatureStatus(status.COOL);
        } else if (item.getTemperature() > 90) {
            item.setTemperatureStatus(status.HOT);
        } else {
            item.setTemperatureStatus(status.WARM);
        }

        document.setValue(item);
    }
}
As you can see, this file contains two functions, generateSensorData and processSensorData. The generateSensorData function simulates a sensor that sends temperature and pressure readings to the event hub. A timer trigger runs the function every 10 seconds, and an event hub output binding sends the return value to the event hub.
When the event hub receives the message, it generates an event. The processSensorData function runs when it receives the event. It then processes the event data and uses an Azure Cosmos DB output binding to send the results to Azure Cosmos DB.
The data used by these functions is stored using a class called TelemetryItem, which you'll need to implement. Create a new file called TelemetryItem.java in the same location as Function.java and add the following code:
package com.example;

public class TelemetryItem {

    private String id;
    private double temperature;
    private double pressure;
    private boolean isNormalPressure;
    private status temperatureStatus;
    static enum status {
        COOL,
        WARM,
        HOT
    }

    public TelemetryItem(double temperature, double pressure) {
        this.temperature = temperature;
        this.pressure = pressure;
    }

    public String getId() {
        return id;
    }

    public double getTemperature() {
        return temperature;
    }

    public double getPressure() {
        return pressure;
    }

    @Override
    public String toString() {
        return "TelemetryItem={id=" + id + ",temperature="
            + temperature + ",pressure=" + pressure + "}";
    }

    public boolean isNormalPressure() {
        return isNormalPressure;
    }

    public void setNormalPressure(boolean isNormal) {
        this.isNormalPressure = isNormal;
    }

    public status getTemperatureStatus() {
        return temperatureStatus;
    }

    public void setTemperatureStatus(status temperatureStatus) {
        this.temperatureStatus = temperatureStatus;
    }
}
Run locally
You can now build and run the functions locally and see data appear in your Azure Cosmos DB.
Use the following Maven commands to build and run the functions:
After some build and startup messages, you'll see output similar to the following example for each time the functions run:
[10/22/19 4:01:30 AM] Executing 'Functions.generateSensorData' (Reason='Timer fired at 2019-10-21T21:01:30.0016769-07:00', Id=c1927c7f-4f70-4a78-83eb-bc077d838410)
[10/22/19 4:01:30 AM] Java Timer trigger function executed at: 2019-10-21T21:01:30.015
[10/22/19 4:01:30 AM] Function "generateSensorData" (Id: c1927c7f-4f70-4a78-83eb-bc077d838410) invoked by Java Worker
[10/22/19 4:01:30 AM] Executed 'Functions.generateSensorData' (Succeeded, Id=c1927c7f-4f70-4a78-83eb-bc077d838410)
[10/22/19 4:01:30 AM] Executing 'Functions.processSensorData' (Reason='', Id=f4c3b4d7-9576-45d0-9c6e-85646bb52122)
[10/22/19 4:01:30 AM] Event hub message received: TelemetryItem={id=null,temperature=32.728691307527015,pressure=10.122563042388165}
[10/22/19 4:01:30 AM] Function "processSensorData" (Id: f4c3b4d7-9576-45d0-9c6e-85646bb52122) invoked by Java Worker
[10/22/19 4:01:38 AM] Executed 'Functions.processSensorData' (Succeeded, Id=1cf0382b-0c98-4cc8-9240-ee2a2f71800d)
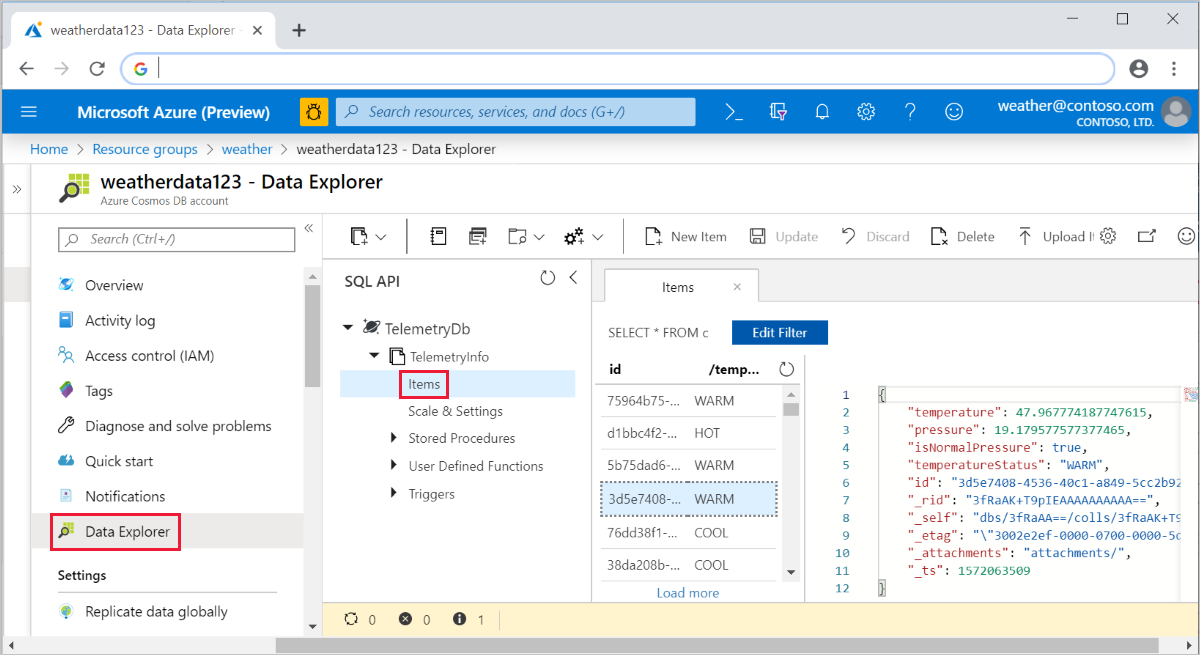
You can then go to the Azure portal and navigate to your Azure Cosmos DB account. Select Data Explorer, expand TelemetryInfo, then select Items to view your data when it arrives.
Deploy to Azure and view app telemetry
Finally, you can deploy your app to Azure and verify that it continues to work the same way it did locally.
Deploy your project to Azure using the following command:
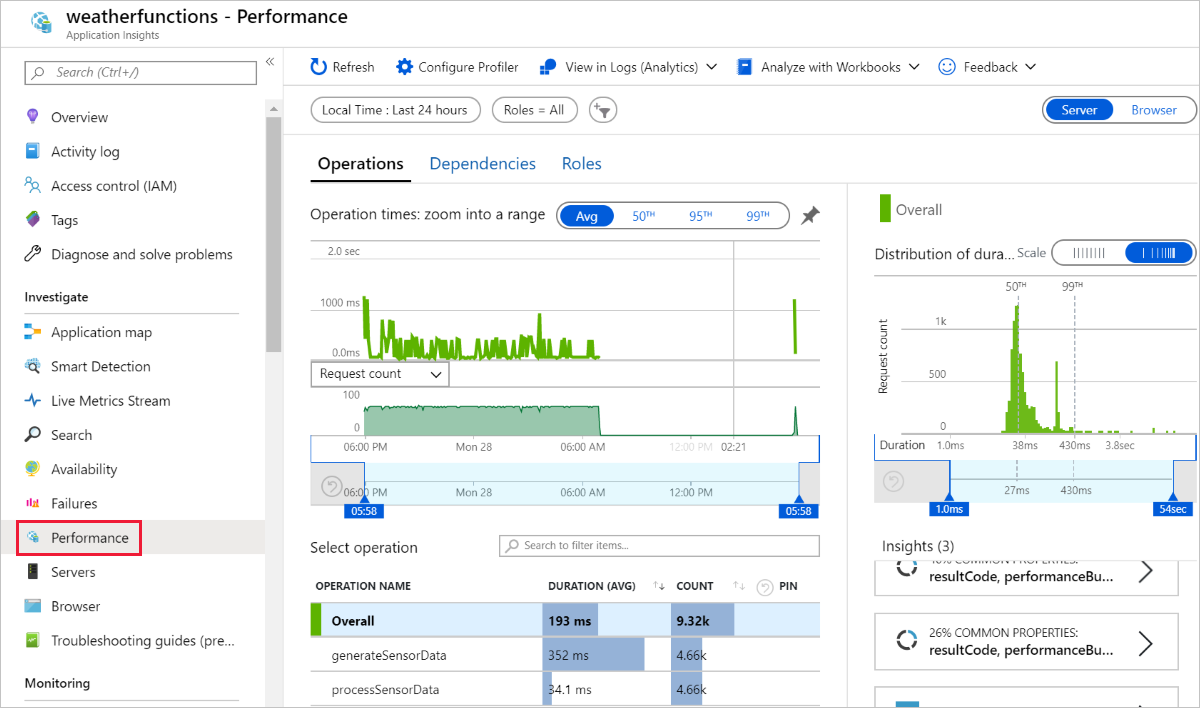
Your functions now run in Azure, and continue to accumulate data in your Azure Cosmos DB. You can view your deployed function app in the Azure portal, and view app telemetry through the connected Application Insights resource, as shown in the following screenshots:
Live Metrics Stream:

Performance:
Clean up resources
When you're finished with the Azure resources you created in this tutorial, you can delete them using the following command:
Next steps
In this tutorial, you learned how to create an Azure Function that handles Event Hub events and updates an Azure Cosmos DB instance. For more information, see the Azure Functions Java developer guide. For information on the annotations used, see the com.microsoft.azure.functions.annotation reference.
This tutorial used environment variables and application settings to store secrets such as connection strings. For information on storing these secrets in Azure Key Vault, see Use Key Vault references for App Service and Azure Functions.
Note
Microsoft recommends using the most secure authentication flow available. The authentication flow described in this procedure, such as for databases, caches, messaging, or AI services, requires a very high degree of trust in the application and carries risks not present in other flows. Use this flow only when more secure options, like managed identities for passwordless or keyless connections, are not viable. For local machine operations, prefer user identities for passwordless or keyless connections.
Next, learn how to use Azure Pipelines CI/CD for automated deployment: