Note
Access to this page requires authorization. You can try signing in or changing directories.
Access to this page requires authorization. You can try changing directories.
This article describes how to prepare clients and mount the Azure Managed Lustre file system from a client machine.
Client prerequisites
Client machines running Linux can access Azure Managed Lustre. The basic client requirements are as follows:
- Lustre client software: Clients must have the appropriate Lustre client package installed. Prebuilt client packages are tested with Azure Managed Lustre. For instructions and package download options, see Install or upgrade Lustre client software. Client packages are available for several commonly used Linux OS distributions.
- Network access to the file system: Client machines need network connectivity to the subnet that hosts the Azure Managed Lustre file system. If the clients are in a different virtual network, you might need to use virtual network peering.
- Mounting requirements: Clients must be able to use the POSIX
mountcommand to connect to the file system. - Requirements to achieve advertised performance:
- Clients must reside in the same availability zone in which the cluster resides.
- Enable accelerated networking on all client virtual machines (VMs). If this option isn't available, then fully enabling accelerated networking requires a stop/deallocate of each VM.
The basic workflow is as follows:
- Install or upgrade Lustre client software on each client.
- Use the
mountcommand to make the Azure Managed Lustre file system available on the client. - When a client is no longer needed, use the
umountcommand without the-f(force) or-l(lazy) option to cleanly unmount the client before shutting it down. Failure to properly unmount a client before restarting or deprovisioning can result in performance problems for other clients.
Install or upgrade Lustre client software
Each client that connects to the Lustre file system must have a Lustre client package that's compatible with the file system's Lustre version (currently 2.15).
You can download prebuilt and tested client packages for Azure Managed Lustre from the Linux software repository for Microsoft products.
Packages and kernel modules are available for the following Linux operating systems. Select the links to go to the installation instructions.
- AlmaLinux HPC 8.6
- AlmaLinux 8
- Red Hat Enterprise Linux 7
- Red Hat Enterprise Linux 8
- Red Hat Enterprise Linux 9
- Ubuntu 18.04
- Ubuntu 20.04
- Ubuntu 22.04
- Ubuntu 24.04
If you need to support a different distribution, contact the support team.
If you need to upgrade an older Lustre client version on your Linux system, see Upgrade Lustre client software to the current version. You must remove old kernel modules and software packages as part of the upgrade.
Note
Microsoft publishes new packages within one business day after a new kernel becomes available. If you experience any problems, please file a support ticket.
Start the Lustre client by using the mount command
Note
Before you run the mount command, make sure that the client host can detect the Azure Managed Lustre file system's virtual network. Ping the file system's server IP address. If the ping command doesn't succeed, make the file system network a peer to your compute resource's network.
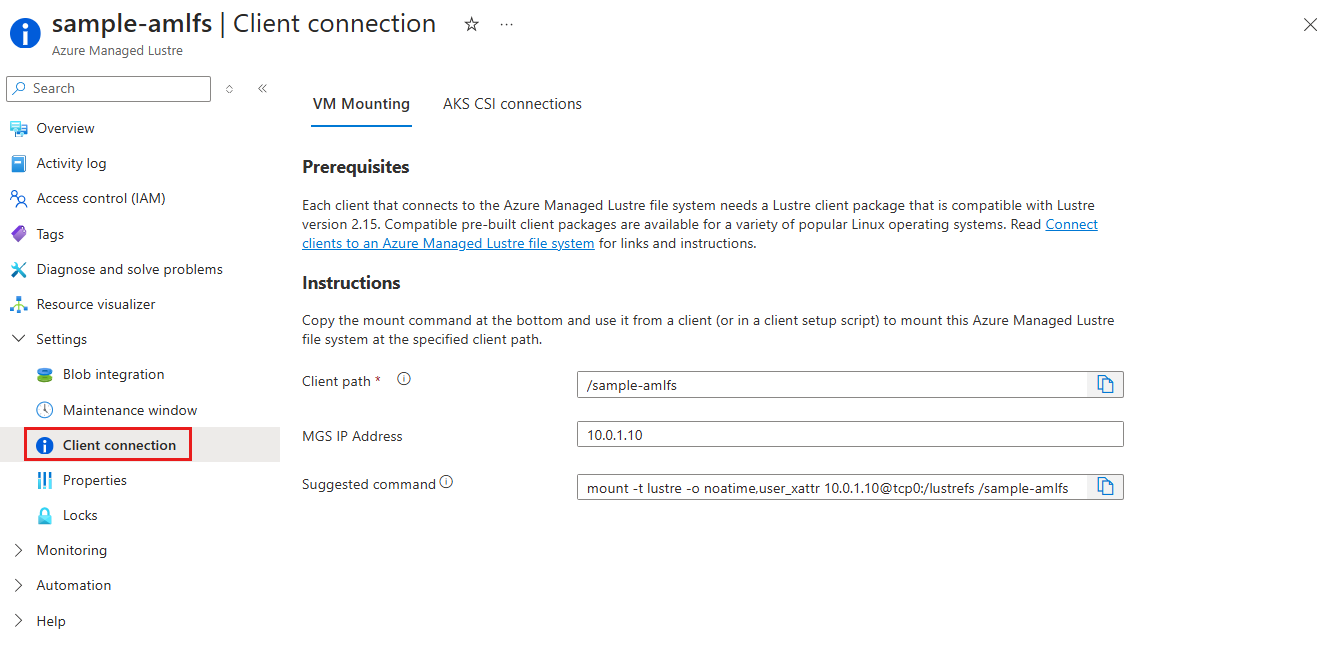
Mount all of your clients to the file system's Lustre Management Service (MGS) IP address. The Client connection pane in the Azure portal shows the IP address and gives a sample mount command that you can copy and use to mount clients.
The mount command includes three components:
- Client path: The path on the client machine where the Azure Managed Lustre file system should be mounted. The default value is the file system name, but you can change it. Make sure that this directory path exists on the client machine before you use the
mountcommand. - MGS IP address: The IP address for the Azure Managed Lustre file system's Lustre Management Service.
- Mount command options: The sample
mountcommand includes additional recommended options.
These components are assembled into a mount command with this form:
sudo mount -t lustre -o noatime,flock <MGS_IP>@tcp:/lustrefs /<client_path>
In the mount command:
The
lustrefsvalue in the MGS IP term is the system-assigned internal name associated with the Lustre cluster inside the Azure-managed system. Don't change this literal value when you create your ownmountcommands.Set the client path to any convenient mount path that exists on your clients. It doesn't need to be the name of the Azure Managed Lustre file system (which is the default value).
Here's an example mount command:
sudo mount -t lustre -o noatime,flock 10.0.0.4@tcp:/lustrefs /azure-lustre-mount
After your clients are connected to the file system, you can use the Azure Managed Lustre file system as you would any mounted file system. For example, you might perform one of the following tasks:
- Access data from your integrated blob container by sending the file request directly to the mount point. The create process populates the file system metadata, and the file is added to the Lustre file system when it's read.
- Add data to the file system (if you didn't add a populated blob container at create time).
- Start a compute job.
Important
When you no longer need a client, you must cleanly unmount the client without using the -f (force) or -l (lazy) option before shutting it down. Failure to properly unmount a client before restarting or deprovisioning can result in performance problems for other clients.
For more information, see the blog post about how to unmount an Azure Managed Lustre file system by using scheduled events.
