Note
Access to this page requires authorization. You can try signing in or changing directories.
Access to this page requires authorization. You can try changing directories.
Note
Azure Maps Creator retirement
The Azure Maps Creator indoor map service is now deprecated and will be retired on 9/30/25. For more information, see End of Life Announcement of Azure Maps Creator.
This guide shows you how to prepare your Drawing Package for the Azure Maps Conversion service using specific CAD commands to correctly prepare your DWG files and manifest file for the Conversion service.
To start with, make sure your Drawing Package is in .zip format, and contains the following files:
- One or more drawing files in DWG format.
- A Manifest file describing DWG files and facility metadata.
If you don't have your own package to reference along with this guide, you may download the sample drawing package.
You may choose any CAD software to open and prepare your facility drawing files. However, this guide is created using Autodesk's AutoCAD® software. Any commands referenced in this guide are meant to be executed using Autodesk's AutoCAD® software.
Tip
For more information about drawing package requirements that aren't covered in this guide, see Drawing Package Requirements.
Glossary of terms
For easy reference, here are some terms and definitions that are important as you read this guide.
| Term | Definition |
|---|---|
| Layer | An AutoCAD DWG layer from the drawing file. |
| Entity | An AutoCAD DWG entity from the drawing file. |
| Level | An area of a building at a set elevation. For example, the floor of a building. |
| Feature | An object that combines a geometry with more metadata information. |
| Feature classes | A common blueprint for features. For example, a unit is a feature class, and an office is a feature. |
Step 1: DWG file requirements
When preparing your facility drawing files for the Conversion service, make sure to follow these preliminary requirements and recommendations:
Facility drawing files must be saved in DWG format, which is the native file format for Autodesk's AutoCAD® software.
The Conversion service works with the AutoCAD DWG file format. AC1032 is the internal format version for the DWG files, and it's a good idea to select AC1032 for the internal DWG file format version.
A DWG file can only contain a single floor. A floor of a facility must be provided in its own separate DWG file. So, if you have five floors in a facility, you must create five separate DWG files.
Step 2: Prepare the DWG files
This part of the guide shows you how to use CAD commands to ensure that your DWG files meet the requirements of the Conversion service.
You may choose any CAD software to open and prepare your facility drawing files. However, this guide is created using Autodesk's AutoCAD® software. Any commands referenced in this guide are meant to be executed using Autodesk's AutoCAD® software.
Bind External References
Each floor of a facility must be provided as one DWG file. If there are no external references, then nothing more needs to be done. However, if there are any external references, they must be bound to a single drawing. To bind an external reference, you may use the XREF command. Each external reference drawing will be added as a block reference after binding. If you need to make changes to any of these layers, remember to explode the block references by using the XPLODE command.
Unit of measurement
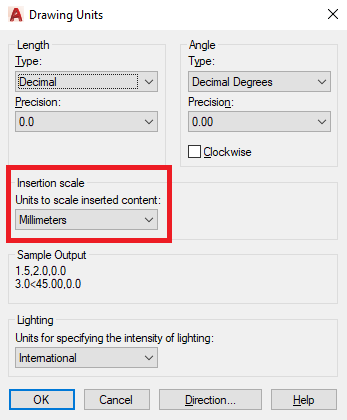
The drawings can be created using any unit of measurement. However, all drawings must use the same unit of measurement. So, if one floor of the facility is using millimeters, then all other floors (drawings) must also be in millimeters. You can verify or modify the measurement unit by using the UNITS command.
The following image shows the Drawing Units window within Autodesk's AutoCAD® software that you can use to verify the unit of measurement.
Alignment
Each floor of a facility is provided as an individual DWG file. As a result, it's possible that the floors aren't perfectly aligned when stacked on top of each other. Azure Maps Conversion service requires that all drawings be aligned with the physical space. To verify alignment, use a reference point that can span across floors, such as an elevator or column that spans multiple floors. You can view all the floors by opening a new drawing, and then use the XATTACH command to load all floor drawings. If you need to fix any alignment issues, you can use the reference points and the MOVE command to realign the floors that require it.
Layers
Ensure that each layer of a drawing contains entities of one feature class. If a layer contains entities for walls, then it can't have other features such as units or doors. However, a feature class can be split up over multiple layers. For example, you can have three layers in the drawing that contain wall entities.
Furthermore, each layer has a list of supported entity types and any other types are ignored. For example, if the Unit Label layer only supports single-line text, a multiline text or Polyline on the same layer is ignored.
For a better understanding of layers and feature classes, see Drawing Package Requirements.
Exterior layer
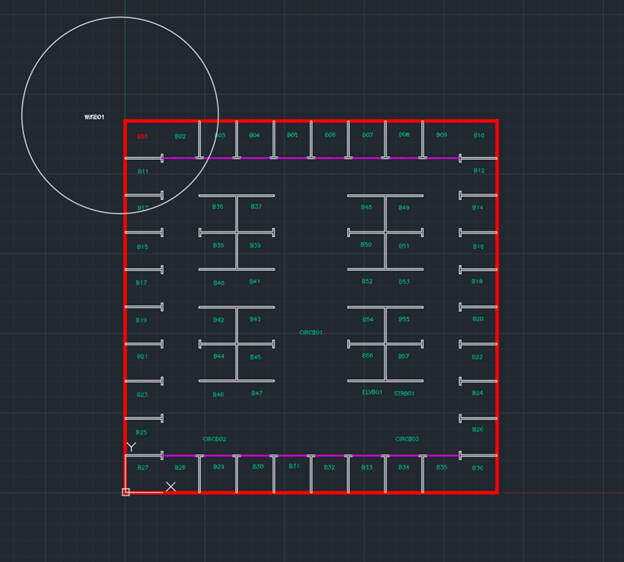
A single level feature is created from each exterior layer or layers. This level feature defines the level's perimeter. It's important to ensure that the entities in the exterior layer meet the requirements of the layer. For example, a closed Polyline is supported; but an open Polyline isn't. If your exterior layer is made of multiple line segments, they must be provided as one closed Polyline. To join multiple line segments together, select all line segments and use the JOIN command.
The following image is taken from the sample package, and shows the exterior layer of the facility in red. The unit layer is turned off to help with visualization.
Unit layer
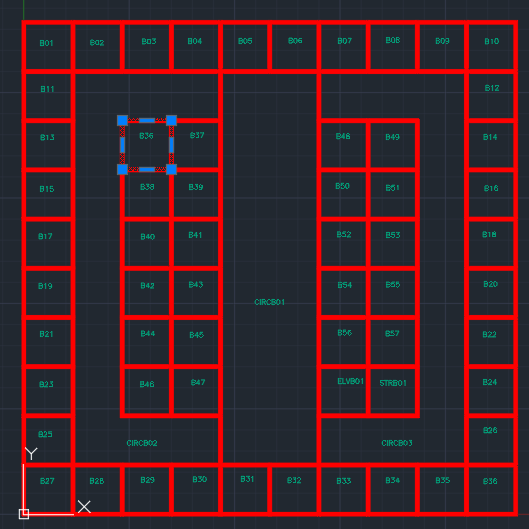
Units are navigable spaces in the building, such as offices, hallways, stairs, and elevators. A closed entity type such as Polygon, closed Polyline, Circle, or closed Ellipse is required to represent each unit. So, walls and doors alone don't create a unit because there isn’t an entity that represents the unit.
The following image is taken from the sample drawing package and shows the unit label layer and unit layer in red. All other layers are turned off to help with visualization. Also, one unit is selected to help show that each unit is a closed Polyline.
Unit label layer
If you'd like to add a name property to a unit, add a separate layer for unit labels. Labels must be provided as single-line text entities that fall inside the bounds of a unit. A corresponding unit property must be added to the manifest file where the unitName matches the Contents of the Text. To learn about all supported unit properties, see unitProperties.
Door layer
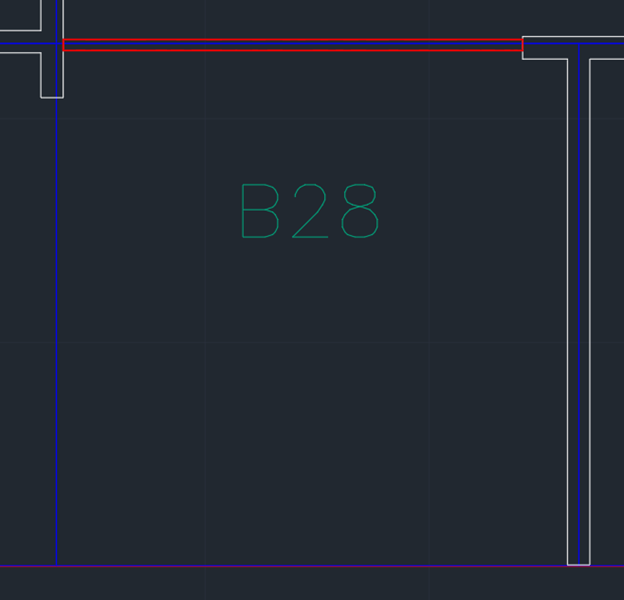
Doors are optional. However, doors may be used if you'd like to specify the entry point(s) for a unit. Doors can be drawn in any way if it's a supported entity type by the door layer. The door must overlap the boundary of a unit and the overlapping edge of the unit is then be treated as an opening to the unit.
The following image is taken from the sample drawing package and shows a unit with a door (in red) drawn on the unit boundary.
Wall layer
The wall layer is meant to represent the physical extents of a facility such as walls and columns. The Azure Maps Conversion service perceives walls as physical structures that are an obstruction to routing. With that in mind, a wall should be thought as a physical structure that one can see, but not walk through. Anything that can’t be seen won't captured in this layer. If a wall has inner walls or columns inside, then only the exterior should be captured.
Step 3: Prepare the manifest
The drawing package Manifest is a JSON file. The Manifest tells the Azure Maps Conversion service how to read the facility DWG files and metadata. Some examples of this information could be the specific information each DWG layer contains, or the geographical location of the facility.
To achieve a successful conversion, all “required” properties must be defined. A sample manifest file can be found inside the sample drawing package. This guide doesn't cover properties supported by the manifest. For more information about manifest properties, see Manifest file requirements.
Building levels
The building level specifies which DWG file to use for which level. A level must have a level name and ordinal that describes that vertical order of each level. Every facility must have an ordinal 0, which is the ground floor of a facility. An ordinal 0 must be provided even if the drawings occupy a few floors of a facility. For example, floors 15-17 can be defined as ordinal 0-2, respectively.
The following example is taken from the sample drawing package. The facility has three levels: basement, ground, and level 2. The filename contains the full file name and path of the file relative to the manifest file within the .zip drawing package.
    "buildingLevels": {
      "levels": [
       {
           "levelName": "Basement",
           "ordinal": -1,
           "filename": "./Basement.dwg"
            }, {

            "levelName": "Ground",
            "ordinal": 0,
            "filename": "./Ground.dwg"
            }, {

            "levelName": "Level 2",
            "ordinal": 1,
             "filename": "./Level_2.dwg"
            }
        ]
    },
georeference
The georeference object is used to specify where the facility is located geographically and how much to rotate the facility. The origin point of the drawing should match the latitude and longitude provided with the georeference object. The clockwise angle, in degrees, between true north and the drawing's vertical (Y) axis.
dwgLayers
The dwgLayers object is used to specify that DWG layer names where feature classes can be found. To receive a property converted facility, it's important to provide the correct layer names. For example, a DWG wall layer must be provided as a wall layer and not as a unit layer. The drawing can have other layers such as furniture or plumbing; but, the Azure Maps Conversion service ignores them if they're not specified in the manifest.
The following example of the dwgLayers object in the manifest.
"dwgLayers": {
        "exterior": [
            "OUTLINE"
        ],
        "unit": [
            "UNITS"
        ],
        "wall": [
            "WALLS"
        ],
        "door": [
            "DOORS"
        ],
        "unitLabel": [
            "UNITLABELS"
        ],
        "zone": [
            "ZONES"
        ],
        "zoneLabel": [
            "ZONELABELS"
        ]
    }
The following image shows the layers from the corresponding DWG drawing viewed in Autodesk's AutoCAD® software.

unitProperties
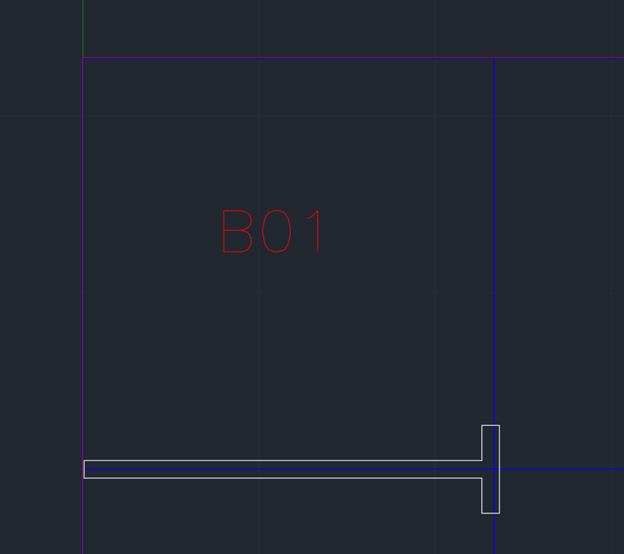
The unitProperties object allows you to define other properties for a unit that you can’t do in the DWG file. Examples could be directory information of a unit or the category type of a unit. A unit property is associated with a unit by having the unitName object match the label in the unitLabel layer.
The following image is taken from the sample drawing package. It displays the unit label that's associated to the unit property in the manifest.
The following snippet shows the unit property object that is associated with the unit.
 "unitProperties": [
        {
            "unitName": "B01",
            "categoryName": "room.office",
            "navigableBy": ["pedestrian", "wheelchair", "machine"],
            "routeThroughBehavior": "disallowed",
            "occupants": [
                {
                    "name": "Joe's Office",
                    "phone": "1 (425) 555-1234"
                }
            ],
            "nameAlt": "Basement01",
            "nameSubtitle": "01",
            "addressRoomNumber": "B01",
            "nonPublic": true,
            "isRoutable": true,
            "isOpenArea": true
        },
Step 4: Prepare the Drawing Package
You should now have all the DWG drawings prepared to meet Azure Maps Conversion service requirements. A manifest file has also been created to help describe the facility. All files need to be zipped into a single archive file, with the .zip extension. It's important that the manifest file is named manifest.json and is placed in the root directory of the zipped package. All other files can be in any directory of the zipped package if the filename includes the relative path to the manifest. For an example of a drawing package, see the sample drawing package.
Next steps
This guide shows you how to prepare your Drawing Package for the Azure Maps Conversion service. A Drawing Package contains one or more DWG drawing files for a single facility and a manifest file describing the DWG files.
If you don't have your own package to reference along with this guide, you may download the sample drawing package v2.
You may choose any CAD software to open and prepare your facility drawing files. However, this guide is created using Autodesk's AutoCAD® software. Any commands referenced in this guide are meant to be executed using Autodesk's AutoCAD® software.
Tip
For more information about drawing package requirements that aren't covered in this guide, see Drawing Package Requirements.
Glossary of terms
For easy reference, here are some terms and definitions that are important as you read this guide.
| Term | Definition |
|---|---|
| Layer | An AutoCAD DWG layer from the drawing file. |
| Entity | An AutoCAD DWG entity from the drawing file. |
| Level | An area of a building at a set elevation. For example, the floor of a building. |
| Feature | An object that combines a geometry with more metadata information. |
| Feature classes | A common blueprint for features. For example, a unit is a feature class, and an office is a feature. |
Step 1: DWG file requirements
When preparing your facility drawing files for the Conversion service, make sure to follow these preliminary requirements and recommendations:
- Facility drawing files must be saved in DWG format, which is the native file format for Autodesk's AutoCAD® software.
- The Conversion service works with the AutoCAD DWG file format. AC1032 is the internal format version for the DWG files, and it's a good idea to select AC1032 for the internal DWG file format version.
- A DWG file can only contain a single floor. A floor of a facility must be provided in its own separate DWG file. So, if you have five floors in a facility, you must create five separate DWG files.
Step 2: Prepare the DWG files
This part of the guide shows you how to use CAD commands to ensure that your DWG files meet the requirements of the Conversion service.
You may choose any CAD software to open and prepare your facility drawing files. However, this guide is created using Autodesk's AutoCAD® software. Any commands referenced in this guide are meant to be executed using Autodesk's AutoCAD® software.
Bind External References
Each floor of a facility must be provided as one DWG file. If there are no external references, then nothing more needs to be done. However, if there are any external references, they must be bound to a single drawing. To bind an external reference, you may use the XREF command. After binding, each external reference drawing will be added as a block reference. If you need to make changes to any of these layers, remember to explode the block references by using the XPLODE command.
Unit of measurement
The drawings can be created using any unit of measurement. However, all drawings must use the same unit of measurement. So, if one floor of the facility is using millimeters, then all other floors (drawings) must also be in millimeters. You can verify or modify the measurement unit by using the UNITS command and setting the “Insertion scale” value.
The following image shows the Drawing Units window within Autodesk's AutoCAD® software that you can use to verify the unit of measurement.

Alignment
Each floor of a facility is provided as an individual DWG file. As a result, it's possible that the floors don't align perfectly, as required by the Azure Maps Conversion service. To verify alignment, use a reference point such as an elevator or column that spans multiple floors. Use the XATTACH command to load all floor drawings, then the MOVE command with the reference points to realign any floors that require it.
Layers
Ensure that each layer of a drawing contains entities of one feature class. If a layer contains entities for walls, then it shouldn't have other entities such as units or doors. However, a feature class can be composed of multiple layers. For example, you can have three layers in the drawing that contain wall entities.
For a better understanding of layers and feature classes, see Drawing Package Requirements.
Step 3: Prepare the manifest
The drawing package Manifest is a JSON file. The Manifest tells the Azure Maps Conversion service how to read the facility DWG files and metadata. Some examples of this information could be the specific information each DWG layer contains, or the geographical location of the facility.
To achieve a successful conversion, all “required” properties must be defined. A sample manifest file can be found inside the sample drawing package v2. This guide doesn't cover properties supported by the manifest. For more information about manifest properties, see Manifest file requirements.
The manifest can be created manually in any text editor, or can be created using the Azure Maps Creator onboarding tool. This guide provides examples for each.
The Azure Maps Creator onboarding tool
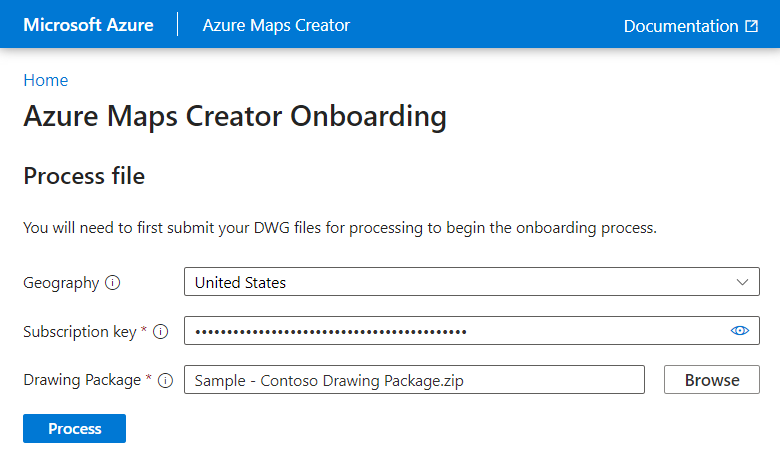
You can use the Azure Maps Creator onboarding tool to create new and edit existing manifest files.
To process the DWG files, enter the geography of your Azure Maps Creator resource, the subscription key of your Azure Maps account and the path and filename of the DWG ZIP package, the select Process. This process can take several minutes to complete.
Facility levels
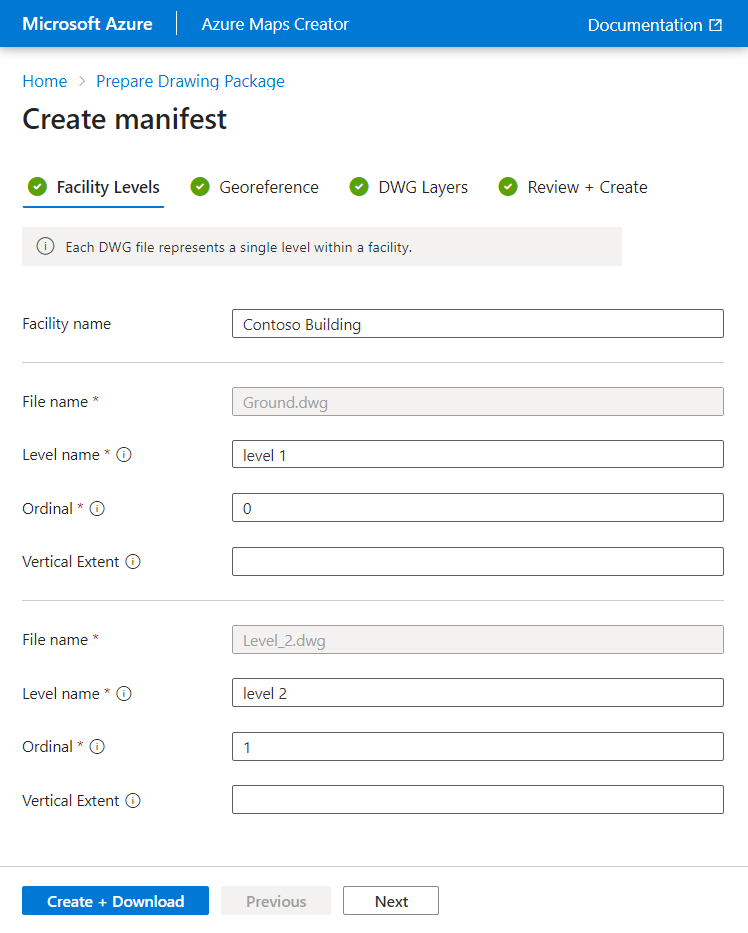
The facility level specifies which DWG file to use for which level. A level must have a level name and ordinal that describes that vertical order of each level in the facility, along with a Vertical Extent describing the height of each level in meters.
The following example is taken from the sample drawing package v2. The facility has two levels: ground and level 2. The filename contains the full file name and path of the file relative to the manifest file within the drawing package.
Georeference
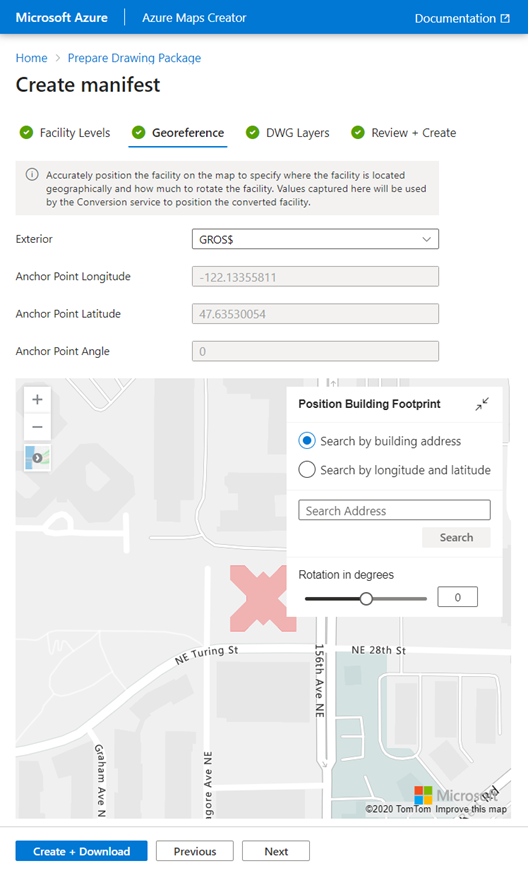
Georeferencing is used to specify the exterior profile, location and rotation of the facility.
The facility level defines the exterior profile as it appears on the map and is selected from the list of DWG layers in the Exterior drop-down list.
The Anchor Point Longitude and Anchor Point Latitude specify the facility's location, the default value is zero (0).
The Anchor Point Angle is specified in degrees between true north and the drawing's vertical (Y) axis, the default value is zero (0).
DWG layers
The dwgLayers object is used to specify the DWG layer names where feature classes can be found. To receive a properly converted facility, it's important to provide the correct layer names. For example, a DWG wall layer must be provided as a wall layer and not as a unit layer. The drawing can have other layers such as furniture or plumbing; but, the Azure Maps Conversion service ignores anything not specified in the manifest.
Defining text properties enables you to associate text entities that fall inside the bounds of a feature. Once defined they can be used to style and display elements on your indoor map
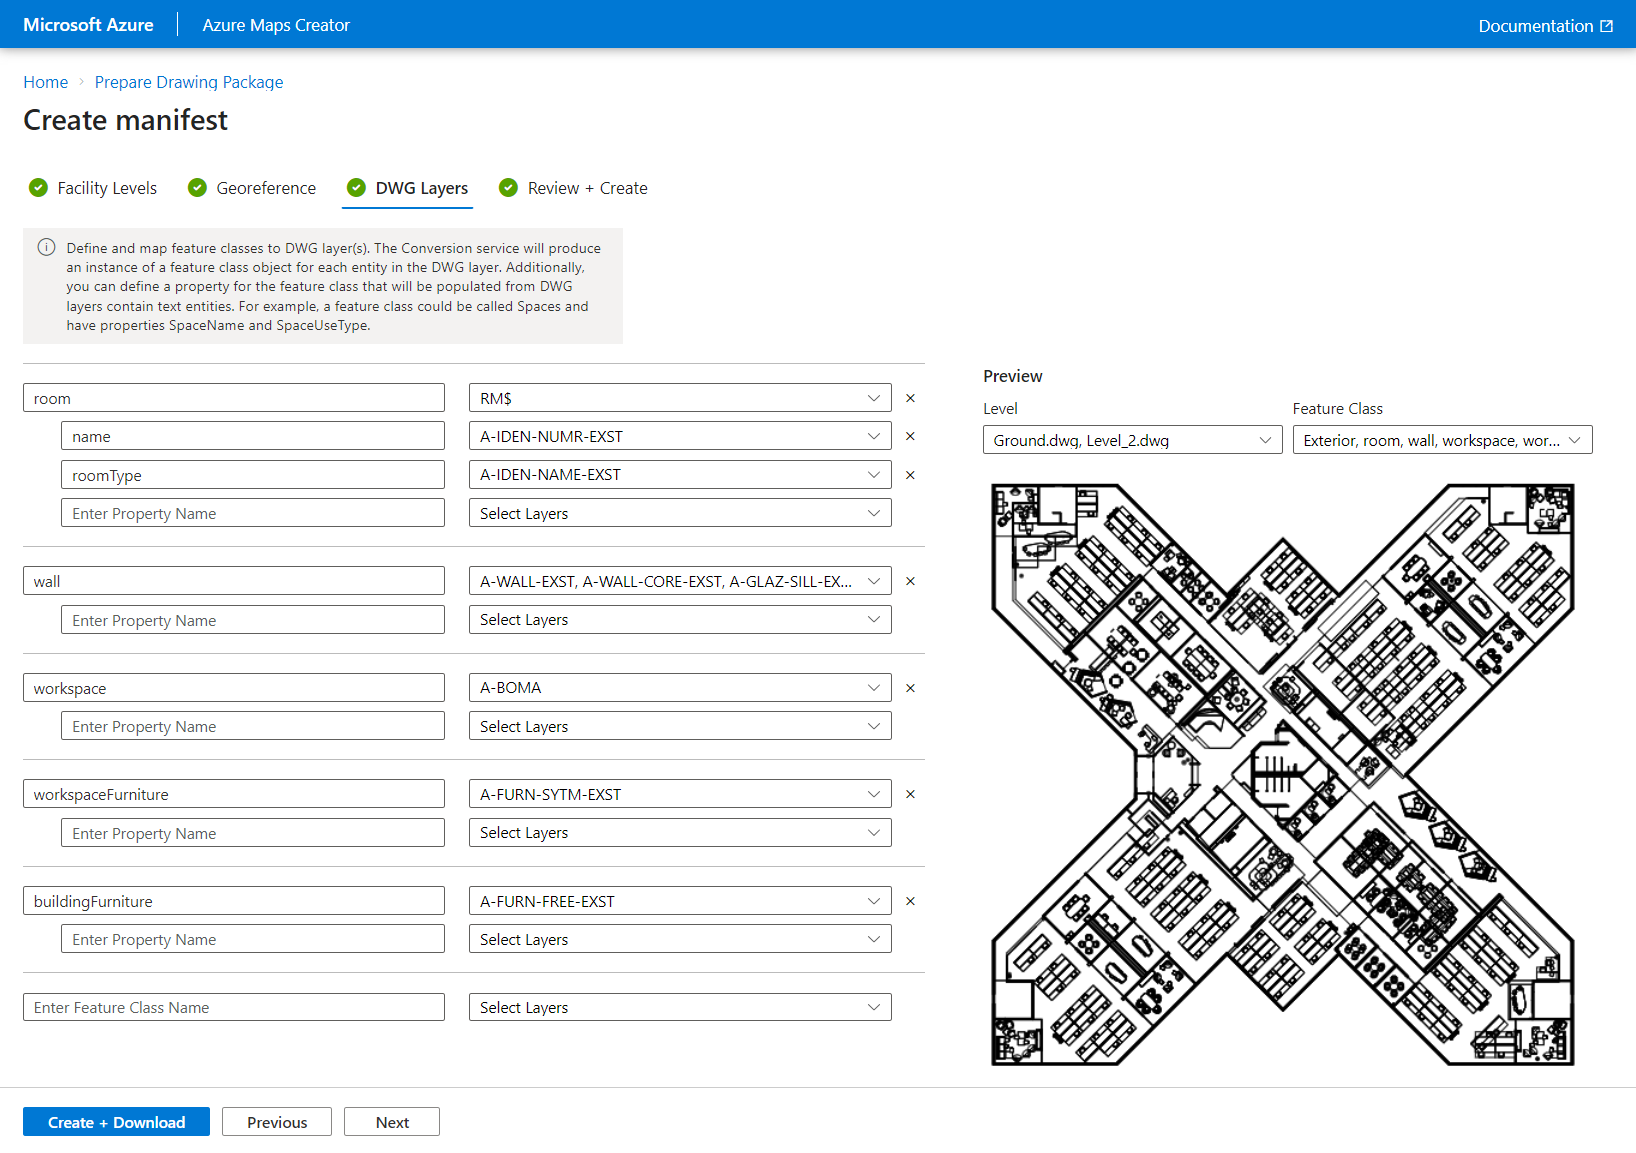
Important
The following feature classes should be defined (not case sensitive) in order to use wayfinding. Wall will be treated as an obstruction for a given path request. Stair and Elevator will be treated as level connectors to navigate across floors:
- Wall
- Stair
- Elevator
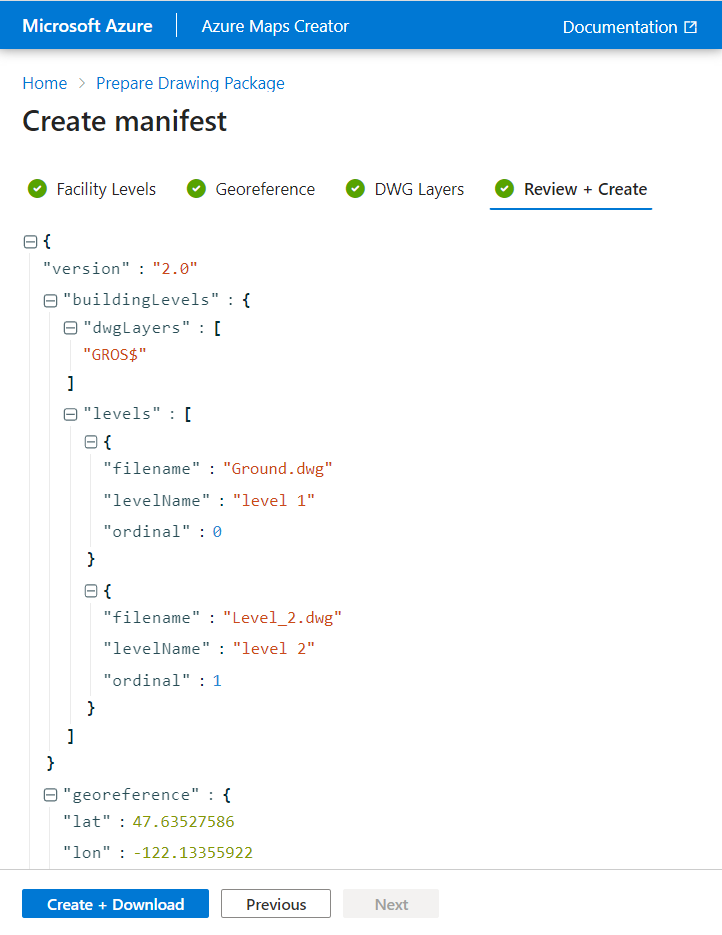
Review + Create
When finished, select the Create + Download button to download a copy of the drawing package and start the map creation process. For more information on the map creation process, see [Create indoor map with the onboarding tool].
Next steps
[Create indoor map with the onboarding tool]