Release and work item insights are crucial for optimizing the software development lifecycle. As applications evolve, it's vital to monitor each release and its work items closely. These insights highlight performance bottlenecks and let teams address issues proactively, ensuring smooth deployment and user experience. They equip developers and stakeholders to make decisions, adjust processes, and deliver high-quality software.
Azure Pipelines integrates with Application Insights to allow continuous monitoring of your Azure DevOps release pipeline throughout the software development lifecycle.
With continuous monitoring, release pipelines can incorporate monitoring data from Application Insights and other Azure resources. When the release pipeline detects an Application Insights alert, the pipeline can gate or roll back the deployment until the alert is resolved. If all checks pass, deployments can proceed automatically from test all the way to production, without the need for manual intervention.
In Azure DevOps, select an organization and project.
On the left menu of the project page, select Pipelines > Releases.
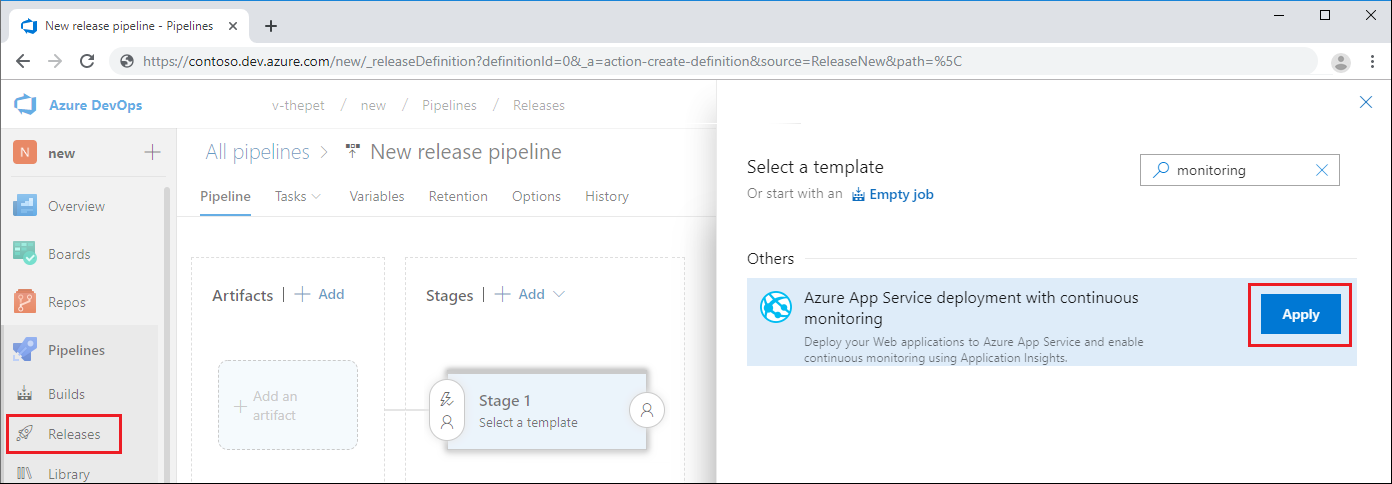
Select the dropdown arrow next to New and select New release pipeline. Or, if you don't have a pipeline yet, select New pipeline on the page that appears.
On the Select a template pane, search for and select Azure App Service deployment with continuous monitoring, and then select Apply.
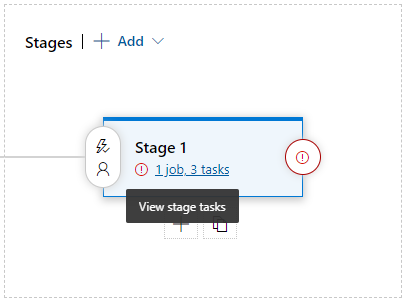
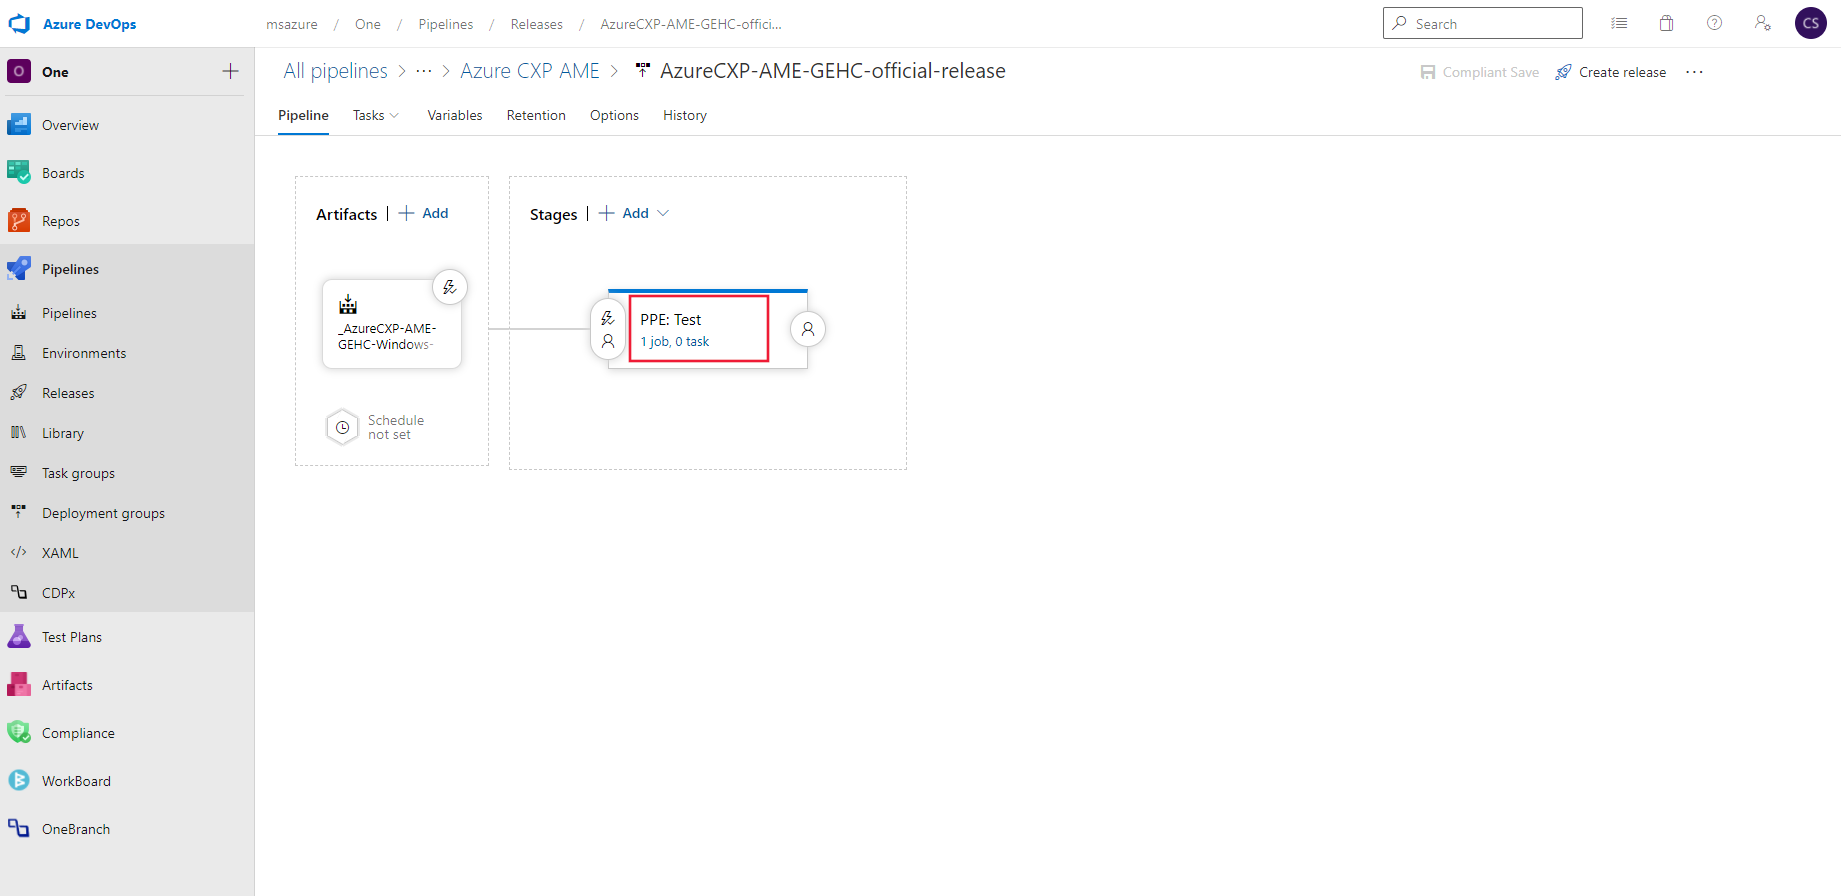
In the Stage 1 box, select the hyperlink to View stage tasks.
In the Stage 1 configuration pane, fill in the following fields:
| Parameter |
Value |
| Stage name |
Provide a stage name or leave it at Stage 1. |
| Azure subscription |
Select the dropdown arrow and select the linked Azure subscription you want to use. |
| App type |
Select the dropdown arrow and select your app type. |
| App Service name |
Enter the name of your Azure App Service. |
| Resource Group name for Application Insights |
Select the dropdown arrow and select the resource group you want to use. |
| Application Insights resource name |
Select the dropdown arrow and select the Application Insights resource for the resource group you selected. |
To save the pipeline with default alert rule settings, select Save in the upper-right corner of the Azure DevOps window. Enter a descriptive comment and select OK.
Modify alert rules
Out of the box, the Azure App Service deployment with continuous monitoring template has four alert rules: Availability, Failed requests, Server response time, and Server exceptions. You can add more rules or change the rule settings to meet your service level needs.
To modify alert rule settings:
In the left pane of the release pipeline page, select Configure Application Insights Alerts.
The four default alert rules are created via an Inline script:
$subscription = az account show --query "id";$subscription.Trim("`"");$resource="/subscriptions/$subscription/resourcegroups/"+"$(Parameters.AppInsightsResourceGroupName)"+"/providers/microsoft.insights/components/" + "$(Parameters.ApplicationInsightsResourceName)";
az monitor metrics alert create -n 'Availability_$(Release.DefinitionName)' -g $(Parameters.AppInsightsResourceGroupName) --scopes $resource --condition 'avg availabilityResults/availabilityPercentage < 99' --description "created from Azure DevOps";
az monitor metrics alert create -n 'FailedRequests_$(Release.DefinitionName)' -g $(Parameters.AppInsightsResourceGroupName) --scopes $resource --condition 'count requests/failed > 5' --description "created from Azure DevOps";
az monitor metrics alert create -n 'ServerResponseTime_$(Release.DefinitionName)' -g $(Parameters.AppInsightsResourceGroupName) --scopes $resource --condition 'avg requests/duration > 5' --description "created from Azure DevOps";
az monitor metrics alert create -n 'ServerExceptions_$(Release.DefinitionName)' -g $(Parameters.AppInsightsResourceGroupName) --scopes $resource --condition 'count exceptions/server > 5' --description "created from Azure DevOps";
You can modify the script and add more alert rules. You can also modify the alert conditions. And you can remove alert rules that don't make sense for your deployment purposes.
Add deployment conditions
When you add deployment gates to your release pipeline, an alert that exceeds the thresholds you set prevents unwanted release promotion. After you resolve the alert, the deployment can proceed automatically.
To add deployment gates:
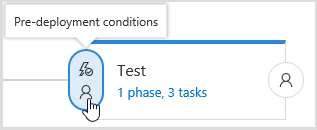
On the main pipeline page, under Stages, select the Pre-deployment conditions or Post-deployment conditions symbol, depending on which stage needs a continuous monitoring gate.
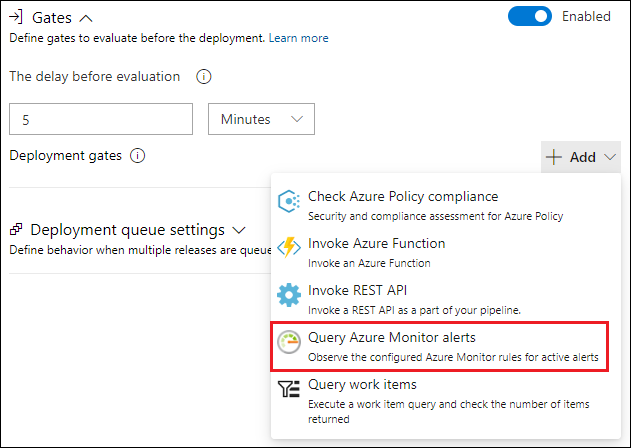
In the Pre-deployment conditions configuration pane, set Gates to Enabled.
Next to Deployment gates, select Add.
Select Query Azure Monitor alerts from the dropdown menu. This option lets you access both Azure Monitor and Application Insights alerts.
Under Evaluation options, enter the values you want for settings like The time between re-evaluation of gates and The timeout after which gates fail.
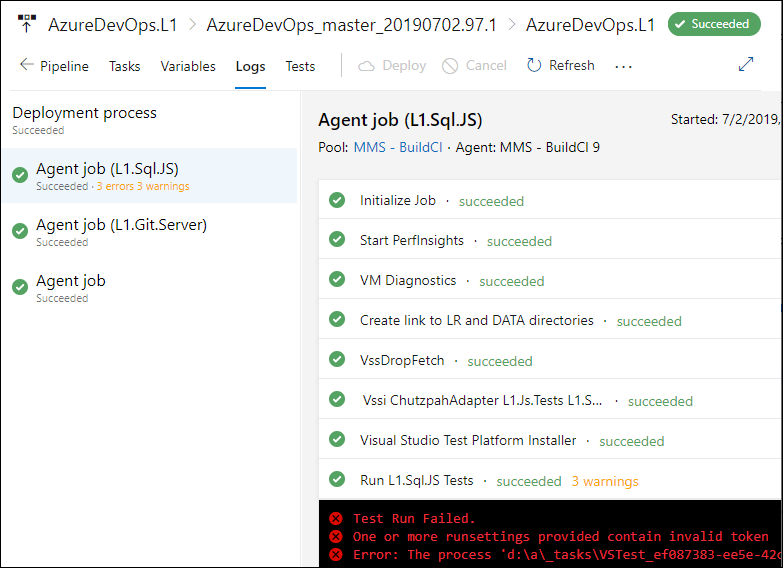
View release logs
You can see deployment gate behavior and other release steps in the release logs. To open the logs:
Select Releases from the left menu of the pipeline page.
Select any release.
Under Stages, select any stage to view a release summary.
To view logs, select View logs in the release summary, select the Succeeded or Failed hyperlink in any stage, or hover over any stage and select Logs.
Annotations show where you deployed a new build or other significant events. Annotations make it easy to see whether your changes had any effect on your application's performance. They can be automatically created by the Azure Pipelines build system. You can also create annotations to flag any event you want by creating them from PowerShell.
Release annotations with Azure Pipelines build
Release annotations are a feature of the cloud-based Azure Pipelines service of Azure DevOps.
If all the following criteria are met, the deployment task creates the release annotation automatically:
The resource to which you're deploying is linked to Application Insights via the APPINSIGHTS_INSTRUMENTATIONKEY app setting.
The Application Insights resource is in the same subscription as the resource to which you're deploying.
You're using one of the following Azure DevOps pipeline tasks:
| Task code |
Task name |
Versions |
| AzureAppServiceSettings |
Azure App Service Settings |
Any |
| AzureRmWebAppDeployment |
Azure App Service deploy |
V3 and above |
| AzureFunctionApp |
Azure Functions |
Any |
| AzureFunctionAppContainer |
Azure Functions for container |
Any |
| AzureWebAppContainer |
Azure Web App for Containers |
Any |
| AzureWebApp |
Azure Web App |
Any |
Note
If you're still using the Application Insights annotation deployment task, you should delete it.
If you can't use one of the deployment tasks in the previous section, you need to add an inline script task in your deployment pipeline.
Go to a new or existing pipeline and select a task.
Add a new task and select Azure CLI.
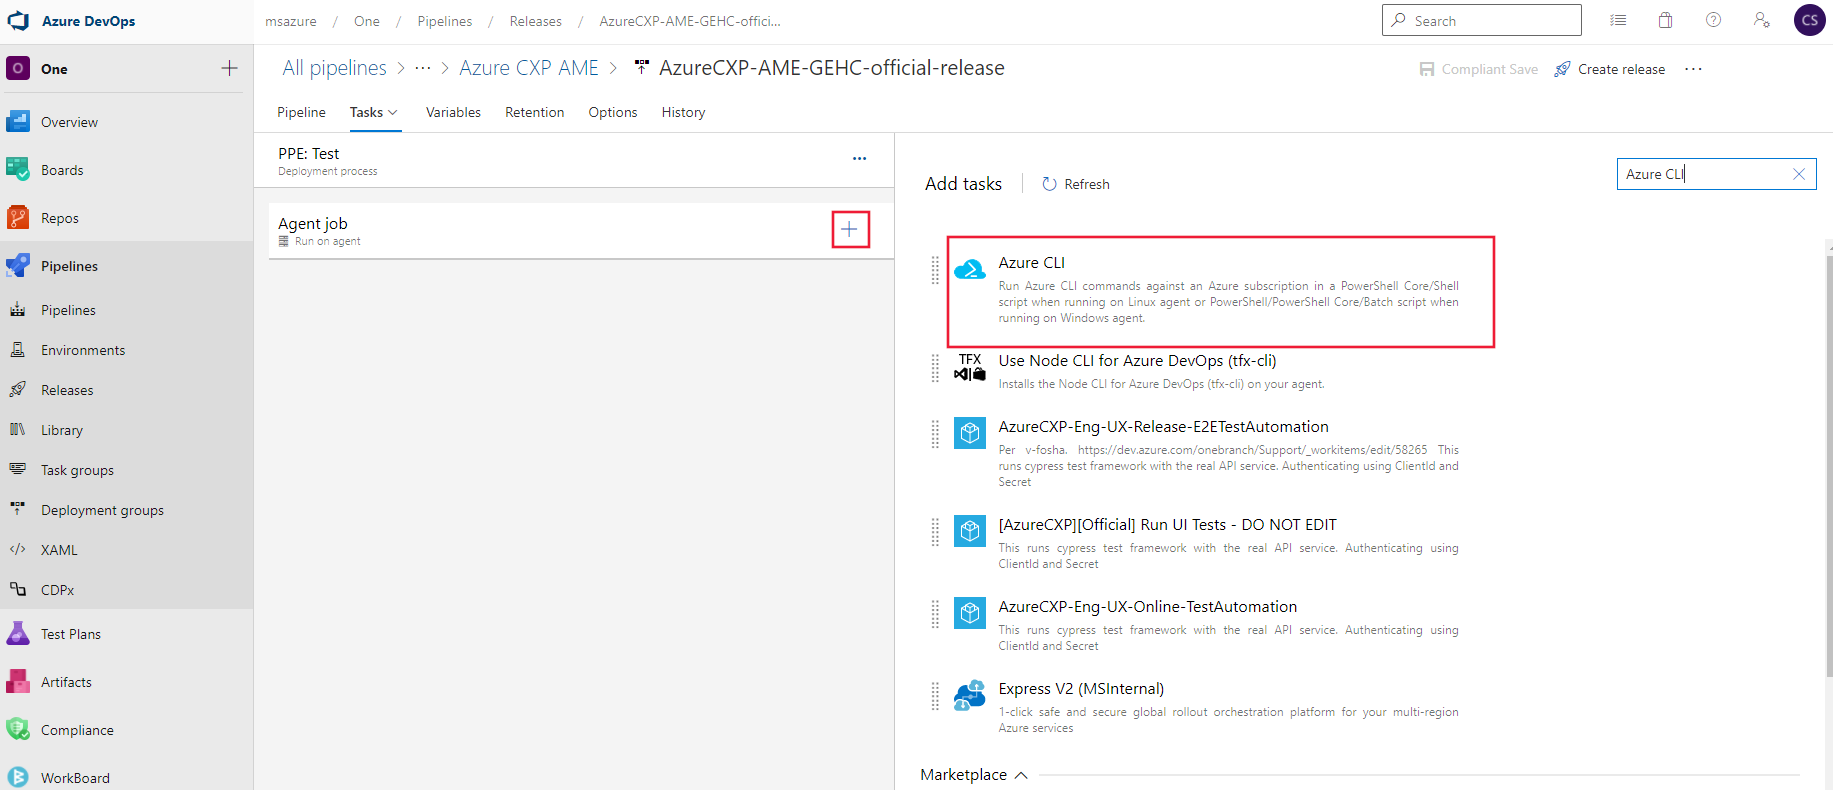
Specify the relevant Azure subscription. Change Script Type to PowerShell and Script Location to Inline.
Add the PowerShell script from step 2 in the next section to Inline Script.
Add the following arguments. Replace the angle-bracketed placeholders with your values to Script Arguments. The -releaseProperties are optional.
    -aiResourceId "<aiResourceId>" `
    -releaseName "<releaseName>" `
    -releaseProperties @{"ReleaseDescription"="<a description>";
         "TriggerBy"="<Your name>" }

The following example shows metadata you can set in the optional releaseProperties argument by using build and release variables.
-releaseProperties @{
 "BuildNumber"="$(Build.BuildNumber)";
 "BuildRepositoryName"="$(Build.Repository.Name)";
 "BuildRepositoryProvider"="$(Build.Repository.Provider)";
 "ReleaseDefinitionName"="$(Build.DefinitionName)";
 "ReleaseDescription"="Triggered by $(Build.DefinitionName) $(Build.BuildNumber)";
 "ReleaseEnvironmentName"="$(Release.EnvironmentName)";
 "ReleaseId"="$(Release.ReleaseId)";
 "ReleaseName"="$(Release.ReleaseName)";
 "ReleaseRequestedFor"="$(Release.RequestedFor)";
 "ReleaseWebUrl"="$(Release.ReleaseWebUrl)";
 "SourceBranch"="$(Build.SourceBranch)";
 "TeamFoundationCollectionUri"="$(System.TeamFoundationCollectionUri)" }
Select Save.
Create release annotations with the Azure CLI
You can use the CreateReleaseAnnotation PowerShell script to create annotations from any process you want without using Azure DevOps.
Sign in to the Azure CLI.
Make a local copy of the following script and call it CreateReleaseAnnotation.ps1.
param(
    [parameter(Mandatory = $true)][string]$aiResourceId,
    [parameter(Mandatory = $true)][string]$releaseName,
    [parameter(Mandatory = $false)]$releaseProperties = @()
)

# Function to ensure all Unicode characters in a JSON string are properly escaped
function Convert-UnicodeToEscapeHex {
  param (
    [parameter(Mandatory = $true)][string]$JsonString
  )
  $JsonObject = ConvertFrom-Json -InputObject $JsonString
  foreach ($property in $JsonObject.PSObject.Properties) {
    $name = $property.Name
    $value = $property.Value
    if ($value -is [string]) {
      $value = [regex]::Unescape($value)
      $OutputString = ""
      foreach ($char in $value.ToCharArray()) {
        $dec = [int]$char
        if ($dec -gt 127) {
          $hex = [convert]::ToString($dec, 16)
          $hex = $hex.PadLeft(4, '0')
          $OutputString += "\u$hex"
        }
        else {
          $OutputString += $char
        }
      }
      $JsonObject.$name = $OutputString
    }
  }
  return ConvertTo-Json -InputObject $JsonObject -Compress
}

$annotation = @{
    Id = [GUID]::NewGuid();
    AnnotationName = $releaseName;
    EventTime = (Get-Date).ToUniversalTime().GetDateTimeFormats("s")[0];
    Category = "Deployment"; #Application Insights only displays annotations from the "Deployment" Category
    Properties = ConvertTo-Json $releaseProperties -Compress
}

$annotation = ConvertTo-Json $annotation -Compress
$annotation = Convert-UnicodeToEscapeHex -JsonString $annotation

$body = $annotation -replace '(\\+)"', '$1$1"' -replace "`"", "`"`""

az rest --method put --uri "$($aiResourceId)/Annotations?api-version=2015-05-01" --body "$($body) "

# Use the following command for Linux Azure DevOps Hosts or other PowerShell scenarios
# Invoke-AzRestMethod -Path "$aiResourceId/Annotations?api-version=2015-05-01" -Method PUT -Payload $body
Note
- Your annotations must have Category set to Deployment to appear in the Azure portal.
- If you receive an error, "The request contains an entity body but no Content-Type header", try removing the replace parameters in the following line.
$body = (ConvertTo-Json $annotation -Compress)
Call the PowerShell script with the following code. Replace the angle-bracketed placeholders with your values. The -releaseProperties are optional.
     .\CreateReleaseAnnotation.ps1 `
      -aiResourceId "<aiResourceId>" `
      -releaseName "<releaseName>" `
      -releaseProperties @{"ReleaseDescription"="<a description>";
          "TriggerBy"="<Your name>" }
| Argument |
Definition |
Note |
aiResourceId |
The resource ID to the target Application Insights resource. |
Example:
/subscriptions/00000000-0000-0000-0000-000000000000/resourceGroups/MyRGName/providers/microsoft.insights/components/MyResourceName |
releaseName |
The name to give the created release annotation. |
|
releaseProperties |
Used to attach custom metadata to the annotation. |
Optional |
View annotations
Note
Release annotations aren't currently available in the Metrics pane of Application Insights.
Whenever you use the release template to deploy a new release, an annotation is sent to Application Insights. You can view annotations in the following locations:
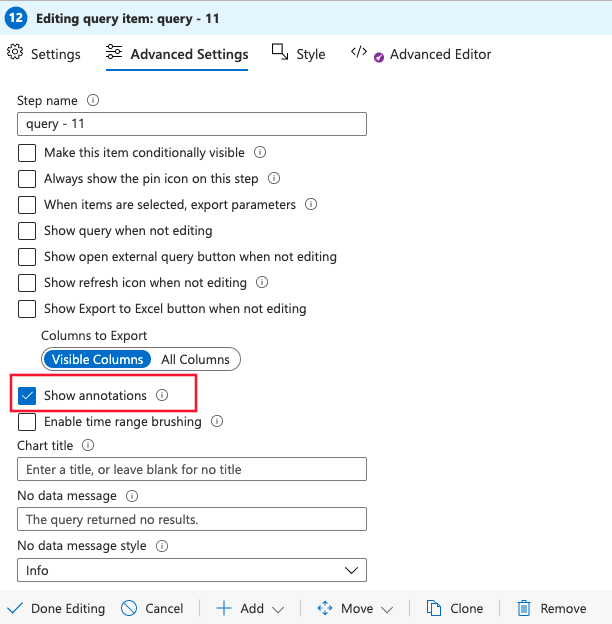
To enable annotations in your workbook, go to Advanced Settings and select Show annotations.
Select any annotation marker to open details about the release, including requestor, source control branch, release pipeline, and environment.
Release annotations by using API keys
Release annotations are a feature of the cloud-based Azure Pipelines service of Azure DevOps.
Important
Annotations using API keys is deprecated. We recommend using the Azure CLI instead.
Install the annotations extension (one time)
To create release annotations, install one of the many Azure DevOps extensions available in Visual Studio Marketplace.
Sign in to your Azure DevOps project.
On the Visual Studio Marketplace Release Annotations extension page, select your Azure DevOps organization. Select Install to add the extension to your Azure DevOps organization.
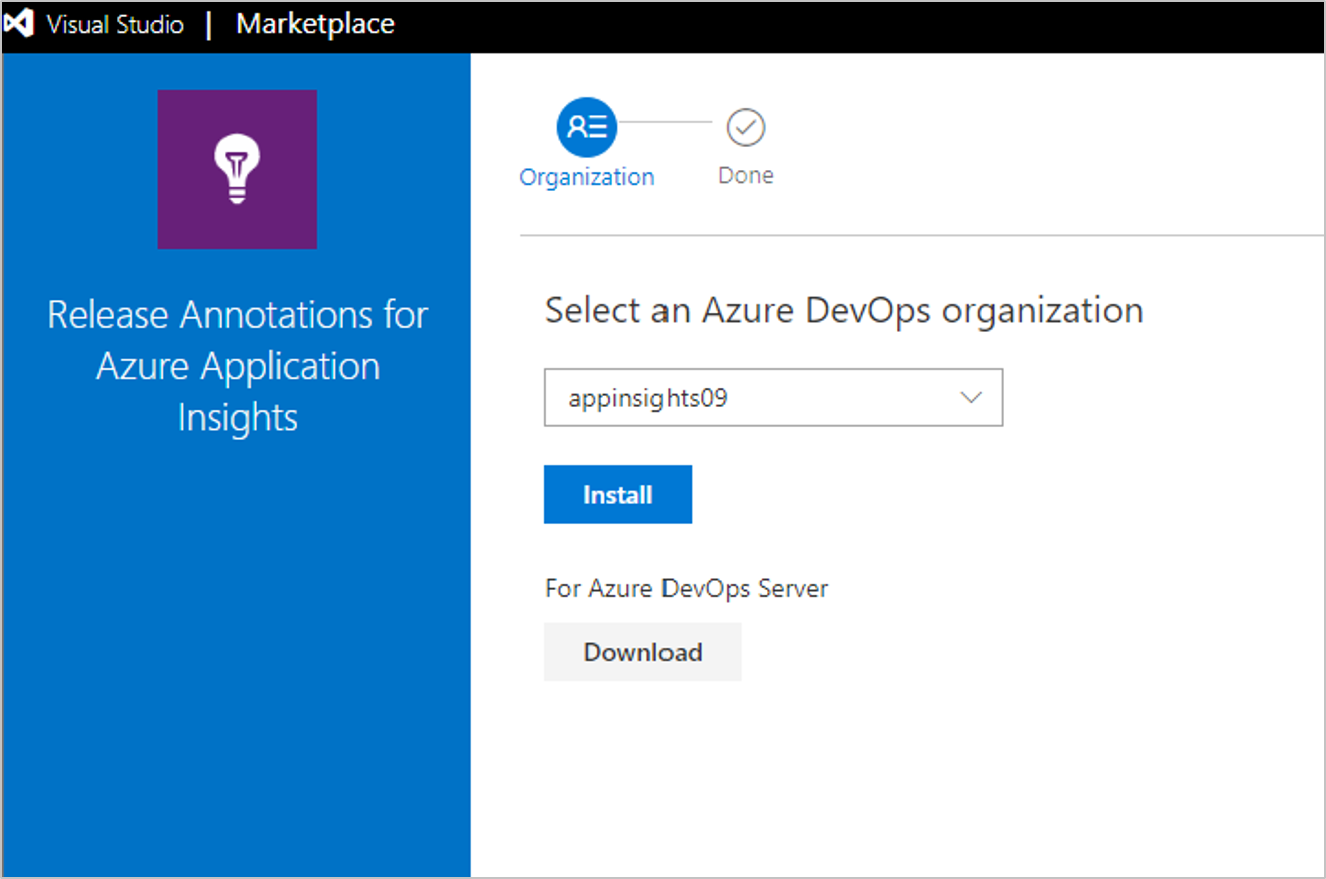
You only need to install the extension once for your Azure DevOps organization. You can now configure release annotations for any project in your organization.
Create a separate API key for each of your Azure Pipelines release templates.
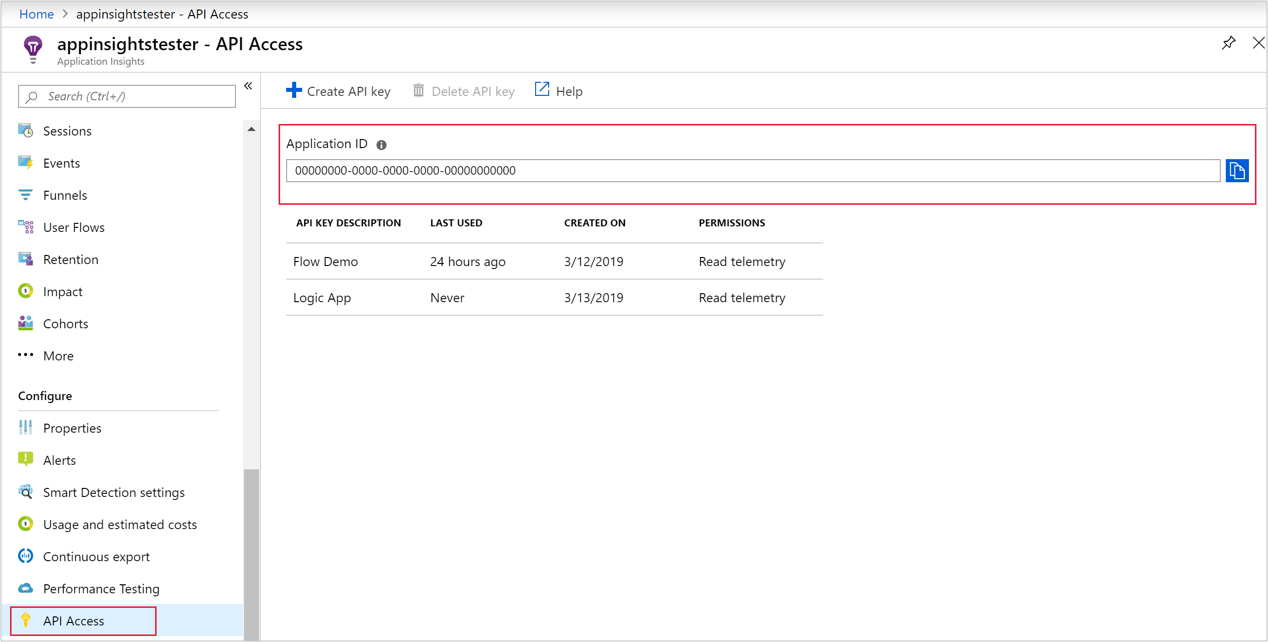
Sign in to the Azure portal and open the Application Insights resource that monitors your application. Or if you don't have one, create a new Application Insights resource.
Open the API Access tab and copy the Application Insights ID.
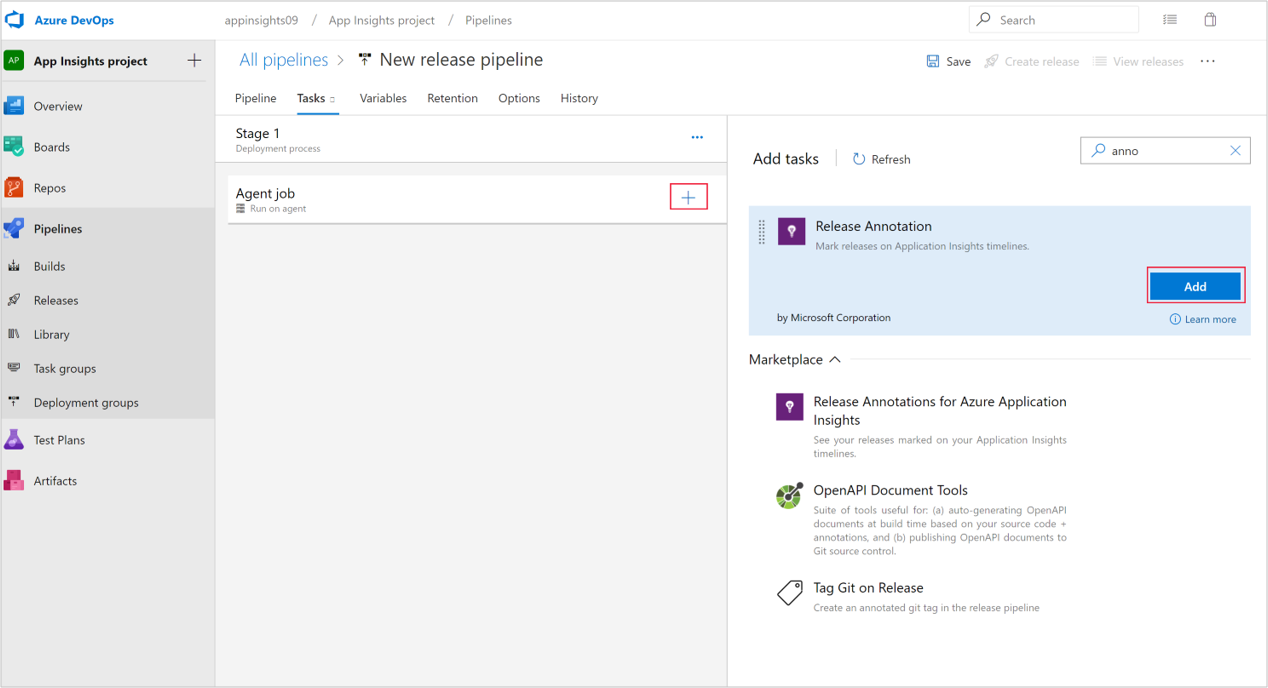
In a separate browser window, open or create the release template that manages your Azure Pipelines deployments.
Select Add task and then select the Application Insights Release Annotation task from the menu.
Note
The Release Annotation task currently supports only Windows-based agents. It won't run on Linux, macOS, or other types of agents.
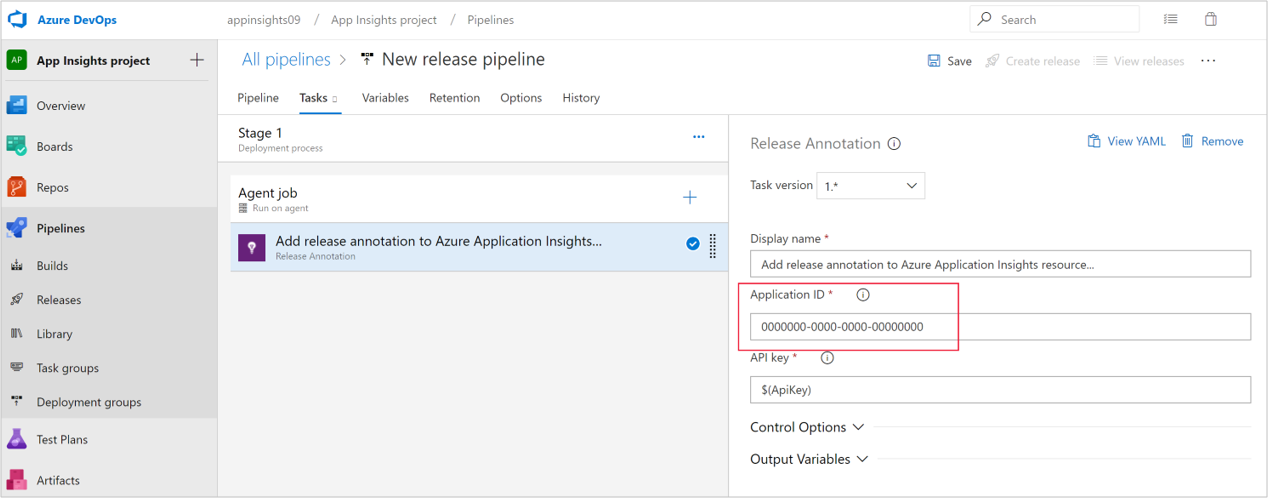
Under Application ID, paste the Application Insights ID you copied from the API Access tab.
Back in the Application Insights API Access window, select Create API Key.
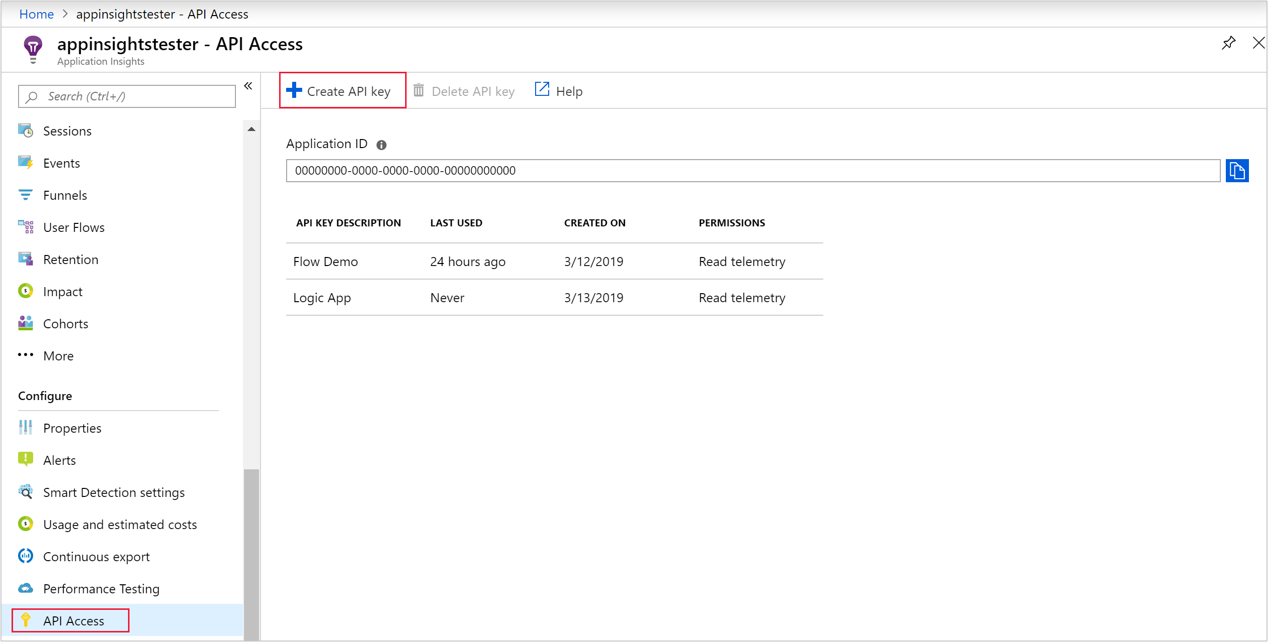
In the Create API key window, enter a description, select Write annotations, and then select Generate key. Copy the new key.

In the release template window, on the Variables tab, select Add to create a variable definition for the new API key.
Under Name, enter ApiKey. Under Value, paste the API key you copied from the API Access tab.
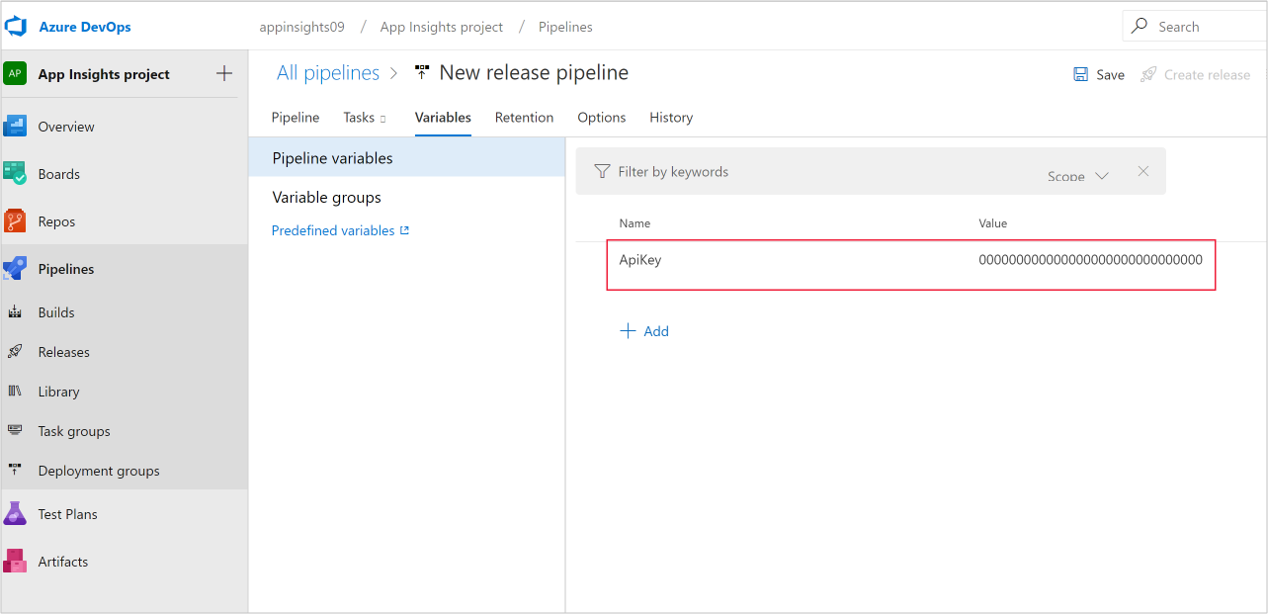
Select Save in the main release template window to save the template.
Transition to the new release annotation
To use the new release annotations:
- Remove the Release Annotations extension.
- Remove the Application Insights Release Annotation task in your Azure Pipelines deployment.
- Create new release annotations with Azure Pipelines or the Azure CLI.
Work item integration functionality allows you to easily create work items in GitHub or Azure DevOps that have relevant Application Insights data embedded in them.
The new work item integration offers the following features over classic:
- Advanced fields like assignee, projects, or milestones.
- Repo icons so you can differentiate between GitHub & Azure DevOps workbooks.
- Multiple configurations for any number of repositories or work items.
- Deployment through Azure Resource Manager templates.
- Pre-built & customizable Keyword Query Language (KQL) queries to add Application Insights data to your work items.
- Customizable workbook templates.
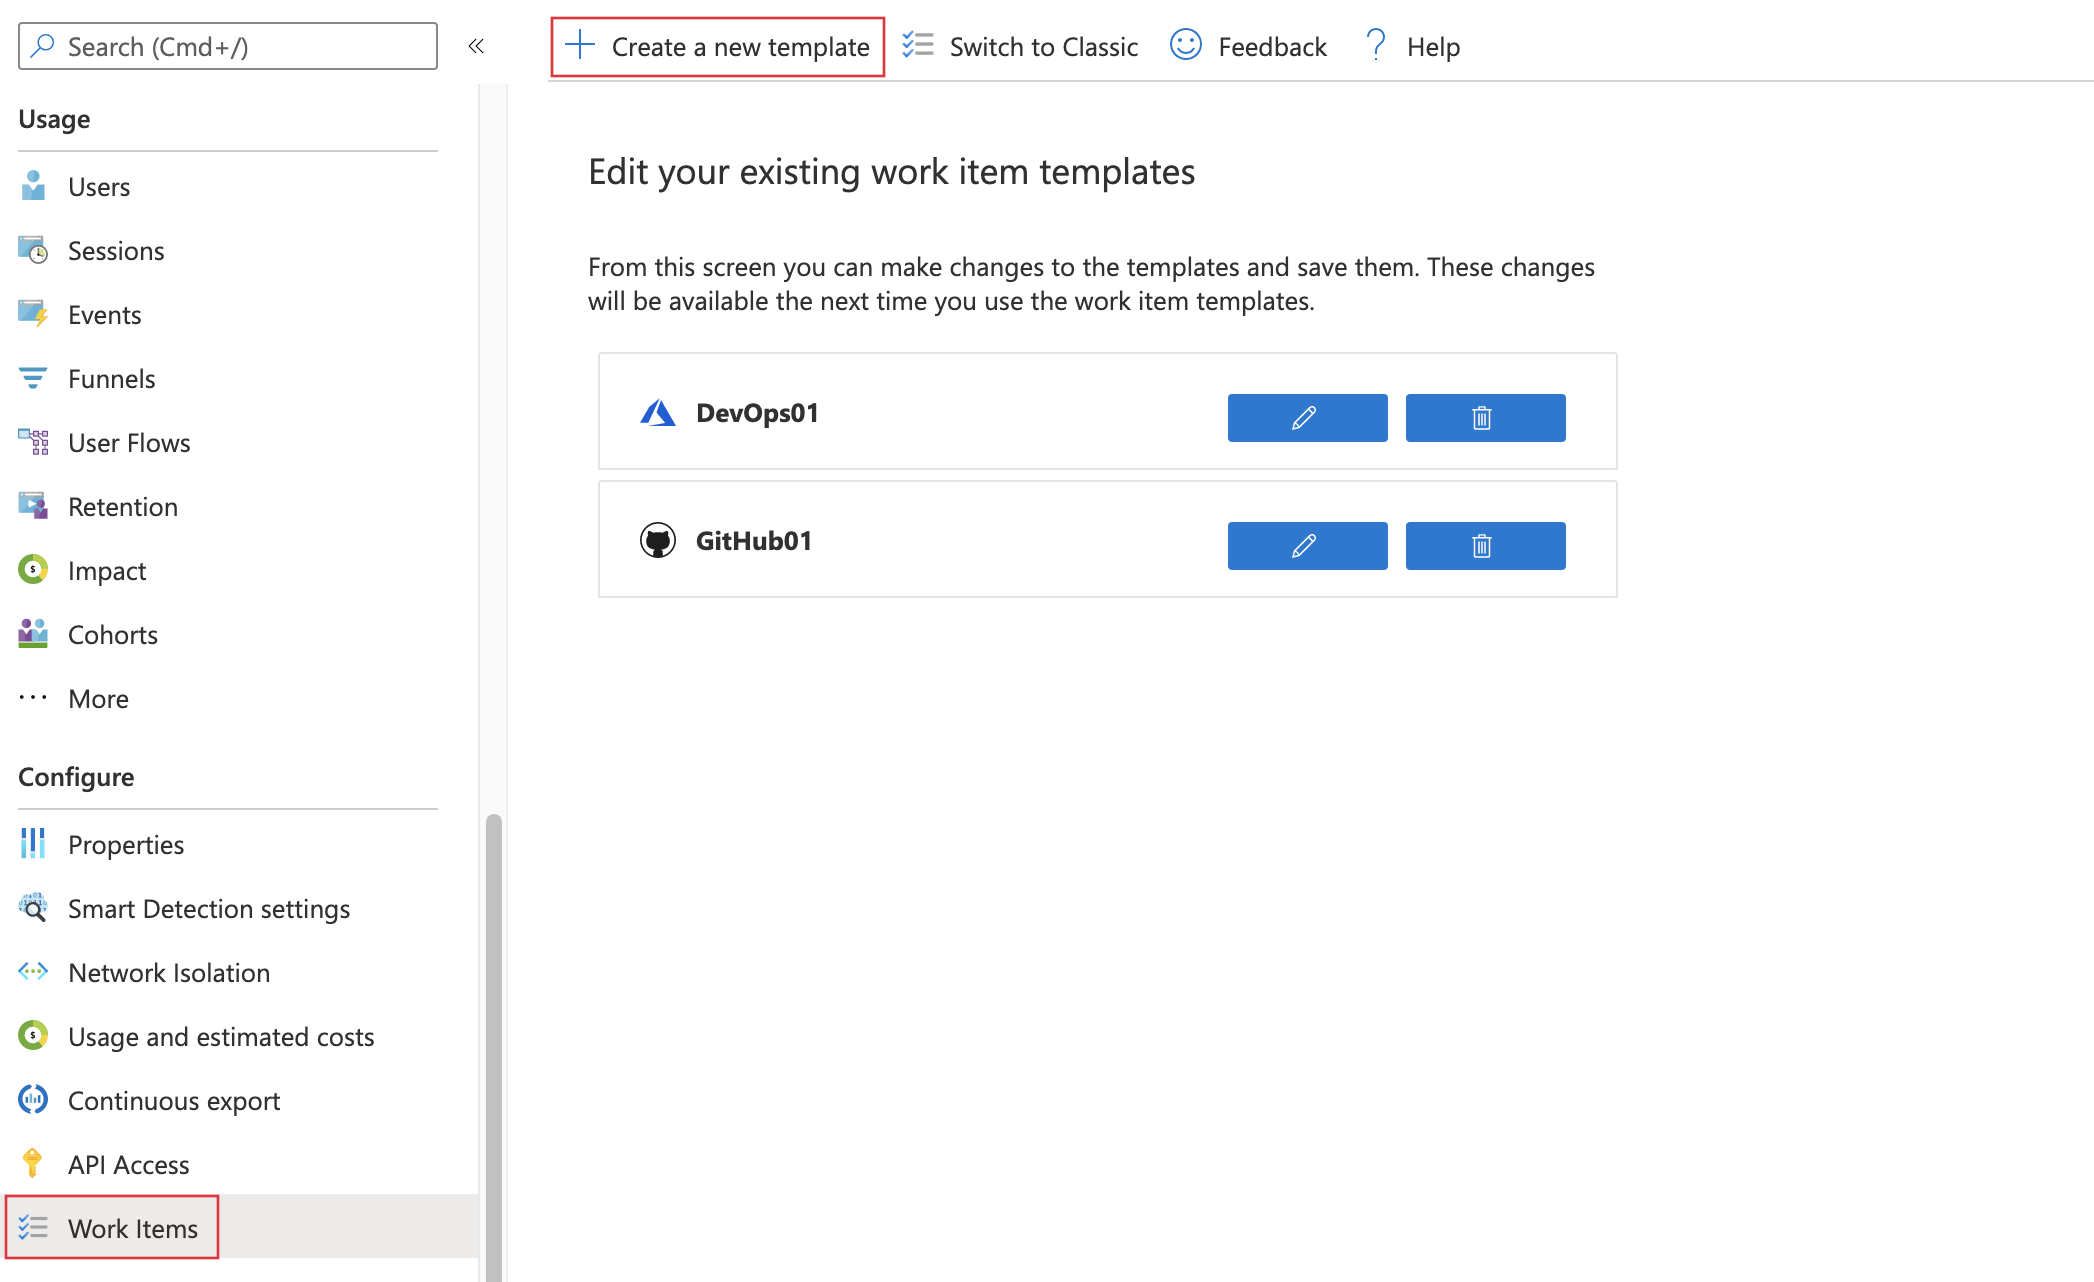
To create a work item template, go to your Application Insights resource and on the left under Configure select Work Items then at the top select Create a new template
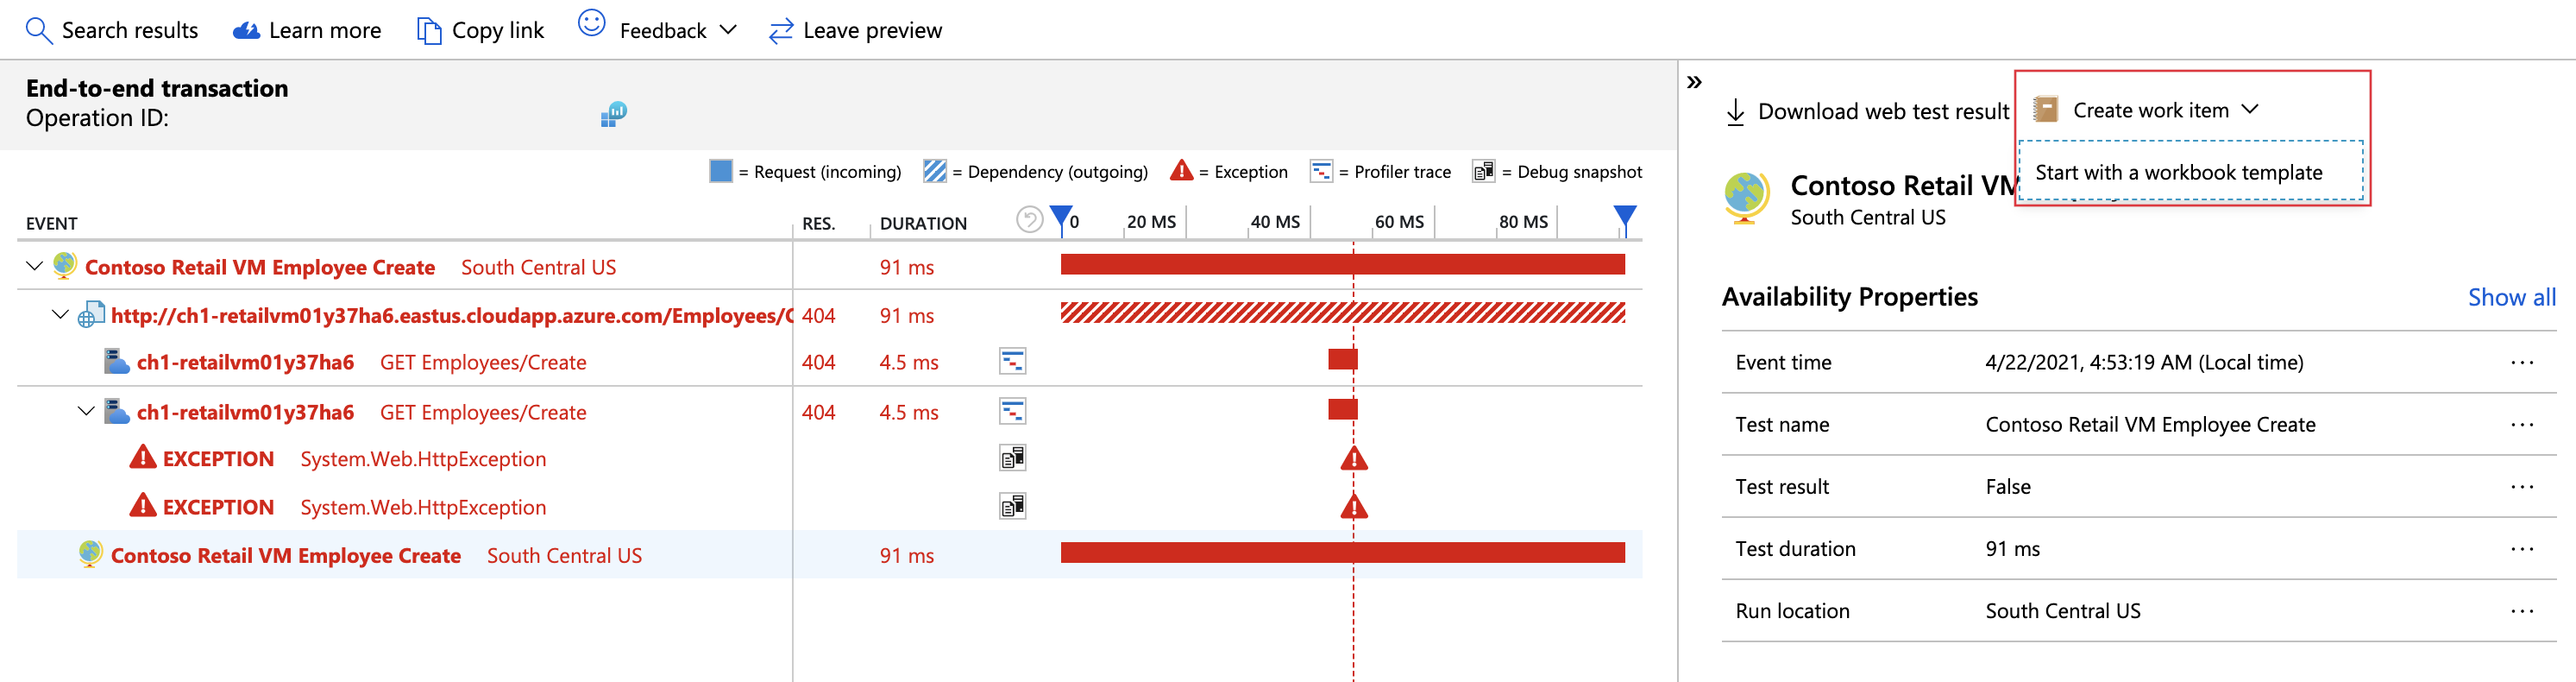
You can also create a work item template from the end-to-end transaction details tab, if no template currently exists. Select an event and on the right select Create a work item, then Start with a workbook template.
After you select create a new template, you can choose your tracking systems, name your workbook, link to your selected tracking system, and choose a region to storage the template (the default is the region your Application Insights resource is located in). The URL parameters are the default URL for your repository, for example, https://github.com/myusername/reponame or https://dev.azure.com/{org}/{project}.

You can set specific work item properties directly from the template itself. This includes the assignee, iteration path, projects, & more depending on your version control provider.
Create a work item
You can access your new template from any End-to-end transaction details that you can access from Performance, Failures, Availability, or other tabs.
To create a work item go to End-to-end transaction details, select an event then select Create work item and choose your work item template.
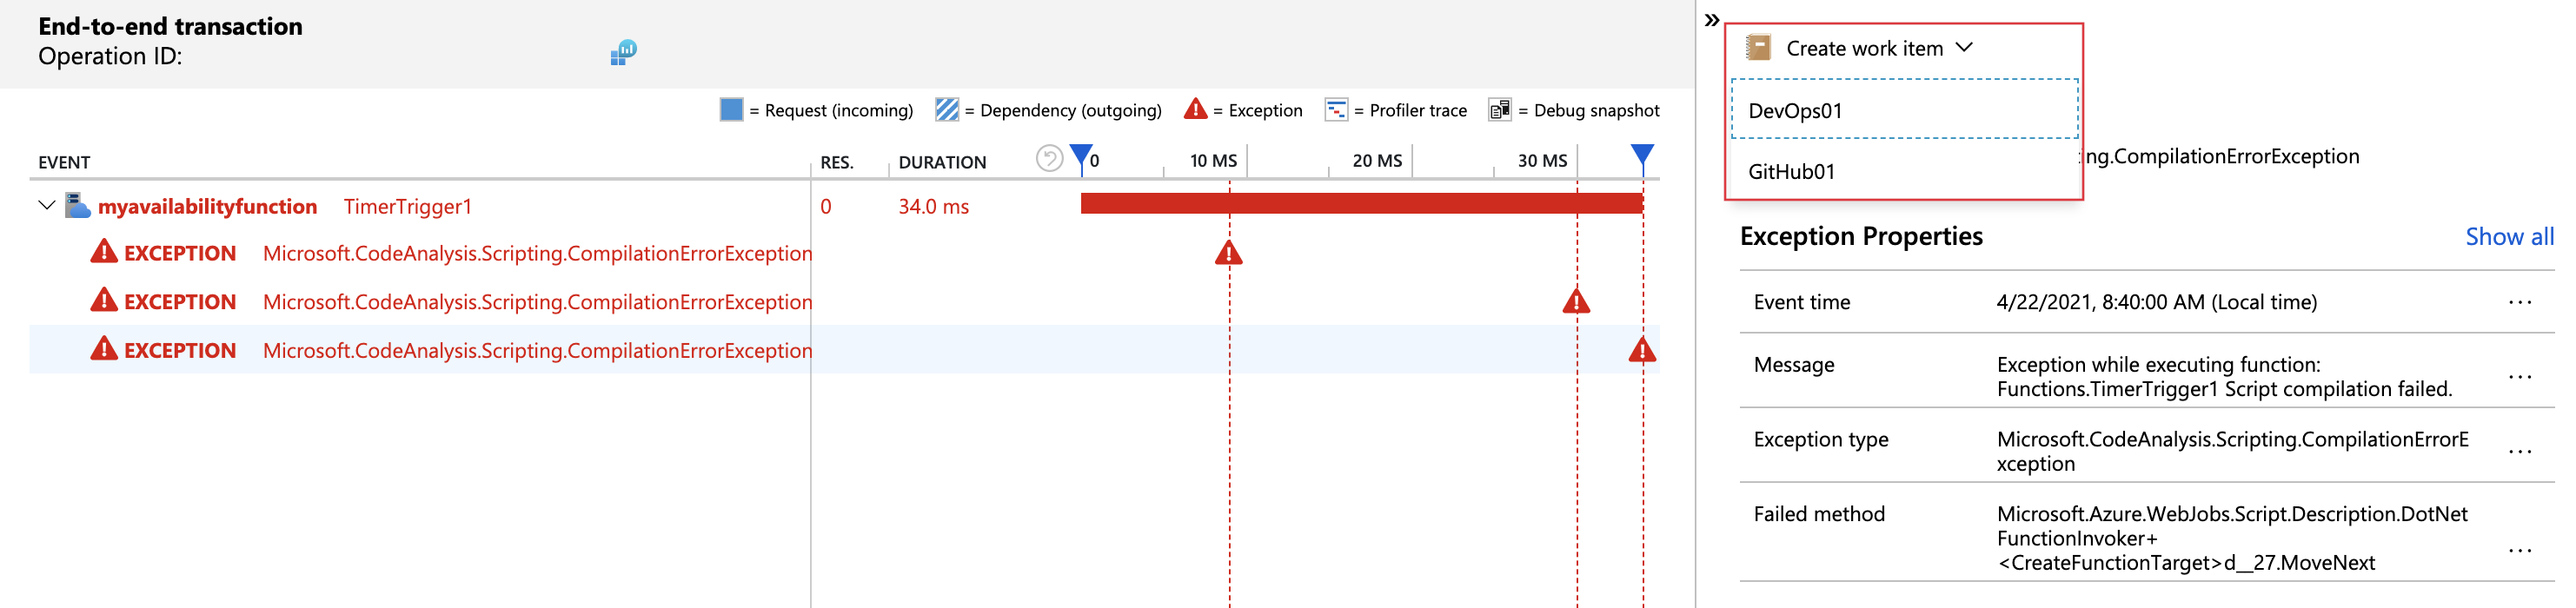
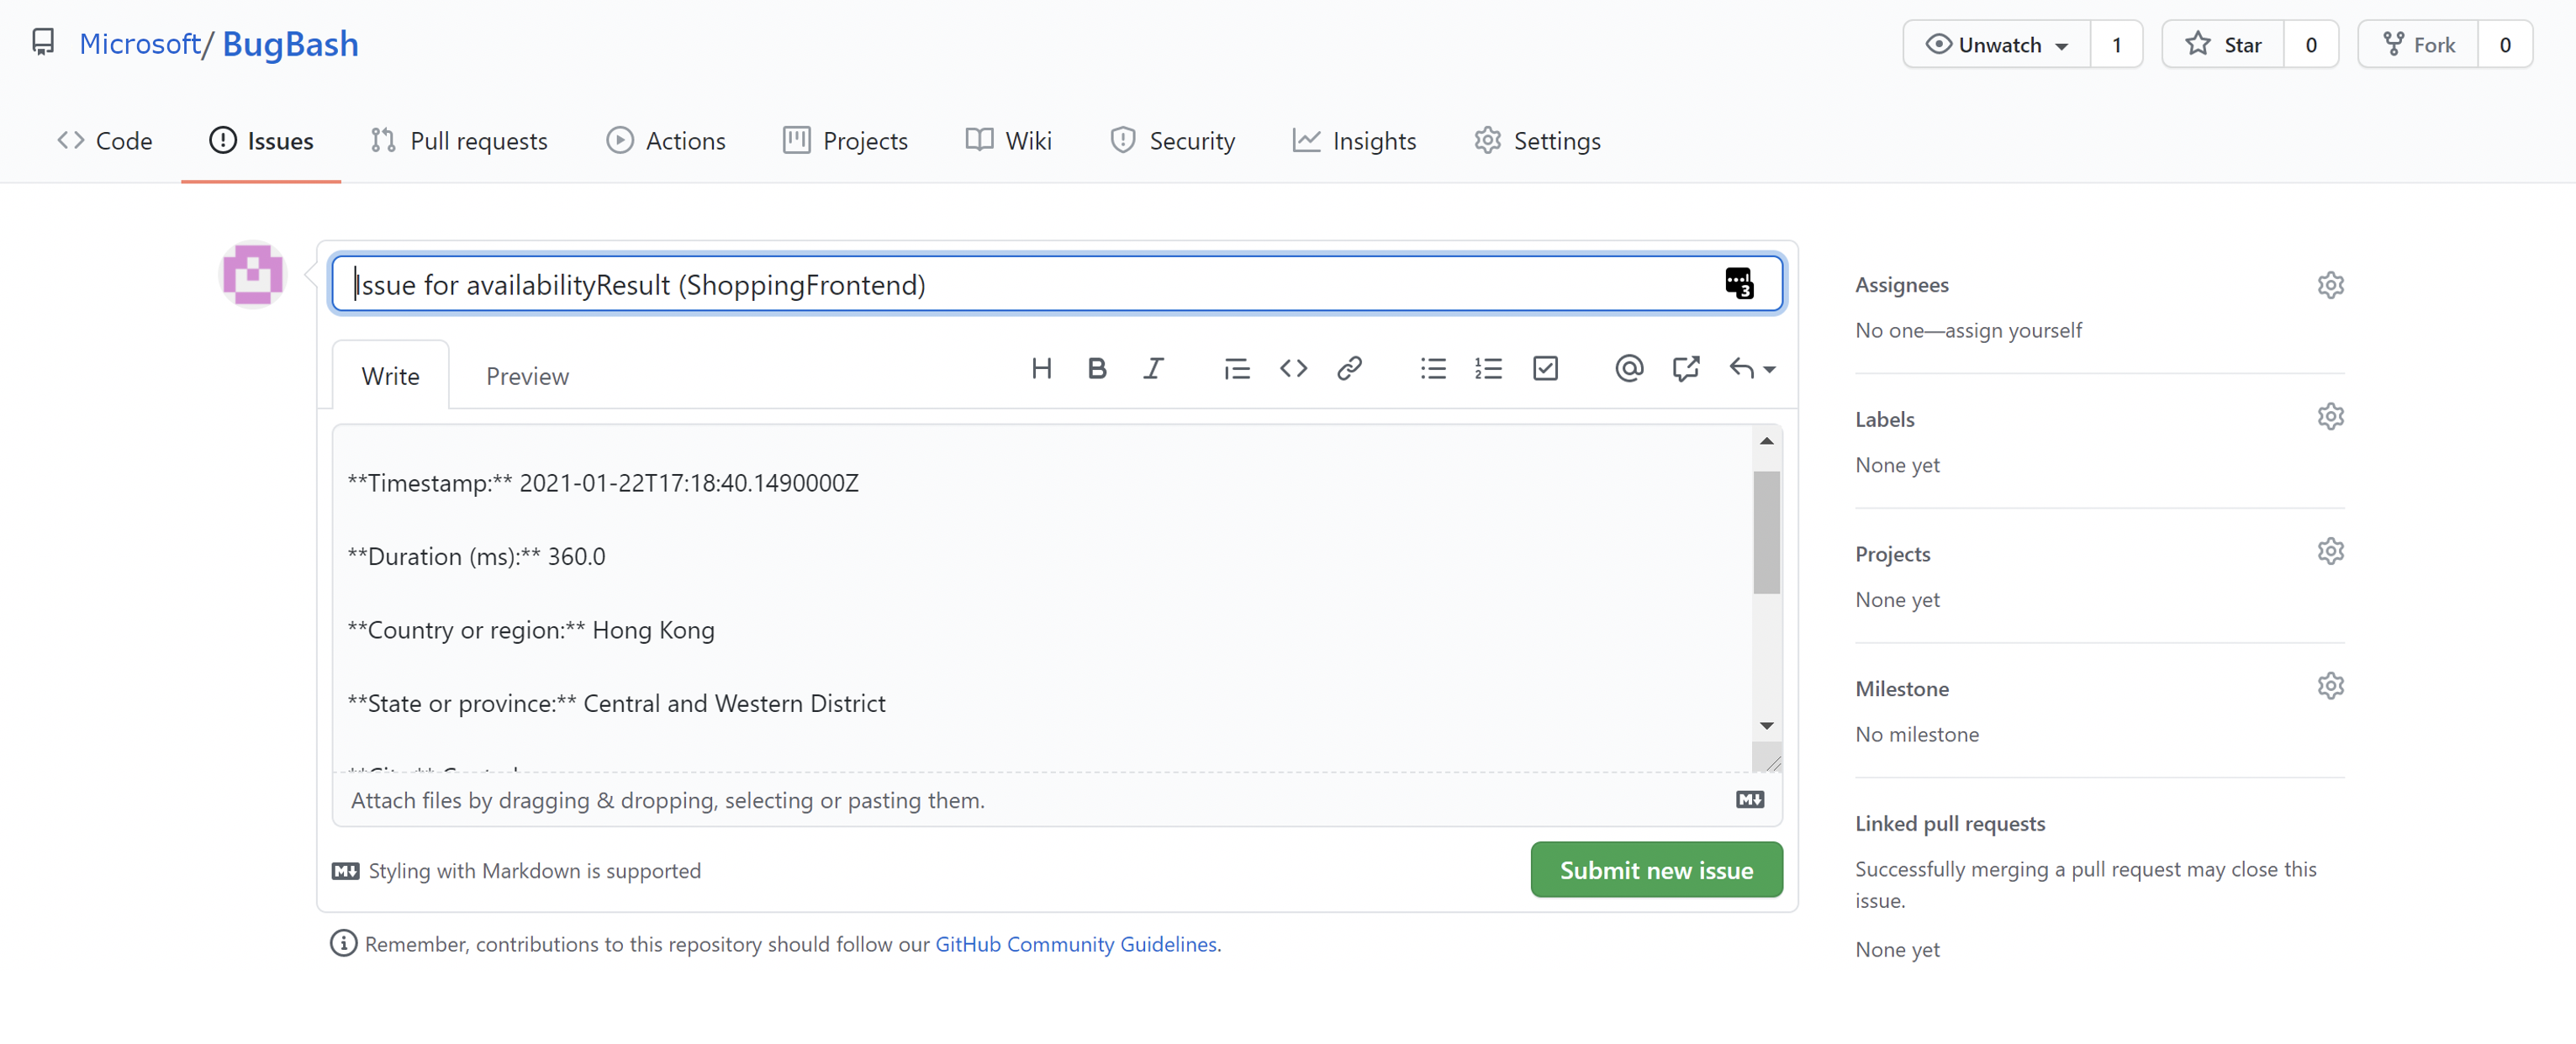
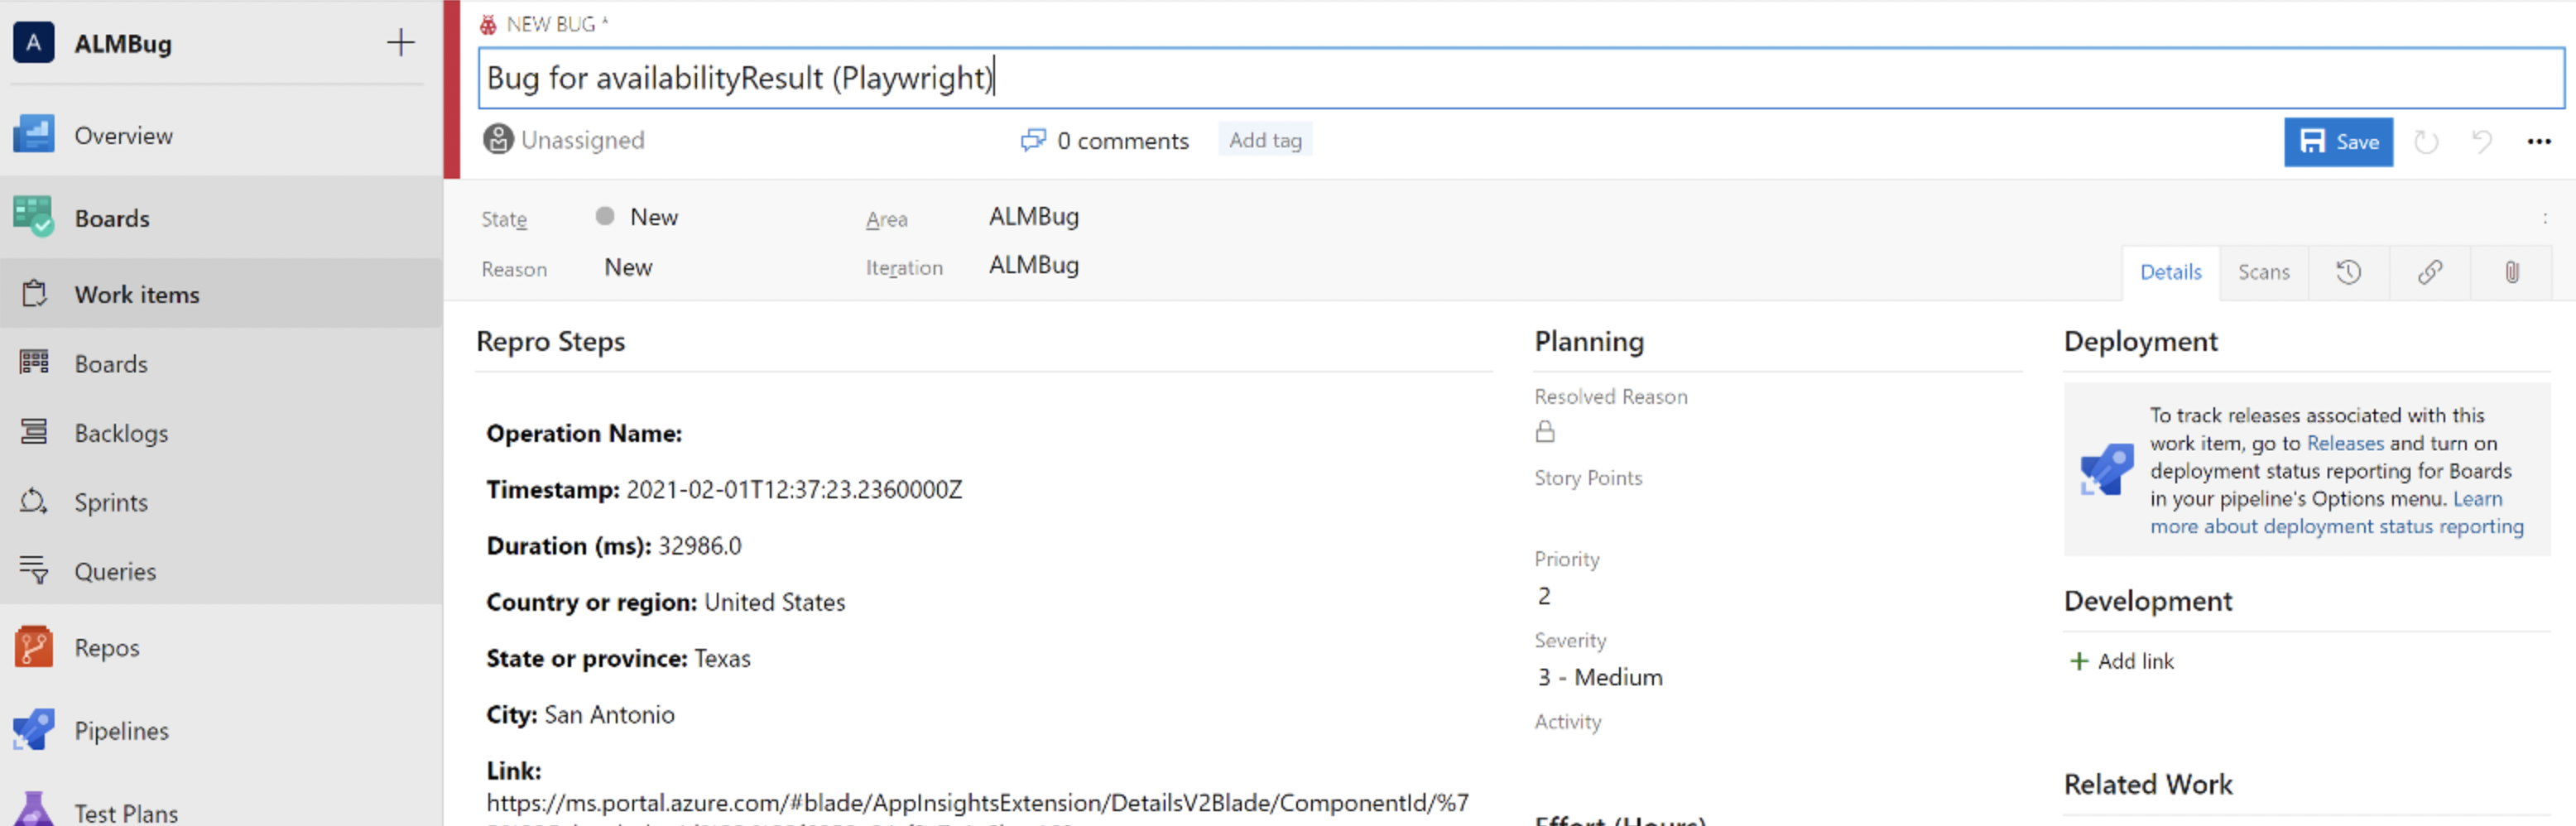
A new tab in your browser will open up to your select tracking system. In Azure DevOps you can create a bug or task, and in GitHub you can create a new issue in your repository. A new work item is automatically create with contextual information provided by Application Insights.
Edit a template
To edit your template, go to the Work Items tab under Configure and select the pencil icon next to the workbook you would like to update.
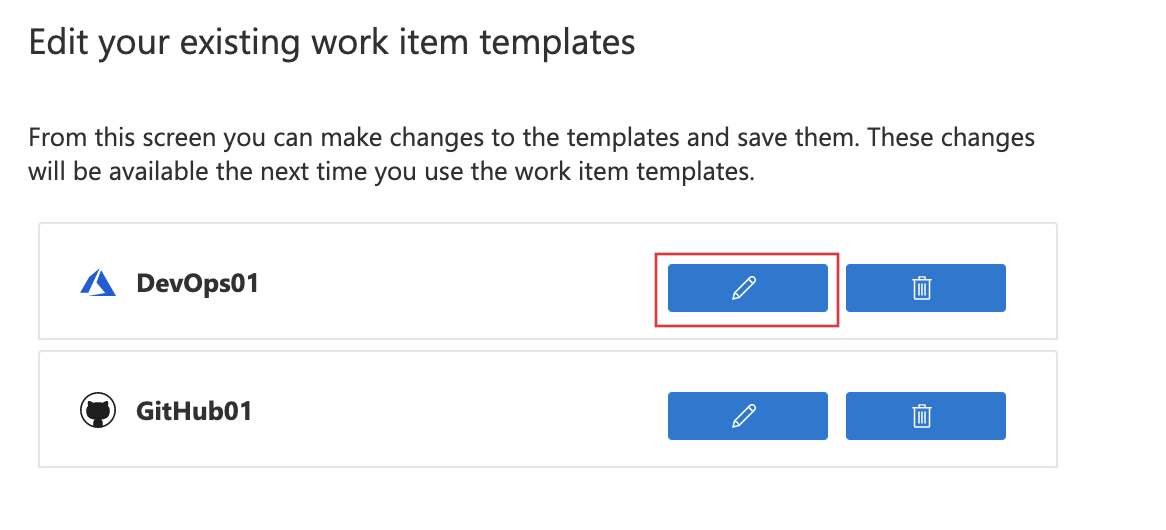
Select edit  in the top toolbar.
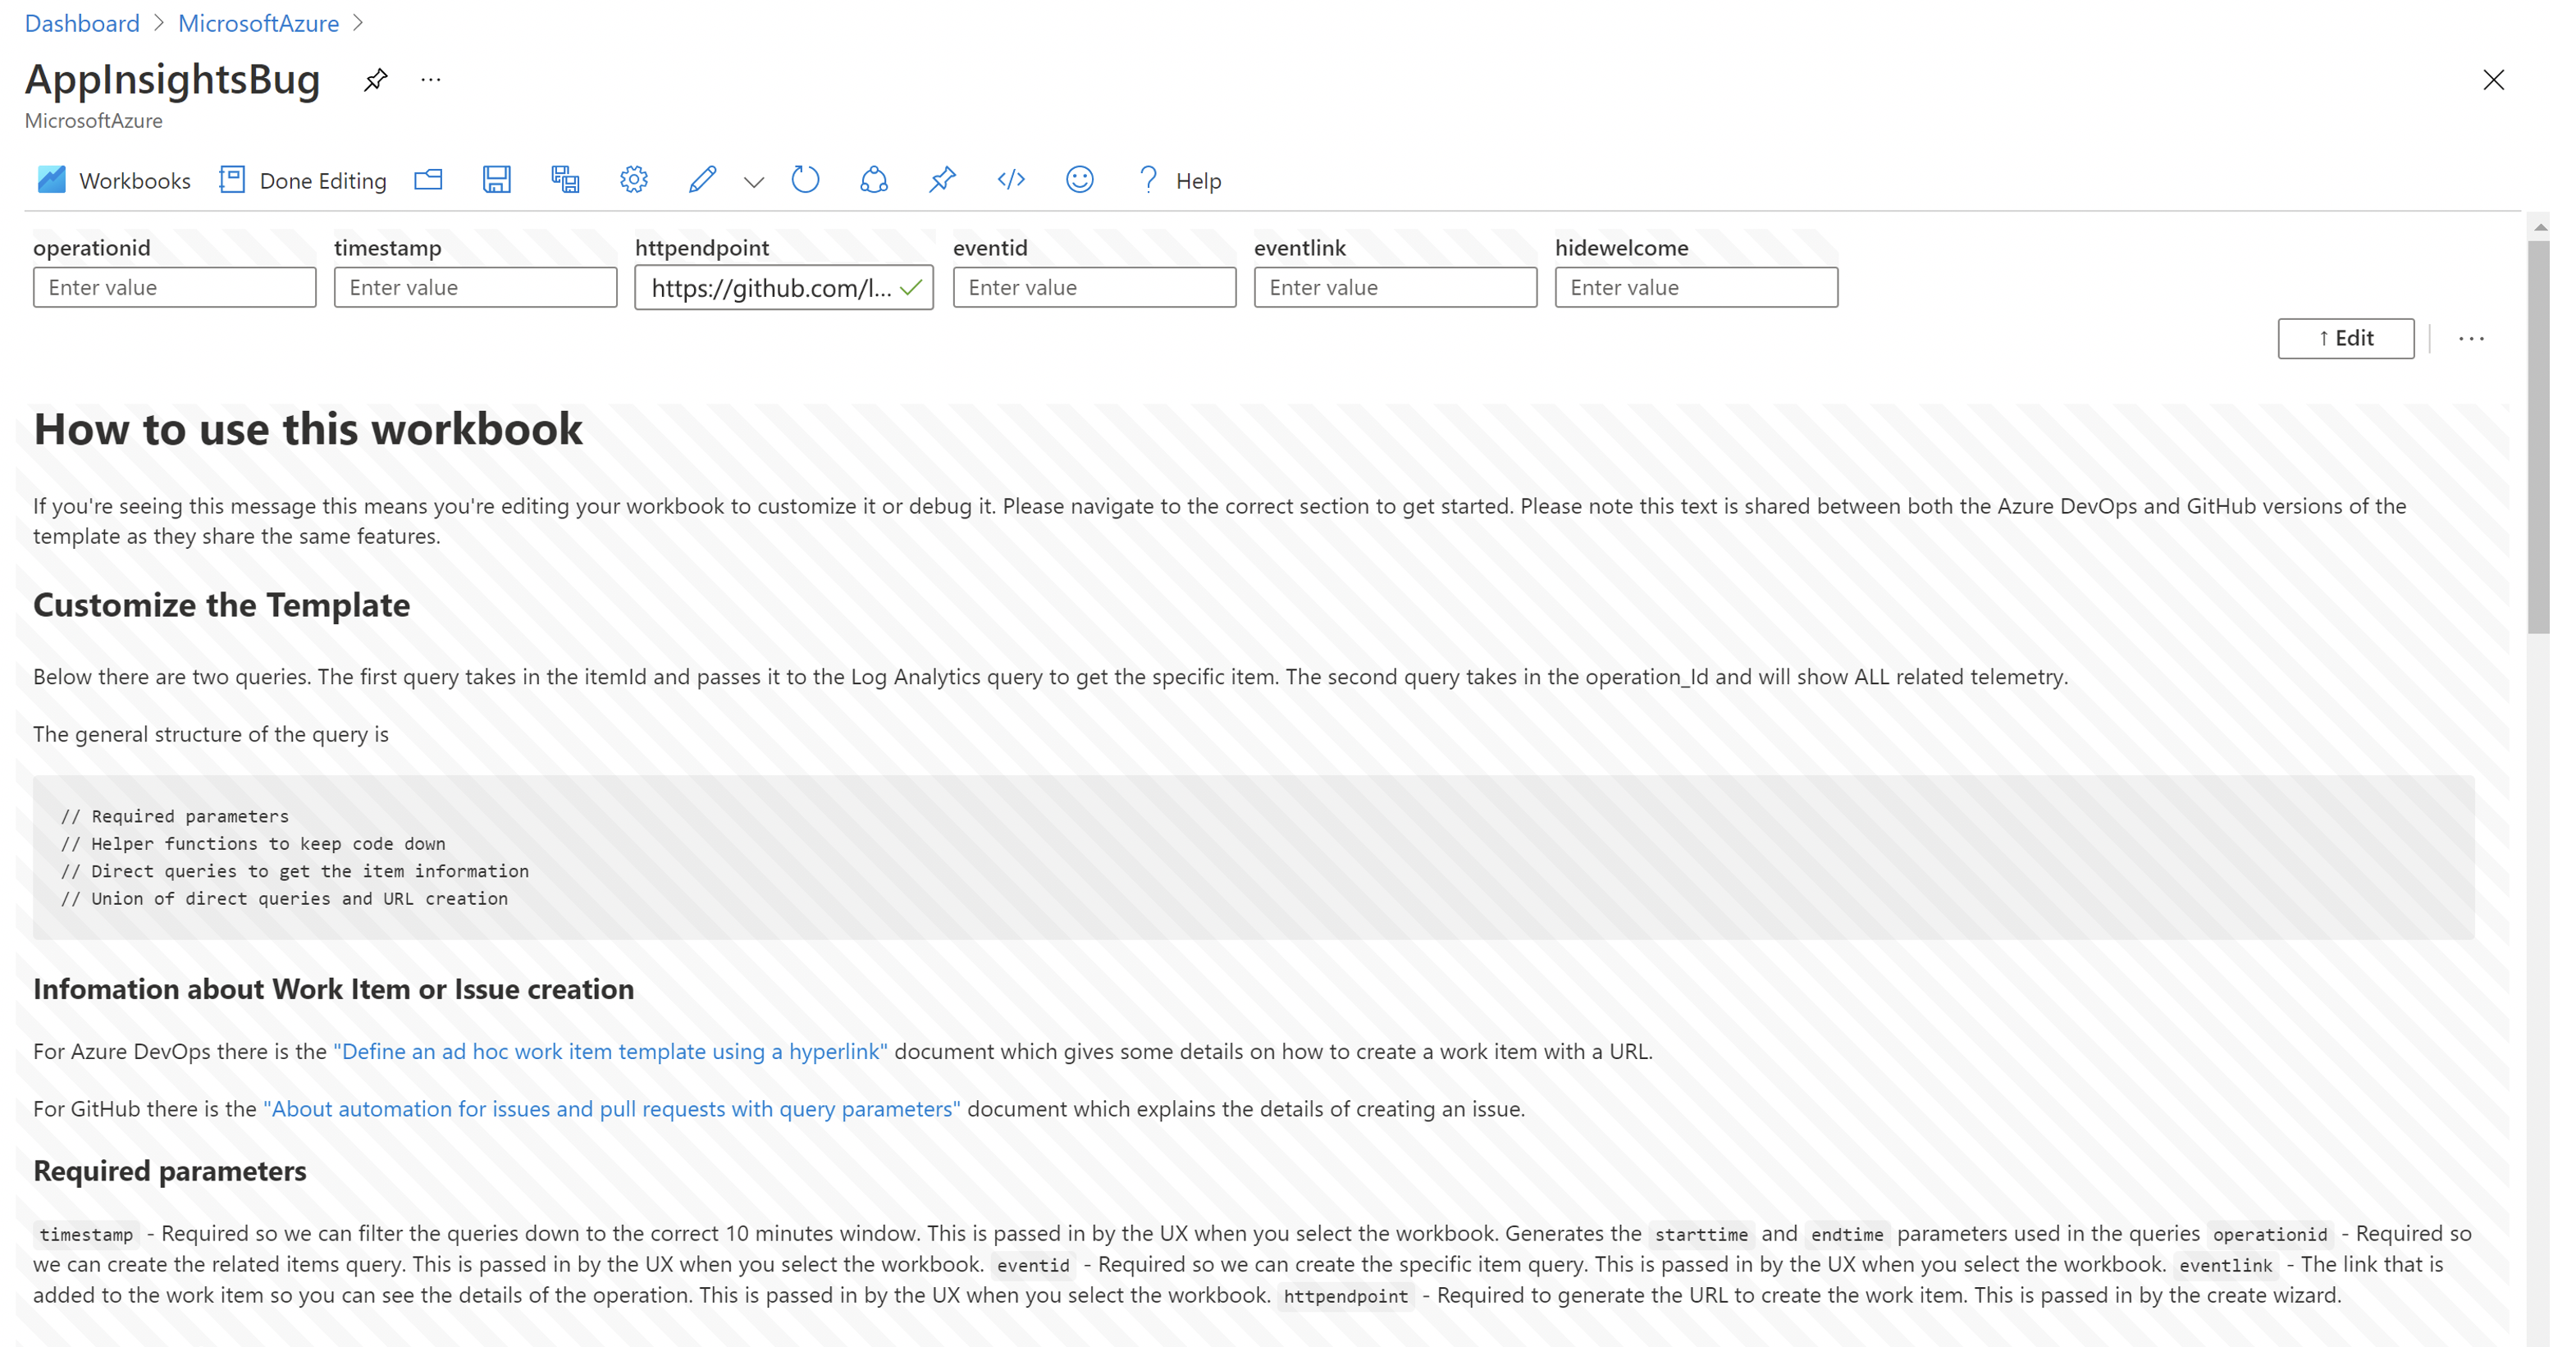
You can create more than one work item configuration and have a custom workbook to meet each scenario. The workbooks can also be deployed by Azure Resource Manager ensuring standard implementations across your environments.
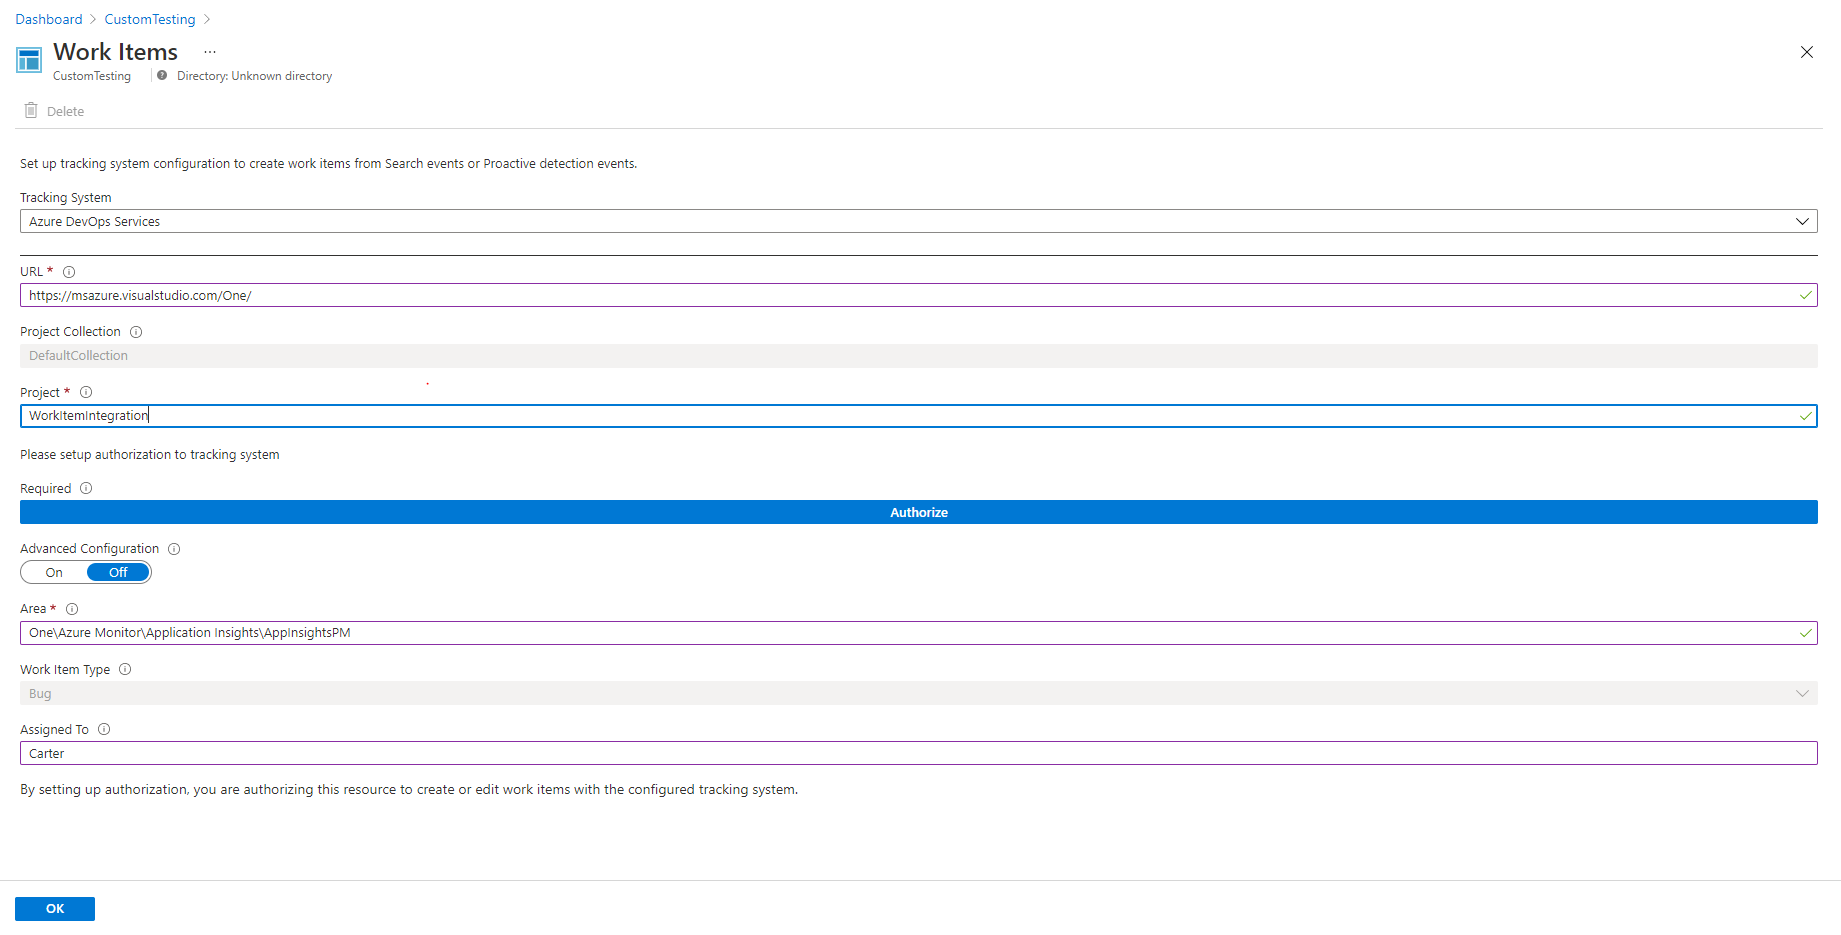
Classic work item integration
In your Application Insights resource under Configure select Work Items.
Select Switch to Classic, fill out the fields with your information, and authorize.
Create a work item by going to the end-to-end transaction details, select an event then select Create work item (Classic).
Migrate to new work item integration
To migrate, delete your classic work item configuration then create and configure a work item template to recreate your integration.
To delete, go to in your Application Insights resource under Configure select Work Items then select Switch to Classic and *Delete at the top.


