Review TrackAvailability() test results
This article explains how to review TrackAvailability() test results in the Azure portal and query the data using Log Analytics. Standard tests should always be used if possible as they require little investment, no maintenance, and have few prerequisites.
Prerequisites
- Workspace-based Application Insights resource
- Access to the source code of a function app in Azure Functions
- Developer expertise capable of authoring custom code for TrackAvailability(), tailored to your specific business needs
Important
TrackAvailability() requires making a developer investment in writing and maintanining potentially complex custom code.
Check availability
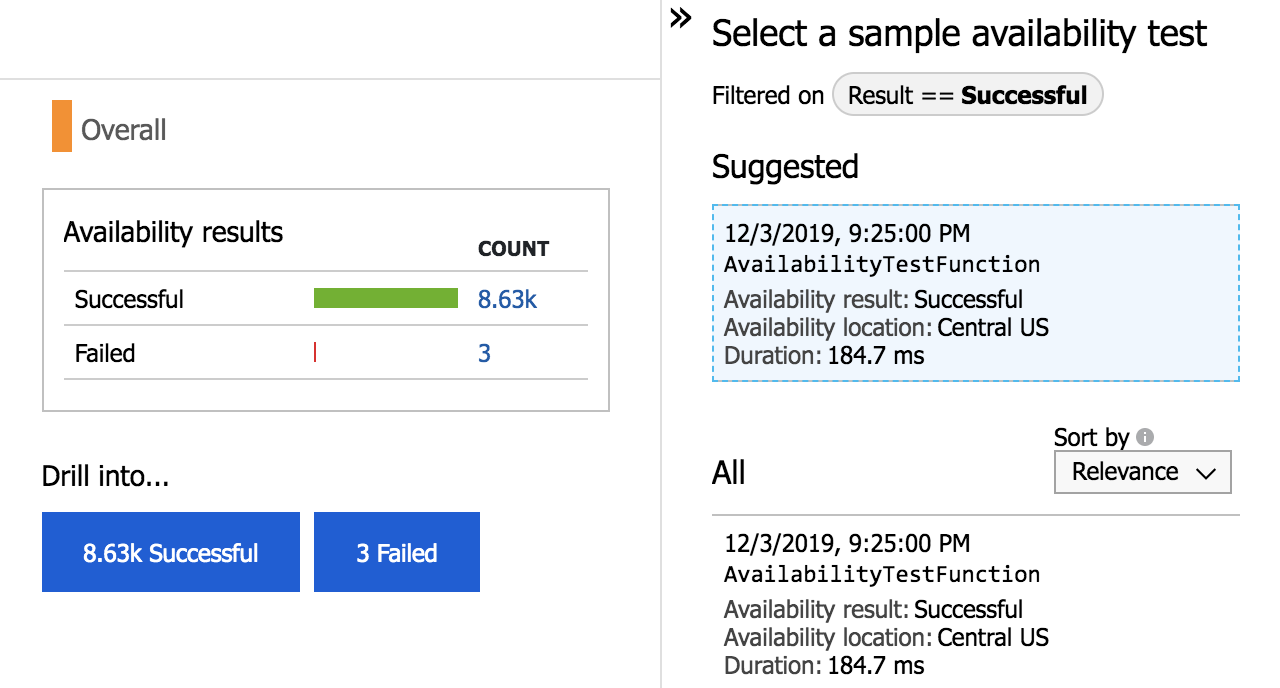
Start by reviewing the graph on the Availability tab of your Application Insights resource.
Note
Tests created with TrackAvailability() will appear with CUSTOM next to the test name.

To see the end-to-end transaction details, under Drill into, select Successful or Failed. Then select a sample. You can also get to the end-to-end transaction details by selecting a data point on the graph.

Query in Log Analytics
You can use Log Analytics to view your availability results, dependencies, and more. To learn more about Log Analytics, see Log query overview.


Basic code sample
Note
This example is designed solely to show you the mechanics of how the TrackAvailability() API call works within an Azure function. It doesn't show you how to write the underlying HTTP test code or business logic that's required to turn this example into a fully functional availability test. By default, if you walk through this example, you'll be creating a basic availability HTTP GET test.
To follow these instructions, you must use the dedicated plan to allow editing code in App Service Editor.
Create a timer trigger function
Create an Azure Functions resource.
If you already have an Application Insights resource:
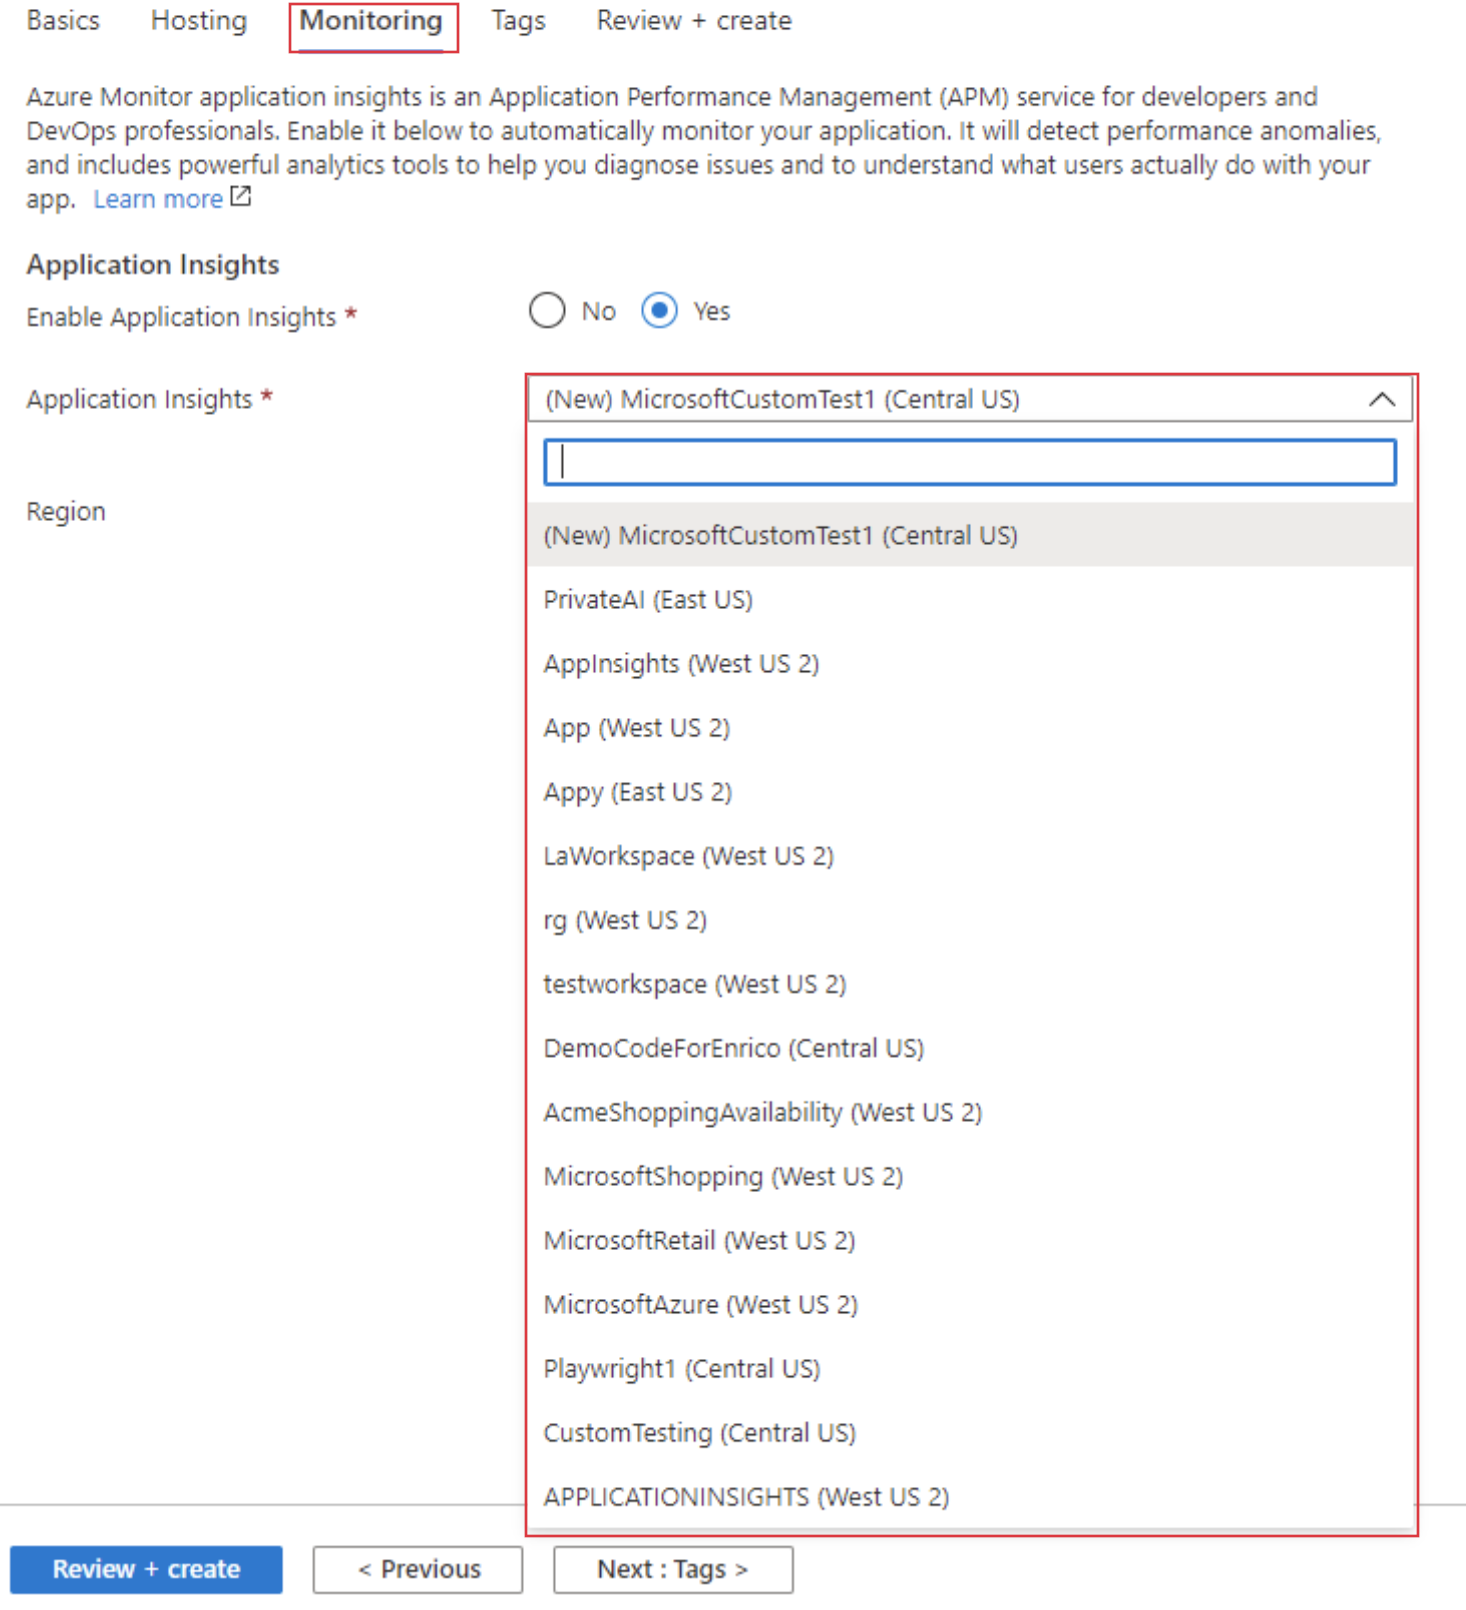
By default, Azure Functions creates an Application Insights resource. But if you want to use a resource you created previously, you must specify that during creation.
Follow the instructions on how to create an Azure Functions resource with the following modification:
On the Monitoring tab, select the Application Insights dropdown box and then enter or select the name of your resource.
If you don't have an Application Insights resource created yet for your timer-triggered function:
- By default, when you're creating your Azure Functions application, it creates an Application Insights resource for you. Follow the instructions on how to create an Azure Functions resource.
Note
You can host your functions on a Consumption, Premium, or App Service plan. If you're testing behind a virtual network or testing nonpublic endpoints, you'll need to use the Premium plan in place of the Consumption plan. Select your plan on the Hosting tab. Ensure the latest .NET version is selected when you create the function app.
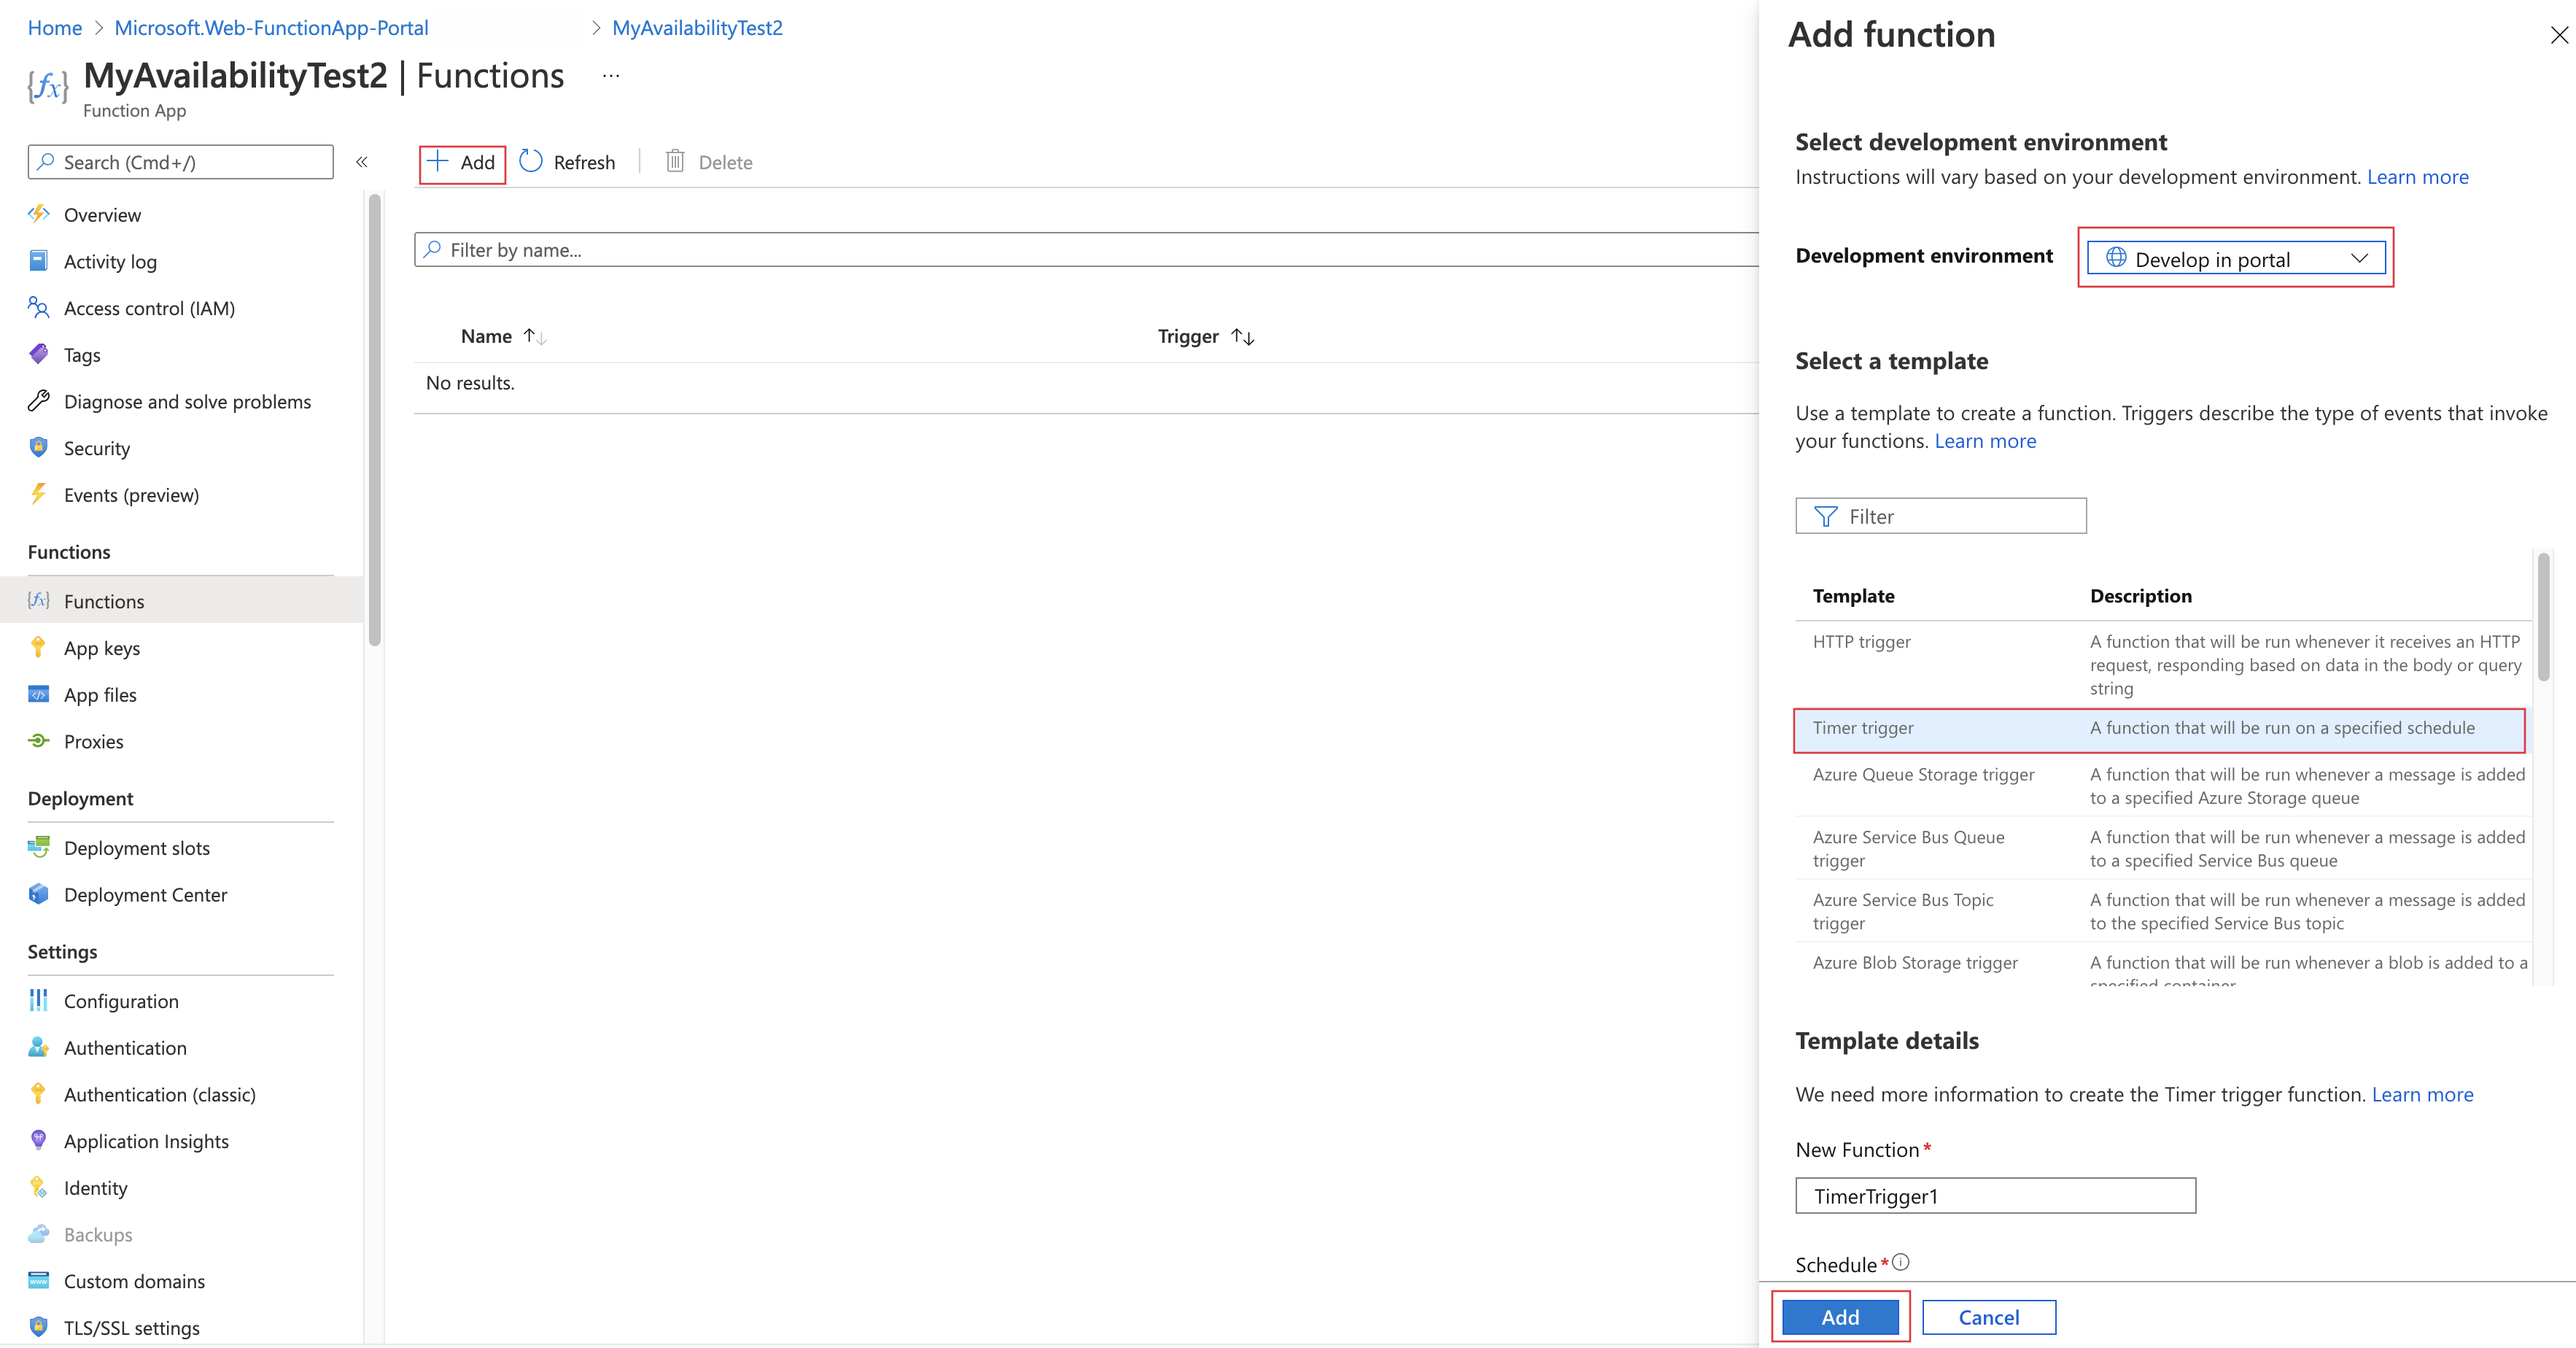
Create a timer trigger function.
- In your function app, select the Functions tab.
- Select Add. On the Add function pane, select the following configurations:
- Development environment: Develop in portal
- Select a template: Timer trigger
- Select Add to create the timer trigger function.

Add and edit code in the App Service Editor
Go to your deployed function app, and under Development Tools, select the App Service Editor tab.
To create a new file, right-click under your timer trigger function (for example, TimerTrigger1) and select New File. Then enter the name of the file and select Enter.
Create a new file called function.proj and paste the following code:
<Project Sdk="Microsoft.NET.Sdk">
    <PropertyGroup>
        <TargetFramework>netstandard2.0</TargetFramework>
    </PropertyGroup>
    <ItemGroup>
        <PackageReference Include="Microsoft.ApplicationInsights" Version="2.15.0" /> <!-- Ensure you’re using the latest version -->
    </ItemGroup>
</Project>
Create a new file called runAvailabilityTest.csx and paste the following code:
using System.Net.Http;

public async static Task RunAvailabilityTestAsync(ILogger log)
{
    using (var httpClient = new HttpClient())
    {
        // TODO: Replace with your business logic
        await httpClient.GetStringAsync("https://www.bing.com/");
    }
}
Define the
REGION_NAMEenvironment variable as a valid Azure availability location.Run the following command in the Azure CLI to list available regions.
az account list-locations -o tableCopy the following code into the run.csx file. (You replace the pre-existing code.)
#load "runAvailabilityTest.csx"

using System;

using System.Diagnostics;

using Microsoft.ApplicationInsights;

using Microsoft.ApplicationInsights.Channel;

using Microsoft.ApplicationInsights.DataContracts;

using Microsoft.ApplicationInsights.Extensibility;

private static TelemetryClient telemetryClient;

// =============================================================

// ****************** DO NOT MODIFY THIS FILE ******************

// Business logic must be implemented in RunAvailabilityTestAsync function in runAvailabilityTest.csx

// If this file does not exist, please add it first

// =============================================================

public async static Task Run(TimerInfo myTimer, ILogger log, ExecutionContext executionContext)

{
    if (telemetryClient == null)
    {
        // Initializing a telemetry configuration for Application Insights based on connection string

        var telemetryConfiguration = new TelemetryConfiguration();
        telemetryConfiguration.ConnectionString = Environment.GetEnvironmentVariable("APPLICATIONINSIGHTS_CONNECTION_STRING");
        telemetryConfiguration.TelemetryChannel = new InMemoryChannel();
        telemetryClient = new TelemetryClient(telemetryConfiguration);
    }

    string testName = executionContext.FunctionName;
    string location = Environment.GetEnvironmentVariable("REGION_NAME");
    var availability = new AvailabilityTelemetry
    {
        Name = testName,

        RunLocation = location,

        Success = false,
    };

    availability.Context.Operation.ParentId = Activity.Current.SpanId.ToString();
    availability.Context.Operation.Id = Activity.Current.RootId;
    var stopwatch = new Stopwatch();
    stopwatch.Start();

    try
    {
        using (var activity = new Activity("AvailabilityContext"))
        {
            activity.Start();
            availability.Id = Activity.Current.SpanId.ToString();
            // Run business logic
            await RunAvailabilityTestAsync(log);
        }
        availability.Success = true;
    }

    catch (Exception ex)
    {
        availability.Message = ex.Message;
        throw;
    }

    finally
    {
        stopwatch.Stop();
        availability.Duration = stopwatch.Elapsed;
        availability.Timestamp = DateTimeOffset.UtcNow;
        telemetryClient.TrackAvailability(availability);
        telemetryClient.Flush();
    }
}

Multi-Step Web Test Code Sample
Follow the same instructions above and instead paste the following code into the runAvailabilityTest.csx file:
using System.Net.Http;

public async static Task RunAvailabilityTestAsync(ILogger log)
{
    using (var httpClient = new HttpClient())
    {
        // TODO: Replace with your business logic
        await httpClient.GetStringAsync("https://www.bing.com/");

        // TODO: Replace with your business logic for an additional monitored endpoint, and logic for additional steps as needed
        await httpClient.GetStringAsync("https://www.learn.microsoft.com/");
    }
}
Next steps
Feedback
Coming soon: Throughout 2024 we will be phasing out GitHub Issues as the feedback mechanism for content and replacing it with a new feedback system. For more information see: https://aka.ms/ContentUserFeedback.
Submit and view feedback for