Enable Azure Monitor OpenTelemetry for .NET, Node.js, Python and Java applications

This article describes how to enable and configure OpenTelemetry-based data collection to power the experiences within Azure Monitor Application Insights. We will walk through how to install the "Azure Monitor OpenTelemetry Distro." To learn more about OpenTelemetry concepts, see the OpenTelemetry overview or OpenTelemetry FAQ.

OpenTelemetry Release Status

OpenTelemetry offerings are available for .NET, Node.js, Python and Java applications.

Language Release Status
Java 1
.NET ⚠️ 2
Node.js ⚠️ 2
Python ⚠️ 2

Footnotes

Note

For a feature-by-feature release status, see the FAQ.

Get started

Follow the steps in this section to instrument your application with OpenTelemetry.

Prerequisites

  • Application using an officially supported version of .NET Core or .NET Framework that's at least .NET Framework 4.6.2

Caution

We have not tested the Azure Monitor OpenTelemetry Distro running side-by-side with the OpenTelemetry Community Package. We recommend you uninstall any OpenTelemetry-related packages before installing the Distro.

Install the client library

Install the latest Azure.Monitor.OpenTelemetry.AspNetCore NuGet package:

dotnet add package --prerelease Azure.Monitor.OpenTelemetry.AspNetCore 

Enable Azure Monitor Application Insights

To enable Azure Monitor Application Insights, you will make a minor modification to your application and set your "Connection String". The Connection String tells your application where to send the telemetry the Distro collects, and it's unique to you.

Modify your Application

Add UseAzureMonitor() to your application startup. Depending on your version of .NET, this will be in either your startup.cs or program.cs class.

var builder = WebApplication.CreateBuilder(args);

builder.Services.AddOpenTelemetry().UseAzureMonitor();

var app = builder.Build();

app.Run();

Copy the Connection String from your Application Insights Resource

Tip

If you don't already have one, now is a great time to Create an Application Insights Resource.

To copy your unique Connection String:

Screenshot that shows Application Insights overview and connection string.

  1. Go to the Overview pane of your Application Insights resource.
  2. Find your Connection String.
  3. Hover over the connection string and select the Copy to clipboard icon.

Paste the Connection String in your environment

To paste your Connection String, select from the options below:

A. Set via Environment Variable (Recommended)

Replace <Your Connection String> in the following command with your unique connection string.

APPLICATIONINSIGHTS_CONNECTION_STRING=<Your Connection String>

B. Set via Configuration File - Java Only (Recommended)

Create a configuration file named applicationinsights.json, and place it in the same directory as applicationinsights-agent-3.4.13.jar with the following content:

{
  "connectionString": "<Your Connection String>"
}

Replace <Your Connection String> in the preceding JSON with your unique connection string.

C. Set via Code - ASP.NET Core, Node.js, and Python Only (Not recommended)

See Connection String Configuration for example setting Connection String via code.

Note

If you set the connection string in more than one place, we adhere to the following precendence:

  1. Code
  2. Environment Variable
  3. Configuration File

Confirm data is flowing

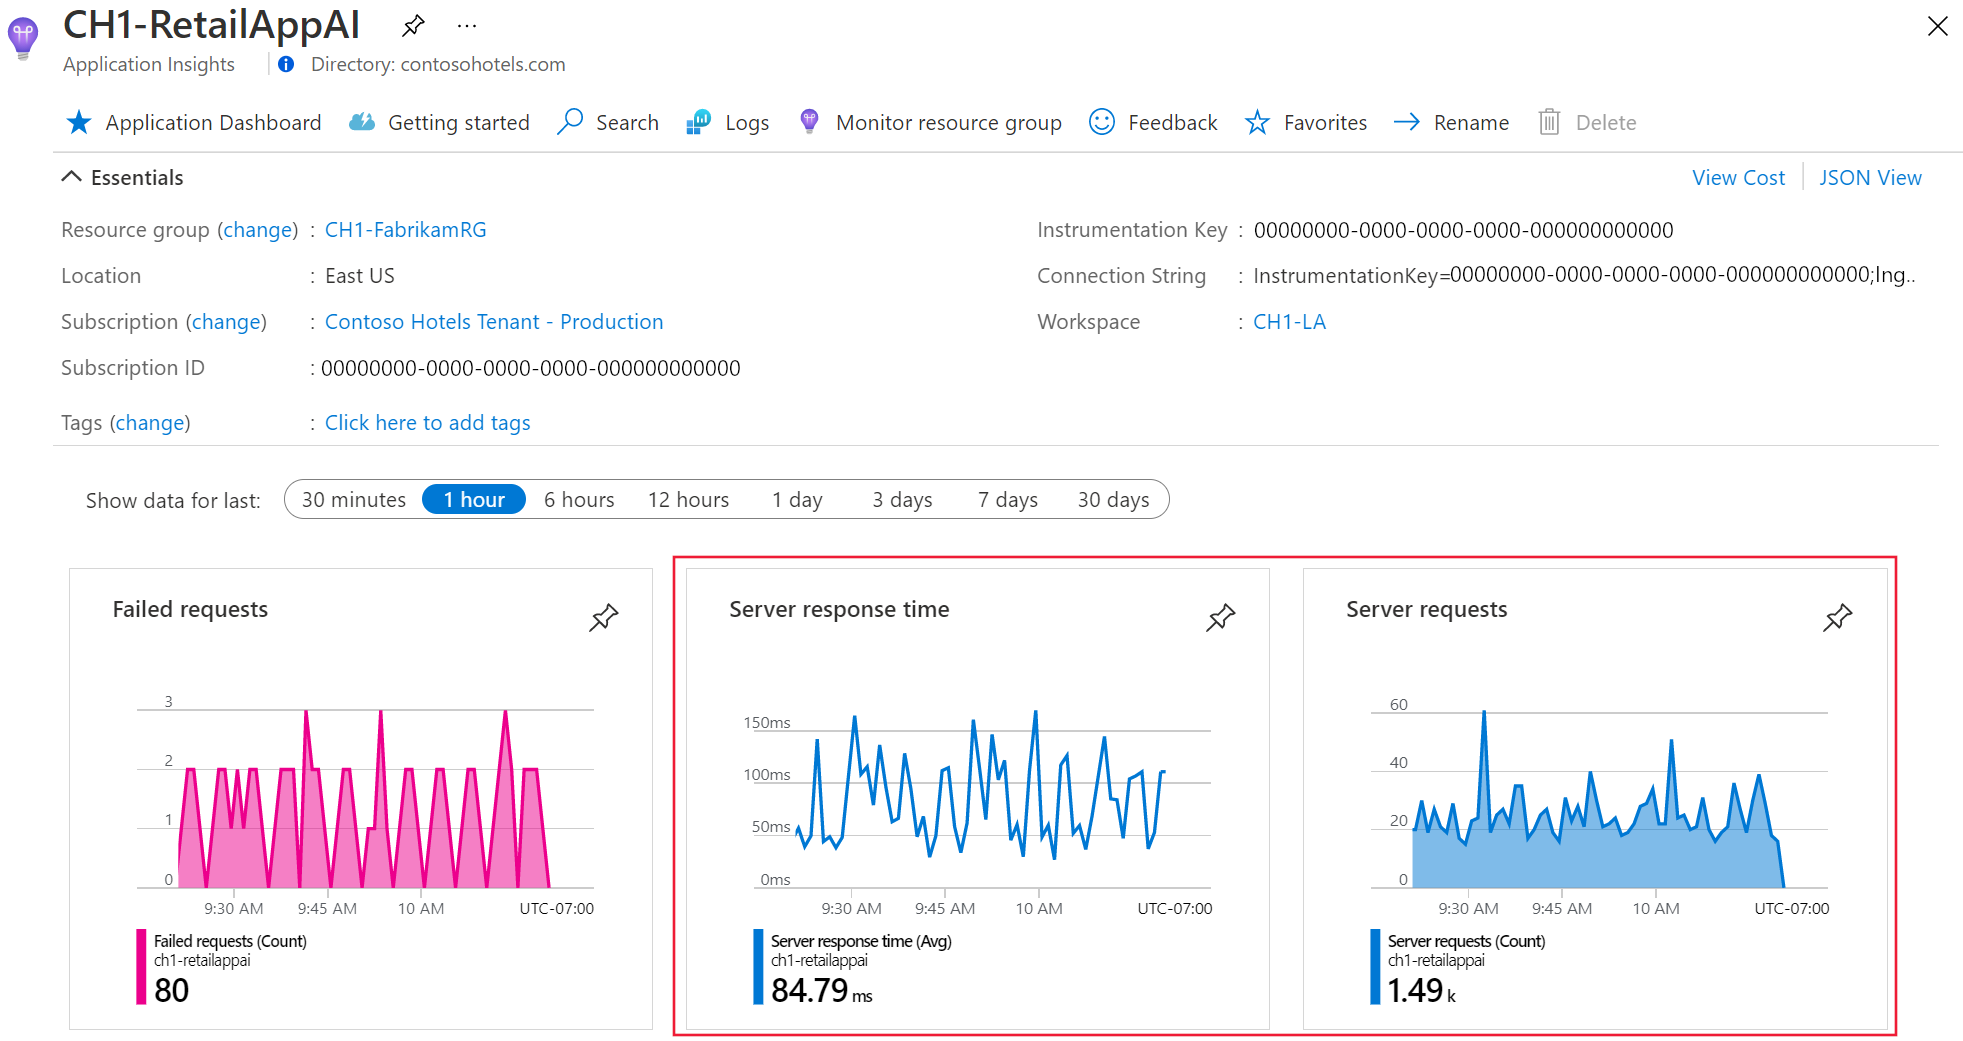
Run your application and open your Application Insights Resource tab in the Azure portal. It might take a few minutes for data to show up in the portal.

Screenshot of the Application Insights Overview tab with server requests and server response time highlighted.

That's it. Your application is now being monitored by Application Insights. Everything else below is optional and available for further customization.

Not working? Check out the troubleshooting page for ASP.NET Core, Java, Node.js, or Python.

Important

If you have two or more services that emit telemetry to the same Application Insights resource, you're required to set Cloud Role Names to represent them properly on the Application Map.

As part of using Application Insights instrumentation, we collect and send diagnostic data to Microsoft. This data helps us run and improve Application Insights. To learn more, see Statsbeat in Azure Application Insights.

Automatic data collection

The distros automatically collect data by bundling in OpenTelemetry "instrumentation libraries".

Included instrumentation libraries

Requests

Dependencies

Logging

  • ILogger

For more information about ILogger, see Logging in C# and .NET and code examples.

Footnotes

  • 1: Supports automatic reporting of unhandled exceptions
  • 2: Supports OpenTelemetry Metrics
  • 3: By default, logging is only collected at INFO level or higher. To change this setting, see the configuration options.
  • 4: By default, logging is only collected at WARNING level or higher..

Note

The Azure Monitor OpenTelemetry Distros include custom mapping and logic to automatically emit Application Insights standard metrics.

Tip

The OpenTelemetry-based offerings currently emit all OpenTelemetry metrics as Custom Metrics and Performance Counters in Metrics Explorer. For .NET, Node.js, and Python, whatever you set as the meter name becomes the metrics namespace.

Add a community instrumentation library

You can collect more data automatically when you include instrumentation libraries from the OpenTelemetry community.

Note

We don't support and cannot guarantee the quality of community instrumentation libraries. If you would like to suggest a community instrumentation library us to include in our distro, post or up-vote an idea in our feedback community.

Caution

Some instrumentation libraries are based on experimental OpenTelemetry semantic specifications. Adding them may leave you vulnerable to future breaking changes.

To add a community library, use the ConfigureOpenTelemetryMeterProvider or ConfigureOpenTelemetryTraceProvider methods.

The following example demonstrates how the Runtime Instrumentation can be added to collect additional metrics.

var builder = WebApplication.CreateBuilder(args);

builder.Services.ConfigureOpenTelemetryMeterProvider((sp, builder) => builder.AddRuntimeInstrumentation());
builder.Services.AddOpenTelemetry().UseAzureMonitor();

var app = builder.Build();

app.Run();

Collect custom telemetry

This section explains how to collect custom telemetry from your application.

Depending on your language and signal type, there are different ways to collect custom telemetry, including:

  • OpenTelemetry API
  • Language-specific logging/metrics libraries
  • Application Insights Classic API

The following table represents the currently supported custom telemetry types:

Language Custom Events Custom Metrics Dependencies Exceptions Page Views Requests Traces
ASP.NET Core
   OpenTelemetry API Yes Yes Yes Yes
   iLogger API Yes
   AI Classic API
Java
   OpenTelemetry API Yes Yes Yes Yes
   Logback, Log4j, JUL Yes Yes
   Micrometer Metrics Yes
   AI Classic API Yes Yes Yes Yes Yes Yes Yes
Node.js
   OpenTelemetry API Yes Yes Yes Yes
   Console, Winston, Bunyan Yes
   AI Classic API Yes Yes Yes Yes Yes Yes Yes
Python
   OpenTelemetry API Yes Yes Yes Yes
   Python Logging Module Yes

Note

Application Insights Java 3.x listens for telemetry that's sent to the Application Insights Classic API. Similarly, Application Insights Node.js 3.x collects events created with the Application Insights Classic API. This makes upgrading easier and fills a gap in our custom telemetry support until all custom telemetry types are supported via the OpenTelemetry API.

Add Custom Metrics

Note

Custom Metrics are under preview in Azure Monitor Application Insights. Custom metrics without dimensions are available by default. To view and alert on dimensions, you need to opt-in.

Consider collecting more metrics beyond what's provided by the instrumentation libraries.

The OpenTelemetry API offers six metric "instruments" to cover various metric scenarios and you need to pick the correct "Aggregation Type" when visualizing metrics in Metrics Explorer. This requirement is true when using the OpenTelemetry Metric API to send metrics and when using an instrumentation library.

The following table shows the recommended aggregation types for each of the OpenTelemetry Metric Instruments.

OpenTelemetry Instrument Azure Monitor Aggregation Type
Counter Sum
Asynchronous Counter Sum
Histogram Min, Max, Average, Sum and Count
Asynchronous Gauge Average
UpDownCounter Sum
Asynchronous UpDownCounter Sum

Caution

Aggregation types beyond what's shown in the table typically aren't meaningful.

The OpenTelemetry Specification describes the instruments and provides examples of when you might use each one.

Tip

The histogram is the most versatile and most closely equivalent to the Application Insights GetMetric Classic API. Azure Monitor currently flattens the histogram instrument into our five supported aggregation types, and support for percentiles is underway. Although less versatile, other OpenTelemetry instruments have a lesser impact on your application's performance.

Histogram Example

Application startup must subscribe to a Meter by name.

var builder = WebApplication.CreateBuilder(args);

builder.Services.ConfigureOpenTelemetryMeterProvider((sp, builder) => builder.AddMeter("OTel.AzureMonitor.Demo"));
builder.Services.AddOpenTelemetry().UseAzureMonitor();

var app = builder.Build();

app.Run();

The Meter must be initialized using that same name.

var meter = new Meter("OTel.AzureMonitor.Demo");
Histogram<long> myFruitSalePrice = meter.CreateHistogram<long>("FruitSalePrice");

var rand = new Random();
myFruitSalePrice.Record(rand.Next(1, 1000), new("name", "apple"), new("color", "red"));
myFruitSalePrice.Record(rand.Next(1, 1000), new("name", "lemon"), new("color", "yellow"));
myFruitSalePrice.Record(rand.Next(1, 1000), new("name", "apple"), new("color", "green"));
myFruitSalePrice.Record(rand.Next(1, 1000), new("name", "apple"), new("color", "red"));
myFruitSalePrice.Record(rand.Next(1, 1000), new("name", "lemon"), new("color", "yellow"));

Counter Example

Application startup must subscribe to a Meter by name.

var builder = WebApplication.CreateBuilder(args);

builder.Services.ConfigureOpenTelemetryMeterProvider((sp, builder) => builder.AddMeter("OTel.AzureMonitor.Demo"));
builder.Services.AddOpenTelemetry().UseAzureMonitor();

var app = builder.Build();

app.Run();

The Meter must be initialized using that same name.

var meter = new Meter("OTel.AzureMonitor.Demo");
Counter<long> myFruitCounter = meter.CreateCounter<long>("MyFruitCounter");

myFruitCounter.Add(1, new("name", "apple"), new("color", "red"));
myFruitCounter.Add(2, new("name", "lemon"), new("color", "yellow"));
myFruitCounter.Add(1, new("name", "lemon"), new("color", "yellow"));
myFruitCounter.Add(2, new("name", "apple"), new("color", "green"));
myFruitCounter.Add(5, new("name", "apple"), new("color", "red"));
myFruitCounter.Add(4, new("name", "lemon"), new("color", "yellow"));

Gauge Example

Application startup must subscribe to a Meter by name.

var builder = WebApplication.CreateBuilder(args);

builder.Services.ConfigureOpenTelemetryMeterProvider((sp, builder) => builder.AddMeter("OTel.AzureMonitor.Demo"));
builder.Services.AddOpenTelemetry().UseAzureMonitor();

var app = builder.Build();

app.Run();

The Meter must be initialized using that same name.

var process = Process.GetCurrentProcess();

var meter = new Meter("OTel.AzureMonitor.Demo");
ObservableGauge<int> myObservableGauge = meter.CreateObservableGauge("Thread.State", () => GetThreadState(process));

private static IEnumerable<Measurement<int>> GetThreadState(Process process)
{
    foreach (ProcessThread thread in process.Threads)
    {
        yield return new((int)thread.ThreadState, new("ProcessId", process.Id), new("ThreadId", thread.Id));
    }
}

Add Custom Exceptions

Select instrumentation libraries automatically report exceptions to Application Insights. However, you may want to manually report exceptions beyond what instrumentation libraries report. For instance, exceptions caught by your code aren't ordinarily reported. You may wish to report them to draw attention in relevant experiences including the failures section and end-to-end transaction views.

  • To log an Exception using an Activity:
    using (var activity = activitySource.StartActivity("ExceptionExample"))
    {
        try
        {
            throw new Exception("Test exception");
        }
        catch (Exception ex)
        {
            activity?.SetStatus(ActivityStatusCode.Error);
            activity?.RecordException(ex);
        }
    }
    
  • To log an Exception using ILogger:
    var logger = loggerFactory.CreateLogger(logCategoryName);
    
    try
    {
        throw new Exception("Test Exception");
    }
    catch (Exception ex)
    {
        logger.Log(
            logLevel: LogLevel.Error,
            eventId: 0,
            exception: ex,
            message: "Hello {name}.",
            args: new object[] { "World" });
    }
    

Add Custom Spans

You may want to add a custom span in two scenarios. First, when there's a dependency request not already collected by an instrumentation library. Second, when you wish to model an application process as a span on the end-to-end transaction view.

Note

The Activity and ActivitySource classes from the System.Diagnostics namespace represent the OpenTelemetry concepts of Span and Tracer, respectively. You create ActivitySource directly by using its constructor instead of by using TracerProvider. Each ActivitySource class must be explicitly connected to TracerProvider by using AddSource(). That's because parts of the OpenTelemetry tracing API are incorporated directly into the .NET runtime. To learn more, see Introduction to OpenTelemetry .NET Tracing API.

internal static readonly ActivitySource activitySource = new("ActivitySourceName");

var builder = WebApplication.CreateBuilder(args);

builder.Services.ConfigureOpenTelemetryTracerProvider((sp, builder) => builder.AddSource("ActivitySourceName"));
builder.Services.AddOpenTelemetry().UseAzureMonitor();

var app = builder.Build();

app.MapGet("/", () =>
{
    using (var activity = activitySource.StartActivity("CustomActivity"))
    {
        // your code here
    }

    return $"Hello World!";
});

app.Run();

When calling StartActivity it will default to ActivityKind.Internal but you can provide any other ActivityKind. ActivityKind.Client, ActivityKind.Producer, and ActivityKind.Internal are mapped to Application Insights dependencies. ActivityKind.Server and ActivityKind.Consumer are mapped to Application Insights requests.

Send custom telemetry using the Application Insights Classic API

We recommend you use the OpenTelemetry APIs whenever possible, but there may be some scenarios when you have to use the Application Insights Classic APIs.

This isn't available in .NET.

Modify telemetry

This section explains how to modify telemetry.

Add span attributes

These attributes might include adding a custom property to your telemetry. You might also use attributes to set optional fields in the Application Insights schema, like Client IP.

Add a custom property to a Span

Any attributes you add to spans are exported as custom properties. They populate the customDimensions field in the requests, dependencies, traces, or exceptions table.

To add span attributes, use either of the following two ways:

Tip

The advantage of using options provided by instrumentation libraries, when they're available, is that the entire context is available. As a result, users can select to add or filter more attributes. For example, the enrich option in the HttpClient instrumentation library gives users access to the HttpRequestMessage and the HttpResponseMessage itself. They can select anything from it and store it as an attribute.

  1. Many instrumentation libraries provide an enrich option. For guidance, see the readme files of individual instrumentation libraries:

  2. Use a custom processor:

Tip

Add the processor shown here before adding Azure Monitor.

var builder = WebApplication.CreateBuilder(args);

builder.Services.ConfigureOpenTelemetryTracerProvider((sp, builder) => builder.AddProcessor(new ActivityEnrichingProcessor()));
builder.Services.AddOpenTelemetry().UseAzureMonitor();

var app = builder.Build();

app.Run();

Add ActivityEnrichingProcessor.cs to your project with the following code:

public class ActivityEnrichingProcessor : BaseProcessor<Activity>
{
    public override void OnEnd(Activity activity)
    {
        // The updated activity will be available to all processors which are called after this processor.
        activity.DisplayName = "Updated-" + activity.DisplayName;
        activity.SetTag("CustomDimension1", "Value1");
        activity.SetTag("CustomDimension2", "Value2");
    }
}

Set the user IP

You can populate the client_IP field for requests by setting the http.client_ip attribute on the span. Application Insights uses the IP address to generate user location attributes and then discards it by default.

Use the add custom property example, but replace the following lines of code in ActivityEnrichingProcessor.cs:

// only applicable in case of activity.Kind == Server
activity.SetTag("http.client_ip", "<IP Address>");

Set the user ID or authenticated user ID

You can populate the user_Id or user_AuthenticatedId field for requests by using the following guidance. User ID is an anonymous user identifier. Authenticated User ID is a known user identifier.

Important

Consult applicable privacy laws before you set the Authenticated User ID.

Use the add custom property example.

activity?.SetTag("enduser.id", "<User Id>");

Add Log Attributes

OpenTelemetry uses .NET's ILogger. Attaching custom dimensions to logs can be accomplished using a message template.

Filter telemetry

You might use the following ways to filter out telemetry before it leaves your application.

  1. Many instrumentation libraries provide a filter option. For guidance, see the readme files of individual instrumentation libraries:

  2. Use a custom processor:

    Tip

    Add the processor shown here before adding Azure Monitor.

    var builder = WebApplication.CreateBuilder(args);
    
    builder.Services.ConfigureOpenTelemetryTracerProvider((sp, builder) => builder.AddProcessor(new ActivityFilteringProcessor()));
    builder.Services.ConfigureOpenTelemetryTracerProvider((sp, builder) => builder.AddSource("ActivitySourceName"));
    builder.Services.AddOpenTelemetry().UseAzureMonitor();
    
    var app = builder.Build();
    
    app.Run();
    

    Add ActivityFilteringProcessor.cs to your project with the following code:

    public class ActivityFilteringProcessor : BaseProcessor<Activity>
    {
        public override void OnStart(Activity activity)
        {
            // prevents all exporters from exporting internal activities
            if (activity.Kind == ActivityKind.Internal)
            {
                activity.IsAllDataRequested = false;
            }
        }
    }
    
  3. If a particular source isn't explicitly added by using AddSource("ActivitySourceName"), then none of the activities created by using that source are exported.

Get the trace ID or span ID

You might want to get the trace ID or span ID. If you have logs sent to a destination other than Application Insights, consider adding the trace ID or span ID. Doing so enables better correlation when debugging and diagnosing issues.

Note

The Activity and ActivitySource classes from the System.Diagnostics namespace represent the OpenTelemetry concepts of Span and Tracer, respectively. That's because parts of the OpenTelemetry tracing API are incorporated directly into the .NET runtime. To learn more, see Introduction to OpenTelemetry .NET Tracing API.

Activity activity = Activity.Current;
string traceId = activity?.TraceId.ToHexString();
string spanId = activity?.SpanId.ToHexString();

Support

OpenTelemetry feedback

To provide feedback:

Next steps