Note
Access to this page requires authorization. You can try signing in or changing directories.
Access to this page requires authorization. You can try changing directories.
This article provides step by step details for creating and configuring an Azure Monitor Private Link Scope (AMPLS) using the Azure portal. Also included in the article are alternate methods for working with AMPLS using CLI, PowerShell, and ARM templates.
Configuring an instance of Azure Private Link requires the following steps. Each of these steps is detailed in the sections below.
- Create an Azure Monitor Private Link Scope (AMPLS).
- Connect resources to the AMPLS.
- Connect AMPLS to a private endpoint.
- Configure access to AMPLS resources.
This article reviews how configuration is done through the Azure portal. It provides an example Azure Resource Manager template (ARM template) to automate the process.
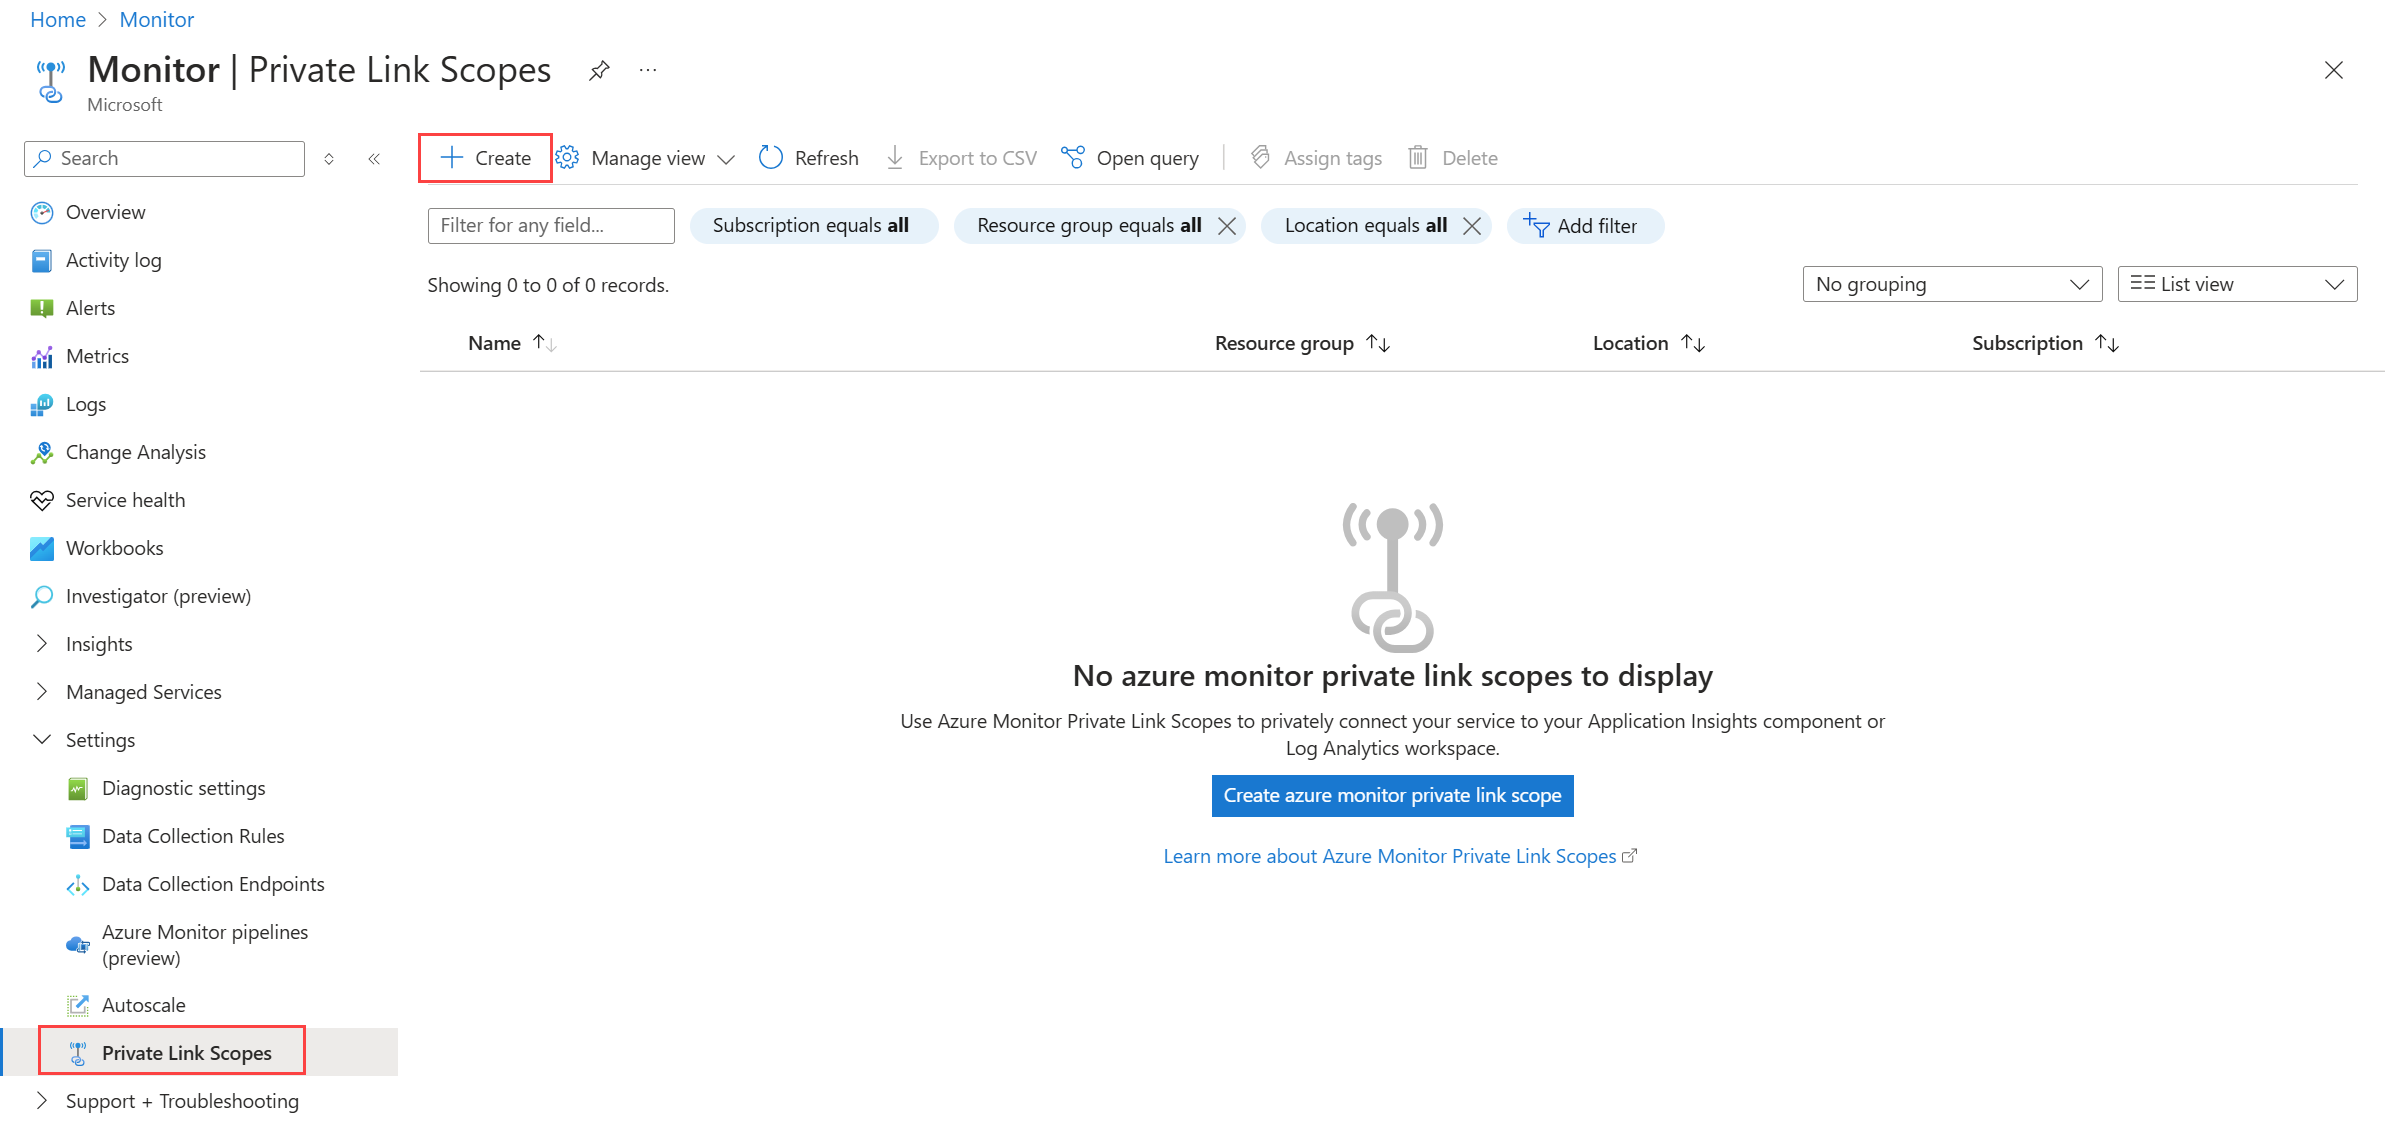
Create Azure Monitor Private Link Scope (AMPLS)
From the Monitor menu in the Azure portal, select Private Link Scopes and then Create.
Select a subscription and resource group, and give the AMPLS a meaningful name like AppServerProdTelem.
Select Review + create.
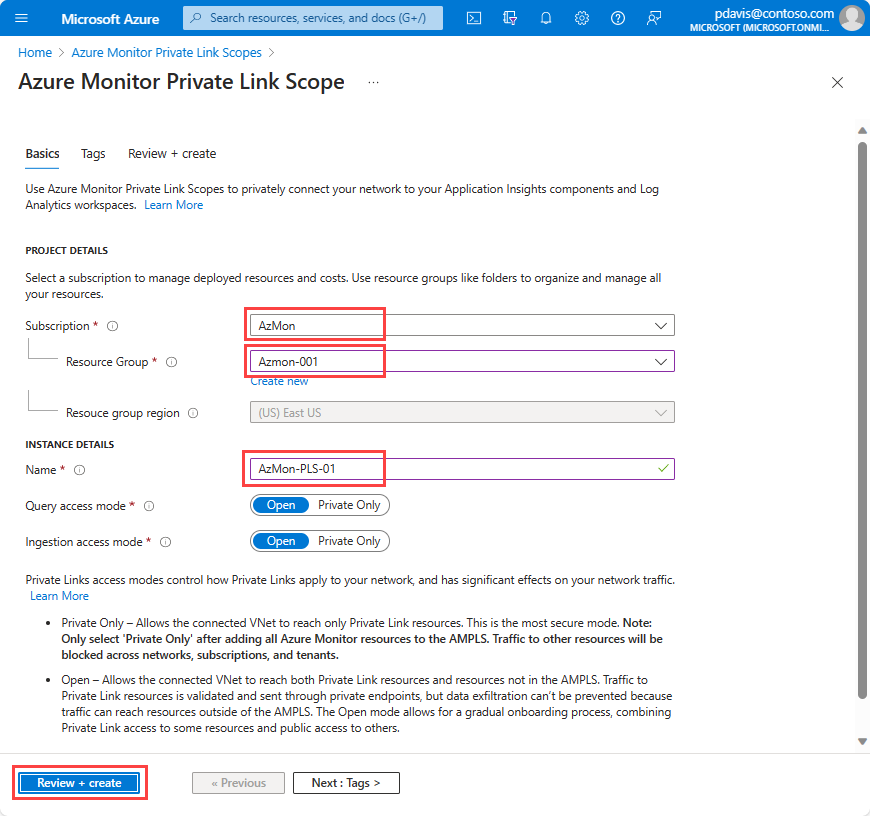
Let the validation pass and select Create.


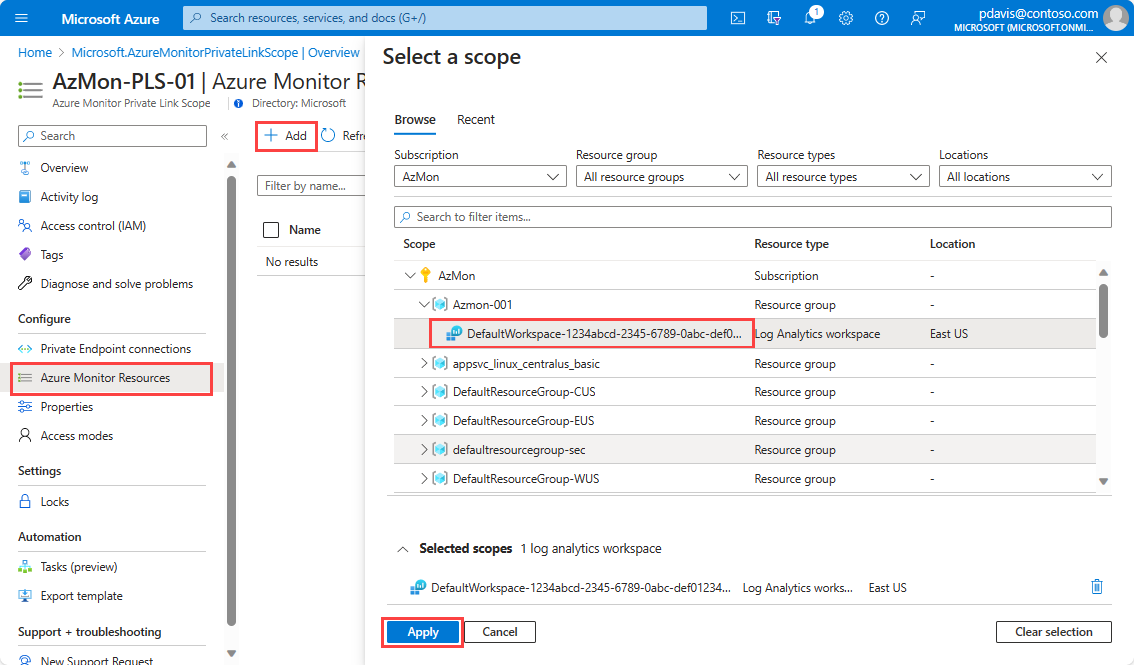
Connect resources to the AMPLS
From the menu for your AMPLS, select Azure Monitor Resources and then Add.
Select the component and select Apply to add it to your scope. Only Azure Monitor resources including Log Analytics workspaces, Application Insights components, and data collection endpoints (DCEs) are available.

Note
Deleting Azure Monitor resources requires that you first disconnect them from any AMPLS objects they're connected to. It's not possible to delete resources connected to an AMPLS.
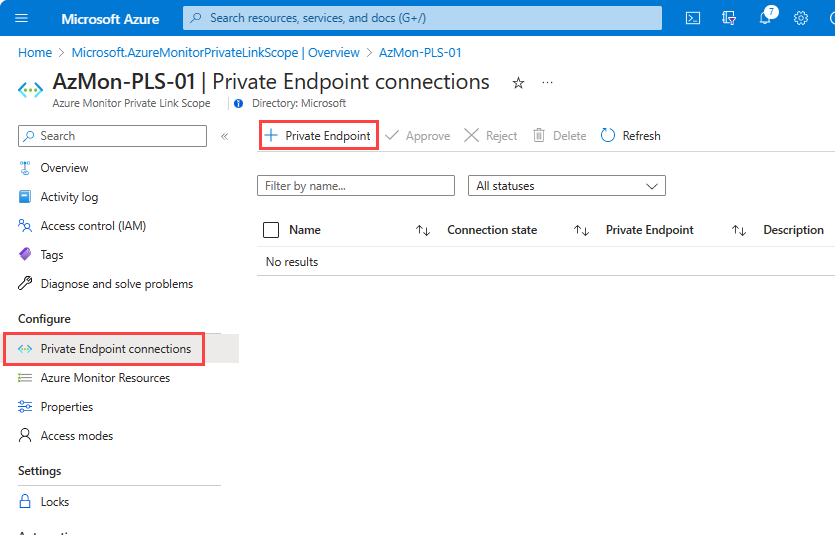
Connect AMPLS to a private endpoint
Once resources are connected to your AMPLS, you can create a private endpoint to connect your network.
From the menu for your AMPLS, select Private Endpoint connections and then Private Endpoint. You can also approve connections that were started in the Private Link Center here by selecting them and selecting Approve.
Basics tab
- select the Subscription and Resource group and then enter a Name for the endpoint, and a Network Interface Name.
- Select the Region the private endpoint should be created in. The region must be the same region as the virtual network to which you connect it.

Resource tab
- Select the Subscription that contains your Azure Monitor Private Link Scope resource.
- For Resource type, select Microsoft.insights/privateLinkScopes.
- From the Resource dropdown, select the Private Link Scope you created.

Virtual Network tab
- Select the Virtual network and Subnet that you want to connect to your Azure Monitor resources.
- For Network policy for private endpoints, select edit if you want to apply network security groups or route tables to the subnet that contains the private endpoint. See Manage network policies for private endpoints for further details.
- For Private IP configuration, by default, Dynamically allocate IP address is selected. If you want to assign a static IP address, select Statically allocate IP address, then enter a name and private IP.
- Optionally, select or create an Application security group. You can use application security groups to group virtual machines and define network security policies based on those groups.

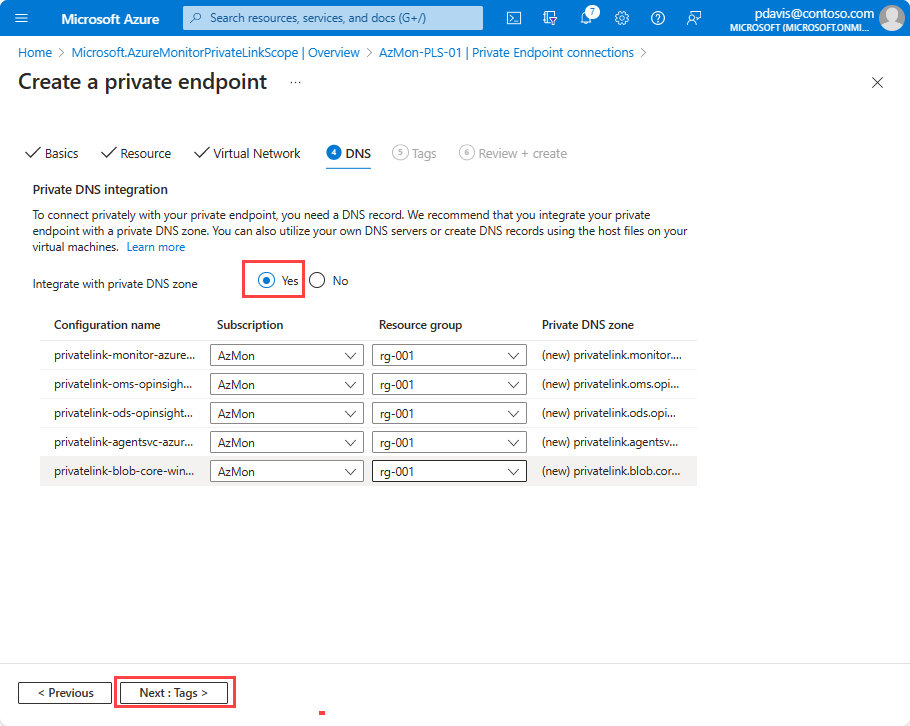
DNS tab
- Select Yes for Integrate with private DNS zone, which will automatically create a new private DNS zone. The actual DNS zones might be different from what's shown in the following screenshot.
Note
If you select No and prefer to manage DNS records manually, first finish setting up your private link. Include this private endpoint and the AMPLS configuration then configure your DNS according to the instructions in Azure private endpoint DNS configuration. Make sure not to create empty records as preparation for your private link setup. The DNS records you create can override existing settings and affect your connectivity with Azure Monitor.
Whether you select Yes or No and you're using your own custom DNS servers, you need to set up conditional forwarders for the Public DNS zone forwarders mentioned in Azure private endpoint DNS configuration. The conditional forwarders need to forward the DNS queries to Azure DNS.
Review + create tab
- Once the validation passes select Create.


Configure access to AMPLS resources
From the menu for your AMPLS, select Network Isolation to control which networks can reach the resource through a private link and whether other networks can reach it or not.

Connected AMPLS
This screen allows you to review and configure the resource's connections to the AMPLS. Connecting to an AMPLS allows traffic from the connected virtual network connected to reach the resource. It has the same effect as connecting it from the scope described in Connect Azure Monitor resources.
To add a new connection, select Add and select the AMPLS. Your resource can connect to five AMPLS objects, as described in AMPLS limits.
Virtual networks access configuration
These settings control access from public networks not connected to the listed scopes. This includes access to logs, metrics, and the live metrics stream. It also includes experiences built on top of this data such as workbooks, dashboards, query API-based client experiences, and insights in the Azure portal. Experiences running outside the Azure portal and that query Log Analytics data also have to be running within the private-linked virtual network.
- If you set Accept data ingestion from public networks not connected through a Private Link Scope to No, clients like machines or SDKs outside of the connected scopes can't upload data or send logs to the resource.
- If you set Accept queries from public networks not connected through a Private Link Scope to No, clients like machines or SDKs outside of the connected scopes can't query data in the resource.
Work with AMPLS using CLI
Create an AMPLS with Open access modes
The following CLI command creates a new AMPLS resource named "my-scope", with both query and ingestion access modes set to Open.
az resource create -g "my-resource-group" --name "my-scope" -l global --api-version "2021-07-01-preview" --resource-type Microsoft.Insights/privateLinkScopes --properties "{\"accessModeSettings\":{\"queryAccessMode\":\"Open\", \"ingestionAccessMode\":\"Open\"}}"
Set resource access flags
To manage the workspace or component access flags, use the flags [--ingestion-access {Disabled, Enabled}] and [--query-access {Disabled, Enabled}]on az monitor log-analytics workspace or az monitor app-insights component.
Work with AMPLS using PowerShell
Create an AMPLS
The following PowerShell script creates a new AMPLS resource named "my-scope", with the query access mode set to Open but the ingestion access modes set to PrivateOnly. This setting means it will allow ingestion only to resources in the AMPLS.
# scope details
$scopeSubscriptionId = "ab1800bd-ceac-48cd-...-..."
$scopeResourceGroup = "my-resource-group"
$scopeName = "my-scope"
$scopeProperties = @{
    accessModeSettings = @{
        queryAccessMode = "Open";
        ingestionAccessMode = "PrivateOnly"
    }
}

# login
Connect-AzAccount

# select subscription
Select-AzSubscription -SubscriptionId $scopeSubscriptionId

# create private link scope resource
$scope = New-AzResource -Location "Global" -Properties $scopeProperties -ResourceName $scopeName -ResourceType "Microsoft.Insights/privateLinkScopes" -ResourceGroupName $scopeResourceGroup -ApiVersion "2021-07-01-preview" -Force
Set AMPLS access modes
Use the following PowerShell code to set the access mode flags on your AMPLS after it's created.
# get private link scope resource
$scope = Get-AzResource -ResourceType Microsoft.Insights/privateLinkScopes -ResourceGroupName $scopeResourceGroup -ResourceName $scopeName -ApiVersion "2021-07-01-preview"

# set access mode settings
$scope.Properties.AccessModeSettings.QueryAccessMode = "Open";
$scope.Properties.AccessModeSettings.IngestionAccessMode = "Open";
$scope | Set-AzResource -Force
ARM templates
Create an AMPLS
The following ARM template performs the following:
- An AMPLS named
"my-scope", with query and ingestion access modes set toOpen. - A Log Analytics workspace named
"my-workspace". - Adds a scoped resource to the
"my-scope"AMPLS named"my-workspace-connection".
{
    "$schema": https://schema.management.azure.com/schemas/2019-04-01/deploymentTemplate.json#,
    "contentVersion": "1.0.0.0",
    "parameters": {
        "private_link_scope_name": {
            "defaultValue": "my-scope",
            "type": "String"
        },
        "workspace_name": {
            "defaultValue": "my-workspace",
            "type": "String"
        }
    },
    "variables": {},
    "resources": [
        {
            "type": "microsoft.insights/privatelinkscopes",
            "apiVersion": "2021-07-01-preview",
            "name": "[parameters('private_link_scope_name')]",
            "location": "global",
            "properties": {
                "accessModeSettings":{
                    "queryAccessMode":"Open",
                    "ingestionAccessMode":"Open"
                }
            }
        },
        {
            "type": "microsoft.operationalinsights/workspaces",
            "apiVersion": "2020-10-01",
            "name": "[parameters('workspace_name')]",
            "location": "westeurope",
            "properties": {
                "sku": {
                    "name": "pergb2018"
                },
                "publicNetworkAccessForIngestion": "Enabled",
                "publicNetworkAccessForQuery": "Enabled"
            }
        },
        {
            "type": "microsoft.insights/privatelinkscopes/scopedresources",
            "apiVersion": "2019-10-17-preview",
            "name": "[concat(parameters('private_link_scope_name'), '/', concat(parameters('workspace_name'), '-connection'))]",
            "dependsOn": [
                "[resourceId('microsoft.insights/privatelinkscopes', parameters('private_link_scope_name'))]",
                "[resourceId('microsoft.operationalinsights/workspaces', parameters('workspace_name'))]"
            ],
            "properties": {
                "linkedResourceId": "[resourceId('microsoft.operationalinsights/workspaces', parameters('workspace_name'))]"
            }
        }
    ]
}
Review and validate AMPLS configuration
Follow the steps in this section to review and validate your private link setup.
Review endpoint's DNS settings
The private endpoint created in this article should have the following five DNS zones configured:
privatelink.monitor.azure.comprivatelink.oms.opinsights.azure.comprivatelink.ods.opinsights.azure.comprivatelink.agentsvc.azure-automation.netprivatelink.blob.core.windows.net
Each of these zones maps specific Azure Monitor endpoints to private IPs from the virtual network's pool of IPs. The IP addresses shown in the images below are only examples. Your configuration should instead show private IPs from your own network.
privatelink-monitor-azure-com
This zone covers the global endpoints used by Azure Monitor, which means endpoints serve requests globally/regionally and not resource-specific requests. This zone should have endpoints mapped for the following:
- in.ai: Application Insights ingestion endpoint (both a global and a regional entry).
- api: Application Insights and Log Analytics API endpoint.
- live: Application Insights live metrics endpoint.
- profiler: Application Insights Profiler for .NET endpoint.
- snapshot: Application Insights snapshot endpoint.
- diagservices-query: Application Insights Profiler for .NET and Snapshot Debugger (used when accessing profiler/debugger results in the Azure portal).
This zone also covers the resource-specific endpoints for the following DCEs:
<unique-dce-identifier>.<regionname>.handler.control: Private configuration endpoint, part of a DCE resource.<unique-dce-identifier>.<regionname>.ingest: Private ingestion endpoint, part of a DCE resource.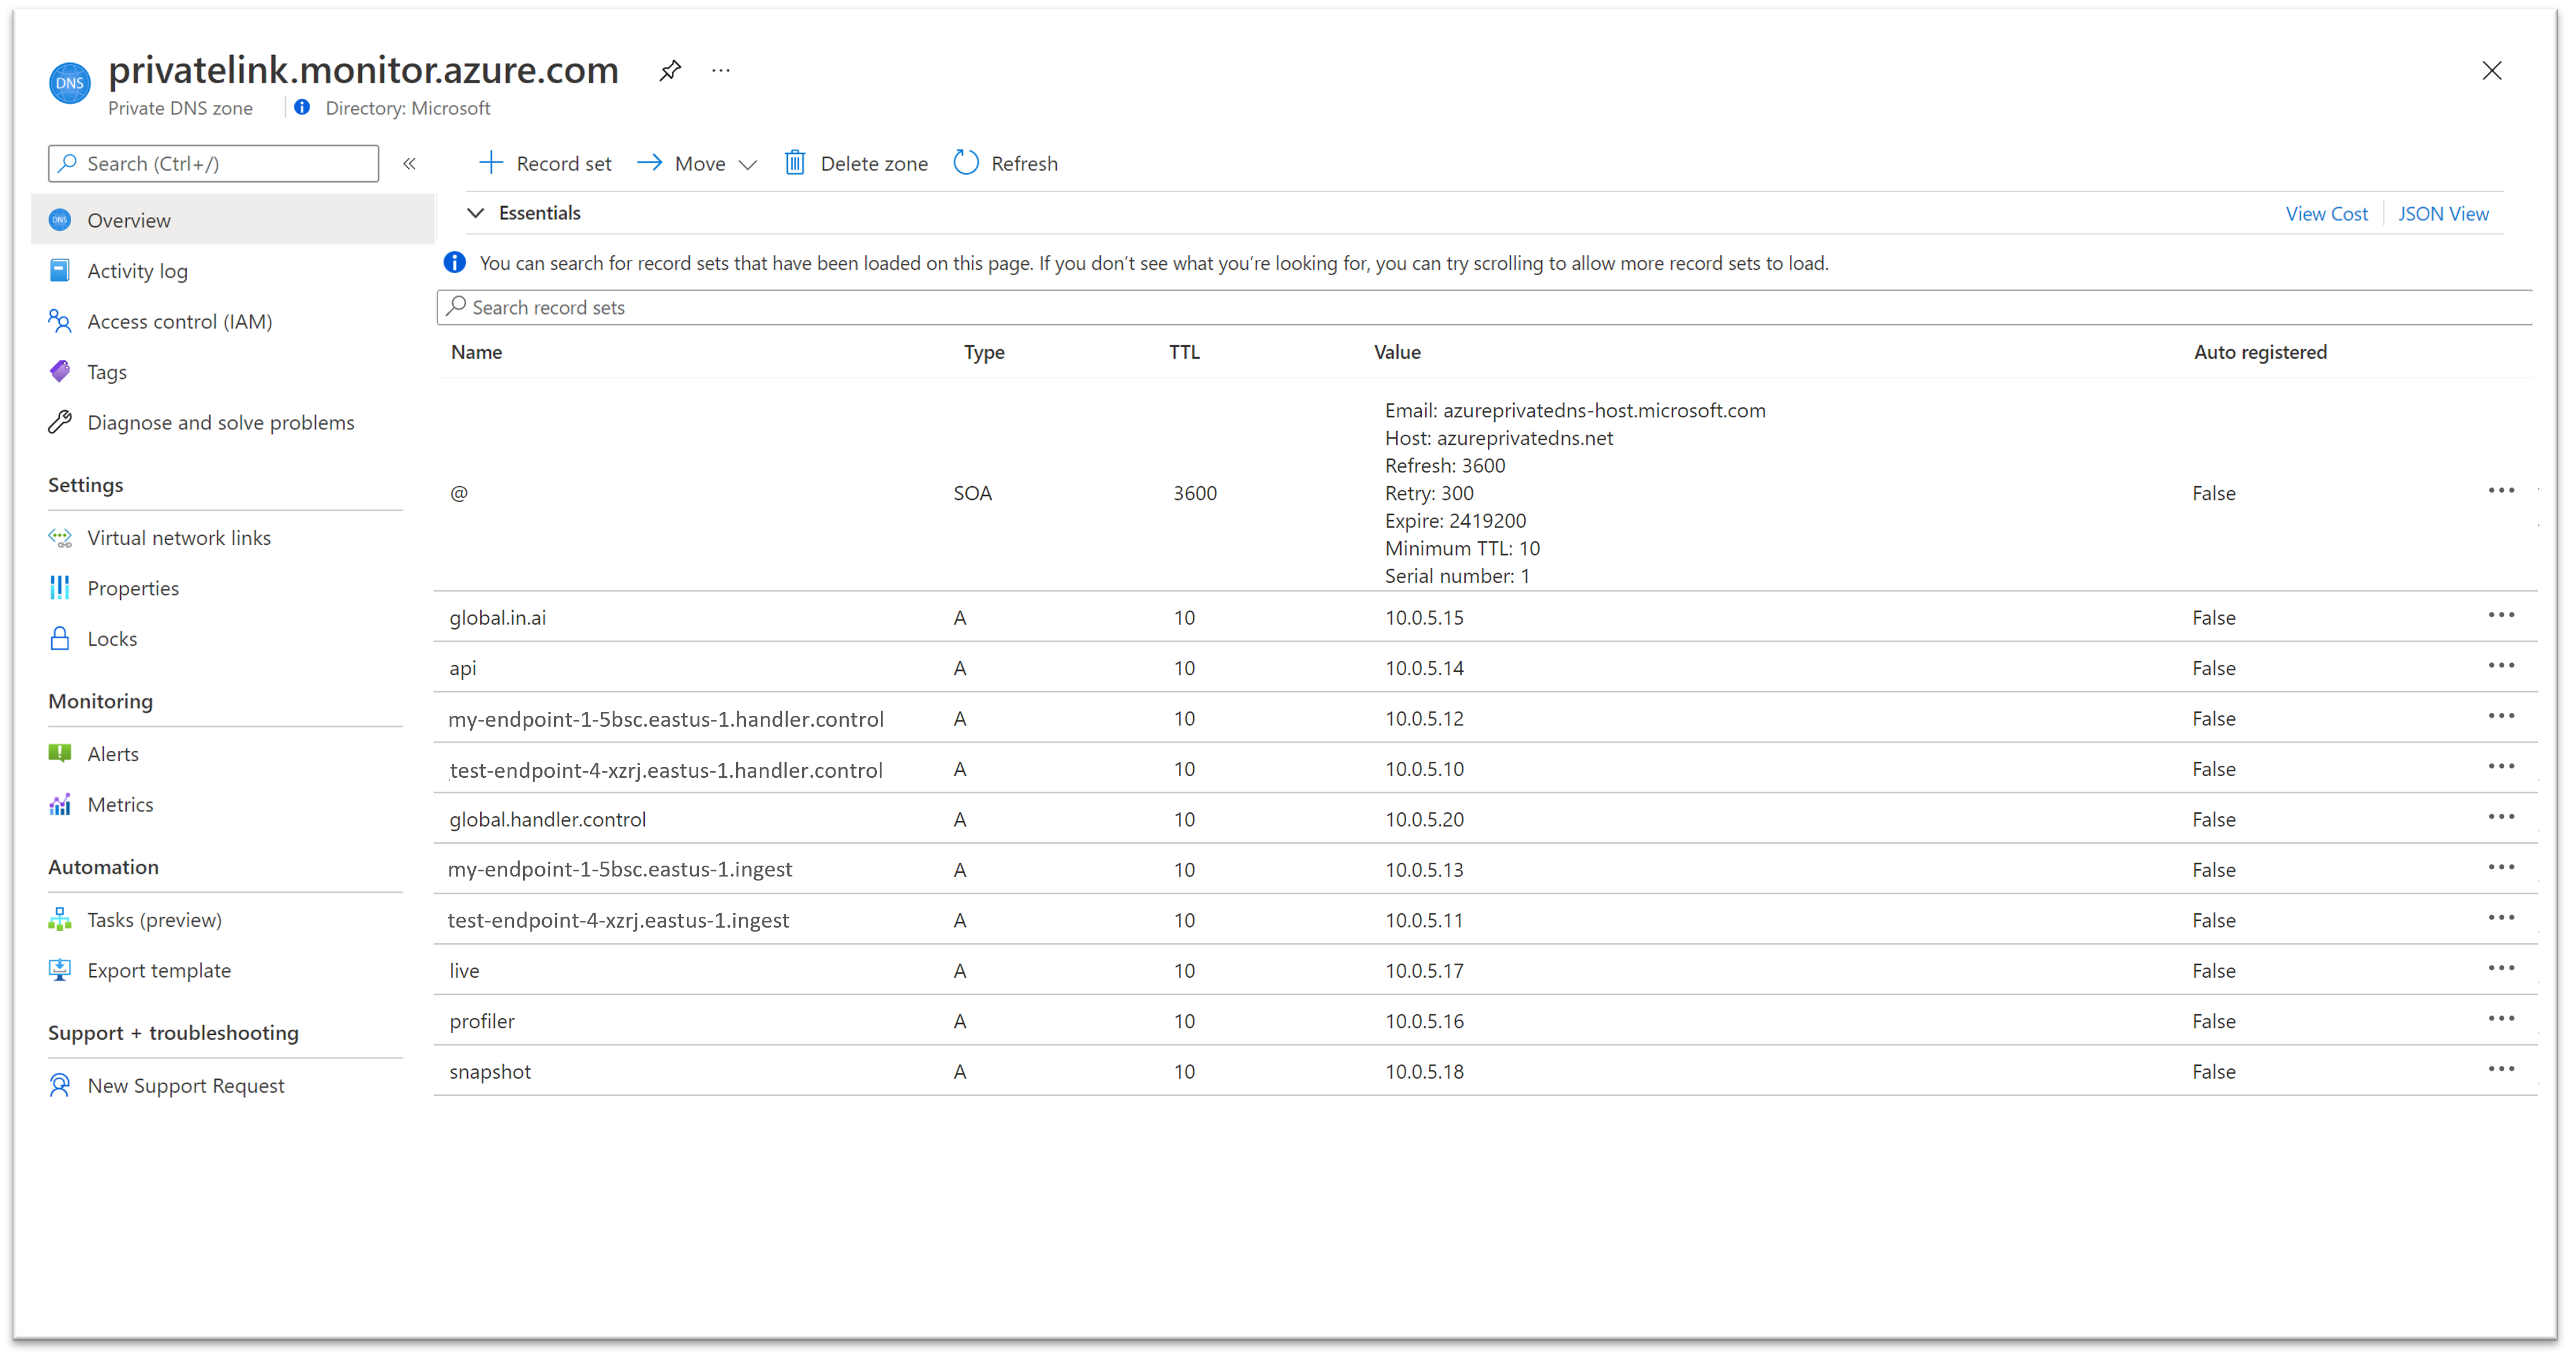

Log Analytics endpoints
Log Analytics uses the following four DNS zones:
privatelink-oms-opinsights-azure-com: Covers workspace-specific mapping to OMS endpoints. You should see an entry for each workspace linked to the AMPLS connected with this private endpoint.privatelink-ods-opinsights-azure-com: Covers workspace-specific mapping to ODS endpoints, which are the ingestion endpoints of Log Analytics. You should see an entry for each workspace linked to the AMPLS connected with this private endpoint.privatelink-agentsvc-azure-automation-net*: Covers workspace-specific mapping to the agent service automation endpoints. You should see an entry for each workspace linked to the AMPLS connected with this private endpoint.privatelink-blob-core-windows-net: Configures connectivity to the global agents' solution packs storage account. Through it, agents can download new or updated solution packs, which are also known as management packs. Only one entry is required to handle all Log Analytics agents, no matter how many workspaces are used. This entry is only added to private link setups created at or after April 19, 2021 (or starting June 2021 on Azure sovereign clouds).
The following screenshot shows endpoints mapped for an AMPLS with two workspaces in East US and one workspace in West Europe. Notice the East US workspaces share the IP addresses. The West Europe workspace endpoint is mapped to a different IP address. The blob endpoint is configured although it doesn't appear in this image.

Validate communication over AMPLS
To validate that your requests are now sent through the private endpoint, review them with your browser or a network tracking tool. For example, when you attempt to query your workspace or application, make sure the request is sent to the private IP mapped to the API endpoint. In this example, it's 172.17.0.9.
Note
Some browsers might use other DNS settings. For more information, see Browser DNS settings. Make sure your DNS settings apply.
To make sure your workspaces or components aren't receiving requests from public networks (not connected through AMPLS), set the resource's public ingestion and query flags to No as explained in Configure access to your resources.
From a client on your protected network, use
nslookupto any of the endpoints listed in your DNS zones. It should be resolved by your DNS server to the mapped private IPs instead of the public IPs used by default.
Testing locally
To test private links locally without affecting other clients on your network, make sure not to update your DNS when you create your private endpoint. Instead, edit the hosts file on your machine so that it will send requests to the private link endpoints:
- Set up a private link, but when you connect to a private endpoint, choose not to auto-integrate with the DNS.
- Configure the relevant endpoints on your machines' hosts files.
Additional configuration
Network subnet size
The smallest supported IPv4 subnet is /27 using CIDR subnet definitions. Although Azure virtual networks can be as small as /29, Azure reserves five IP addresses. The Azure Monitor private link setup requires at least 11 more IP addresses even if you're connecting to a single workspace. Review your endpoint's DNS settings for the list of Azure Monitor private link endpoints.
Azure portal
To use Azure Monitor portal experiences for Application Insights, Log Analytics, and DCEs, allow the Azure portal and Azure Monitor extensions to be accessible on the private networks. Add AzureActiveDirectory, AzureResourceManager, AzureFrontDoor.FirstParty, and AzureFrontdoor.Frontend service tags to your network security group.
Programmatic access
To use the REST API, the Azure CLI, or PowerShell with Azure Monitor on private networks, add the service tags AzureActiveDirectory and AzureResourceManager to your firewall.
Browser DNS settings
If you're connecting to your Azure Monitor resources over a private link, traffic to these resources must go through the private endpoint that's configured on your network. To enable the private endpoint, update your DNS settings as described in Connect to a private endpoint. Some browsers use their own DNS settings instead of the ones you set. The browser might attempt to connect to Azure Monitor public endpoints and bypass the private link entirely. Verify that your browser settings don't override or cache old DNS settings.
Querying limitation: externaldata operator
- The externaldata operator isn't supported over a private link because it reads data from storage accounts but doesn't guarantee the storage is accessed privately.
- The Azure Data Explorer proxy (ADX proxy) allows log queries to query Azure Data Explorer. The ADX proxy isn't supported over a private link because it doesn't guarantee the targeted resource is accessed privately.
Next steps
- Learn about private storage for custom logs and customer-managed keys.
- Learn about the new data collection endpoints.
To create and manage Private Link Scopes, use the REST API or the Azure CLI (az monitor private-link-scope).