Note
Access to this page requires authorization. You can try signing in or changing directories.
Access to this page requires authorization. You can try changing directories.
Link actions can be accessed through workbook link components or through column settings of grids, tiles, or graphs.
General link actions
| Link action | Action on select |
|---|---|
| Generic Details | Shows the row values in a property grid context view. |
| Cell Details | Shows the cell value in a property grid context view. Useful when the cell contains a dynamic type with information, for example, JSON with request properties like location and role instance. |
| URL | The value of the cell is expected to be a valid HTTP URL. The cell is a link that opens that URL in a new tab. |
Application Insights
| Link action | Action on select |
|---|---|
| Custom Event Details | Opens the Application Insights search details with the custom event ID ("itemId") in the cell. |
| Details | Similar to Custom Event Details except for dependencies, exceptions, page views, requests, and traces. |
| Custom Event User Flows | Opens the Application Insights User Flows experience pivoted on the custom event name in the cell. |
| User Flows | Similar to Custom Event User Flows except for exceptions, page views, and requests. |
| User Timeline | Opens the user timeline with the user ID ("user_Id") in the cell. |
| Session Timeline | Opens the Application Insights search experience for the value in the cell, for example, search for text abc where abc is the value in the cell. |
Azure resource
| Link action | Action on select |
|---|---|
| ARM Deployment | Deploys an Azure Resource Manager (ARM) template. When this item is selected, more fields are displayed to let you configure which ARM template to open and parameters for the template. See Azure Resource Manager deployment link settings. |
| Create Alert Rule | Creates an alert rule for a resource. |
| Custom View | Opens a custom view. When this item is selected, more fields appear where you can configure the view extension, view name, and any parameters used to open the view. See custom view link settings. |
| Metrics | Opens a metrics view. |
| Resource Overview | Opens the resource's view in the portal based on the resource ID value in the cell. You can also optionally set a submenu value that opens a specific menu item in the resource view. |
| Workbook (Template) | Opens a workbook template. When this item is selected, more fields appear where you can configure what template to open. See Workbook (Template) settings. |
| Copilot in Azure | When the action is invoked, it formats and sends a prompt to Microsoft Copilot in Azure. See Copilot in Azure settings. |
Link settings
When you use the link renderer, the following settings are available:
| Setting | Description |
|---|---|
| View to open | Allows you to select one of the actions. |
| Menu item | If Resource Overview is selected, this menu item is in the resource's overview. You can use it to open alerts or activity logs instead of the "overview" for the resource. Menu item values are different for each Azure Resource type. |
| Link label | If specified, this value appears in the grid column. If this value isn't specified, the value of the cell appears. If you want another value to appear, like a heatmap or icon, don't use the link renderer. Instead, use the appropriate renderer and select the Make this item a link option. |
| Open link in Context pane | If specified, the link is opened as a pop-up "context" view on the right side of the window instead of opening as a full view. |
When you use the Make this item a link option, the following settings are available:
| Setting | Description |
|---|---|
| Link value comes from | When a cell is displayed as a renderer with a link, this field specifies where the "link" value to be used in the link comes from. You can select from a dropdown of the other columns in the grid. For example, the cell might be a heatmap value. But perhaps you want the link to open the Resource Overview for the resource ID in the row. In that case, you would set the link value to come from the Resource ID field. |
| View to open | Same as above. |
| Menu item | Same as above. |
| Open link in Context pane | Same as above. |
ARM Action Settings
Use this setting to invoke an ARM action by specifying the ARM API details. The documentation for ARM REST APIs can be found here. In all of the UX fields, you can resolve parameters using {paramName}. You can also resolve columns using ["columnName"]. In the example images below, we can reference the column id by writing ["id"]. If the column is an Azure Resource ID, you can get a friendly name of the resource using the formatter label. See parameter formatting.
ARM Action Settings Tab
This section defines the ARM action API.
| Source | Explanation |
|---|---|
| ARM Action path | The ARM action path. For example: "/subscriptions/:subscription/resourceGroups/:resourceGroup/someAction?api-version=:apiversion". |
| Http Method | Select an HTTP method. The available choices are: POST, PUT, PATCH, DELETE |
| Long Operation | Long Operations poll the URI from the Azure-AsyncOperation or the Location response header from the original operation. Learn more about tracking asynchronous Azure operations. |
| Parameters | URL parameters grid with the key and value. |
| Headers | Headers grid with the key and value. |
| Body | Editor for the request payload in JSON. |
ARM Action UX Settings
This section configures what the users see before they run the ARM action.
| Source | Explanation |
|---|---|
| Title | Title used on the run view. |
| Customize ARM Action name | Authors can customize the ARM action displayed on the notification after the action is triggered. |
| Description of ARM Action | The markdown text used to provide a helpful description to users when they want to run the ARM action. |
| Run button text from | Label used on the run (execute) button to trigger the ARM action. |
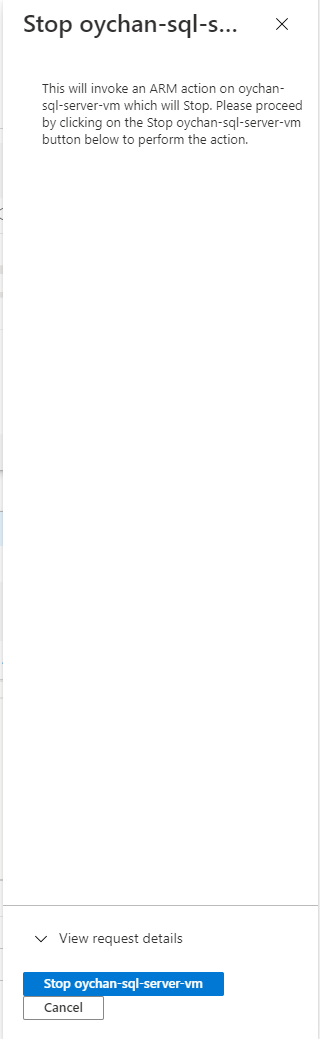
After these configurations are set, when the user selects the link, the view opens with the UX described here. If the user selects the button specified by Run button text from, it runs the ARM action using the configured values. On the bottom of the context pane, you can select View Request Details to inspect the HTTP method and the ARM API endpoint used for the ARM action.
The progress and result of the ARM Action is shown as an Azure portal notification.
Azure Resource Manager deployment link settings
If the link type is ARM Deployment, you must specify more settings to open a Resource Manager deployment. There are two main tabs for configurations: Template Settings and UX Settings.
Template settings
This section defines where the template should come from and the parameters used to run the Resource Manager deployment.
| Source | Description |
|---|---|
| Resource group ID comes from | The resource ID is used to manage deployed resources. The subscription is used to manage deployed resources and costs. The resource groups are used like folders to organize and manage all your resources. If this value isn't specified, the deployment fails. Select from Cell, Column, Parameter, and Static Value in Link sources. |
| ARM template URI from | The URI to the ARM template itself. The template URI needs to be accessible to the users who deploy the template. Select from Cell, Column, Parameter, and Static Value in Link sources. For more information, see Azure Quickstart Templates. |
| ARM Template Parameters | Defines the template parameters used for the template URI defined earlier. These parameters are used to deploy the template on the run page. The grid contains an Expand toolbar button to help fill the parameters by using the names defined in the template URI and set to static empty values. This option can only be used when there are no parameters in the grid and the template URI is set. The lower section is a preview of what the parameter output looks like. Select Refresh to update the preview with current changes. Parameters are typically values. References are something that could point to key vault secrets that the user has access to. Template Viewer pane limitation doesn't render reference parameters correctly and shows as a null/value. As a result, users won't be able to correctly deploy reference parameters from the Template Viewer tab. |
UX settings
This section configures what you see before you run the Resource Manager deployment.
| Source | Description |
|---|---|
| Title from | Title used on the run view. Select from Cell, Column, Parameter, and Static Value in Link sources. |
| Description from | The Markdown text used to provide a helpful description to users when they want to deploy the template. Select from Cell, Column, Parameter, and Static Value in Link sources. If you select Static Value, a multi-line text box appears. In this text box, you can resolve parameters by using "{paramName}". Also, you can treat columns as parameters by appending "_column" after the column name like {columnName_column}. In the following example image, you can reference the column "VMName" by writing "{VMName_column}". The value after the colon is the parameter formatter. In this case, it's value. |
| Run button text from | Label used on the run (execute) button to deploy the ARM template. Users select this button to start deploying the ARM template. |
After these configurations are set, when you select the link, the view opens with the UX described in the UX settings. If you select Run button text from, an ARM template is deployed by using the values from Template Settings. View template opens the Template Viewer tab so that you can examine the template and the parameters before you deploy.
Custom view link settings
Use this setting to open Custom Views in the Azure portal. You can configure the settings using the form or URL.
Note
Views with a menu can't be opened in a context tab. If a view with a menu is configured to open in a context tab, no context tab is shown when the link is selected.
Form
| Source | Description |
|---|---|
| Extension name | The name of the extension that hosts the name of the view. |
| View name | The name of the view to open. |
There are two types of inputs: grids and JSON. Use a grid for simple key and value tab inputs. Use JSON to specify a nested JSON input.
Grid
- Parameter Name: The name of the View input parameter.
- Parameter Comes From: Indicates where the value of the View parameter should come from. Select from Cell, Column, Parameter, and Static Value in Link sources.
Note
If you select Static Value, the parameters can be resolved by using brackets to link
"{paramName}"in the text box. Columns can be treated as parameters columns by appending_columnafter the column name like"{columnName_column}". - Parameter Value: Depending on the value in Parameter Comes From, this dropdown contains available parameters, columns, or a static value.

JSON
- Specify your tab input in a JSON format on the editor. Like the Grid mode, parameters and columns can be referenced by using
{paramName}for parameters and{columnName_column}for columns. Selecting Show JSON Sample shows the expected output of all resolved parameters and columns used for the view input.
URL
Paste a portal URL that contains the extension, name of the view, and any inputs needed to open the view. After you select Initialize Settings, the form is populated so that you can add, modify, or remove any of the view inputs.

Workbook (Template) link settings
If the selected link type is Workbook (Template), you must specify more settings to open the correct workbook template. The following settings have options for how the grid finds the appropriate value for each of the settings.
| Setting | Description |
|---|---|
| Workbook owner Resource ID comes from | This value is the Resource ID of the Azure resource that "owns" the workbook. Commonly, it's an Application Insights resource or a Log Analytics workspace. Inside of Azure Monitor, this value might also be the literal string "Azure Monitor". When the workbook is saved, this value is what the workbook is linked to. |
| Workbook resources come from | An array of Azure Resource IDs that specify the default resource used in the workbook. For example, if the template being opened shows virtual machine metrics, the values here would be virtual machine resource IDs. Many times, the owner and resources are set to the same settings. |
| Template ID comes from | Specify the ID of the template to be opened. A community template from the gallery is the most common case. Prefix the path to the template with Community-, like Community-Workbooks/Performance/Apdex for the Workbooks/Performance/Apdex template. If it's a link to a saved workbook or template, use the full path to the Azure resource ID of that item, for example, "/subscriptions/12345678-a1b2-1234-a1b2-c3d4e5f6/resourceGroups/rgname/providers/microsoft.insights/workbooks/aaaa0a0a-bb1b-cc2c-dd3d-eeeeee4e4e4e. |
| Workbook Type comes from | Specify the kind of workbook template to open. The most common cases use the default or workbook option to use the value in the current workbook. |
| Gallery Type comes from | This value specifies the gallery type that's displayed in the Gallery view of the template that opens. The most common cases use the default or workbook option to use the value in the current workbook. |
| Location comes from | The location field should be specified if you're opening a specific workbook resource. If location isn't specified, finding the workbook content is slower. If you know the location, specify it. If you don't know the location or are opening a template with no specific location, leave this field as Default. |
| Pass specific parameters to template | Select to pass specific parameters to the template. If selected, only the specified parameters are passed to the template or else all the parameters in the current workbook are passed to the template. In that case, the parameter names must be the same in both workbooks for this parameter value to work. |
| Workbook Template Parameters | This section defines the parameters that are passed to the target template. The name should match with the name of the parameter in the target template. Select from Cell, Column, Parameter, and Static Value. The name and value must not be empty to pass that parameter to the target template. |
For each of the preceding settings, you must choose where the value in the linked workbook comes from. See Link sources.
When the workbook link is opened, the new workbook view is passed to all the values configured from the preceding settings.


Link sources
| Source | Description |
|---|---|
| Cell | Use the value in that cell in the grid as the link value. |
| Column | When selected, a field appears where you can select another column in the grid. The value of that column for the row is used in the link value. This link value is commonly used to enable each row of a grid to open a different template by setting the Template Id field to column. Or it's used to open the same workbook template for different resources, if the Workbook resources field is set to a column that contains an Azure Resource ID. |
| Parameter | When selected, a field appears where you can select a parameter. The value of that parameter is used for the value when the link is selected. |
| Static Value | When selected, a field appears where you can enter a static value that's used in the linked workbook. This value is commonly used when all the rows in the grid use the same value for a field. |
| Component | Use the value set in the current component of the workbook. It's common in query and metrics components to set the workbook resources in the linked workbook to those resources used in the query/metrics component, not the current workbook. |
| Workbook | Use the value set in the current workbook. |
| Default | Use the default value that would be used if no value were specified. This situation is common for Gallery Type comes from, where the default gallery would be set by the type of the owner resource. |
Copilot in Azure settings
When a Copilot in Azure link is invoked, it formats the configured link and sends it as a prompt to the Microsoft Copilot in Azure. The Microsoft Copilot in Azure then responds to the prompt to explain more about Azure concepts, services, or offerings. The link action can be configured to insert parameter values or grid content into the prompt text.
Note
If Microsoft Copilot in Azure is not enabled in your environment, instead of sending the prompt to Microsoft Copilot in Azure, the formatted prompt will be displayed in Cell Details side pane.
Select the Configure... button to open the Copilot in Azure prompt settings pane. The Copilot in Azure prompt settings shows a text area, where you can configure the prompt text and insert parameter markers with the standard {parameter} syntax, or references grid columns via the standard ["column name"] syntax. At the current time, the prompt content is limited to 500 characters after formatting. Any remaining content is truncated.
