Note
Access to this page requires authorization. You can try signing in or changing directories.
Access to this page requires authorization. You can try changing directories.
Bicep parameter files allow you to define values in an individual file that are then passed to your main.bicep file. The parameter file exposes values that may change from a given subscription, environment, and/or region. Leveraging a parameter file will drive consistency in your IaC deployments while also providing flexibility. Some of this flexibility might allow an organization to take advantage of cost benefits by right-sizing their nonproduction environments while maintaining the same core infrastructure.
These parameter files also help enable a streamlined CI/CD deployment approach. Each parameter file is under source control and passed into the appropriate automated deployment steps. These parameter files ensure a consistent deployment experience.
This article shows you how to create a parameters file, which you can use instead of passing parameters as inline values in your script. You can use either a Bicep parameters file with the .bicepparam file extension or a JSON parameters file that contains the parameter value.
Note
Bicep parameters files are supported only in Bicep CLI version 0.18.4 or later, Azure CLI version 2.47.0 or later, and Azure PowerShell version 9.7.1 or later. The using none feature is supported in Bicep CLI version 0.31.0 or later.
A single Bicep file can be associated with multiple parameter files. However, each parameter file is typically linked to one specific Bicep file—unless using none is specified. This association is established using the using statement within the parameter file.
You can compile Bicep parameters files into JSON parameters files that you can deploy by using a Bicep file. For more information, see build-params. You can also decompile a JSON parameters file into a Bicep parameters file. For more information, see decompile-params.
Parameters file
A parameters file uses the following format:
using '<path>/<file-name>.bicep' | using none

param <first-parameter-name> = <first-value>
param <second-parameter-name> = <second-value>
You can apply the using statement by using a Bicep file, JSON Azure Resource Manager templates, Bicep modules, and template specifications. For example:
using './main.bicep'
...
using './azuredeploy.json'
...
using 'br/public:avm/res/storage/storage-account:0.9.0'
...
using 'br:myacr.azurecr.io/bicep/modules/storage:v1'
...
using 'ts:00000000-0000-0000-0000-000000000000/myResourceGroup/storageSpec:1.0'
...
For more information, see Using statement.
You can apply the using none statement to indicate that the parameters file is not tied to a specific Bicep template during authoring or compilation. This decouples the parameter file from a particular template, enabling greater flexibility in how parameters are defined and used across deployments. For more information, see Using none statement.
You can use expressions with the default value. For example:

```bicep
using 'main.bicep'

param storageName = toLower('MyStorageAccount')
param intValue = 2 + 2
You can reference environment variables as parameter values. For example:
using './main.bicep'

param intFromEnvironmentVariables = int(readEnvironmentVariable('intEnvVariableName'))
You can define and use variables. You must use Bicep CLI version 0.21.X or later to use variables in .bicepparam files. See the following examples:
using './main.bicep'

var storagePrefix = 'myStorage'
param primaryStorageName = '${storagePrefix}Primary'
param secondaryStorageName = '${storagePrefix}Secondary'
using './main.bicep'

var testSettings = {
  instanceSize: 'Small'
  instanceCount: 1
}

var prodSettings = {
  instanceSize: 'Large'
  instanceCount: 4
}

param environmentSettings = {
  test: testSettings
  prod: prodSettings
}
Note
A parameters file saves parameter values as plain text. For security reasons, we don't recommend using this approach with sensitive values such as passwords.
If you need to pass a parameter with a sensitive value, you should keep the value in a key vault. Instead of adding a sensitive value to your parameters file, use the getSecret function to retrieve it. For more information, see Use Azure Key Vault to pass a secret as a parameter during Bicep deployment.
Parameter type formats
The following example shows the formats of various parameter types: string, integer, Boolean, array, and object.
using './main.bicep'

param exampleString = 'test string'
param exampleInt = 2 + 2
param exampleBool = true
param exampleArray = [
  'value 1'
  'value 2'
]
param exampleObject = {
  property1: 'value 1'
  property2: 'value 2'
}
File name
The file extension for a Bicep parameters file is .bicepparam.
To deploy to multiple environments, you create more than one parameters file. When you use multiple parameters files, label them according to their use. For example, to deploy resources, use the label main.dev.bicepparam for development and the label main.prod.bicepparam for production.
Define parameter values
To determine how to define parameter names and values, open your Bicep file. Look at the parameters section of the Bicep file. The following examples show the parameters from a Bicep file named main.bicep:
@maxLength(11)
param storagePrefix string

@allowed([
  'Standard_LRS'
  'Standard_GRS'
  'Standard_ZRS'
  'Premium_LRS'
])
param storageAccountType string = 'Standard_LRS'
In the parameters file, look for the name of each parameter. The parameter names in your parameters file must match the parameter names in your Bicep file.
using 'main.bicep'

param storagePrefix
param storageAccountType
The using statement ties the Bicep parameters file to a Bicep file. For more information, see Using statement.
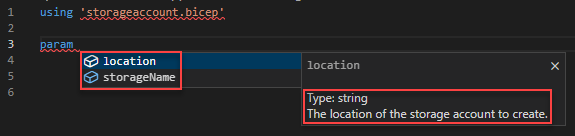
When you type the keyword param in Visual Studio Code, it prompts you the available parameters and their descriptions from the linked Bicep file.
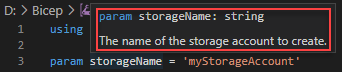
When you hover over a param name, you can see the parameter data type and description.
Review the parameter type, because the parameter types in your parameters file must use the same types as your Bicep file. In this example, both parameter types are strings:
using 'main.bicep'

param storagePrefix = ''
param storageAccountType = ''
Check the Bicep file for parameters that include a default value. If a parameter has a default value, you can provide a value in the parameters file, but it isn't required. The parameters file value overrides the Bicep file's default value.
using 'main.bicep'

param storagePrefix = '' // This value must be provided.
param storageAccountType = '' // This value is optional. Bicep uses default value if not provided.
To see if there are any restrictions like maximum length, check the Bicep file's allowed values. The allowed values specify the range of values you can provide for a parameter. In this example, storagePrefix can have a maximum of 11 characters, and storageAccountType must specify an allowed value.
using 'main.bicep'

param storagePrefix = 'storage'
param storageAccountType = 'Standard_ZRS'
Generate parameters file
You can create a parameters file by using either Visual Studio Code or the Bicep CLI. Both tools allow you to use a Bicep file to generate a parameters file. See Generate parameters file for the Visual Studio Code method and Generate parameters file for the Bicep CLI method.
Build Bicep parameters file
From the Bicep CLI, you can build a Bicep parameters file into a JSON parameters file. For more information, see Build parameters file.
Deploy Bicep file with parameters file
Azure CLI
From the Azure CLI, you can pass a parameters file with your Bicep file deployment.
You can deploy a Bicep file by using a Bicep parameters file with Azure CLI version 2.53.0 or later and Bicep CLI version 0.22.X or later. With the using statement within the Bicep parameters file, there's no need to provide the --template-file switch when specifying a Bicep parameters file for the --parameters switch.
az deployment group create \
  --name ExampleDeployment \
  --resource-group ExampleGroup \
  --parameters storage.bicepparam
You can use inline parameters and a location parameters file in the same deployment operation. For example:
az deployment group create \
  --name ExampleDeployment \
  --resource-group ExampleGroup \
  --parameters storage.bicepparam \
  --parameters storageAccountType=Standard_LRS
For more information, see Deploy Bicep files by using the Azure CLI.
Azure PowerShell
From Azure PowerShell, pass a local parameters file by using the TemplateParameterFile parameter.
New-AzResourceGroupDeployment `
  -Name ExampleDeployment `
  -ResourceGroupName ExampleResourceGroup `
  -TemplateFile C:\MyTemplates\storage.bicep `
  -TemplateParameterFile C:\MyTemplates\storage.bicepparam
You can use inline parameters and a location parameters file in the same deployment operation. For example:
New-AzResourceGroupDeployment `
  -Name ExampleDeployment `
  -ResourceGroupName ExampleResourceGroup `
  -TemplateFile C:\MyTemplates\storage.bicep `
  -TemplateParameterFile C:\MyTemplates\storage.bicepparam `
  -storageAccountType Standard_LRS
For more information, see Deploy Bicep files with Azure PowerShell. To deploy .bicep files, you need Azure PowerShell version 5.6.0 or later.
Parameter precedence
You can use inline parameters and a local parameters file in the same deployment operation. For example, you can specify some values in the local parameters file and add other values inline during deployment. If you provide values for a parameter in both the local parameters file and inline, the inline value takes precedence.
Although external Bicep parameters files aren't currently supported, you can use an external JSON parameters file by providing the URI to the file. When you use an external parameters file, provide all parameter values in the external file. When you use an external file, you can't pass other values inline or from a local file, and all inline parameters are ignored.
Parameter name conflicts
If your Bicep file includes a parameter with the same name as one of the parameters in the Azure PowerShell command, Azure PowerShell presents the parameter from your Bicep file with the FromTemplate postfix. For example, if a parameter named ResourceGroupName in your Bicep file conflicts with the ResourceGroupName parameter in the New-AzResourceGroupDeployment cmdlet, you're prompted to provide a value for ResourceGroupNameFromTemplate. To avoid this confusion, use parameter names that aren't used for deployment commands.
Related content
- For more information about how to define parameters in a Bicep file, see Parameters in Bicep.
- To get sensitive values, see Use Azure Key Vault to pass secure parameter value during deployment.