Note
Access to this page requires authorization. You can try signing in or changing directories.
Access to this page requires authorization. You can try changing directories.
This tutorial continues on the chat room application introduced in Create a chat room with SignalR Service. Complete that quickstart first to set up your chat room.
In this tutorial, learn how to create and integrate your authentication method using Microsoft Azure SignalR Service.
The authentication initially used in the quickstart's chat room application is too simple for real-world scenarios. The application allows each client to claim who they are, and the server simply accepts that. This approach is ineffective in the real-world because malicious users can use fake identities to access sensitive data.
GitHub provides authentication APIs based on a popular industry-standard protocol called OAuth. These APIs allow third-party applications to authenticate GitHub accounts. In this tutorial, you can use these APIs to implement authentication through a GitHub account before allowing client logins to the chat room application. After GitHub account authentication, the account information will be added as a cookie to be used by the web client to authenticate.
For more information on the OAuth authentication APIs provided through GitHub, see Basics of Authentication.
You can use any code editor to complete the steps in this quickstart. However, Visual Studio Code is an excellent option available on the Windows, macOS, and Linux platforms.
The code for this tutorial is available for download in the AzureSignalR-samples GitHub repository.
In this tutorial, you learn how to:
- Register a new OAuth app with your GitHub account
- Add an authentication controller to support GitHub authentication
- Deploy your ASP.NET Core web app to Azure
If you don't have an Azure account, create a free account before you begin.
Prerequisites
To complete this tutorial, you must have the following prerequisites:
- An account created on GitHub
- Git
- .NET Core SDK
- Azure Cloud Shell configured for the bash environment
- Download or clone the AzureSignalR-sample GitHub repository
Create an OAuth app
Open a web browser and navigate to
https://github.comand sign into your account.For your account, navigate to Settings > Developer settings > OAuth Apps, and select New OAuth App under OAuth Apps.
Use the following settings for the new OAuth App, then select Register application:
Setting Name Suggested Value Description Application name Azure SignalR Chat The GitHub user should be able to recognize and trust the app they're authenticating with. Homepage URL https://localhost:5001Application description A chat room sample using the Azure SignalR Service with GitHub authentication A useful description of the application that helps your application users understand the context of the authentication being used. Authorization callback URL https://localhost:5001/signin-githubThis setting is the most important setting for your OAuth application. It's the callback URL that GitHub returns the user to after successful authentication. In this tutorial, you must use the default callback URL for the AspNet.Security.OAuth.GitHub package, /signin-github. Once the new OAuth app registration is complete, add the Client ID and Client Secret to Secret Manager using the following commands. Replace Your_GitHub_Client_Id and Your_GitHub_Client_Secret with the values for your OAuth app.
dotnet user-secrets set GitHubClientId Your_GitHub_Client_Id
dotnet user-secrets set GitHubClientSecret Your_GitHub_Client_Secret
Implement the OAuth flow
Let's reuse the chat app created in tutorial Create a chat room with SignalR Service.
Update Program.cs to support GitHub authentication
Add a reference to the latest AspNet.Security.OAuth.GitHub packages and restore all packages.
dotnet add package AspNet.Security.OAuth.GitHubOpen Program.cs, and update the code to the following code snippet:
using Microsoft.AspNetCore.Authentication.Cookies;
using Microsoft.AspNetCore.Authentication.OAuth;

using System.Net.Http.Headers;
using System.Security.Claims;

var builder = WebApplication.CreateBuilder(args);

builder.Services
    .AddAuthentication(CookieAuthenticationDefaults.AuthenticationScheme)
    .AddCookie()
    .AddGitHub(options =>
    {
        options.ClientId = builder.Configuration["GitHubClientId"] ?? "";
        options.ClientSecret = builder.Configuration["GitHubClientSecret"] ?? "";
        options.Scope.Add("user:email");
        options.Events = new OAuthEvents
        {
            OnCreatingTicket = GetUserCompanyInfoAsync
        };
    });

builder.Services.AddControllers();
builder.Services.AddSignalR().AddAzureSignalR();

var app = builder.Build();

app.UseHttpsRedirection();
app.UseDefaultFiles();
app.UseStaticFiles();

app.UseRouting();

app.UseAuthorization();

app.MapControllers();
app.MapHub<ChatSampleHub>("/chat");

app.Run();

static async Task GetUserCompanyInfoAsync(OAuthCreatingTicketContext context)
{
    var request = new HttpRequestMessage(HttpMethod.Get, context.Options.UserInformationEndpoint);
    request.Headers.Accept.Add(new MediaTypeWithQualityHeaderValue("application/json"));
    request.Headers.Authorization = new AuthenticationHeaderValue("Bearer", context.AccessToken);

    var response = await context.Backchannel.SendAsync(request,
        HttpCompletionOption.ResponseHeadersRead, context.HttpContext.RequestAborted);
    var user = await response.Content.ReadFromJsonAsync<GitHubUser>();
    if (user?.company != null)
    {
        context.Principal?.AddIdentity(new ClaimsIdentity(new[]
        {
            new Claim("Company", user.company)
        }));
    }
}

class GitHubUser
{
    public string? company { get; set; }
}
Inside the code,
AddAuthenticationandUseAuthenticationare used to add authentication support with the GitHub OAuth app, andGetUserCompanyInfoAsynchelper method is sample code showing how to load the company info from GitHub OAuth and save into user identity. You might also notice thatUseHttpsRedirection()is used since GitHub OAuth setsecurecookie that only passes through to securedhttpsscheme. Also don't forget to update the localProperties/launchSettings.jsonto add https endpoint:{ "profiles": { "GitHubChat" : { "commandName": "Project", "launchBrowser": true, "environmentVariables": { "ASPNETCORE_ENVIRONMENT": "Development" }, "applicationUrl": "http://0.0.0.0:5000/;https://0.0.0.0:5001/;" } } }
Add an authentication Controller
In this section, you implement a Login API that authenticates clients using the GitHub OAuth app. Once authenticated, the API adds a cookie to the web client response before redirecting the client back to the chat app. That cookie is then used to identify the client.
Add a new controller code file to the GitHubChat\Controllers directory. Name the file AuthController.cs.
Add the following code for the authentication controller. Make sure to update the namespace, if your project directory wasn't GitHubChat:
using AspNet.Security.OAuth.GitHub;

using Microsoft.AspNetCore.Authentication;
using Microsoft.AspNetCore.Mvc;

namespace GitHubChat.Controllers
{
    [Route("/")]
    public class AuthController : Controller
    {
        [HttpGet("login")]
        public IActionResult Login()
        {
            if (User.Identity == null || !User.Identity.IsAuthenticated)
            {
                return Challenge(GitHubAuthenticationDefaults.AuthenticationScheme);
            }

            HttpContext.Response.Cookies.Append("githubchat_username", User.Identity.Name ?? "");
            HttpContext.SignInAsync(User);
            return Redirect("/");
        }
    }
}
Save your changes.
Update the Hub class
By default, web client connects to SignalR Service using an access token generated by the Azure SignalR SDK automatically.
In this section, you integrate the real authentication workflow by adding the Authorize attribute to the hub class, and update the hub methods to read the username from the authenticated user's claim.
Open Hub\ChatSampleHub.cs and update the code to the below code snippet. The code adds the
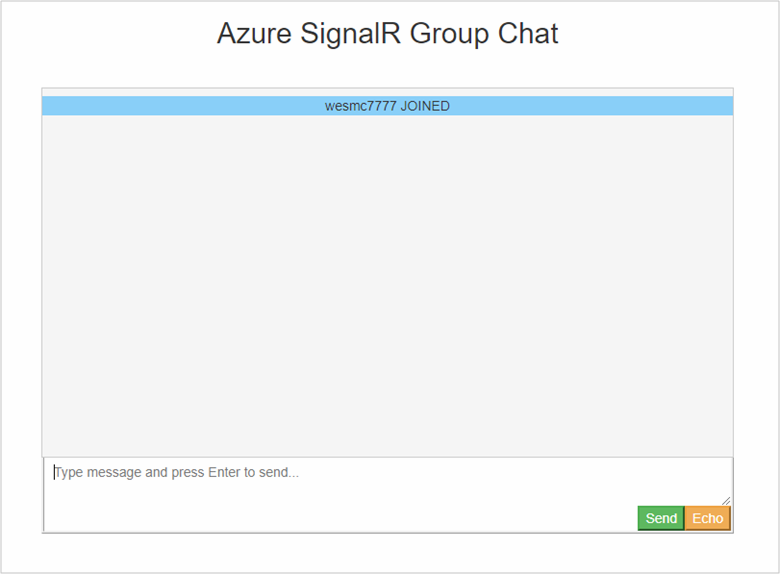
Authorizeattribute to theChatSampleHubclass, and uses the user's authenticated identity in the hub methods. Also, theOnConnectedAsyncmethod is added, which logs a system message to the chat room each time a new client connects.using Microsoft.AspNetCore.Authorization; using Microsoft.AspNetCore.SignalR; [Authorize] public class ChatSampleHub : Hub { public override Task OnConnectedAsync() { return Clients.All.SendAsync("broadcastMessage", "_SYSTEM_", $"{Context.User?.Identity?.Name} JOINED"); } // Uncomment this line to only allow user in Microsoft to send message //[Authorize(Policy = "Microsoft_Only")] public Task BroadcastMessage(string message) { return Clients.All.SendAsync("broadcastMessage", Context.User?.Identity?.Name, message); } public Task Echo(string message) { var echoMessage = $"{message} (echo from server)"; return Clients.Client(Context.ConnectionId).SendAsync("echo", Context.User?.Identity?.Name, echoMessage); } }Save your changes.
Update the web client code
Open wwwroot\index.html and replace the code that prompts for the username with code to use the cookie returned by the authentication controller.
Update the code inside function
getUserNamein index.html to the following to use cookies:function getUserName() { // Get the user name cookie. function getCookie(key) { var cookies = document.cookie.split(";").map((c) => c.trim()); for (var i = 0; i < cookies.length; i++) { if (cookies[i].startsWith(key + "=")) return unescape(cookies[i].slice(key.length + 1)); } return ""; } return getCookie("githubchat_username"); }Update
onConnectedfunction to remove theusernameparameter when invoking hub methodbroadcastMessageandecho:function onConnected(connection) { console.log("connection started"); connection.send("broadcastMessage", "_SYSTEM_", username + " JOINED"); document.getElementById("sendmessage").addEventListener("click", function (event) { // Call the broadcastMessage method on the hub. if (messageInput.value) { connection.invoke("broadcastMessage", messageInput.value) .catch((e) => appendMessage("_BROADCAST_", e.message)); } // Clear text box and reset focus for next comment. messageInput.value = ""; messageInput.focus(); event.preventDefault(); }); document.getElementById("message").addEventListener("keypress", function (event) { if (event.keyCode === 13) { event.preventDefault(); document.getElementById("sendmessage").click(); return false; } }); document.getElementById("echo").addEventListener("click", function (event) { // Call the echo method on the hub. connection.send("echo", messageInput.value); // Clear text box and reset focus for next comment. messageInput.value = ""; messageInput.focus(); event.preventDefault(); }); }At the bottom of index.html, update the error handler for
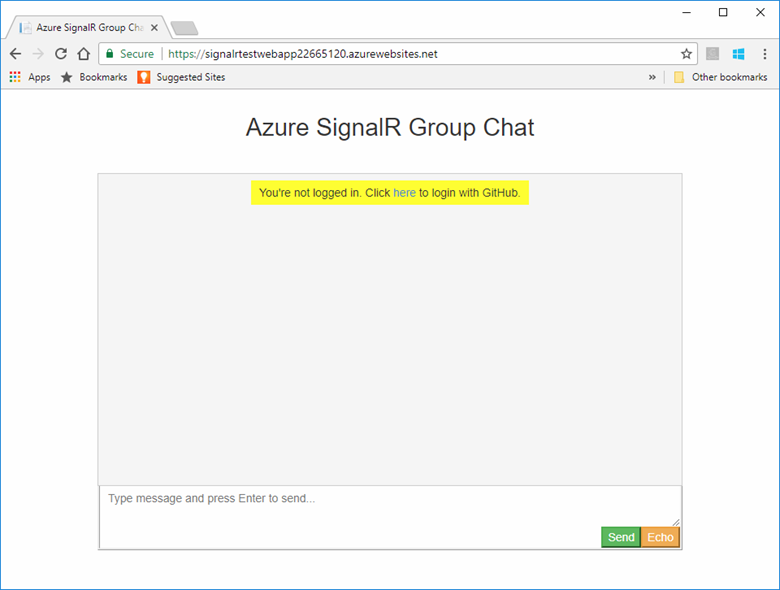
connection.start()as shown below to prompt the user to sign in.connection.start() .then(function () { onConnected(connection); }) .catch(function (error) { console.error(error.message); if (error.statusCode && error.statusCode === 401) { appendMessage( "_BROADCAST_", "You\"re not logged in. Click <a href="/login">here</a> to login with GitHub." ); } });Save your changes.
Build and Run the app locally
Save changes to all files.
Execute the following command to run the web app locally:
dotnet runThe app is hosted locally on port 5000 by default:
info: Microsoft.Hosting.Lifetime[14]
      Now listening on: http://0.0.0.0:5000
info: Microsoft.Hosting.Lifetime[14]
      Now listening on: https://0.0.0.0:5001
info: Microsoft.Hosting.Lifetime[0]
      Application started. Press Ctrl+C to shut down.
info: Microsoft.Hosting.Lifetime[0]
      Hosting environment: Development
Launch a browser window and navigate to
https://localhost:5001. Select the here link at the top to sign in with GitHub.You're prompted to authorize the chat app's access to your GitHub account. Select the Authorize button.

You're redirected back to the chat application and logged in with your GitHub account name. The web application determined your account name by authenticating you using the new authentication you added.
With the chat app now performs authentication with GitHub and stores the authentication information as cookies, the next step involves deploying it to Azure. This approach enables other users to authenticate using their respective accounts and communicate from various workstations.
Deploy the app to Azure
Prepare your environment for the Azure CLI:
Use the Bash environment in Azure Cloud Shell. For more information, see Get started with Azure Cloud Shell.

If you prefer to run CLI reference commands locally, install the Azure CLI. If you're running on Windows or macOS, consider running Azure CLI in a Docker container. For more information, see How to run the Azure CLI in a Docker container.
If you're using a local installation, sign in to the Azure CLI by using the az login command. To finish the authentication process, follow the steps displayed in your terminal. For other sign-in options, see Authenticate to Azure using Azure CLI.
When you're prompted, install the Azure CLI extension on first use. For more information about extensions, see Use and manage extensions with the Azure CLI.
Run az version to find the version and dependent libraries that are installed. To upgrade to the latest version, run az upgrade.
In this section, you use the Azure CLI to create a new web app in Azure App Service to host your ASP.NET application in Azure. The web app is configured to use local Git deployment. The web app is also configured with your SignalR connection string, GitHub OAuth app secrets, and a deployment user.
When creating the following resources, make sure to use the same resource group that your SignalR Service resource resides in. This approach makes cleanup a lot easier later when you want to remove all the resources. The examples given assume you used the group name recommended in previous tutorials, SignalRTestResources.
Create the web app and plan
Copy the text for the commands below and update the parameters. Paste the updated script into the Azure Cloud Shell, and press Enter to create a new App Service plan and web app.
#========================================================================
#=== Update these variable for your resource group name.              ===
#========================================================================
ResourceGroupName=SignalRTestResources

#========================================================================
#=== Update these variable for your web app.                          ===
#========================================================================
WebAppName=myWebAppName
WebAppPlan=myAppServicePlanName

# Create an App Service plan.
az appservice plan create --name $WebAppPlan --resource-group $ResourceGroupName \
    --sku FREE

# Create the new Web App
az webapp create --name $WebAppName --resource-group $ResourceGroupName \
    --plan $WebAppPlan
| Parameter | Description |
|---|---|
| ResourceGroupName | This resource group name was suggested in previous tutorials. It's a good idea to keep all tutorial resources grouped together. Use the same resource group you used in the previous tutorials. |
| WebAppPlan | Enter a new, unique, App Service Plan name. |
| WebAppName | This parameter is the name of the new web app and part of the URL. Make it unique. For example, signalrtestwebapp22665120. |
Add app settings to the web app
In this section, you add app settings for the following components:
- SignalR Service resource connection string
- GitHub OAuth app client ID
- GitHub OAuth app client secret
Copy the text for the commands below and update the parameters. Paste the updated script into the Azure Cloud Shell, and press Enter to add the app settings:
#========================================================================
#=== Update these variables for your GitHub OAuth App.                ===
#========================================================================
GitHubClientId=1234567890
GitHubClientSecret=1234567890

#========================================================================
#=== Update these variables for your resources.                       ===
#========================================================================
ResourceGroupName=SignalRTestResources
SignalRServiceResource=mySignalRresourcename
WebAppName=myWebAppName

# Get the SignalR primary connection string
primaryConnectionString=$(az signalr key list --name $SignalRServiceResource \
  --resource-group $ResourceGroupName --query primaryConnectionString -o tsv)

#Add an app setting to the web app for the SignalR connection
az webapp config appsettings set --name $WebAppName \
    --resource-group $ResourceGroupName \
    --settings "Azure__SignalR__ConnectionString=$primaryConnectionString"

#Add the app settings to use with GitHub authentication
az webapp config appsettings set --name $WebAppName \
    --resource-group $ResourceGroupName \
    --settings "GitHubClientId=$GitHubClientId"
az webapp config appsettings set --name $WebAppName \
    --resource-group $ResourceGroupName \
    --settings "GitHubClientSecret=$GitHubClientSecret"
| Parameter | Description |
|---|---|
| GitHubClientId | Assign this variable the secret Client ID for your GitHub OAuth App. |
| GitHubClientSecret | Assign this variable the secret password for your GitHub OAuth App. |
| ResourceGroupName | Update this variable to be the same resource group name you used in the previous section. |
| SignalRServiceResource | Update this variable with the name of the SignalR Service resource you created in the quickstart. For example, signalrtestsvc48778624. |
| WebAppName | Update this variable with the name of the new web app you created in the previous section. |
Configure the web app for local Git deployment
In the Azure Cloud Shell, paste the following script. This script creates a new deployment user name and password that you use when deploying your code to the web app with Git. The script also configures the web app for deployment with a local Git repository, and returns the Git deployment URL.
#========================================================================
#=== Update these variables for your resources.                       ===
#========================================================================
ResourceGroupName=SignalRTestResources
WebAppName=myWebAppName

#========================================================================
#=== Update these variables for your deployment user.                 ===
#========================================================================
DeploymentUserName=myUserName
DeploymentUserPassword=myPassword

# Add the desired deployment user name and password
az webapp deployment user set --user-name $DeploymentUserName \
    --password $DeploymentUserPassword

# Configure Git deployment and note the deployment URL in the output
az webapp deployment source config-local-git --name $WebAppName \
    --resource-group $ResourceGroupName \
    --query [url] -o tsv
| Parameter | Description |
|---|---|
| DeploymentUserName | Choose a new deployment user name. |
| DeploymentUserPassword | Choose a password for the new deployment user. |
| ResourceGroupName | Use the same resource group name you used in the previous section. |
| WebAppName | This parameter is the name of the new web app you created previously. |
Make a note the Git deployment URL returned from this command. You use this URL later.
Deploy your code to the Azure web app
To deploy your code, execute the following commands in a Git shell.
Navigate to the root of your project directory. If you don't have the project initialized with a Git repository, execute following command:
git initAdd a remote for the Git deployment URL you noted earlier:
git remote add Azure <your git deployment url>Stage all files in the initialized repository and add a commit.
git add -A
git commit -m "init commit"
Deploy your code to the web app in Azure.
git push Azure mainYou're prompted to authenticate in order to deploy the code to Azure. Enter the user name and password of the deployment user you created above.
Update the GitHub OAuth app
The last thing you need to do is update the Homepage URL and Authorization callback URL of the GitHub OAuth app to point to the new hosted app.
Open https://github.com in a browser and navigate to your account's Settings > Developer settings > Oauth Apps.
Select on your authentication app and update the Homepage URL and Authorization callback URL as shown below:
Setting Example Homepage URL https://signalrtestwebapp22665120.azurewebsites.netAuthorization callback URL https://signalrtestwebapp22665120.azurewebsites.net/signin-githubNavigate to your web app URL and test the application.
Clean up resources
If you'll be continuing to the next tutorial, you can keep the resources created in this quickstart and reuse them with the next tutorial.
Otherwise, if you're finished with the quickstart sample application, you can delete the Azure resources created in this quickstart to avoid charges.
Important
Deleting a resource group is irreversible and that the resource group and all the resources in it are permanently deleted. Make sure that you do not accidentally delete the wrong resource group or resources. If you created the resources for hosting this sample inside an existing resource group that contains resources you want to keep, you can delete each resource individually from their respective blades instead of deleting the resource group.
Sign in to the Azure portal and select Resource groups.
In the Filter by name... textbox, type the name of your resource group. The instructions for this article used a resource group named SignalRTestResources. On your resource group in the result list, click ... then Delete resource group.

You're asked to confirm the deletion of the resource group. Type the name of your resource group to confirm, and select Delete.
After a few moments, the resource group and all of its contained resources are deleted.
Next steps
In this tutorial, you added authentication with OAuth to provide a better approach to authentication with Azure SignalR Service. To learn more about using Azure SignalR Server, continue to the Azure CLI samples for SignalR Service.