Note
Access to this page requires authorization. You can try signing in or changing directories.
Access to this page requires authorization. You can try changing directories.
Application Gateway is a web traffic load balancer that enables you to manage traffic to your web applications. Using Application Gateway with SignalR Service enables you to do the following:
- Protect your applications from common web vulnerabilities.
- Get application-level load-balancing for your scalable and highly available applications.
- Set up end-to-end security.
- Customize the domain name.
This article contains two parts,
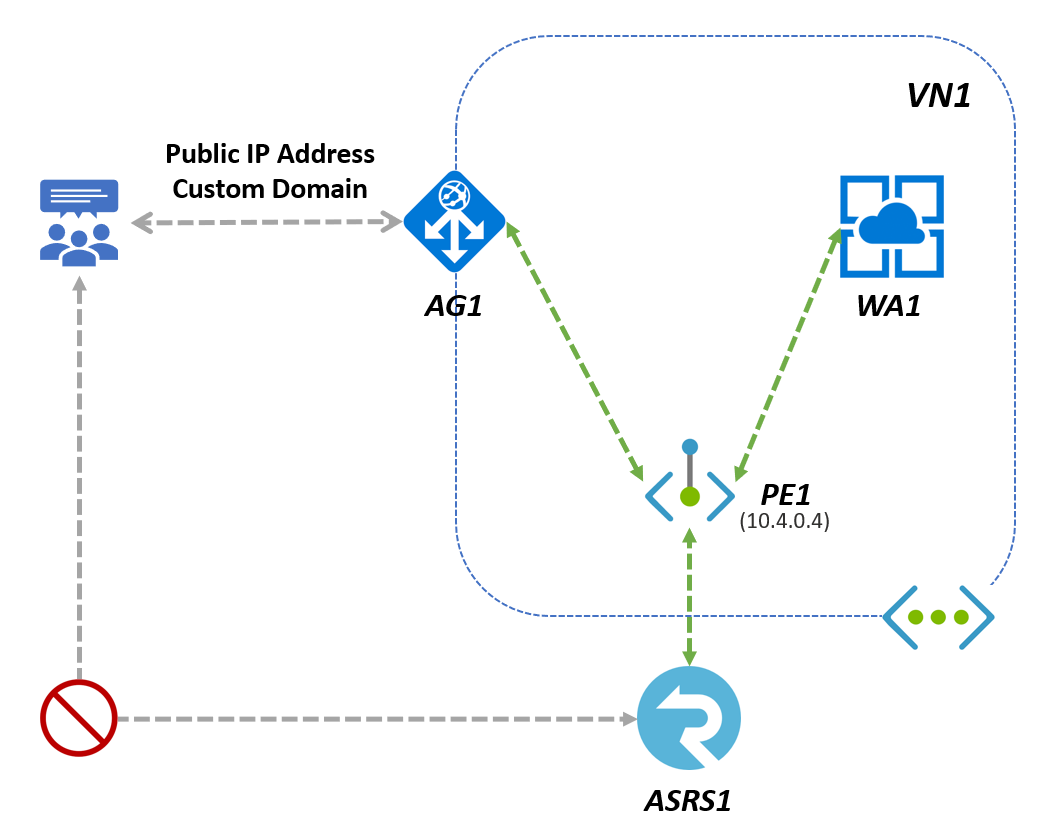
- The first part shows how to configure Application Gateway so that the clients can access SignalR through Application Gateway.
- The second part shows how to secure SignalR Service by adding access control to SignalR Service and only allow traffic from Application Gateway.
Raw connection strings appear in this article for demonstration purposes only. In production environments, always protect your access keys. Use Azure Key Vault to manage and rotate your keys securely and secure your connection string using Microsoft Entra ID and authorize access with Microsoft Entra ID.
Set up and configure Application Gateway
Create a SignalR Service instance
- Follow the article and create a SignalR Service instance ASRS1
Create an Application Gateway instance
Create from the portal an Application Gateway instance AG1:
On the Azure portal, search for Application Gateway and Create.
On the Basics tab, use these values for the following application gateway settings:
Subscription and Resource group and Region: the same as what you choose for SignalR Service
Application gateway name: AG1
Virtual network, select Create new, and in the Create virtual network window that opens, enter the following values to create the virtual network and two subnets, one for the application gateway, and another for the backend servers.
Name: Enter VN1 for the name of the virtual network.
Subnets: Update the Subnets grid with below 2 subnets
Subnet name Address range Note myAGSubnet (address range) Subnet for the application gateway. The application gateway subnet can contain only application gateways. No other resources are allowed. myBackendSubnet (another address range) Subnet for the Azure SignalR instance.
Accept the default values for the other settings and then select Next: Frontends
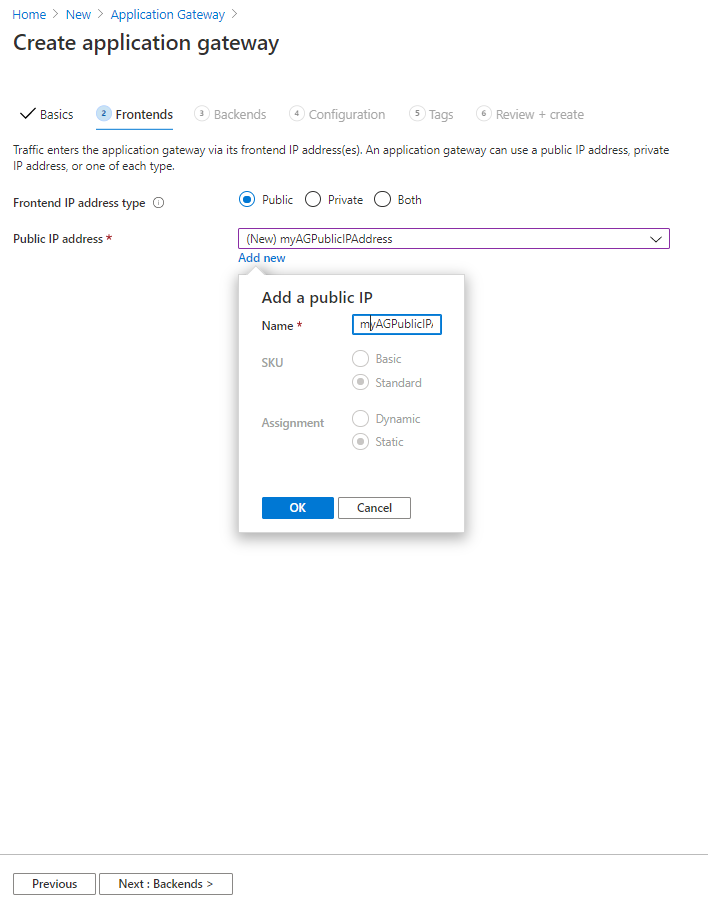
On the Frontends tab:
- Frontend IP address type: Public.
- Select Add new for the Public IP address and enter myAGPublicIPAddress for the public IP address name, and then select OK.
- Select Next: Backends
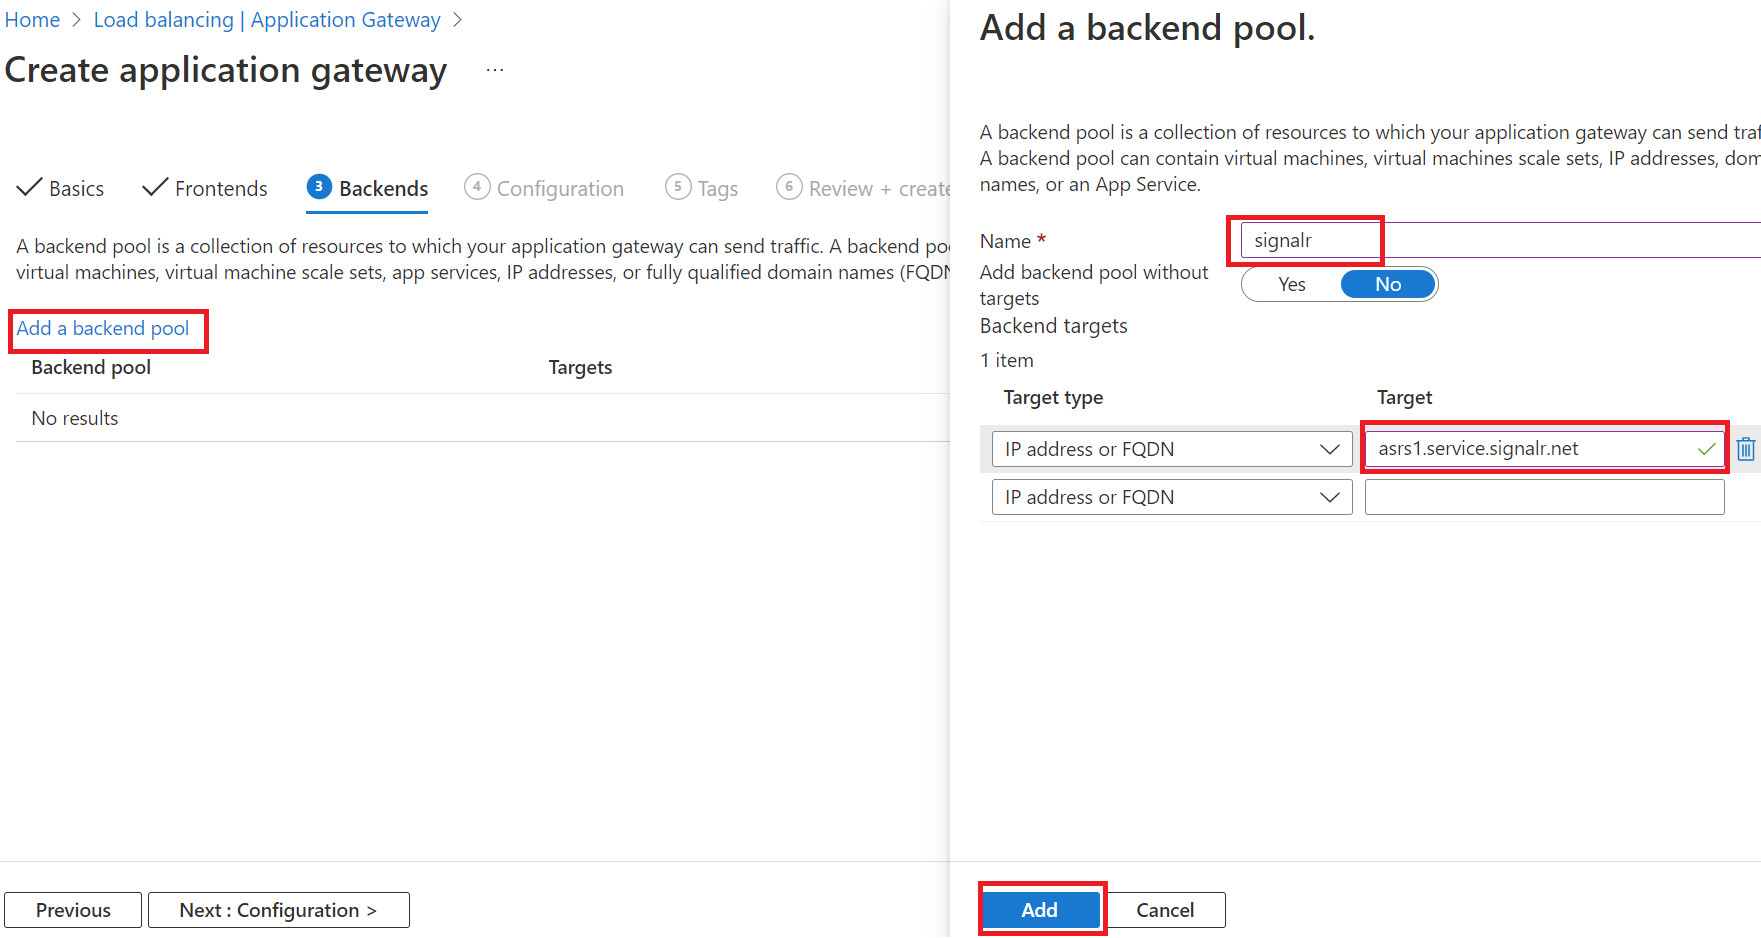
On the Backends tab, select Add a backend pool:
- Name: Enter signalr for the SignalR Service resource backend pool.
- Backend targets Target: the host name of your SignalR Service instance ASRS1, for example
asrs1.service.signalr.net - Select Next: Configuration
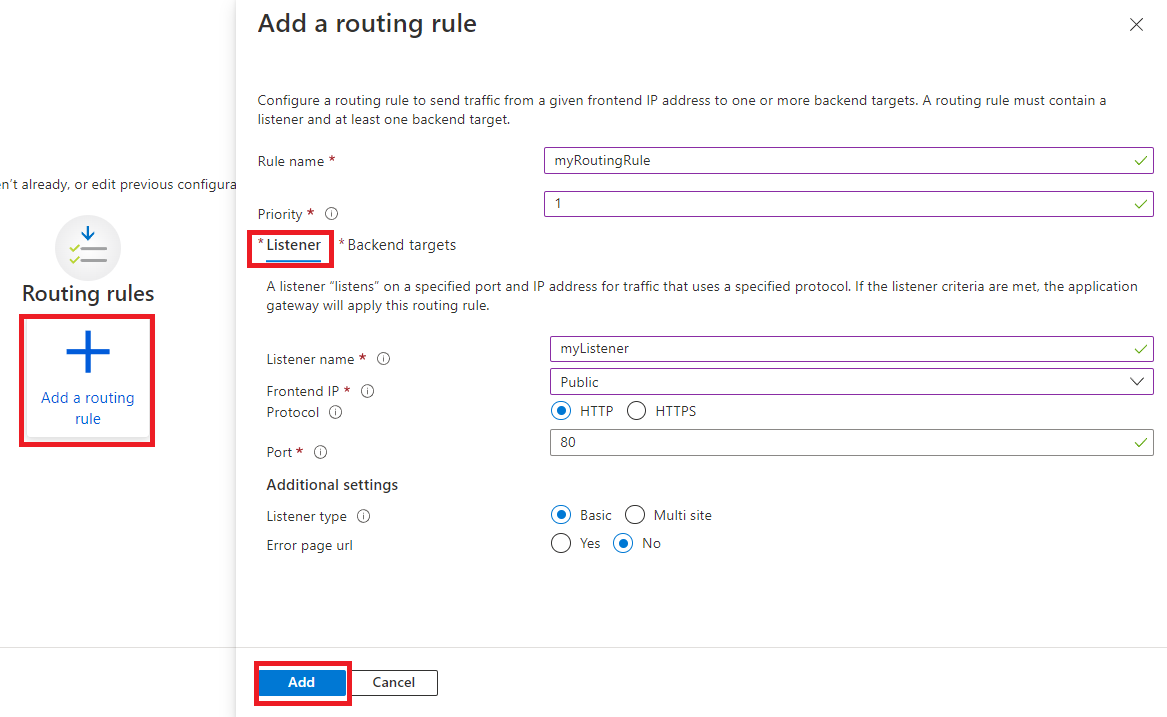
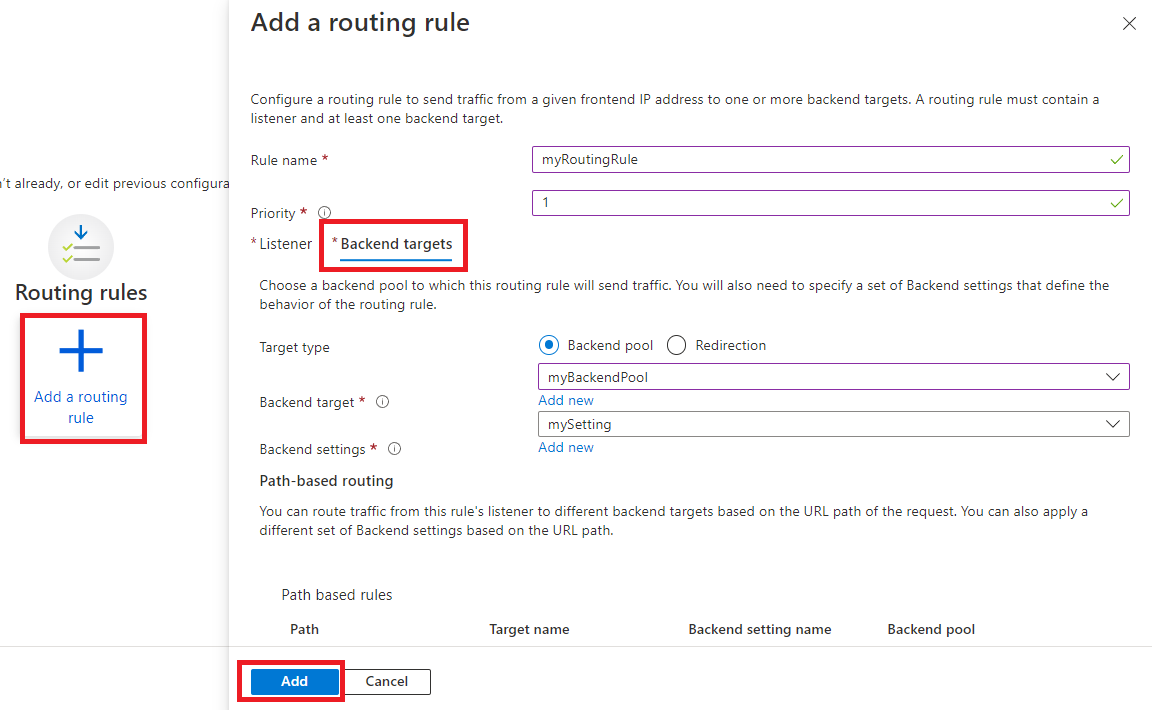
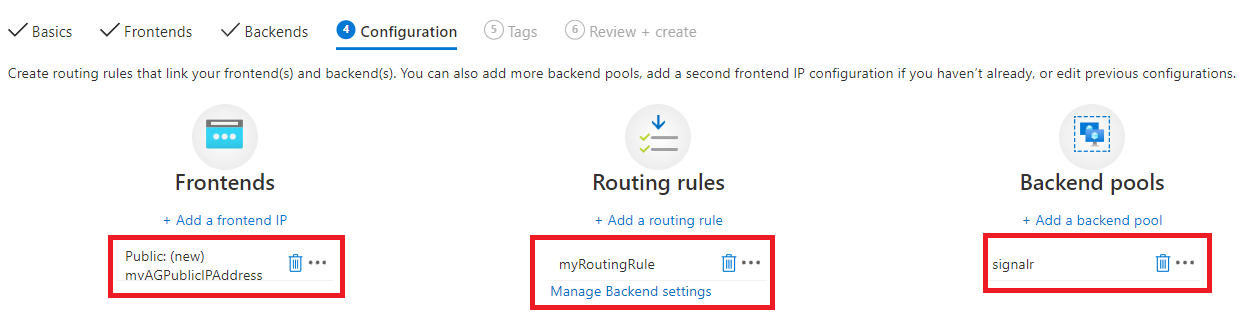
On the Configuration tab, select Add a routing rule in the Routing rules column:
Rule name: myRoutingRule
Priority: 1
On the Listener tab within the Add a routing rule window, enter the following values for the listener:
- Listener name: Enter myListener for the name of the listener.
- Frontend IP: Select Public to choose the public IP you created for the frontend.
- Protocol: HTTP
- We use the HTTP frontend protocol on Application Gateway in this article to simplify the demo and help you get started easier. But in reality, you may need to enable HTTPS and Customer Domain on it with production scenario.
- Accept the default values for the other settings on the Listener tab
On the Backend targets tab, use the following values:
Target type: Backend pool
Backend target: select signalr we previously created
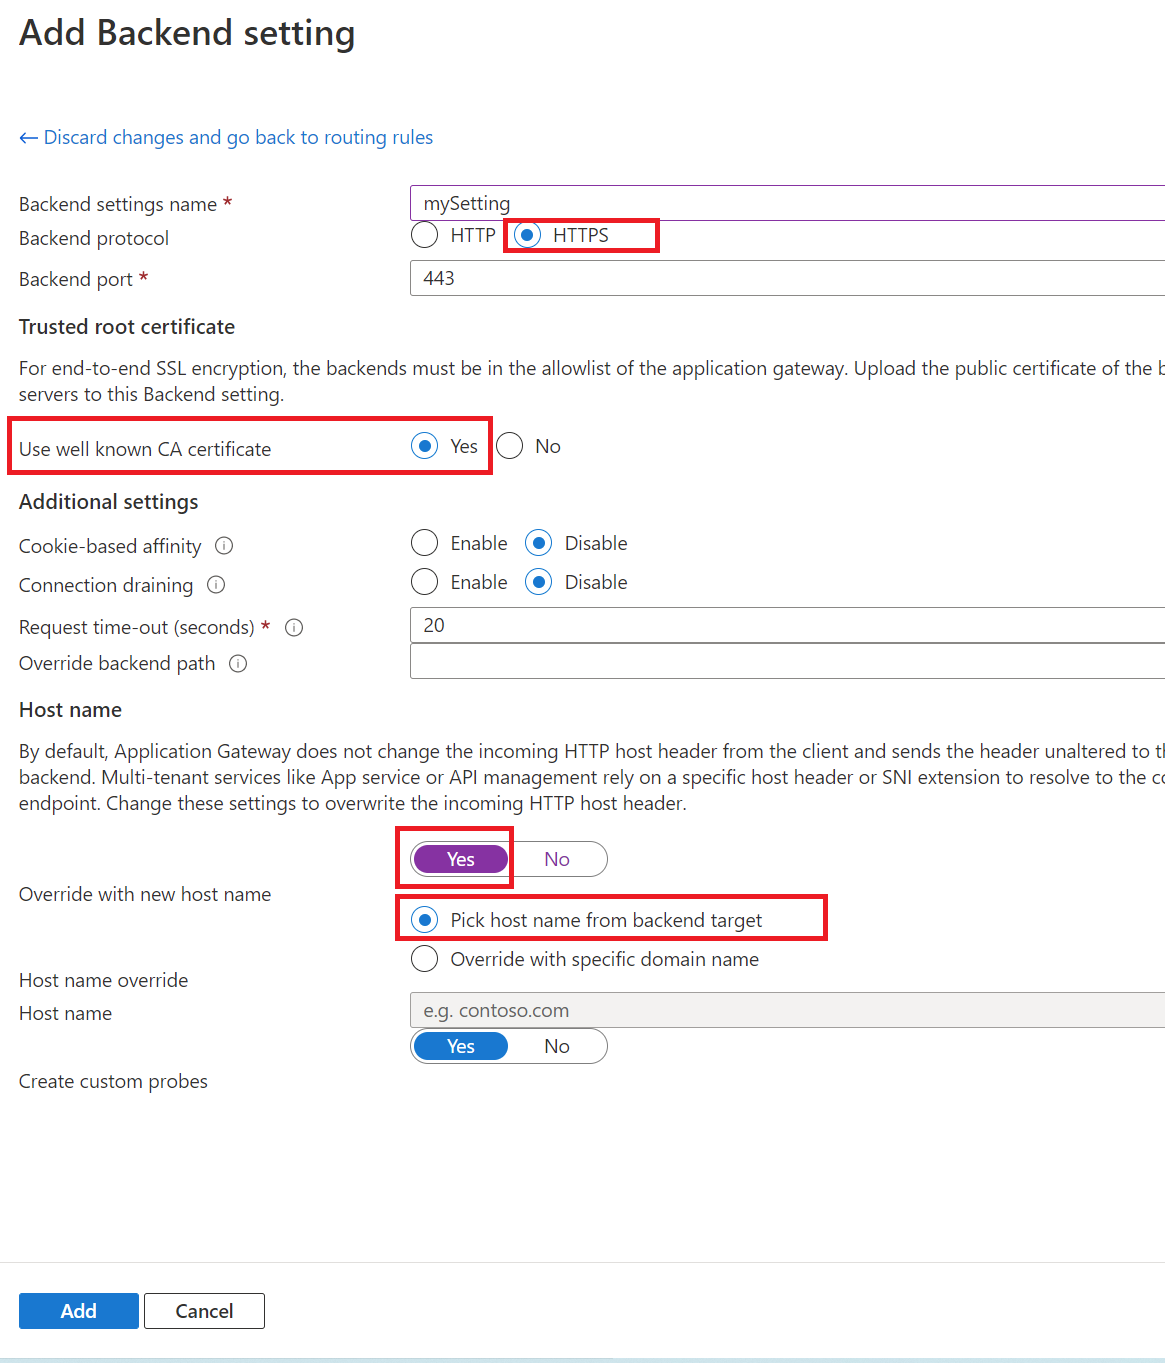
Backend settings: select Add new to add a new setting.
- Backend settings name: mySetting
- Backend protocol: HTTPS
- Use well known CA certificate: Yes
- Override with new host name: Yes
- Host name override: Pick host name from backend target
- Others keep the default values
Review and create the AG1
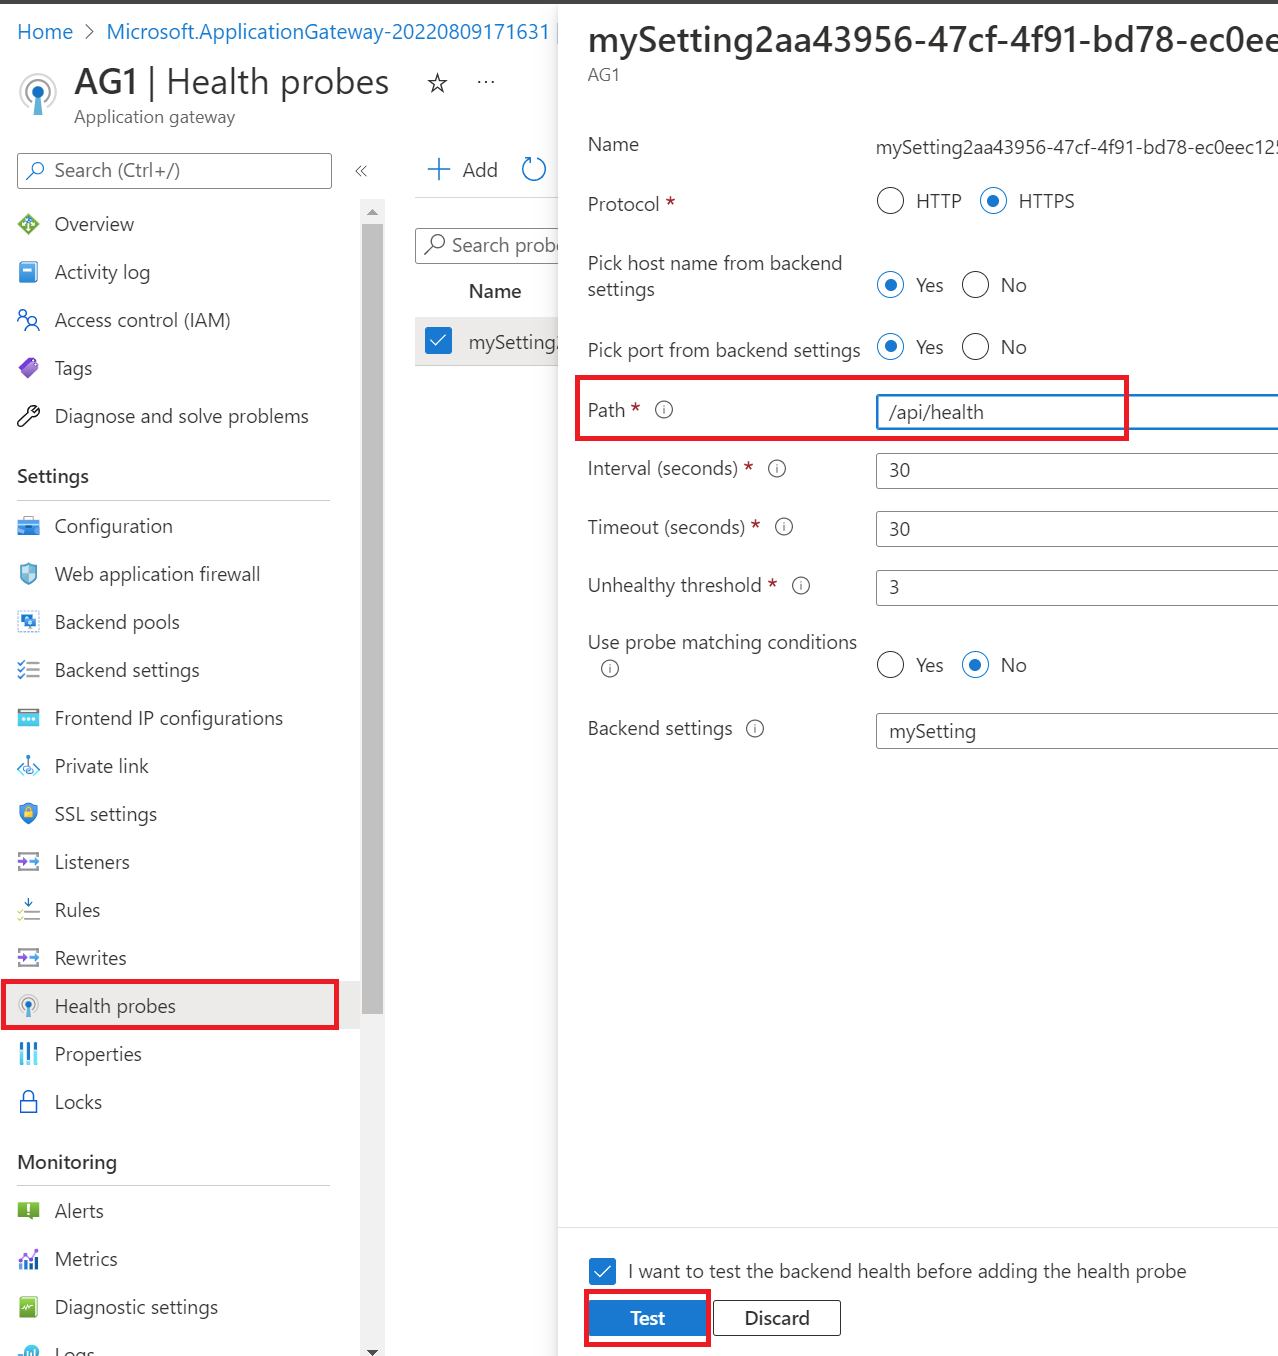
Configure Application Gateway health probe
When AG1 is created, go to Health probes tab under Settings section in the portal, change the health probe path to /api/health
Quick test
Try with an invalid client request
https://asrs1.service.signalr.net/clientand it returns 400 with error message 'hub' query parameter is required. It means the request arrived at the SignalR Service and did the request validation.curl -v https://asrs1.service.signalr.net/clientreturns
< HTTP/1.1 400 Bad Request
< ...
<
'hub' query parameter is required.
Go to the Overview tab of AG1, and find out the Frontend public IP address

Visit the health endpoint through AG1
http://<frontend-public-IP-address>/client, and it also returns 400 with error message 'hub' query parameter is required. It means the request successfully went through Application Gateway to SignalR Service and did the request validation.curl -I http://<frontend-public-IP-address>/clientreturns
< HTTP/1.1 400 Bad Request
< ...
<
'hub' query parameter is required.
Run chat through Application Gateway
Now, the traffic can reach SignalR Service through the Application Gateway. The customer could use the Application Gateway public IP address or custom domain name to access the resource. Let’s use this chat application as an example. Let's start with running it locally.
Raw connection strings appear in this article for demonstration purposes only. In production environments, always protect your access keys. Use Azure Key Vault to manage and rotate your keys securely and secure your connection string using Microsoft Entra ID and authorize access with Microsoft Entra ID.
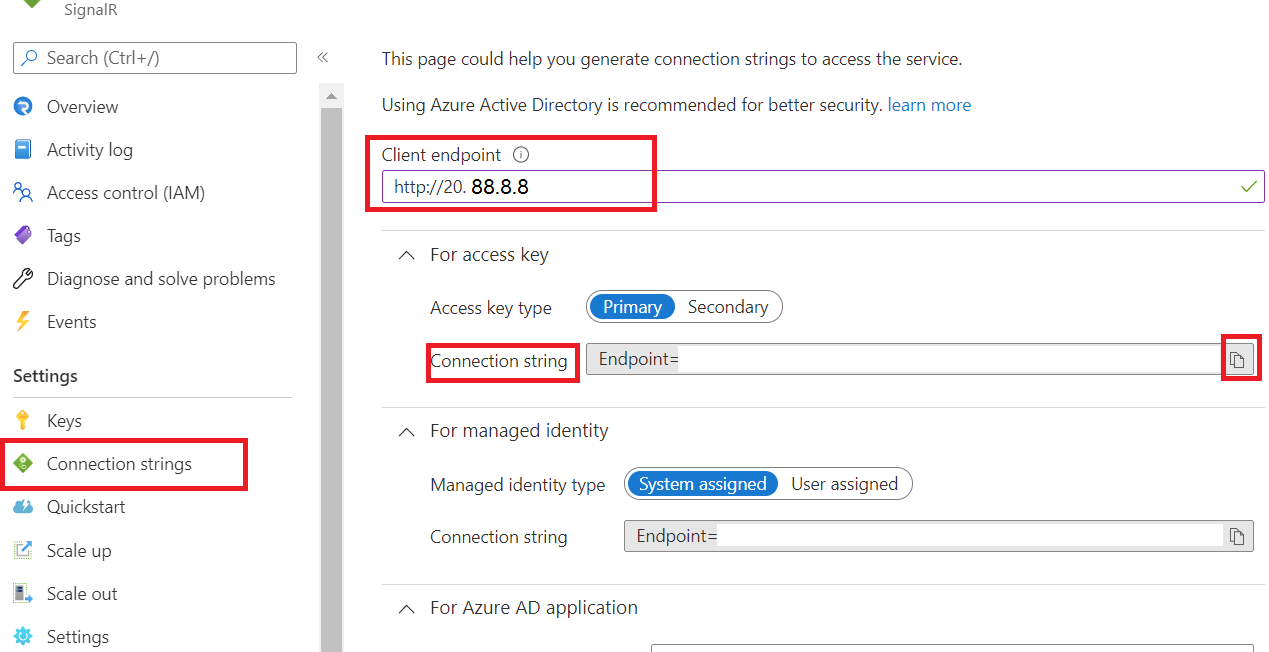
First let's get the connection string of ASRS1
- On the Connection strings tab of ASRS1
- Client endpoint: Enter the URL using frontend public IP address of AG1, for example
http://20.88.8.8. It's a connection string generator when using reverse proxies, and the value isn't preserved when next time you come back to this tab. When value entered, the connection string appends aClientEndpointsection. - Copy the Connection string
- Client endpoint: Enter the URL using frontend public IP address of AG1, for example
- On the Connection strings tab of ASRS1
Clone the GitHub repo https://github.com/aspnet/AzureSignalR-samples
Go to samples/Chatroom folder:
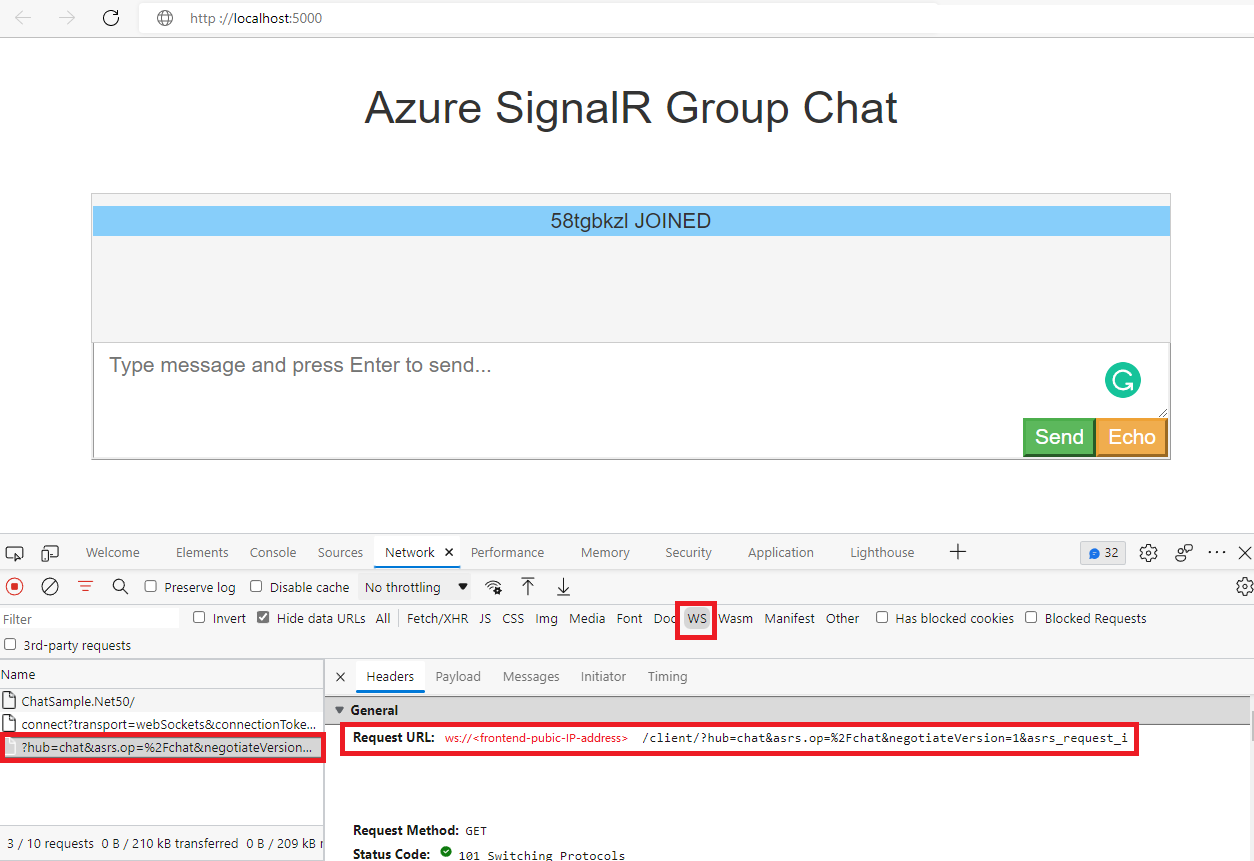
Set the copied connection string and run the application locally, you can see that there's a
ClientEndpointsection in the ConnectionString.cd samples/Chatroom dotnet restore dotnet user-secrets set Azure:SignalR:ConnectionString "<copied-connection-string-with-client-endpoint>" dotnet runOpen http://localhost:5000 from the browser and use F12 to view the network traces, you can see that the WebSocket connection is established through AG1
Secure SignalR Service
In previous section, we successfully configured SignalR Service as the backend service of Application Gateway, we can call SignalR Service directly from public network, or through Application Gateway.
In this section, let's configure SignalR Service to deny all the traffic from public network and only accept traffic from Application Gateway.
Configure SignalR Service
Let's configure SignalR Service to only allow private access. You can find more details in use private endpoint for SignalR Service.
Go to the SignalR Service instance ASRS1 in the portal.
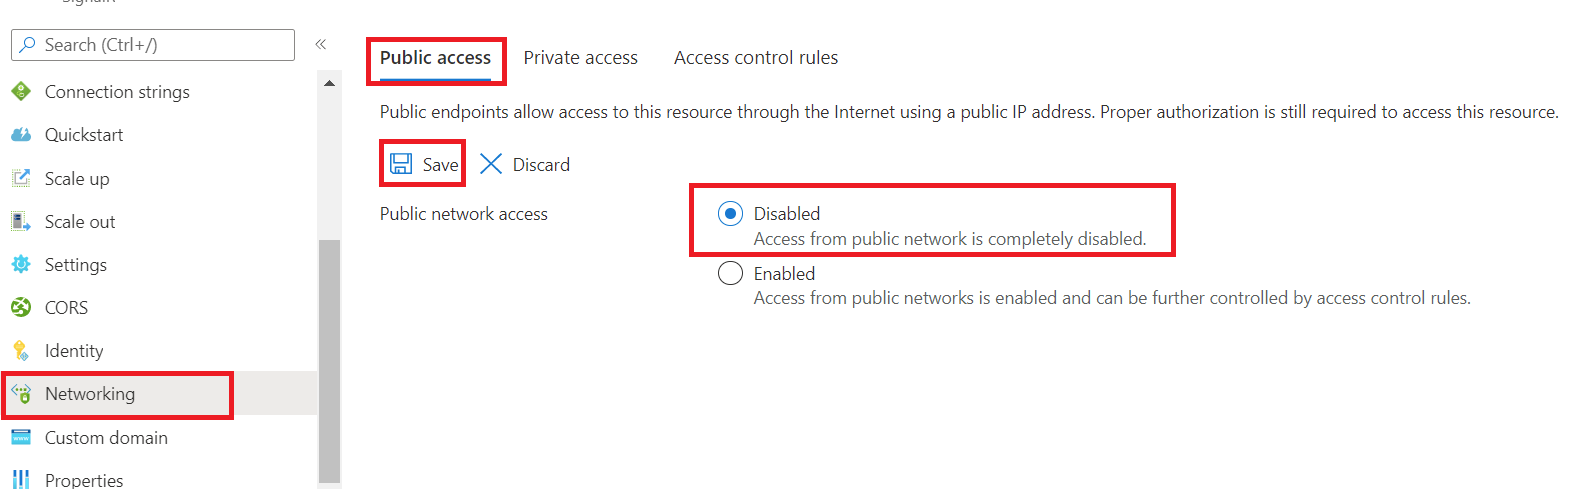
Go the Networking tab:
On Public access tab: Public network access change to Disabled and Save, now you're no longer able to access SignalR Service from public network
On Private access tab, select + Private endpoint:
- On Basics tab:
- Name: PE1
- Network Interface Name: PE1-nic
- Region: make sure to choose the same region as your Application Gateway
- Select Next: Resources
- On Resources tab
- Keep default values
- Select Next: Virtual Network
- On Virtual Network tab
- Virtual network: Select previously created VN1
- Subnet: Select previously created VN1/myBackendSubnet
- Others keep the default settings
- Select Next: DNS
- On DNS tab
- Integration with private DNS zone: Yes
- Review and create the private endpoint
- On Basics tab:
Refresh Application Gateway backend pool
Since Application Gateway was set up before there was a private endpoint for it to use, we need to refresh the backend pool for it to look at the Private DNS Zone and figure out that it should route the traffic to the private endpoint instead of the public address. We do the refresh by setting the backend FQDN to some other value and then changing it back.
Go to the Backend pools tab for AG1, and select signalr:
- Step1: change Target
asrs1.service.signalr.netto some other value, for example,x.service.signalr.net, and select Save - Step2: change Target back to
asrs1.service.signalr.net
Quick test
Now let's visit
https://asrs1.service.signalr.net/clientagain. With public access disabled, it returns 403 instead.curl -v https://asrs1.service.signalr.net/clientreturns
< HTTP/1.1 403 ForbiddenVisit the endpoint through AG1
http://<frontend-public-IP-address>/client, and it returns 400 with error message 'hub' query parameter is required. It means the request successfully went through the Application Gateway to SignalR Service.curl -I http://<frontend-public-IP-address>/clientreturns
< HTTP/1.1 400 Bad Request
< ...
<
'hub' query parameter is required.
Now if you run the Chat application locally again, you'll see error messages Failed to connect to .... The server returned status code '403' when status code '101' was expected., it is because public access is disabled so that localhost server connections are longer able to connect to the SignalR service.
Let's deploy the Chat application into the same VNet with ASRS1 so that the chat can talk with ASRS1.
Deploy the chat application to Azure
On the Azure portal, search for App services and Create Web App.
On the Basics tab, use these values for the following web app settings:
- Subscription and Resource group and Region: the same as what you choose for SignalR Service
- Name: WA1
- Publish: Code
- Runtime stack: .NET 6 (LTS)
- Operating System: Linux
- Region: Make sure it's the same as what you choose for SignalR Service
- Select Next: Deployment, keep all as default, and select Next:Networking
On the Networking tab
- Enable network injection: select On
- Virtual Network: select VN1 we previously created
- Enable VNet integration: On
- Outbound subnet: create a new subnet
- Select Review + create
Now let's deploy our chat application to Azure. Below
We use Azure CLI to deploy our chat application to Azure. Check Quickstart: Deploy an ASP.NET web app for other deployment environments deploying to Azure.
Under folder samples/Chatroom, run the below commands:
# Build and publish the assemblies to publish folder
dotnet publish --os linux -o publish
# zip the publish folder as app.zip
cd publish
zip -r app.zip .
# use az CLI to deploy app.zip to our webapp
az login
az account set -s <your-subscription-name-used-to-create-WA1>
az webapp deploy -g <resource-group-of-WA1> -n WA1 --src-path app.zip
Now the web app is deployed, let's go to the portal for WA1 and make the following updates:
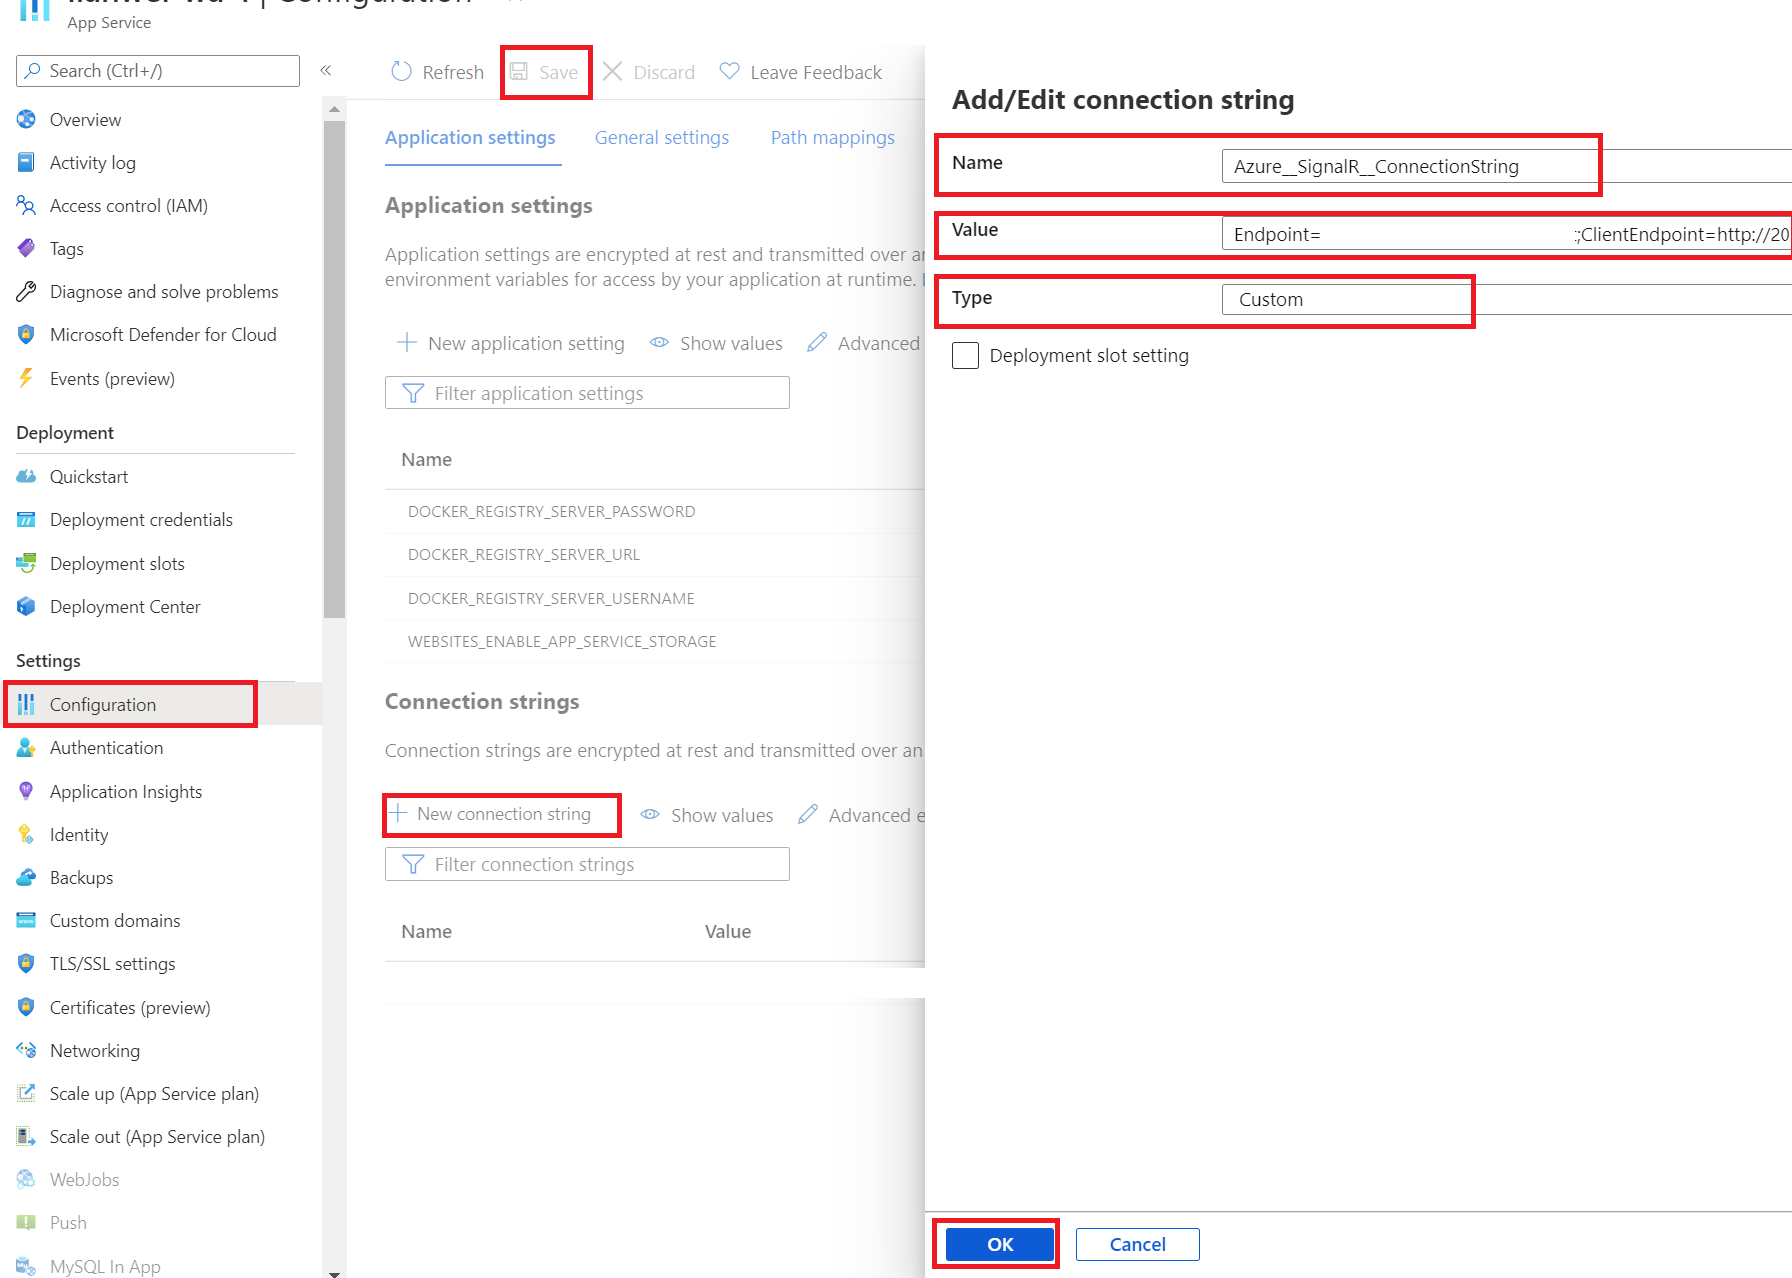
On the Configuration tab:
New application settings:
Name Value WEBSITE_DNS_SERVER 168.63.129.16 WEBSITE_VNET_ROUTE_ALL 1 New connection string:
Name Value Type AzureSignalRConnectionString The copied connection string with ClientEndpoint value select Custom
On the TLS/SSL settings tab:
- HTTPS Only: Off. To Simplify the demo, we used the HTTP frontend protocol on Application Gateway. Therefore, we need to turn off this option to avoid changing the HTTP URL to HTTPS automatically.
Go to the Overview tab and get the URL of WA1.
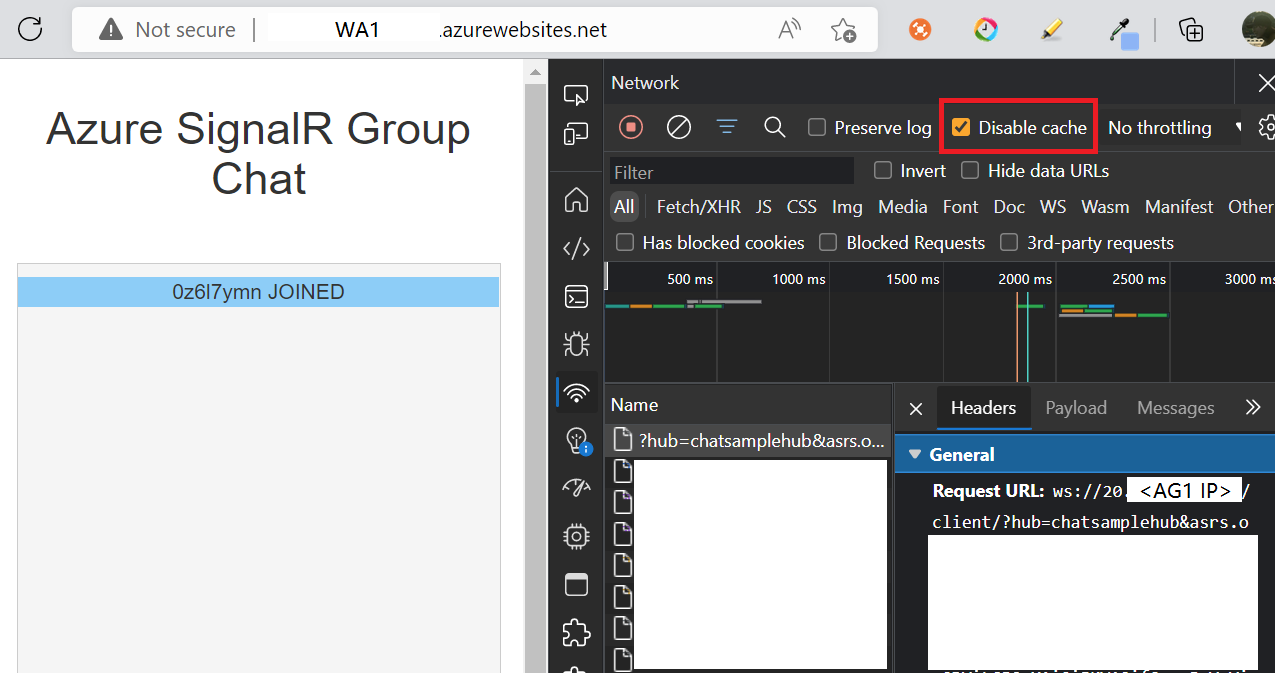
Get the URL, and replace scheme https with http, for example,
http://wa1.azurewebsites.net, open the URL in the browser, now you can start chatting! Use F12 to open network traces, and you can see the SignalR connection is established through AG1.Note
Sometimes you need to disable browser's auto https redirection and browser cache to prevent the URL from redirecting to HTTPS automatically.
Next steps
Now, you have successfully built a real-time chat application with SignalR Service and used Application Gateway to protect your applications and set up end-to-end security. Learn more about SignalR Service.