Note
Access to this page requires authorization. You can try signing in or changing directories.
Access to this page requires authorization. You can try changing directories.
Azure SignalR Service is based on SignalR for ASP.NET Core 2.1, which is not 100% compatible with ASP.NET SignalR. Azure SignalR Service reimplemented ASP.NET SignalR data protocol based on the latest ASP.NET Core technologies. When you use Azure SignalR Service for ASP.NET SignalR, some ASP.NET SignalR features are no longer supported, for example, Azure SignalR doesn't replay messages when the client reconnects. Also, the Forever Frame transport and JSONP aren't supported. Some code changes and proper version of dependent libraries are needed to make ASP.NET SignalR application work with SignalR Service.
Refer to the version differences doc for a complete list of feature comparison between ASP.NET SignalR and ASP.NET Core SignalR.
In this quickstart, you learn how to get started with the ASP.NET and Azure SignalR Service for a similar Chat Room application.
If you don't have an Azure subscription, create a free account before you begin.
Important
Raw connection strings appear in this article for demonstration purposes only.
A connection string includes the authorization information required for your application to access Azure SignalR Service. The access key inside the connection string is similar to a root password for your service. In production environments, always protect your access keys. Use Azure Key Vault to manage and rotate your keys securely and secure your connection string using Microsoft Entra ID and authorize access with Microsoft Entra ID.
Avoid distributing access keys to other users, hard-coding them, or saving them anywhere in plain text that is accessible to others. Rotate your keys if you believe they may have been compromised.
Prerequisites
Having issues? Try the troubleshooting guide or let us know.
Sign in to Azure
Sign in to the Azure portal with your Azure account.
Having issues? Try the troubleshooting guide or let us know.
In this section, you create a basic Azure SignalR instance to use for your app. The following steps use the Azure portal to create a new instance, but you can also use the Azure CLI. For more information, see the az signalr create command in the Azure SignalR Service CLI Reference.
- Sign in to the Azure portal.
- In the upper-left side of the page, select + Create a resource.
- On the Create a resource page, in the Search services and marketplace text box, enter signalr and then select SignalR Service from the list.
- On the SignalR Service page, select Create.
- On the Basics tab, you enter the essential information for your new SignalR Service instance. Enter the following values:
| Field | Suggested Value | Description |
|---|---|---|
| Subscription | Choose your subscription | Select the subscription you want to use to create a new SignalR Service instance. |
| Resource group | Create a resource group named SignalRTestResources | Select or create a resource group for your SignalR resource. It's useful to create a new resource group for this tutorial instead of using an existing resource group. To free resources after completing the tutorial, delete the resource group. Deleting a resource group also deletes all of the resources that belong to the group. This action can't be undone. Before you delete a resource group, make certain that it doesn't contain resources you want to keep. For more information, see Using resource groups to manage your Azure resources. |
| Resource name | testsignalr | Enter a unique resource name to use for the SignalR resource. If testsignalr is already taken in your region, add a digit or character until the name is unique. The name must be a string of 1 to 63 characters and contain only numbers, letters, and the hyphen ( -) character. The name can't start or end with the hyphen character, and consecutive hyphen characters aren't valid. |
| Region | Choose your region | Select the appropriate region for your new SignalR Service instance. Azure SignalR Service isn't currently available in all regions. For more information, see Azure SignalR Service region availability |
| Pricing tier | Select Change and then choose Free (Dev/Test Only). Choose Select to confirm your choice of pricing tier. | Azure SignalR Service has three pricing tiers: Free, Standard, and Premium. Tutorials use the Free tier, unless noted otherwise in the prerequisites. For more information about the functionality differences between tiers and pricing, see Azure SignalR Service pricing |
| Service mode | Choose the appropriate service mode | Use Default when you host the SignalR hub logic in your web apps and use SignalR service as a proxy. Use Serverless when you use Serverless technologies such as Azure Functions to host the SignalR hub logic. Classic mode is only for backward compatibility and isn't recommended to use. For more information, see Service mode in Azure SignalR Service. |
You don't need to change the settings on the Networking and Tags tabs for the SignalR tutorials.
- Select the Review + create button at the bottom of the Basics tab.
- On the Review + create tab, review the values and then select Create. It takes a few moments for deployment to complete.
- When the deployment is complete, select the Go to resource button.
- On the SignalR resource page, select Keys from the menu on the left, under Settings.
- Copy the Connection string for the primary key. You need this connection string to configure your app later in this tutorial.
Serverless mode isn't supported for ASP.NET SignalR applications. Always use Default or Classic for the Azure SignalR Service instance.
You can also create Azure resources used in this quickstart with Create a SignalR Service script.
Having issues? Try the troubleshooting guide or let us know.
Clone the sample application
While the service is deploying, let's switch to working with code. Clone the sample app from GitHub, set the SignalR Service connection string, and run the application locally.
Open a git terminal window. Change to a folder where you want to clone the sample project.
Run the following command to clone the sample repository. This command creates a copy of the sample app on your computer.
git clone https://github.com/aspnet/AzureSignalR-samples.git
Having issues? Try the troubleshooting guide or let us know.
Configure and run Chat Room web app
Start Visual Studio and open the solution in the aspnet-samples/ChatRoom/ folder of the cloned repository.
In the browser where the Azure portal is opened, find and select the instance you created.
Select Keys to view the connection strings for the SignalR Service instance.
Select and copy the primary connection string.
Now set the connection string in the web.config file.
Raw connection strings appear in this article for demonstration purposes only. In production environments, always protect your access keys. Use Azure Key Vault to manage and rotate your keys securely and secure your connection string using Microsoft Entra ID and authorize access with Microsoft Entra ID.
<configuration>
<connectionStrings>
    <add name="Azure:SignalR:ConnectionString" connectionString="<Replace By Your Connection String>"/>
</connectionStrings>
...
</configuration>
In Startup.cs, instead of calling
MapSignalR(), you need to callMapAzureSignalR({YourApplicationName})and pass in connection string to make the application connect to the service instead of hosting SignalR by itself. Replace{YourApplicationName}to the name of your application. This name is a unique name to distinguish this application from your other applications. You can usethis.GetType().FullNameas the value.public void Configuration(IAppBuilder app) { // Any connection or hub wire up and configuration should go here app.MapAzureSignalR(this.GetType().FullName); }You also need to reference the service SDK before using these APIs. Open the Tools | NuGet Package Manager | Package Manager Console and run command:
Install-Package Microsoft.Azure.SignalR.AspNetOther than these changes, everything else remains the same, you can still use the hub interface you're already familiar with to write business logic.
Note
In the implementation an endpoint
/signalr/negotiateis exposed for negotiation by Azure SignalR Service SDK. It will return a special negotiation response when clients try to connect and redirect clients to service endpoint defined in the connection string.Press F5 to run the project in debug mode. You can see the application runs locally. Instead of hosting a SignalR runtime by application itself, it now connects to the Azure SignalR Service.
Having issues? Try the troubleshooting guide or let us know.
Clean up resources
If you're not going to continue to use this app, delete all resources created by this quickstart with the following steps so you don't incur any charges:
In the Azure portal, select Resource groups on the far left, and then select the resource group you created. Alternatively, you may use the search box to find the resource group by its name.
In the window that opens, select the resource group, and then click Delete resource group.
In the new window, type the name of the resource group to delete, and then click Delete.
Important
Deleting a resource group is irreversible and that the resource group and all the resources in it are permanently deleted. Make sure that you do not accidentally delete the wrong resource group or resources. If you created the resources for hosting this sample inside an existing resource group that contains resources you want to keep, you can delete each resource individually from their respective blades instead of deleting the resource group.
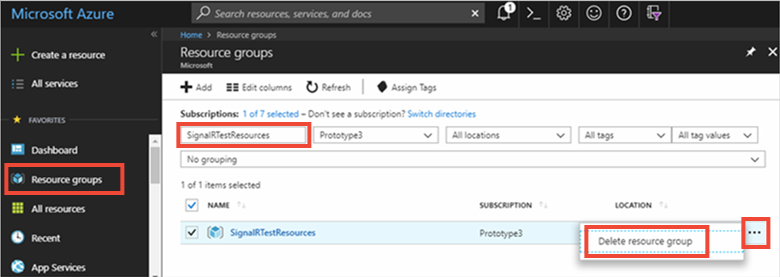
Sign in to the Azure portal and select Resource groups.
In the Filter by name... textbox, type the name of your resource group. The instructions for this quickstart used a resource group named SignalRTestResources. On your resource group in the result list, click ... then Delete resource group.
After a few moments, the resource group and all of its contained resources are deleted.
Having issues? Try the troubleshooting guide or let us know.
Next steps
In this quickstart, you created a new Azure SignalR Service resource and used it with an ASP.NET web app. Next, learn how to develop real-time applications using Azure SignalR Service with ASP.NET Core.