Tutorial: Getting started using Always Encrypted with Intel SGX enclaves in Azure SQL Database
Applies to: ![]() Azure SQL Database
Azure SQL Database
This tutorial teaches you how to get started with Always Encrypted with secure enclaves in Azure SQL Database. You'll use Intel Software Guard Extensions (Intel SGX) enclaves. It will show you:
- How to create an environment for testing and evaluating Always Encrypted with Intel SGX enclaves.
- How to encrypt data in-place and issue rich confidential queries against encrypted columns using SQL Server Management Studio (SSMS).
Prerequisites
- An active Azure subscription. If you don't have one, create a free account. You need to be a member of the Contributor role or the Owner role for the subscription to be able to create resources and configure an attestation policy.
- Optional, but recommended for storing your column master key for Always Encrypted: a key vault in Azure Key Vault. For information on how to create a key vault, see Quickstart: Create a key vault using the Azure portal.
- If your key vault uses the access policy permissions model, make sure you have the following key permissions in the key vault:
get,list,create,unwrap key,wrap key,verify,sign. For more information, see Assign a Key Vault access policy. - If you're using the Azure role-based access control (RBAC) permission model, make you sure you're a member of the Key Vault Crypto Officer role for your key vault. See Provide access to Key Vault keys, certificates, and secrets with an Azure role-based access control.
- If your key vault uses the access policy permissions model, make sure you have the following key permissions in the key vault:
- The latest version of SQL Server Management Studio (SSMS).
PowerShell requirements
Note
The prerequisites listed in this section apply only if you choose to use PowerShell for some of the steps in this tutorial. If you plan to use the Azure portal instead, you can skip this section.
Az PowerShell module version 9.3.0 or later is required. For details on how to install the Az PowerShell module, see Install the Azure Az PowerShell module. To determine the version of the Az PowerShell module that is installed on your machine, run the following command from PowerShell.
Get-InstalledModule -Name Az
Step 1: Create and configure a server and a DC-series database
In this step, you'll create a new Azure SQL Database logical server and a new database using DC-series hardware, required for Always Encrypted with secure enclaves. For more information, see DC-series.
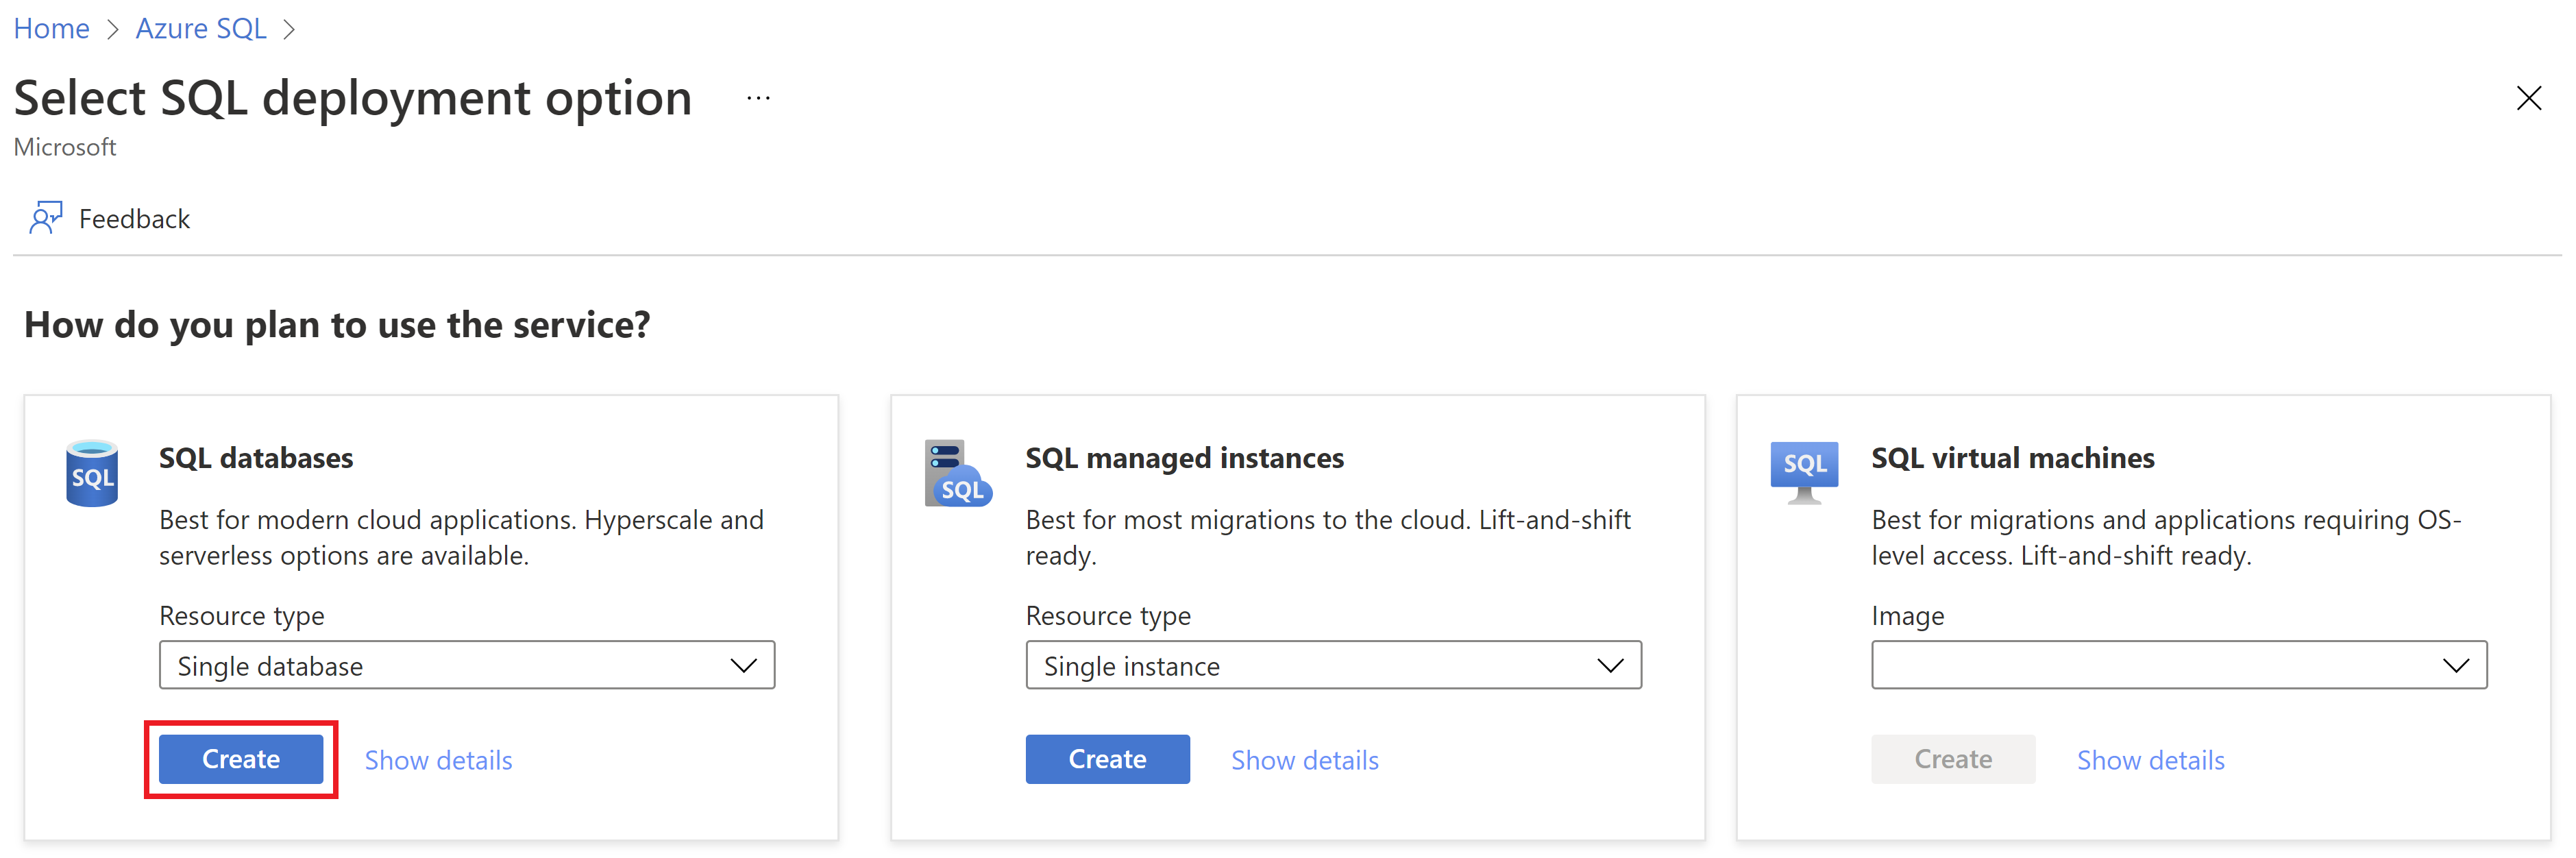
Browse to the Select SQL deployment option page.
If you aren't already signed in to the Azure portal, sign in when prompted.
Under SQL databases, leave Resource type set to Single database, and select Create.
On the Basics tab of the Create SQL Database form, under Project details, select the desired Azure Subscription.
For Resource group, select Create new, enter a name for your resource group, and select OK.
For Database name enter ContosoHR.
For Server, select Create new, and fill out the New server form with the following values:
- Server name: Enter mysqlserver, and add some characters for uniqueness. We can't provide an exact server name to use because server names must be globally unique for all servers in Azure, not just unique within a subscription. So enter something like mysqlserver135, and the portal lets you know if it's available or not.
- Location: Select a location from the dropdown list.
Important
You need to select a location (an Azure region) that supports both the DC-series hardware and Microsoft Azure Attestation. For the list of regions supporting DC-series, see DC-series availability. Here is the regional availability of Microsoft Azure Attestation.
- Authentication method: Select Use SQL Authentication
- Server admin login: Enter an admin login name, for example: azureuser.
- Password: Enter a password that meets requirements, and enter it again in the Confirm password field.
- Select OK.
Leave Want to use SQL elastic pool set to No.
Under Compute + storage, select Configure database, and select Change configuration.
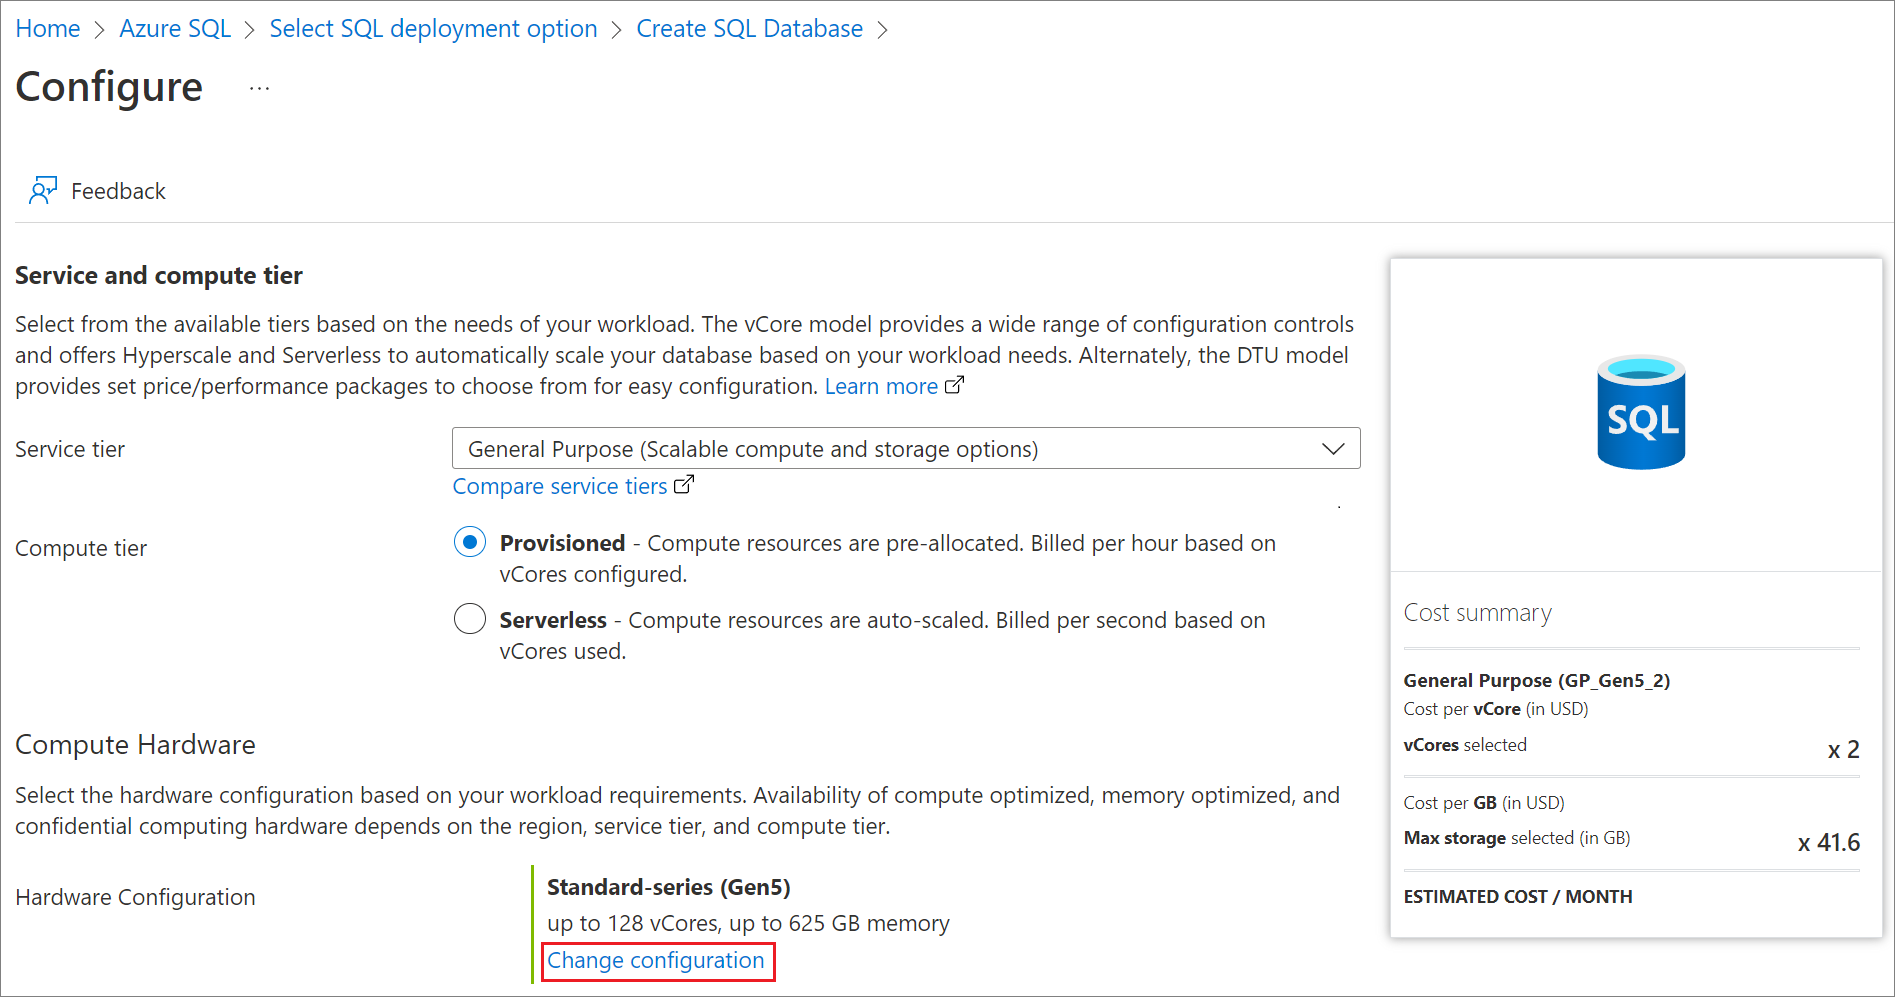
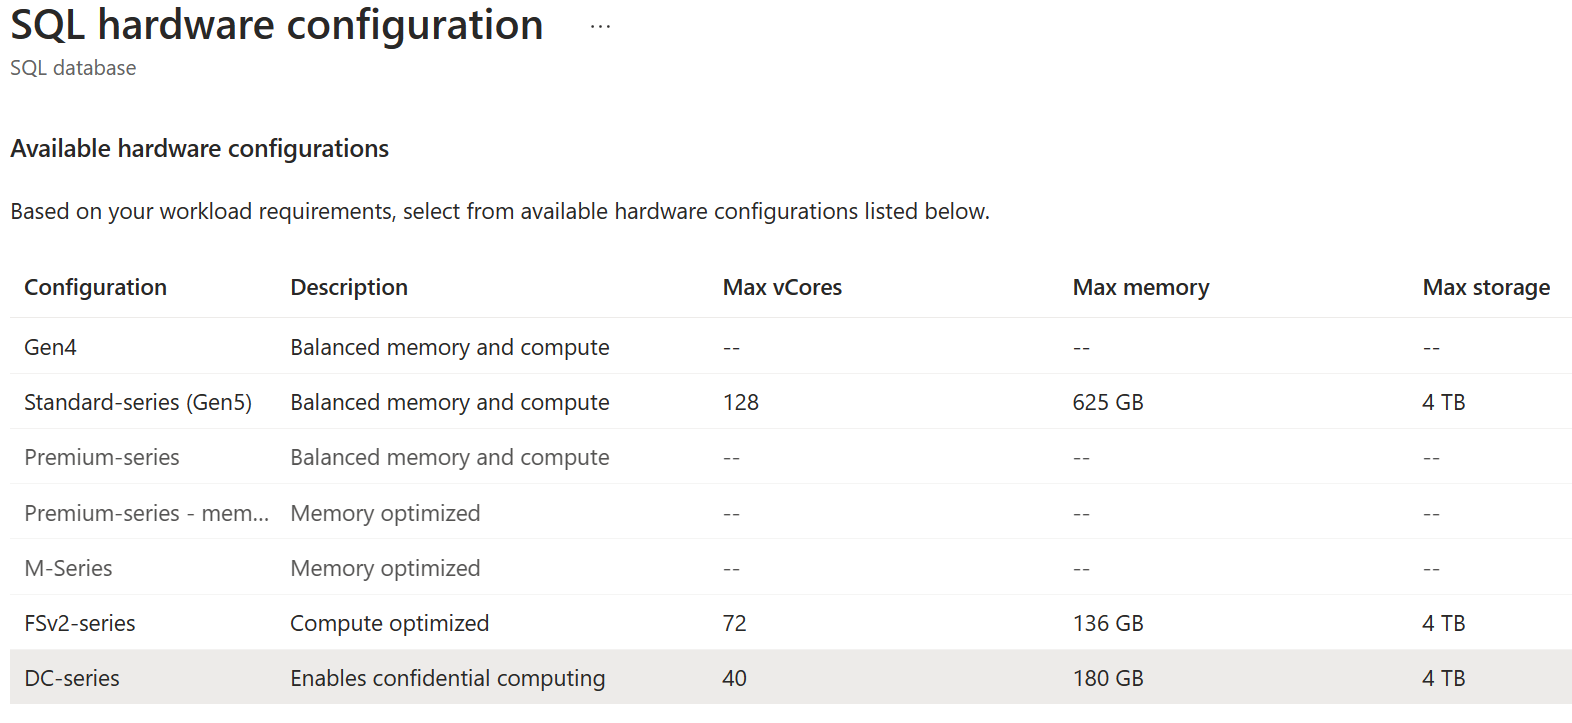
Select the DC-series hardware configuration, and then select OK.
Select Apply.
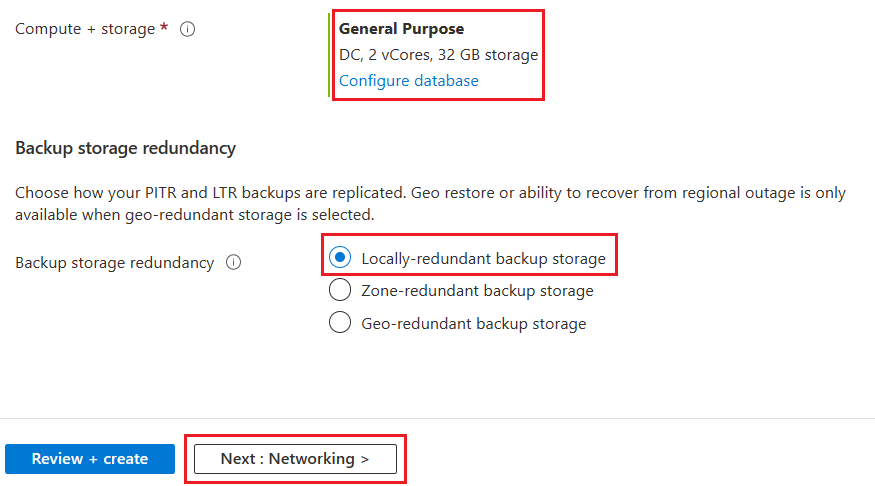
Back on the Basics tab, verify Compute + storage is set to General Purpose, DC, 2 vCores, 32 GB storage.
For Backup storage redundancy select Locally-redundant backup storage.
Select Next: Networking at the bottom of the page.
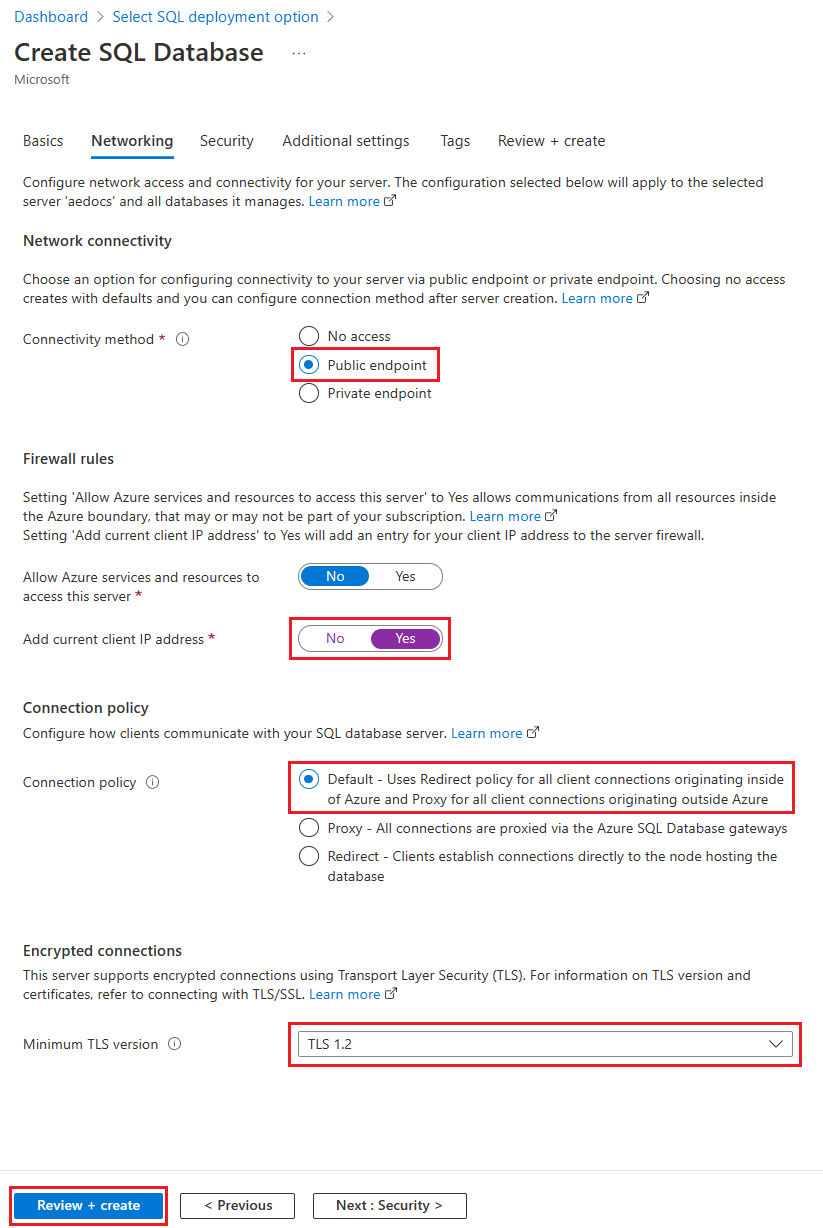
On the Networking tab, for Connectivity method, select Public endpoint.
For Firewall rules, set Add current client IP address to Yes. Leave Allow Azure services and resources to access this server set to No.
For Connection policy, leave Connection policy to Default - Uses Redirect policy for all client connections originating inside of Azure and Proxy for all client connections originating outside Azure
For Encrypted connections, leave Minimum TLS version to TLS 1.2.
Select Review + create at the bottom of the page.
On the Review + create page, after reviewing, select Create.

Step 2: Configure an attestation provider
In this step, you'll create and configure an attestation provider in Microsoft Azure Attestation. This is needed to attest the secure enclave your database uses.
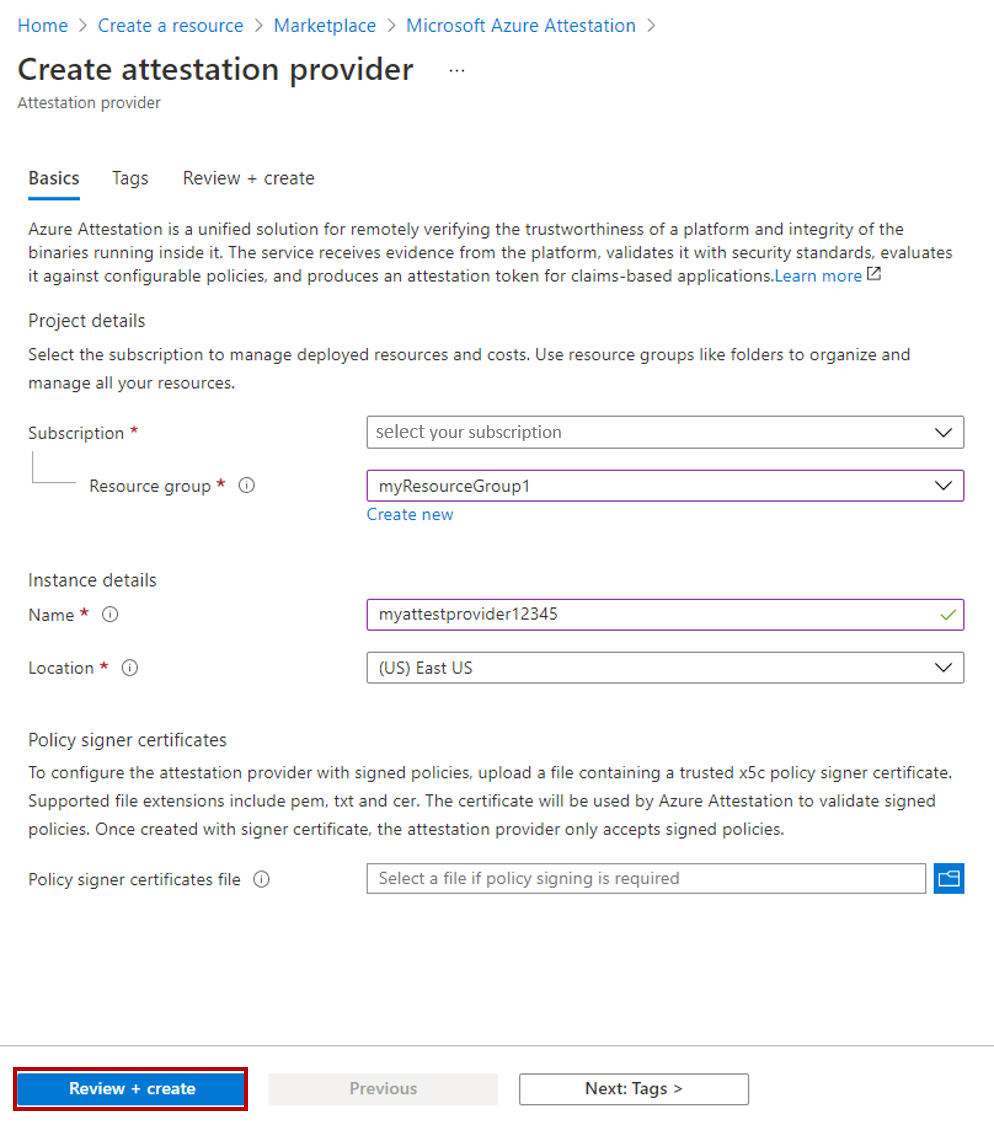
Browse to the Create attestation provider page.
On the Create attestation provider page, provide the following inputs:
- Subscription: Choose the same subscription you created the Azure SQL logical server in.
- Resource Group: Choose the same resource group you created the Azure SQL logical server in.
- Name: Enter myattestprovider, and add some characters for uniqueness. We can't provide an exact attestation provider name to use because names must be globally unique. So enter something like myattestprovider12345, and the portal lets you know if it's available or not.
- Location: Choose the same location as your Azure SQL logical server.
- Policy signer certificates file: Leave this field empty, as you'll configure an unsigned policy.
After you provide the required inputs, select Review + create.
Select Create.
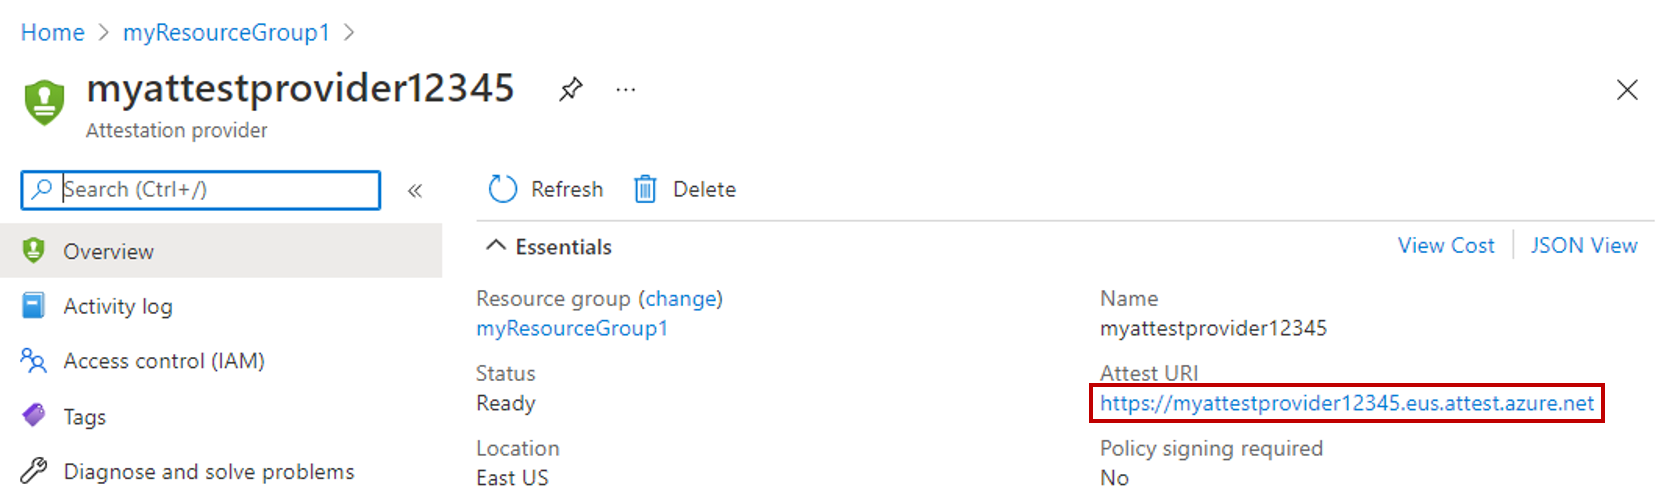
Once the attestation provider is created, select Go to resource.
On the Overview tab for the attestation provider, copy the value of the Attest URI property to clipboard and save it in a file. This is the attestation URL, you'll need in later steps.
Select Policy on the resource menu on the left side of the window or on the lower pane.
Set Attestation Type to SGX-IntelSDK.
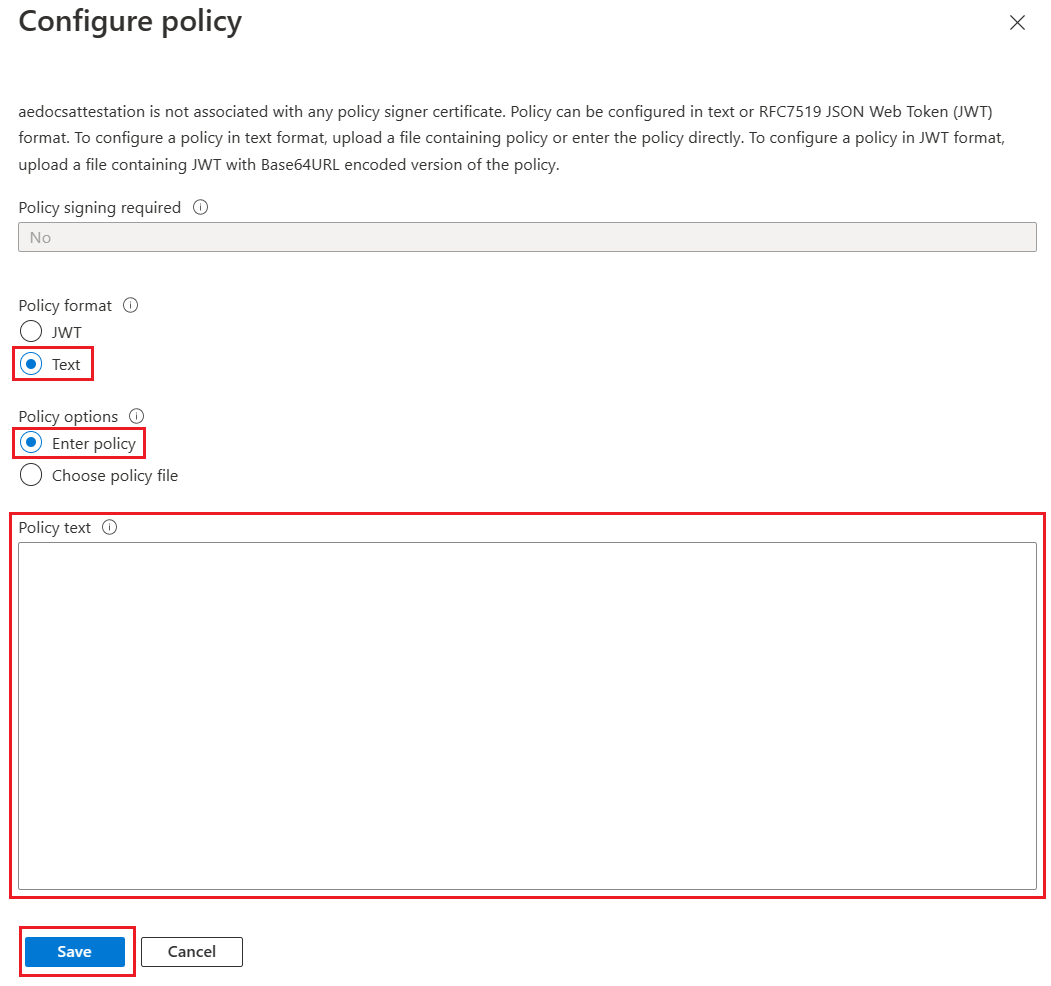
Select Configure on the upper menu.

Set Policy Format to Text. Leave Policy options set to Enter policy.
In the Policy text field, replace the default policy with the below policy. For information about the below policy, see Create and configure an attestation provider.
version= 1.0;
authorizationrules
{
       [ type=="x-ms-sgx-is-debuggable", value==false ]
        && [ type=="x-ms-sgx-product-id", value==4639 ]
        && [ type=="x-ms-sgx-svn", value>= 2 ]
        && [ type=="x-ms-sgx-mrsigner", value=="e31c9e505f37a58de09335075fc8591254313eb20bb1a27e5443cc450b6e33e5"]
    => permit();
};
Select Save.
Select Refresh on the upper menu to view the configured policy.
Step 3: Populate your database
In this step, you'll create a table and populate it with some data that you'll later encrypt and query.
Open SSMS and connect to the ContosoHR database in the Azure SQL logical server you created without Always Encrypted enabled in the database connection.
In the Connect to Server dialog, specify the fully qualified name of your server (for example, myserver135.database.windows.net), and enter the administrator user name and the password you specified when you created the server.
Select Options >> and select the Connection Properties tab. Make sure to select the ContosoHR database (not the default,
masterdatabase).Select the Always Encrypted tab.
Make sure the Enable Always Encrypted (column encryption) checkbox is not selected.
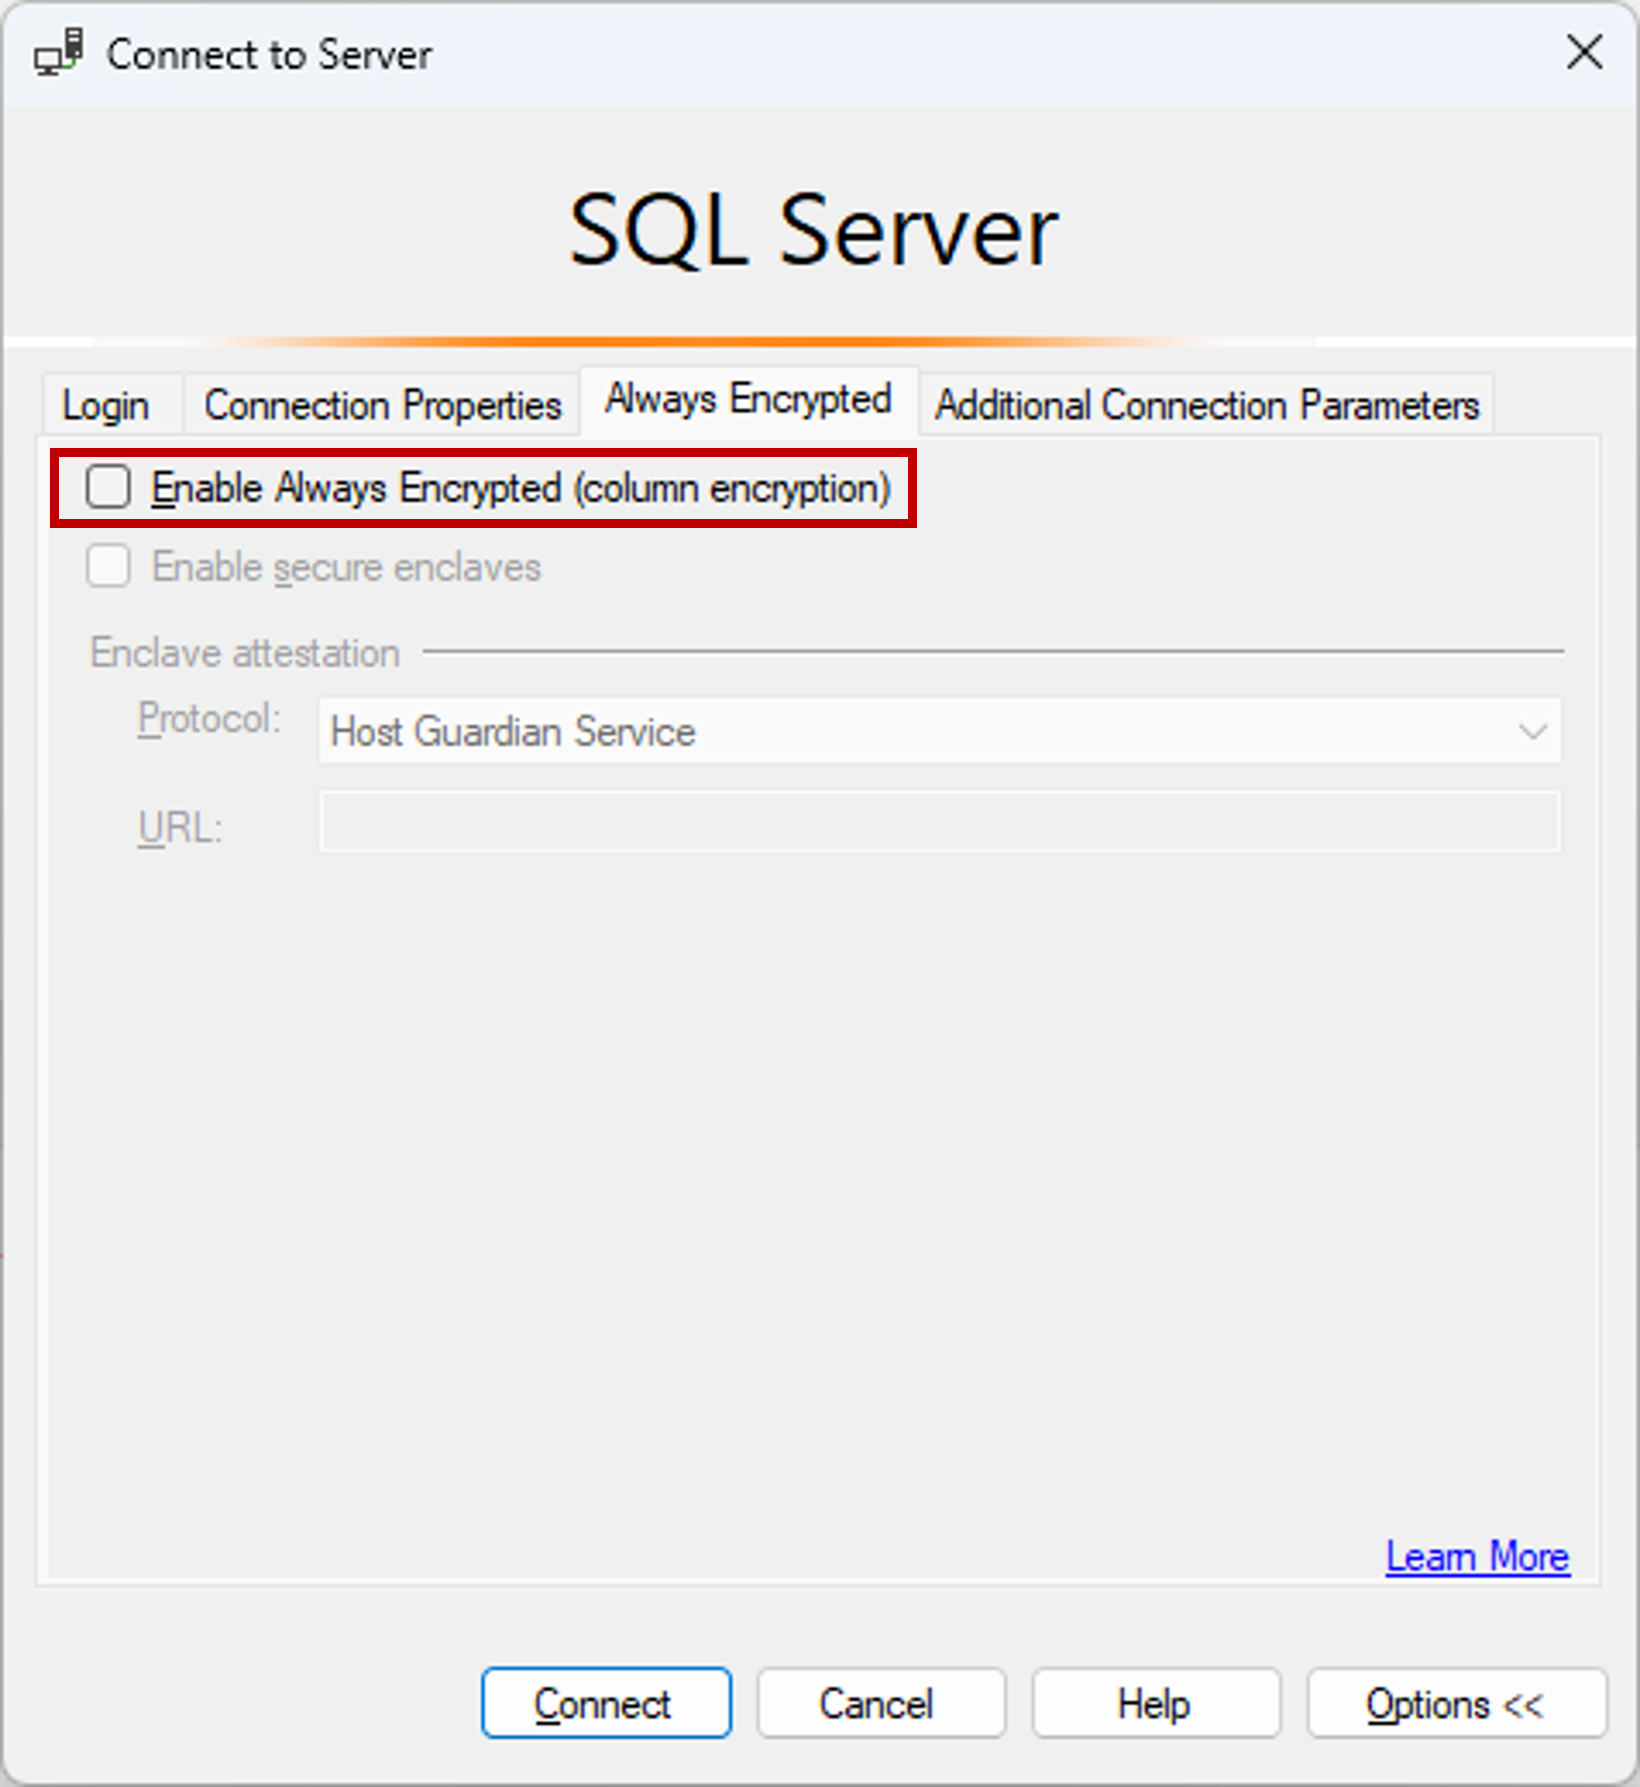
Select Connect.
Create a new table, named Employees.
CREATE SCHEMA [HR];
GO

CREATE TABLE [HR].[Employees]
(
    [EmployeeID] [int] IDENTITY(1,1) NOT NULL,
    [SSN] [char](11) NOT NULL,
    [FirstName] [nvarchar](50) NOT NULL,
    [LastName] [nvarchar](50) NOT NULL,
    [Salary] [money] NOT NULL
) ON [PRIMARY];
GO
Add a few employee records to the Employees table.
INSERT INTO [HR].[Employees]
        ([SSN]
        ,[FirstName]
        ,[LastName]
        ,[Salary])
    VALUES
        ('795-73-9838'
        , N'Catherine'
        , N'Abel'
        , $31692);

INSERT INTO [HR].[Employees]
        ([SSN]
        ,[FirstName]
        ,[LastName]
        ,[Salary])
    VALUES
        ('990-00-6818'
        , N'Kim'
        , N'Abercrombie'
        , $55415);
Step 4: Provision enclave-enabled keys
In this step, you'll create a column master key and a column encryption key that allow enclave computations.
Using the SSMS instance from the previous step, in Object Explorer, expand your database and navigate to Security > Always Encrypted Keys.
Provision a new enclave-enabled column master key:
- Right-click Always Encrypted Keys and select New Column Master Key....
- Enter a name for the new column master key: CMK1.
- Verify Allow enclave computations is selected. (It's selected by default if a secure enclave is enabled for the database. It should be enabled since your database uses the DC-series hardware configuration.)
- Select either Azure Key Vault (recommended) or Windows Certificate Store (Current User or Local Machine).
- If you select Azure Key Vault, sign into Azure, select an Azure subscription containing a key vault you want to use, and select your key vault. Select Generate Key to create a new key.
- If you select Windows Certificate Store, select the Generate Certificate button to create a new certificate.

- Select OK.
Create a new enclave-enabled column encryption key:
- Right-click Always Encrypted Keys and select New Column Encryption Key.
- Enter a name for the new column encryption key: CEK1.
- In the Column master key dropdown, select the column master key you created in the previous steps.
- Select OK.
Step 5: Encrypt some columns in place
In this step, you'll encrypt the data stored in the SSN and Salary columns inside the server-side enclave, and then test a SELECT query on the data.
Open a new SSMS instance and connect to your database with Always Encrypted enabled for the database connection.
Start a new instance of SSMS.
In the Connect to Server dialog, specify the fully qualified name of your server (for example, myserver135.database.windows.net), and enter the administrator user name and the password you specified when you created the server.
Select Options >> and select the Connection Properties tab. Make sure to select the ContosoHR database (not the default,
masterdatabase).Select the Always Encrypted tab.
Select the Enable Always Encrypted (column encryption) checkbox.
Select Enable secure enclaves. (This step applies to SSMS 19 or later.)
Set Protocol to Microsoft Azure Attestation. (This step applies to SSMS 19 or later.)
Specify your enclave attestation URL that you've obtained by following the steps in Step 2: Configure an attestation provider. See the below screenshot.

Select Connect.
If you're prompted to enable Parameterization for Always Encrypted queries, select Enable.
Using the same SSMS instance (with Always Encrypted enabled), open a new query window and encrypt the SSN and Salary columns by running the below statements.
ALTER TABLE [HR].[Employees]
ALTER COLUMN [SSN] [char] (11) COLLATE Latin1_General_BIN2
ENCRYPTED WITH (COLUMN_ENCRYPTION_KEY = [CEK1], ENCRYPTION_TYPE = Randomized, ALGORITHM = 'AEAD_AES_256_CBC_HMAC_SHA_256') NOT NULL
WITH
(ONLINE = ON);

ALTER TABLE [HR].[Employees]
ALTER COLUMN [Salary] [money]
ENCRYPTED WITH (COLUMN_ENCRYPTION_KEY = [CEK1], ENCRYPTION_TYPE = Randomized, ALGORITHM = 'AEAD_AES_256_CBC_HMAC_SHA_256') NOT NULL
WITH
(ONLINE = ON);

ALTER DATABASE SCOPED CONFIGURATION CLEAR PROCEDURE_CACHE;
Note
Notice the ALTER DATABASE SCOPED CONFIGURATION CLEAR PROCEDURE_CACHE statement to clear the query plan cache for the database in the above script. After you have altered the table, you need to clear the plans for all batches and stored procedures that access the table to refresh parameters encryption information.
To verify the SSN and Salary columns are now encrypted, open a new query window in the SSMS instance without Always Encrypted enabled for the database connection and execute the below statement. The query window should return encrypted values in the SSN and Salary columns. If you execute the same query using the SSMS instance with Always Encrypted enabled, you should see the data decrypted.
SELECT * FROM [HR].[Employees];
Step 6: Run rich queries against encrypted columns
You can run rich queries against the encrypted columns. Some query processing will be performed inside your server-side enclave.
In the SSMS instance with Always Encrypted enabled, make sure Parameterization for Always Encrypted is also enabled.
- Select Tools from the main menu of SSMS.
- Select Options....
- Navigate to Query Execution > SQL Server > Advanced.
- Ensure that Enable Parameterization for Always Encrypted is checked.
- Select OK.
Open a new query window, paste in the below query, and execute. The query should return plaintext values and rows meeting the specified search criteria.
DECLARE @SSNPattern [char](11) = '%6818';
DECLARE @MinSalary [money] = $1000;
SELECT * FROM [HR].[Employees]
WHERE SSN LIKE @SSNPattern AND [Salary] >= @MinSalary;
Try the same query again in the SSMS instance that doesn't have Always Encrypted enabled. A failure should occur.
Next steps
After completing this tutorial, you can go to one of the following tutorials:
- Tutorial: Develop a .NET application using Always Encrypted with secure enclaves
- Tutorial: Develop a .NET Framework application using Always Encrypted with secure enclaves
- Tutorial: Creating and using indexes on enclave-enabled columns using randomized encryption