Note
Access to this page requires authorization. You can try signing in or changing directories.
Access to this page requires authorization. You can try changing directories.
Applies to: ![]() Azure SQL Database
Azure SQL Database
Azure SQL Database is a relational database-as-a-service (DBaaS) in the Microsoft Cloud (Azure). In this tutorial, you learn how to use the Azure portal and ADO.NET with Visual Studio to:
- Create a database using the Azure portal
- Set up a server-level IP firewall rule using the Azure portal
- Connect to the database with ADO.NET and Visual Studio
- Create tables with ADO.NET
- Insert, update, and delete data with ADO.NET
- Query data ADO.NET
Tip
This free Learn module shows you how to Develop and configure an ASP.NET application that queries an Azure SQL Database, including the creation of a simple database.
Prerequisites
- An installation of Visual Studio 2019 or later.
- If you don't have an Azure subscription, create a free account before you begin.
- If you don't already have an Azure SQL Database created, visit Quickstart: Create a single database. Look for the option to use your offer to Deploy Azure SQL Database for free.
Sign in to the Azure portal
Sign in to the Azure portal.
Create a server-level IP firewall rule
SQL Database creates an IP firewall at the server-level. This firewall prevents external applications and tools from connecting to the server and any databases on the server unless a firewall rule allows their IP through the firewall. To enable external connectivity to your database, you must first add an IP firewall rule for your IP address (or IP address range). Follow these steps to create a server-level IP firewall rule.
Important
SQL Database communicates over port 1433. If you are trying to connect to this service from within a corporate network, outbound traffic over port 1433 might not be allowed by your network's firewall. If so, you cannot connect to your database unless your administrator opens port 1433.
After the deployment is complete, select SQL databases from the left-hand menu and then select yourDatabase on the SQL databases page. The overview page for your database opens, showing you the fully qualified Server name (such as yourserver.database.windows.net) and provides options for further configuration.
Copy this fully qualified server name for use to connect to your server and databases from SQL Server Management Studio.
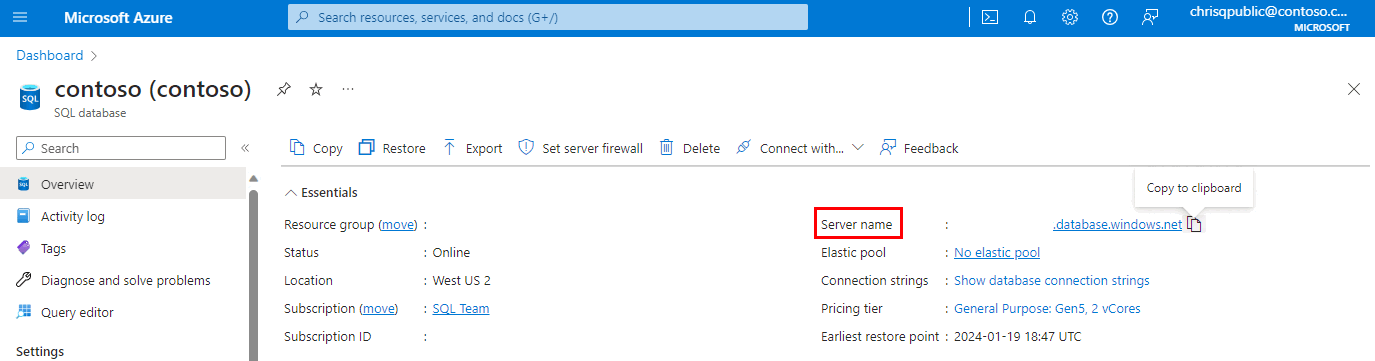
In the Azure portal, navigate to the logical SQL server for your Azure SQL Database. The easiest way is to select the Server name value on the SQL database page.
In the resource menu, under Settings, select Networking.
Choose the Public Access tab, and then select Selected networks under Public network access.

Scroll down to the Firewall rules section.

Select Add your client IPv4 address to add your current IP address to a new IP firewall rule. An IP firewall rule can open port 1433 for a single IP address or a range of IP addresses.
Select Save. A server-level IP firewall rule is created for your current IP address opening port 1433 on the server.
Select OK and then close the Firewall settings page.
Your IP address can now pass through the IP firewall. You can now connect to your database using SQL Server Management Studio or another tool of your choice. Be sure to use the server admin account you created previously.


Important
By default, access through the SQL Database IP firewall is enabled for all Azure services. Select OFF on this page to disable access for all Azure services.
C# program example
The next sections of this article present a C# program that uses ADO.NET to send Transact-SQL (T-SQL) statements to SQL Database. The C# program demonstrates the following actions:
- Connect to SQL Database using ADO.NET
- Methods that return T-SQL statements
- Create tables
- Populate tables with data
- Update, delete, and select data
- Submit T-SQL to the database
Entity Relationship Diagram (ERD)
The CREATE TABLE statements involve the REFERENCES keyword to create a foreign key (FK) relationship between two tables. If you're using tempdb, comment out the --REFERENCES keyword using a pair of leading dashes.
The ERD displays the relationship between the two tables. The values in the tabEmployee.DepartmentCode child column are limited to values from the tabDepartment.DepartmentCode parent column.

Note
You have the option of editing the T-SQL to add a leading # to the table names, which creates them as temporary tables in tempdb. This is useful for demonstration purposes, when no test database is available. Foreign key references aren't enforced during their use, and temporary tables are deleted automatically when the connection closes after the program finishes running.
To compile and run
The C# program is logically one .cs file, and is physically divided into several code blocks, to make each block easier to understand. To compile and run the program, do the following steps:
Create a C# project in Visual Studio. The project type should be a Console, found under Templates > Visual C# > Windows Desktop > Console App (.NET Framework).
In the file Program.cs, replace the starter lines of code with the following steps:
Copy and paste the following code blocks, in the same sequence they're presented, see Connect to database, Generate T-SQL, and Submit to database.
Change the following values in the
Mainmethod:- cb.DataSource
- cb.UserID
- cb.Password
- cb.InitialCatalog
Add the Microsoft.Data.SqlClient NuGet package to your project. In Visual Studio, right-click on the project in Solution Explorer, select Manage NuGet Packages, and search for
Microsoft.Data.SqlClient.To build and run the program from Visual Studio, select the Start button. The report output is displayed in a program window, though GUID values will vary between test runs.
=================================
T-SQL to 2 - Create-Tables...
-1 = rows affected.

=================================
T-SQL to 3 - Inserts...
8 = rows affected.

=================================
T-SQL to 4 - Update-Join...
2 = rows affected.

=================================
T-SQL to 5 - Delete-Join...
2 = rows affected.

=================================
Now, SelectEmployees (6)...
8ddeb8f5-9584-4afe-b7ef-d6bdca02bd35 , Alison , 20 , acct , Accounting
9ce11981-e674-42f7-928b-6cc004079b03 , Barbara , 17 , hres , Human Resources
315f5230-ec94-4edd-9b1c-dd45fbb61ee7 , Carol , 22 , acct , Accounting
fcf4840a-8be3-43f7-a319-52304bf0f48d , Elle , 15 , NULL , NULL
View the report output here, then press any key to end the program...
Connect to SQL Database using ADO.NET
using System;
using Microsoft.Data.SqlClient;
//using System.Data;           // For:  SqlDbType , ParameterDirection

namespace csharp_db_test
{
    class Program
    {
        static void Main(string[] args)
        {
            try
            {
                var cb = new SqlConnectionStringBuilder();
                cb.DataSource = "your_server.database.windows.net";
                cb.UserID = "your_user";
                cb.Password = "your_password";
                cb.InitialCatalog = "your_database";

                using (var connection = new SqlConnection(cb.ConnectionString))
                {
                    connection.Open();

                    Submit_Tsql_NonQuery(connection, "2 - Create-Tables", Build_2_Tsql_CreateTables());

                    Submit_Tsql_NonQuery(connection, "3 - Inserts", Build_3_Tsql_Inserts());

                    Submit_Tsql_NonQuery(connection, "4 - Update-Join", Build_4_Tsql_UpdateJoin(),
                        "@csharpParmDepartmentName", "Accounting");

                    Submit_Tsql_NonQuery(connection, "5 - Delete-Join", Build_5_Tsql_DeleteJoin(),
                        "@csharpParmDepartmentName", "Legal");

                    Submit_6_Tsql_SelectEmployees(connection);
                }
            }
            catch (SqlException e)
            {
                Console.WriteLine(e.ToString());
            }

            Console.WriteLine("View the report output here, then press any key to end the program...");
            Console.ReadKey();
        }
Methods that return T-SQL statements
static string Build_2_Tsql_CreateTables()
{
    return @"
        DROP TABLE IF EXISTS tabEmployee;
        DROP TABLE IF EXISTS tabDepartment;  -- Drop parent table last.

        CREATE TABLE tabDepartment
        (
            DepartmentCode  nchar(4)          not null    PRIMARY KEY,
            DepartmentName  nvarchar(128)     not null
        );

        CREATE TABLE tabEmployee
        (
            EmployeeGuid    uniqueIdentifier  not null  default NewId()    PRIMARY KEY,
            EmployeeName    nvarchar(128)     not null,
            EmployeeLevel   int               not null,
            DepartmentCode  nchar(4)              null
            REFERENCES tabDepartment (DepartmentCode)  -- (REFERENCES would be disallowed on temporary tables.)
        );
    ";
}

static string Build_3_Tsql_Inserts()
{
    return @"
        -- The company has these departments.
        INSERT INTO tabDepartment (DepartmentCode, DepartmentName)
        VALUES
            ('acct', 'Accounting'),
            ('hres', 'Human Resources'),
            ('legl', 'Legal');

        -- The company has these employees, each in one department.
        INSERT INTO tabEmployee (EmployeeName, EmployeeLevel, DepartmentCode)
        VALUES
            ('Alison'  , 19, 'acct'),
            ('Barbara' , 17, 'hres'),
            ('Carol'   , 21, 'acct'),
            ('Deborah' , 24, 'legl'),
            ('Elle'    , 15, null);
    ";
}

static string Build_4_Tsql_UpdateJoin()
{
    return @"
        DECLARE @DName1  nvarchar(128) = @csharpParmDepartmentName;  --'Accounting';

        -- Promote everyone in one department (see @parm...).
        UPDATE empl
        SET
            empl.EmployeeLevel += 1
        FROM
            tabEmployee   as empl
        INNER JOIN
            tabDepartment as dept ON dept.DepartmentCode = empl.DepartmentCode
        WHERE
            dept.DepartmentName = @DName1;
    ";
}

static string Build_5_Tsql_DeleteJoin()
{
    return @"
        DECLARE @DName2  nvarchar(128);
        SET @DName2 = @csharpParmDepartmentName;  --'Legal';

        -- Right size the Legal department.
        DELETE empl
        FROM
            tabEmployee   as empl
        INNER JOIN
            tabDepartment as dept ON dept.DepartmentCode = empl.DepartmentCode
        WHERE
            dept.DepartmentName = @DName2

        -- Disband the Legal department.
        DELETE tabDepartment
            WHERE DepartmentName = @DName2;
    ";
}

static string Build_6_Tsql_SelectEmployees()
{
    return @"
        -- Look at all the final Employees.
        SELECT
            empl.EmployeeGuid,
            empl.EmployeeName,
            empl.EmployeeLevel,
            empl.DepartmentCode,
            dept.DepartmentName
        FROM
            tabEmployee   as empl
        LEFT OUTER JOIN
            tabDepartment as dept ON dept.DepartmentCode = empl.DepartmentCode
        ORDER BY
            EmployeeName;
    ";
}
Submit T-SQL to the database
static void Submit_6_Tsql_SelectEmployees(SqlConnection connection)
{
    Console.WriteLine();
    Console.WriteLine("=================================");
    Console.WriteLine("Now, SelectEmployees (6)...");

    string tsql = Build_6_Tsql_SelectEmployees();

    using (var command = new SqlCommand(tsql, connection))
    {
        using (SqlDataReader reader = command.ExecuteReader())
        {
            while (reader.Read())
            {
                Console.WriteLine("{0} , {1} , {2} , {3} , {4}",
                    reader.GetGuid(0),
                    reader.GetString(1),
                    reader.GetInt32(2),
                    (reader.IsDBNull(3)) ? "NULL" : reader.GetString(3),
                    (reader.IsDBNull(4)) ? "NULL" : reader.GetString(4));
            }
        }
    }
}

static void Submit_Tsql_NonQuery(
    SqlConnection connection,
    string tsqlPurpose,
    string tsqlSourceCode,
    string parameterName = null,
    string parameterValue = null
    )
{
    Console.WriteLine();
    Console.WriteLine("=================================");
    Console.WriteLine("T-SQL to {0}...", tsqlPurpose);

    using (var command = new SqlCommand(tsqlSourceCode, connection))
    {
        if (parameterName != null)
        {
            command.Parameters.AddWithValue(  // Or, use SqlParameter class.
                parameterName,
                parameterValue);
        }
        int rowsAffected = command.ExecuteNonQuery();
        Console.WriteLine(rowsAffected + " = rows affected.");
    }
}
} // EndOfClass
}
Tip
To learn more about writing SQL queries, visit Tutorial: Write Transact-SQL statements.
Related content
- Deploy Azure SQL Database for free
- What's new in Azure SQL Database?
- Configure and manage content reference - Azure SQL Database
- Plan and manage costs for Azure SQL Database
Next step
Advance to the next tutorial to learn about data migration.