Note
Access to this page requires authorization. You can try signing in or changing directories.
Access to this page requires authorization. You can try changing directories.
Applies to: ![]() Azure SQL Managed Instance
Azure SQL Managed Instance
This article teaches you how to configure a failover group for Azure SQL Managed Instance by using the Azure portal and Azure PowerShell.
For an end-to-end PowerShell script to create both instances within a failover group, review Add instance to a failover group with PowerShell.
Prerequisites
To configure a failover group, you should already have proper permissions and a SQL managed instance you intend to use as the primary. Review Create instance to get started.
Be sure to review the limitations before creating your secondary instance and failover group.
Configuration requirements
To configure a failover group between a primary and secondary SQL Managed Instance, consider the following requirements:
- The secondary managed instance must be empty, without any user databases.
- The configuration of your primary and secondary instance should be the same to ensure the secondary instance can sustainably process changes replicated from the primary instance, including during periods of peak activity. This includes the compute size, storage size, and service tier.
- The IP address range for the virtual network of the primary instance must not overlap with the address range of the virtual network for the secondary managed instance, or any other virtual network peered with either the primary or secondary virtual network.
- Both instances must be in the same DNS zone. When you create your secondary managed instance, you must specify the primary instance's DNS zone ID. If you don't, the zone ID is generated as a random string when the first instance is created in each virtual network and the same ID is assigned to all other instances in the same subnet. Once assigned, the DNS zone can't be modified.
- Network Security Groups (NSG) rules for the subnets of both instances must have open inbound and outbound TCP connections for port 5022 and port range 11000-11999 to facilitate communication between the two instances.
- Managed instances should be deployed to paired regions for performance reasons. Managed instances that reside in geo-paired regions benefit from a significantly higher geo-replication speed compared to unpaired regions.
- Both instances must use the same update policy.
Create the secondary instance
When you create the secondary instance, you must use a virtual network that has an IP address space that doesn't overlap with the IP address space range of the primary instance. Additionally, when you configure the new secondary instance, you must specify the zone ID of the primary instance.
You can configure the secondary virtual network, and create the secondary instance by using the Azure portal and PowerShell.
Create virtual network
To create virtual network for your secondary instance in the Azure portal, follow these steps:
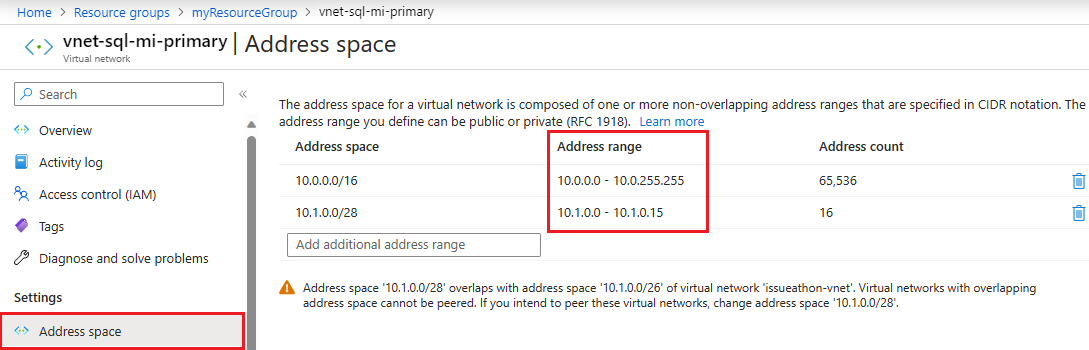
Check the address space for the primary instance. Go to the virtual network resource for the primary instance in the Azure portal and under Settings, select Address space. Check the range under Address range:
Create a new virtual network that you plan to use for the secondary instance by going to the Create virtual network page.
On the Basics tab of the Create virtual network page:
- Select the Resource Group you intend to use for the secondary instance. Create a new one if it doesn't exist yet.
- Provide a name for your virtual network, such as
vnet-sql-mi-secondary. - Select a region that's paired with the region where the primary instance is.
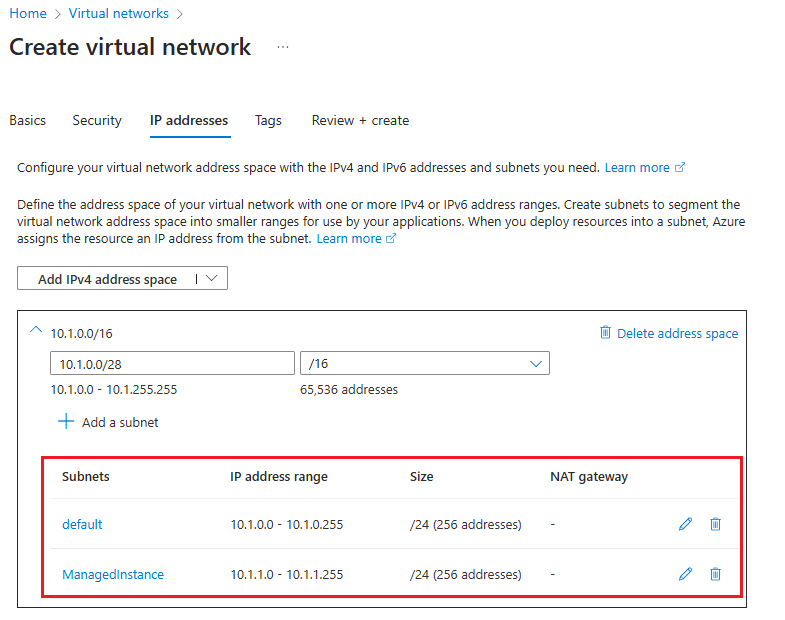
On the IP addresses tab of the Create virtual network page:
- Use Delete address space to delete the existing IPv4 address space.
- After the address space is deleted, select Add IPv4 address space to add a new space, and then provide an IP address space that is different to the address space used by the virtual network of the primary instance. For example, if your current primary instance uses an address space of 10.0.0.16, then enter
10.1.0.0/16for the address space of the virtual network you intend to use for the secondary instance. - Use + Add a subnet to add a default subnet with default values.
- Use + Add a subnet to add an empty subnet named
ManagedInstancethat will be dedicated to the secondary instance, using an address range different to the default subnet. For example, if your primary instance uses an address range of 10.0.0.0 - 10.0.255.255, then provide a subnet range of10.1.1.0 - 10.1.1.255for the subnet of the secondary instance.
Use Review + Create to review your settings and then use Create to create your new virtual network.

Create secondary instance
After your virtual network is ready, follow these steps to create your secondary instance in the Azure portal:
Go to the Create Azure SQL Managed Instance in the Azure portal.
On the Basics tab of the Create Azure SQL Managed Instance page:
- Choose a region for your secondary instance that's paired with the primary instance.
- Choose a service tier that matches the service tier of the primary instance.
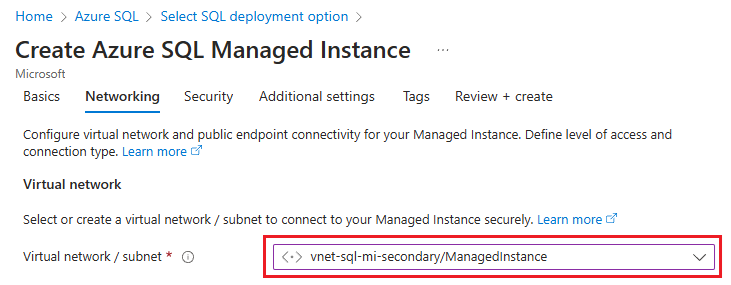
On the Networking tab of the Create Azure SQL Managed Instance page, use the dropdown list under Virtual network / subnet to select the virtual network and subnet you previously created:
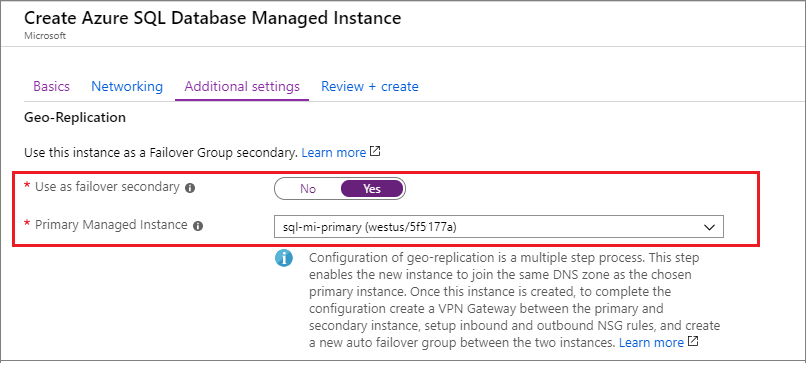
On the Additional settings tab of the Create Azure SQL Managed Instance page, select Yes to Use as failover secondary and then choose the appropriate primary instance from the dropdown list.
Configure the rest of the instance according to your business needs, and then create it by using Review + Create.

Establish connectivity between the instances
For uninterrupted geo-replication traffic flow, you must establish connectivity between the virtual network subnets that host the primary and secondary instances. There are multiple ways to connect managed instances in different Azure regions, including:
- Global virtual network peering
- Azure ExpressRoute
- VPN gateways
Global virtual network peering is recommended as the most performant and robust way to establish connectivity between instances in a failover group. Global virtual network peering provides a low-latency, high-bandwidth private connection between peered virtual networks using the Microsoft backbone infrastructure. No public internet, gateways, or additional encryption is required in the communication between the peered virtual networks.
Important
Alternative ways of connecting instances that involve additional networking devices can complicate troubleshooting connectivity or replication speed issues, possibly requiring active involvement of network administrators, and potentially significantly prolonging resolution time.
If you use a mechanism to establish connectivity between the instances other than the recommended global virtual network peering, ensure the following:
- Networking device, like firewalls or network virtual appliances (NVAs), don't block traffic on inbound and outbound connections for port 5022 (TCP) and port range 11000-11999.
- Routing is properly configured, and asymmetric routing is avoided.
- If you deploy failover groups in a hub-and-spoke network topology cross-region, to avoid connectivity and replication speed issues, replication traffic should go directly between the two managed instance subnets rather than directed through the hub networks.
This article guides you to configure global virtual network peering between the networks of the two instances by using the Azure portal and PowerShell.
In the Azure portal, go to the Virtual network resource for your primary managed instance.
Select Peerings under Settings to open the Peerings page and then use + Add from the command bar to open the Add peering page.
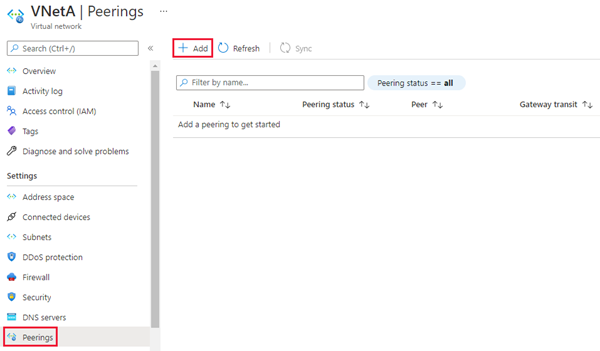
On the Add peering page, enter or select values for the following settings:
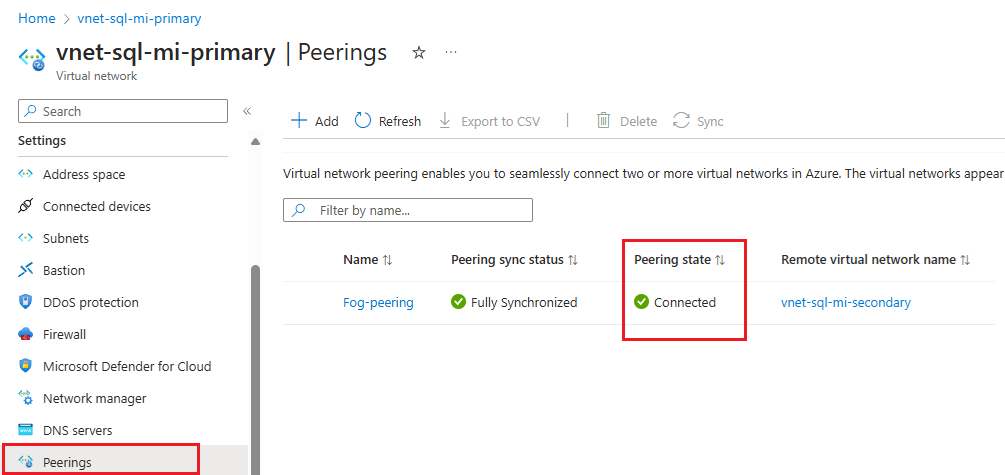
Settings Description Remote virtual network summary Peering link name The name for the peering must be unique within the virtual network. This article uses Fog-peering.Virtual network deployment model Select Resource manager. I know my resource ID You can leave this box unchecked, unless you know the resource ID. Subscription Select the subscription from the dropdown list. Virtual network Select the virtual network for the secondary instance from the dropdown list. Remote virtual network peering settings Allow 'secondary virtual network' to access 'primary virtual network' Check the box to allow communication between the two networks. Enabling communication between virtual networks allows resources that are connected to either virtual network to communicate with each other with the same bandwidth and latency as if they were connected to the same virtual network. All communication between resources in the two virtual networks is over the Azure private network. Allow 'secondary virtual network' to receive forwarded traffic from 'primary virtual network' You can either check or uncheck this box, either works for this guide. For more information, see Create a peering. Allow gateway or route server in 'secondary virtual network' to forward traffic to 'primary virtual network' You can either check or uncheck this box, either works for this guide. For more information, see Create a peering. Enable 'secondary virtual network' to use 'primary virtual network's remote gateway or route server Leave this box unchecked. For more information about the other options available, see Create a peering. Local virtual network summary Peering link name The name of the same peering used for the remote virtual network. This article uses Fog-peering.Allow 'primary virtual network' to access 'secondary virtual network' Check the box to allow communication between the two networks. Enabling communication between virtual networks allows resources that are connected to either virtual network to communicate with each other with the same bandwidth and latency as if they were connected to the same virtual network. All communication between resources in the two virtual networks is over the Azure private network. Allow 'primary virtual network' to receive forwarded traffic from 'secondary virtual network' You can either check or uncheck this box, either works for this guide. For more information, see Create a peering. Allow gateway or route server in 'primary virtual network' to forward traffic to 'secondary virtual network' You can either check or uncheck this box, either works for this guide. For more information, see Create a peering. Enable 'primary virtual network' to use 'secondary virtual network's remote gateway or route server Leave this box unchecked. For more information about the other options available, see Create a peering. Use Add to configure peering with the virtual network you selected, and automatically navigate back to the Peerings page, which shows the two networks are connected:
Configure ports and NSG rules
Regardless of the chosen connectivity mechanism between the two instances, your networks must meet the following requirements for the flow of geo-replication traffic:
- The route table and network security groups assigned to the managed instance subnets aren't shared across the two peered virtual networks.
- The Network Security Group (NSG) rules on both subnets that host each instance allows both inbound and outbound traffic to the other instance on port 5022, and the port range 11000-11999.
You can configure your port communication and NSG rules by using the Azure portal and PowerShell.
To open Network Security Group (NSG) ports in the Azure portal, follow these steps:
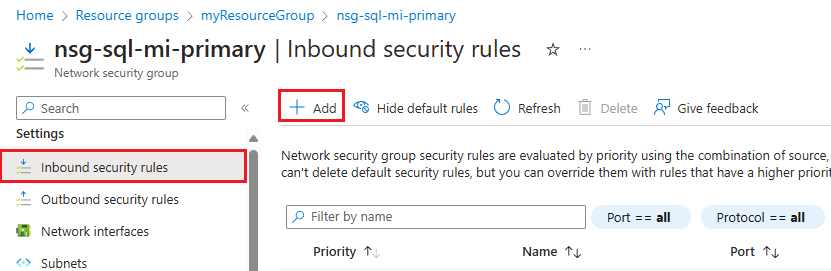
Go to the Network security group resource for the primary instance.
Under Settings, select Inbound security rules. Check to see if you already have rules that allow traffic for port 5022, and the range 11000-11999. If you do, and the source meets your business needs, skip this step. If the rules don't exist, or if you want to use a different source (such as the more secure IP address) delete the existing rule, and then select + Add from the command bar to open the Add inbound security rule pane:
On the Add inbound security rule pane, enter, or select values for the following settings:
Settings Recommended value Description Source IP addresses or Service Tag The filter for the source of the communication. IP address is the most secure, and recommended for production environments. Service tag is appropriate for nonproduction environments. Source service tag If you selected Service tag as the source, then provide VirtualNetworkas the source tag.Default tags are predefined identifiers that represent a category of IP addresses. The VirtualNetwork tag denotes all virtual and local network address spaces. Source IP addresses If you selected IP addresses as the source, then provide the IP address of the secondary instance. Provide an address range using CIDR notation (e.g. 192.168.99.0/24 or 2001:1234::/64), or an IP address (e.g. 192.168.99.0 or 2001:1234::). You can also provide a comma-separated list of IP addresses or address ranges using either IPv4 or IPv6. Source port ranges 5022 This specifies on which ports traffic will be allowed this rule. Service Custom The service specifies the destination protocol and port range for this rule. Destination port ranges 5022 This specifies on which ports traffic will be allowed this rule. This port should match the source port range. Action Allow Allow communication on the specified port. Protocol TCP Determines the protocol for port communication. Priority 1200 Rules are processed in priority order; the lower the number, the higher the priority. Name allow_geodr_inbound The name of the rule. Description Optional You can choose to provide a description, or leave this field blank. Select Add to save your settings and add your new rule.
Repeat these steps to add another inbound security rule for the port range
11000-11999with a name such as allow_redirect_inbound and a priority slightly higher than the 5022 rule, such as1100.Under Settings, select Outbound security rules. Check to see if you already have rules that allow traffic for port 5022, and the range 11000-11999. If you do, and the source meets your business needs, skip this step. If the rules don't exist, or if you want to use a different source (such as the more secure IP address) delete the existing rule, and then select + Add from the command bar to open the Add outbound security rule pane.
On the Add outbound security rule pane, use the same configuration for port 5022, and the range
11000-11999as you did for the inbound ports.Go to the Network security group for the secondary instance, and repeat these steps so that both network security groups have the following rules:
- Allow inbound traffic on port 5022
- Allow inbound traffic on port range
11000-11999 - Allow outbound traffic on port 5022
- Allow outbound traffic on port range
11000-11999
Create the failover group
Create the failover group for your managed instances by using the Azure portal or PowerShell.
Create the failover group for your SQL Managed Instances by using the Azure portal.
Select Azure SQL in the left-hand menu of the Azure portal. If Azure SQL isn't in the list, select All services, then type Azure SQL in the search box. (Optional) Select the star next to Azure SQL to add it as a favorite item to the left-hand navigation.
Select the primary managed instance you want to add to the failover group.
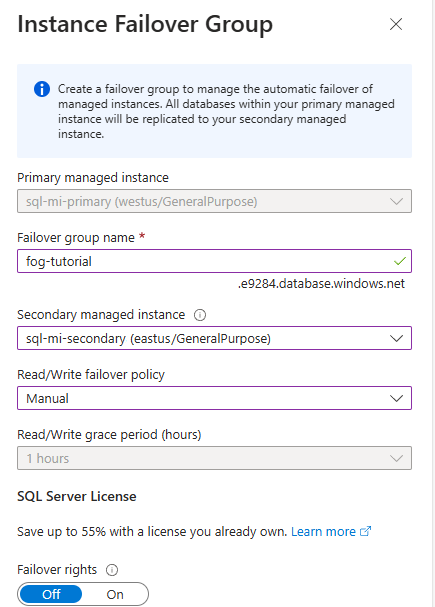
Under Data Management, select Failover groups and then use Add group to open the Instance Failover Group page:

On the Instance Failover Group page:
- The Primary managed instance is preselected.
- Under Failover group name enter a name for the failover group.
- Under Secondary managed instance, select the managed instance you want to use as the secondary in the failover group.
- Choose a Read/Write failover policy from the dropdown list. Manual is recommended to give you control over failover.
- Leave Enable failover rights to Off, unless you intend to use this replica for disaster recovery only.
- Use Create to save your settings and create your failover group.
After failover group deployment starts, you're taken back to the Failover groups page. The page refreshes to show you the new failover group after deployment completes.
Test failover
Test failover of your failover group by using the Azure portal or PowerShell.
Test failover of your failover group using the Azure portal.
Go to either the primary or secondary managed instance within the Azure portal.
Under Data management, select Failover groups.
On the Failover groups pane, note which instance is the primary instance, and which instance is the secondary instance.
On the Failover groups pane, select Failover from the command bar. Select Yes on the warning about TDS sessions being disconnected, and note the licensing implication.
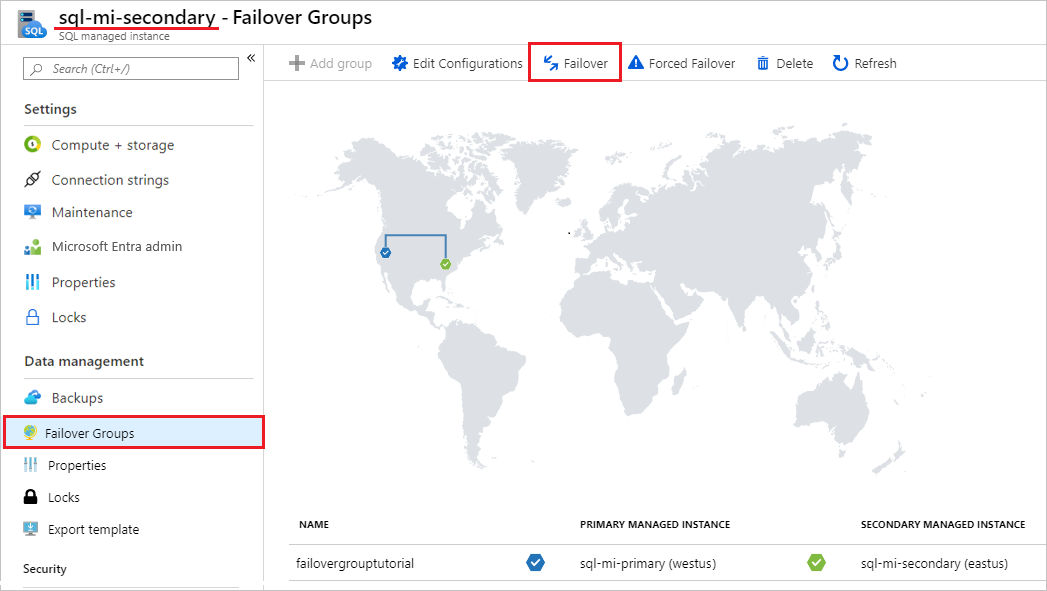
On the Failover groups pane, after failover succeeds, the instances switch roles so the previous secondary becomes the new primary and the previous primary becomes the new secondary.
Important
If roles didn't switch, check connectivity between the instances and related NSG and firewall rules. Proceed with the next step only after roles switch.
(Optional) On the Failover groups pane, use Failover to switch the roles back so the original primary becomes primary again.

Track failover in the activity log
You can use the Activity log in the Azure portal to track the status of the failover operation. To do this, follow these steps:
Go to your SQL managed instance in the Azure portal.
Select Activity log to open the Activity log pane.
Clear any filters for Resource.
Search for operations with the name
Failover Azure SQL Database failover group: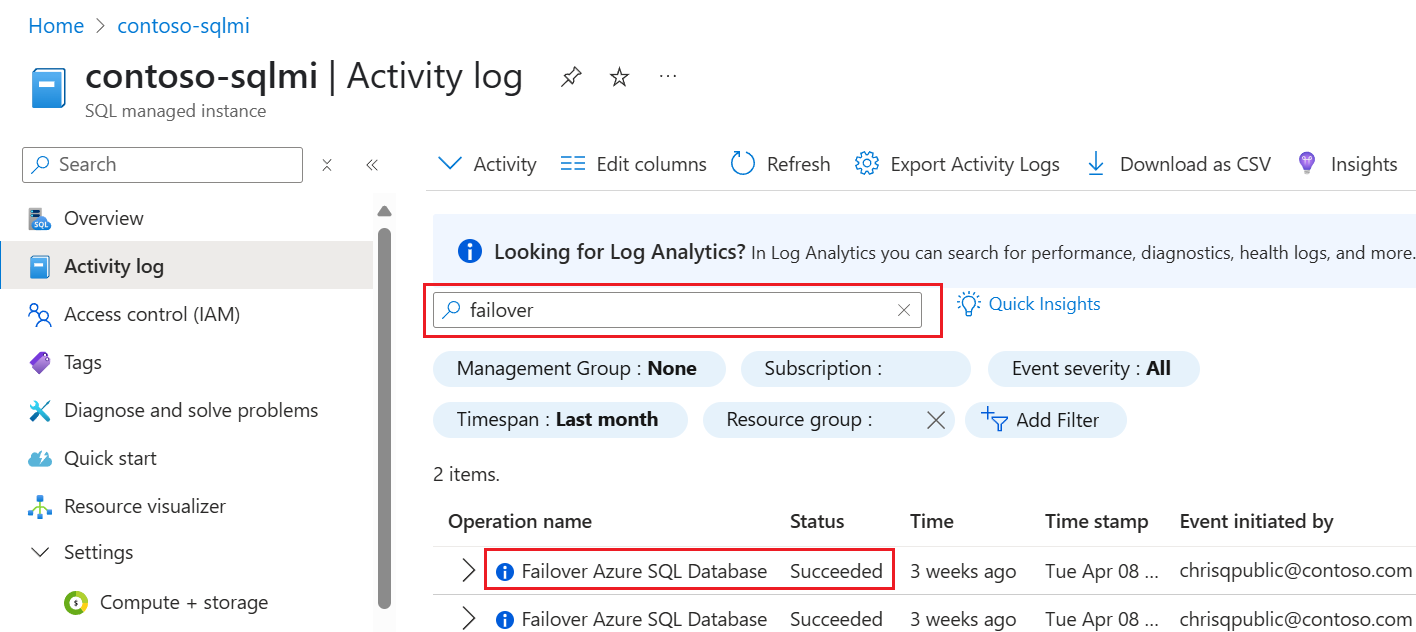

Modify existing failover group
You can modify an existing failover group, such as to change the failover policy, by using the Azure portal, PowerShell, Azure CLI and the REST APIs.
To modify an existing failover group by using the Azure portal, follow these steps:
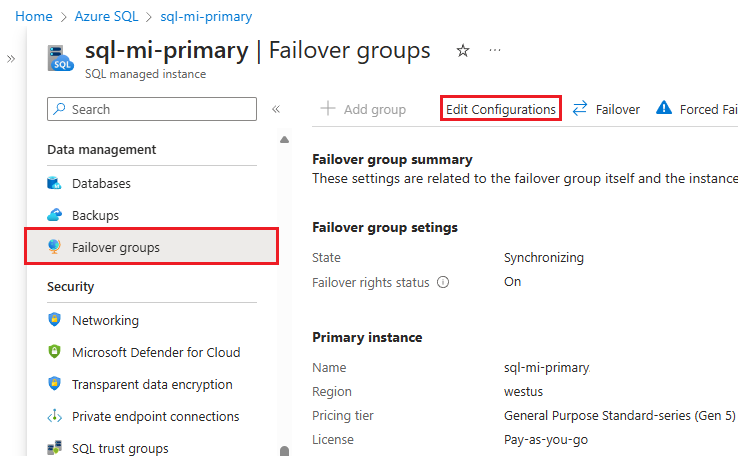
Go to your SQL managed instance in the Azure portal.
Under Data management, select Failover groups to open the Failover groups pane.
On the Failover groups pane, select Edit configurations from the command bar to open the Edit failover group pane:
Locate listener endpoint
After your failover group is configured, update the connection string for your application to point to the Read/write listener endpoint so that your application continues to connect to whichever instance is primary after failover. By using the listener endpoint, you don't have to manually update your connection string every time your failover group fails over since traffic is always routed to the current primary. You can also point read-only workload to the Read-only listener endpoint.
Important
While connecting to an instance in a failover group using the instance-specific connection string is supported, it's strongly discouraged. Use the listener endpoints instead.
To locate the listener endpoint in the Azure portal, go to your SQL managed instance and under Data management, select Failover groups.
Scroll down to find the listener endpoints:
- The Read/write listener endpoint, in the form of
fog-name.dns-zone.database.windows.net, routes traffic to the primary instance. - The Read-only listener endpoint, in the form of
fog-name.secondary.dns-zone.database.windows.net, routes traffic to the secondary instance.

Create failover group between instances in different subscriptions
You can create a failover group between SQL Managed Instances in two different subscriptions, as long as subscriptions are associated to the same Microsoft Entra tenant.
- When using PowerShell API, you can do it by specifying the
PartnerSubscriptionIdparameter for the secondary SQL Managed Instance. - When using REST API, each instance ID included in the
properties.managedInstancePairsparameter can have its own Subscription ID. - Azure portal doesn't support creating failover groups across different subscriptions.
Important
Creating a failover group between two instances in different resource groups or subscriptions is only supported with Azure PowerShell, or the REST API, and not the Azure portal or the Azure CLI.
Prevent loss of critical data
Due to the high latency of wide area networks, geo-replication uses an asynchronous replication mechanism. Asynchronous replication makes the possibility of data loss unavoidable if the primary fails. To protect critical transactions from data loss, an application developer can call the sp_wait_for_database_copy_sync stored procedure immediately after committing the transaction. Calling sp_wait_for_database_copy_sync blocks the calling thread until the last committed transaction has been transmitted and hardened in the transaction log of the secondary database. However, it doesn't wait for the transmitted transactions to be replayed (redone) on the secondary. sp_wait_for_database_copy_sync is scoped to a specific geo-replication link. Any user with the connection rights to the primary database can call this procedure.
To prevent data loss during user-initiated, planned geo-failover, replication automatically and temporarily changes to synchronous replication, then performs a failover. Replication then returns to asynchronous mode after the geo-failover is complete.
Note
sp_wait_for_database_copy_sync prevents data loss after geo-failover for specific transactions, but doesn't guarantee full synchronization for read access. The delay caused by a sp_wait_for_database_copy_sync procedure call can be significant and depends on the size of the not yet transmitted transaction log on the primary at the time of the call.
Change the secondary region
Let's assume that instance A is the primary instance, instance B is the existing secondary instance, and instance C is the new secondary instance in the third region. To make the transition, follow these steps:
- Create instance C with same size as A and in the same DNS zone.
- Delete the failover group between instances A and B. At this point, attempts to sign in start to fail because the SQL aliases for the failover group listeners have been deleted and the gateway won't recognize the failover group name. The secondary databases are disconnected from the primaries and become read-write databases.
- Create a failover group with the same name between instance A and C. Follow the instructions in configure failover group guide. This is a size-of-data operation and completes when all databases from instance A are seeded and synchronized.
- Delete instance B if not needed to avoid unnecessary charges.
Note
After step 2 and until step 3 is completed the databases in instance A will remain unprotected from a catastrophic failure of instance A.
Change the primary region
Let's assume instance A is the primary instance, instance B is the existing secondary instance, and instance C is the new primary instance in the third region. To make the transition, follow these steps:
- Create instance C with same size as B and in the same DNS zone.
- Initiate a manual failover from instance B to make it the new primary. Instance A becomes the new secondary instance automatically.
- Delete the failover group between instances A and B. At this point, sign in attempts using failover group endpoints start to fail. The secondary databases on A are disconnected from the primaries and become read-write databases.
- Create a failover group with the same name between instance B and C. This is a size-of-data operation and completes when all databases from instance B are seeded and synchronized with instance C. At this point, sign in attempts stop failing.
- Manually fail over to switch the C instance to the primary role. Instance B becomes the new secondary instance automatically.
- Delete instance A if not needed to avoid unnecessary charges.
Caution
After step 3 and until step 4 is completed, the databases in instance A will remain unprotected from a catastrophic failure of instance A.
Important
When the failover group is deleted, the DNS records for the listener endpoints are also deleted. At that point, there's a non-zero probability of somebody else creating a failover group with the same name. Because failover group names must be globally unique, this will prevent you from using the same name again. To minimize this risk, don't use generic failover group names.
Change update policy
Instances in a failover group must have matching update policies. To change the update policy to a higher version on instances that are part of a failover group, first enable the update policy on the secondary instance, wait for the change to take effect, and then update the policy for the primary instance.
While changing the update policy on the primary instance in the failover group causes the instance to fail over to another local node (similar to management operations on instances that aren't part of a failover group), it doesn't cause the failover group to failover, keeping the primary instance in the primary role.
Caution
Once the updated policy is changed to higher SQL Server version, including Always-up-to-date, changing it back to the lower version update policy is no longer possible.
Enable scenarios dependent on objects from the system databases
System databases are not replicated to the secondary instance in a failover group. To enable scenarios that depend on objects from the system databases, make sure to create the same objects on the secondary instance and keep them synchronized with the primary instance.
For example, if you plan to use the same logins on the secondary instance, make sure to create them with the identical SID.
-- Code to create login on the secondary instance
CREATE LOGIN foo WITH PASSWORD = '<enterStrongPasswordHere>', SID = <login_sid>;
To learn more, see Replication of logins and agent jobs.
Synchronize instance properties and retention policies instances
Instances in a failover group remain separate Azure resources, and no changes made to the configuration of the primary instance will be automatically replicated to the secondary instance. Make sure to perform all relevant changes both on primary and secondary instance. For example, if you change backup storage redundancy or long-term backup retention policy on primary instance, make sure to change it on secondary instance as well.
Scaling instances
The configuration of your primary and secondary instance should be the same. This includes the compute size, storage size, and service tier. If you need to change the configuration of your failover group, you can do so by scaling each instance to the same configuration accordingly.
To avoid problems from a lower service tier or under-resourced geo-secondary getting overloaded, or having to reseed during an upgrade or downgrade process, consider the following:
- You can scale the primary and secondary instance up or down to a different compute size within the same service tier or to a different service tier.
- When scaling up within the same service tier, scale up the geo-secondary first, and then scale up the primary.
- When scaling down within the same service tier, reverse the order: scale down the primary first, and then scale down the secondary.
- Follow the same sequence when you change the configuration of your instance. If you're scaling resources up, do so on the secondary first. If you're scaling down, do so the primary first. This applies to the following instance configuration changes:
- Upgrading or downgrading the service tier.
- Changing the number of vCores.
- Scaling the storage size.
- Changing the memory allocation of your Next-gen General Purpose instance.
Permissions
Permissions for a failover group are managed via Azure role-based access control (Azure RBAC).
The SQL Managed Instance Contributor role, scoped to the resource groups of the primary and the secondary managed instance, is sufficient to perform all management operations on failover groups.
The following table provides granular view of minimal required permissions and their respective minimal required scope levels for management operations on failover groups:
| Management operation | Permission | Scope |
|---|---|---|
| Create/Update failover group | Microsoft.Sql/locations/instanceFailoverGroups/write |
Resource groups of primary and secondary managed instance |
| Create/Update failover group | Microsoft.Sql/managedInstances/write |
Primary and secondary managed instance |
| Failover failover group | Microsoft.Sql/locations/instanceFailoverGroups/failover/action |
Resource groups of primary and secondary managed instance |
| Force failover failover group | Microsoft.Sql/locations/instanceFailoverGroups/forceFailoverAllowDataLoss/action |
Resource groups of primary and secondary managed instance |
| Delete failover group | Microsoft.Sql/locations/instanceFailoverGroups/delete |
Resource groups of primary and secondary managed instance |
Limitations
When creating a new failover group, consider the following limitations:
- Failover groups can't be created between two instances in the same Azure region.
- An instance can participate only in one failover group at any moment.
- A failover group can't be created between two instances that belong to different Azure tenants.
- Creating a failover group between two instances in different resource groups or subscriptions is only supported with Azure PowerShell, or the REST API, and not the Azure portal or the Azure CLI. Once the failover group is created, it's visible in the Azure portal, and all operations are supported in the Azure portal or with the Azure CLI.
- If initial seeding of all databases doesn't complete within 7 days, creating the failover group fails and all successfully replicated databases are deleted from the secondary instance.
- Creating a failover group with an instance configured with a Managed Instance link is currently unsupported.
- Failover groups can't be created between instances if any of them are in an instance pool.
- Databases migrated to Azure SQL Managed Instance by using the Log Replay Service (LRS) can't be added to a failover group until the cutover step is executed.
When using failover groups, consider the following limitations:
- Failover groups can't be renamed. You'll need to delete the group and re-create it with a different name.
- A failover group contains exactly two managed instances. Adding additional instances to the failover group is unsupported.
- Full backups are automatically taken:
- before initial seeding and can noticeably delay the start of the initial seeding process.
- after failover, and can delay or prevent a subsequent failover.
- Database rename isn't supported for databases in failover group. You'll need to temporarily delete the failover group to be able to rename a database.
- System databases aren't replicated to the secondary instance in a failover group. Therefore, scenarios that depend on objects from the system databases such as Server Logins and Agent jobs, require objects to be manually created on the secondary instances and also manually kept in sync after any changes made on primary instance. The only exception is Service master Key (SMK) for SQL Managed Instance that is replicated automatically to secondary instance during creation of failover group. Any subsequent changes of SMK on the primary instance however won't be replicated to secondary instance. To learn more, see how to Enable scenarios dependent on objects from the system databases.
- For instances inside of a failover group, changing the service tier to, or from, the Next-gen General Purpose tier isn't supported. You must first delete the failover group before modifying either replica, and then re-create the failover group after the change takes effect.
- SQL managed instances in a failover group must have the same update policy, though it's possible to change the update policy for instances within a failover group.
Programmatically manage failover groups
Failover groups can also be managed programmatically using Azure PowerShell, Azure CLI, and REST API. The following tables describe the set of commands available. Failover groups include a set of Azure Resource Manager APIs for management, including the Azure SQL Database REST API and Azure PowerShell cmdlets. These APIs require the use of resource groups and support Azure role-based access control (Azure RBAC). For more information on how to implement access roles, see Azure role-based access control (Azure RBAC).
| Cmdlet | Description |
|---|---|
| New-AzSqlDatabaseInstanceFailoverGroup | This command creates a failover group and registers it on both primary and secondary instances |
| Set-AzSqlDatabaseInstanceFailoverGroup | Modifies configuration of a failover group |
| Get-AzSqlDatabaseInstanceFailoverGroup | Retrieves a failover group's configuration |
| Switch-AzSqlDatabaseInstanceFailoverGroup | Triggers failover of a failover group to the secondary instance |
| Remove-AzSqlDatabaseInstanceFailoverGroup | Removes a failover group |