Note
Access to this page requires authorization. You can try signing in or changing directories.
Access to this page requires authorization. You can try changing directories.
Applies to: ![]() Azure SQL Managed Instance
Azure SQL Managed Instance
This article explains how to migrate SQL Server databases to Azure SQL Managed Instance using Log Replay Service (LRS). LRS is a free cloud service for Azure SQL Managed Instance migrations, built on SQL Server log-shipping technology. Learn the complete process from prerequisites to cutover, including best practices for a successful database migration.
Note
It's now possible to migrate your SQL Server instance enabled by Azure Arc to Azure SQL Managed Instance directly through the Azure portal. To learn more, review Migrate to Azure SQL Managed Instance.
The following sources are supported:
- SQL Server on Virtual Machines
- Amazon EC2 (Elastic Compute Cloud)
- Amazon RDS (Relational Database Service) for SQL Server
- Google Compute Engine
- Cloud SQL for SQL Server - GCP (Google Cloud Platform)
Prerequisites
Important
- Before you migrate databases to the Business Critical service tier, consider these limitations, which don't apply to the General Purpose service tier.
- You can't use databases that are being restored through LRS until the migration process finishes.
- LRS doesn't support read-only access to databases during the migration.
- After the migration finishes, the migration process is final and can't be resumed with additional differential backups.
Before you begin, consider the requirements in this section for both your SQL Server instance and Azure. Carefully review the limitations and best practices sections to ensure a successful migration.
SQL Server
Make sure that you meet the following requirements for SQL Server:
- SQL Server versions 2008 to 2022.
- Your SQL Server database is using the full recovery model (mandatory).
- A full backup of databases (one or multiple files).
- A differential backup (one or multiple files).
- A log backup (not split for a transaction log file).
- For SQL Server versions 2008 to 2016, take a backup locally and manually upload it to your Azure Blob Storage account.
- For SQL Server 2016 and later, you can take your backup directly to your Azure Blob Storage account.
- Although having
CHECKSUMenabled for backups isn't required, it's highly recommended to prevent unintentionally migrating a corrupt database, and for faster restore operations. - Any version of Windows Server is supported based on the SQL Server version supportability.
- For SQL Server 2019 and later, accelerated database recovery should be enabled, with the persistent version store set to
PRIMARY. For more information, see Known issues after migrating to SQL Managed Instance in this article. - To use Service Broker on a database migrated to Azure SQL Managed Instance, Service Broker must be enabled on the source database before migration. For more information, see Known issues after migrating to SQL Managed Instance in this article.
Azure
Make sure that you meet the following requirements for Azure:
- PowerShell Az.SQL module version 4.0.0 or later (installed or accessed through Azure Cloud Shell).
- Azure CLI version 2.42.0 or later (installed).
- A provisioned Azure Blob Storage container.
- A shared access signature (SAS) security token with
ReadandListpermissions generated for the Blob Storage container, or a managed identity that can access the container. Granting more permissions thanReadandListwill cause LRS to fail. - Place backup files for an individual database inside a separate folder in a storage account by using a flat-file structure (mandatory). Nesting folders inside database folders isn't supported.
Azure RBAC permissions
Running LRS through the provided clients requires one of the following Azure role-based access control (RBAC) roles:
- SQL Managed Instance Contributor role
- A role with the following permission:
Microsoft.Sql/managedInstances/databases/*
Best practices
When you're using LRS, consider the following best practices:
- Split full and differential backups into multiple files, instead of using a single file.
- Enable backup compression to help the network transfer speeds.
- Use Cloud Shell to run PowerShell or CLI scripts, because it will always be updated to use the latest released cmdlets.
- Configure a maintenance window so system updates are scheduled at a specific day and time outside of the migration window to prevent delaying or interrupting the migration.
- Plan to complete a single LRS migration job within a maximum of 30 days. On expiration of this time frame, the LRS job is automatically canceled.
- To prevent unintentionally migrating a corrupt database, and for a faster database restore, enable
CHECKSUMwhen you're taking your backups. Although SQL Managed Instance performs a basic integrity check on backups withoutCHECKSUM, catching all forms of corruption isn't guaranteed. Taking backups withCHECKSUMis the only way to ensure the backup restored to SQL Managed Instance isn't corrupt. The basic integrity check on backups withoutCHECKSUMincreases the restore time of a database. - When migrating to the Business Critical service tier, account for a prolonged delay in database availability after cutover, while databases are seeded to secondary replicas. For especially large databases with minimal downtime requirements, consider migrating to the General Purpose service tier first and then upgrading to the Business Critical service tier, or using the Managed Instance link to migrate your data.
- Uploading thousands of database files to restore can lead to excessive migration times and even failure. Consolidate databases into fewer files to speed up the migration process, and ensure its success.
- To minimize cutover time and reduce the risk of failure, make sure your last backup is as small as possible.
Configure a maintenance window
System updates for SQL Managed Instance take precedence over database migrations in progress.
Migration is affected differently based on the service tier:
- In the General Purpose service tier, all pending LRS migrations are suspended and resumed only after the update is applied. This system behavior might prolong migration time, especially for large databases.
- In the Business Critical service tier, all pending LRS migrations are canceled and automatically restarted after the update is applied. This system behavior might prolong migration time, especially for large databases.
To achieve a predictable time for database migrations, consider configuring a maintenance window to schedule system updates for a specific day and time, and run and complete migration jobs outside the designated maintenance window time frame. For example, for a migration that starts on Monday, configure your custom maintenance window on Sunday to allow for the most time to complete the migration.
Configuring a maintenance window isn't required but is highly recommended for large databases.
Note
While a maintenance window controls the predictability of planned updates, it doesn't guarantee that unplanned failovers, or security patch updates won't occur. An unplanned failover or a security patch (which takes precedence over all other updates) can still interrupt your migration.
Migrate multiple databases
If you're migrating multiple databases by using the same Azure Blob Storage container, you must place backup files for different databases in separate folders inside the container. All backup files for a single database must be placed in a flat-file structure inside a database folder, and the folders can't be nested. Nesting folders inside database folders isn't supported.
Here's an example of a folder structure inside an Azure Blob Storage container, a structure that's required to migrate multiple databases by using LRS.
-- Place all backup files for database 1 in a separate "database1" folder in a flat-file structure.
-- Don't use nested folders inside the database1 folder.
https://<mystorageaccountname>.blob.core.windows.net/<containername>/<database1>/<all-database1-backup-files>

-- Place all backup files for database 2 in a separate "database2" folder in a flat-file structure.
-- Don't use nested folders inside the database2 folder.
https://<mystorageaccountname>.blob.core.windows.net/<containername>/<database2>/<all-database2-backup-files>

-- Place all backup files for database 3 in a separate "database3" folder in a flat-file structure.
-- Don't use nested folders inside the database3 folder.
https://<mystorageaccountname>.blob.core.windows.net/<containername>/<database3>/<all-database3-backup-files>
Create a storage account
You use an Azure Blob Storage account as intermediary storage for backup files between your SQL Server instance and your SQL Managed Instance deployment. To create a new storage account and a blob container inside the storage account:
- Create a storage account.
- Create a blob container inside the storage account.
Configure Azure storage behind a firewall
Using Azure Blob storage that's protected behind a firewall is supported, but requires additional configuration. To enable read / write access to Azure Storage with Azure Firewall turned on, you have to add the subnet of the SQL managed instance to the firewall rules of the virtual network for the storage account by using MI subnet delegation and the Storage service endpoint. The storage account and the managed instance must be in the same region, or two paired regions.
If your Azure storage is behind a firewall, you might see the following message in the SQL managed instance error log:
Audit: Storage access denied user fault. Creating an email notification:
This generates an email that notifies you that auditing for the SQL managed instance is failing to write audit logs to the storage account. If you see this error, or receive this email, follow the steps in this section to configure your firewall.
To configure the firewall, follow these steps:
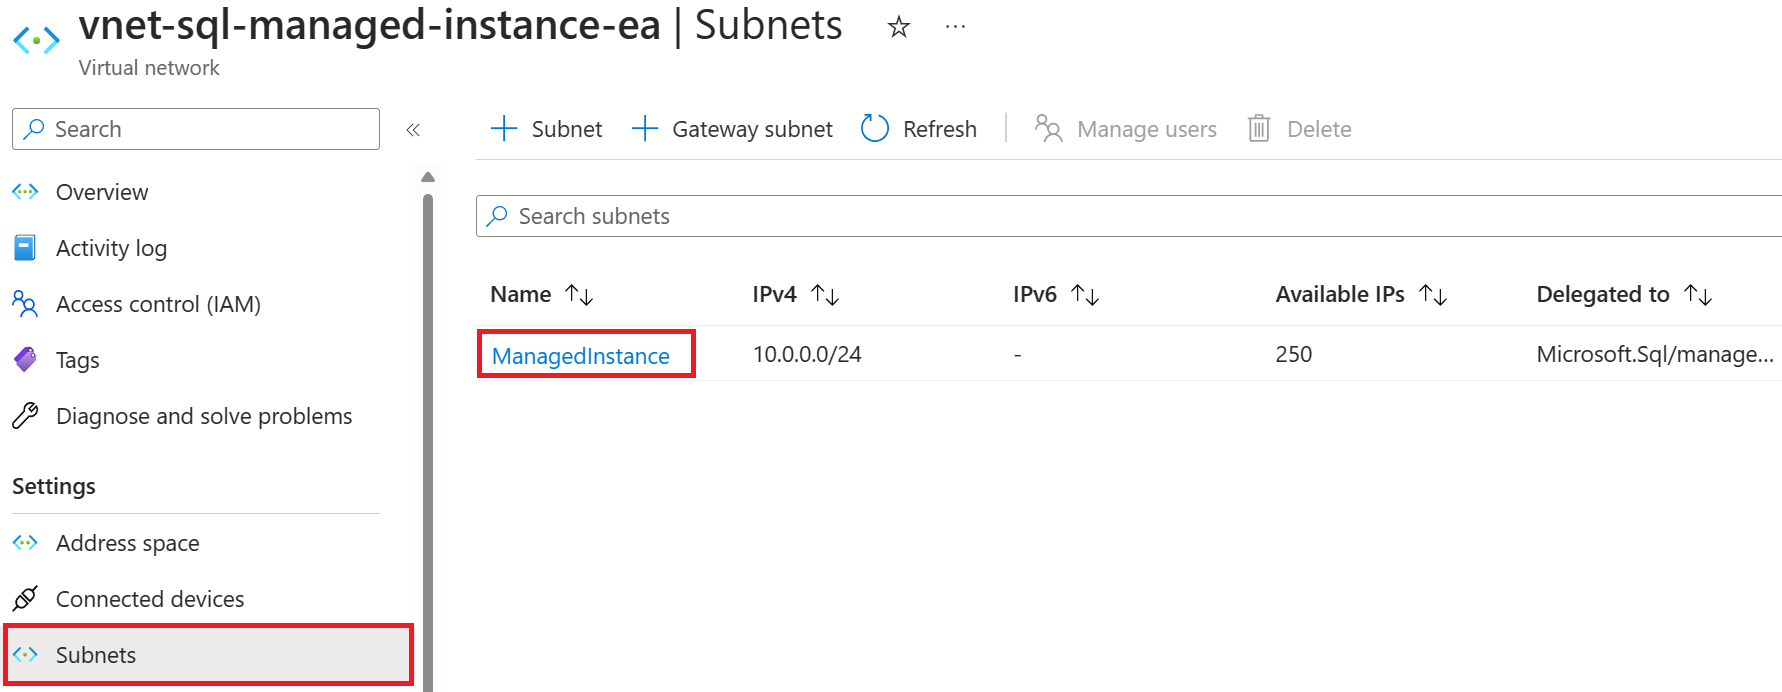
Go to your SQL managed instance in the Azure portal and select the subnet to open the Subnets page.
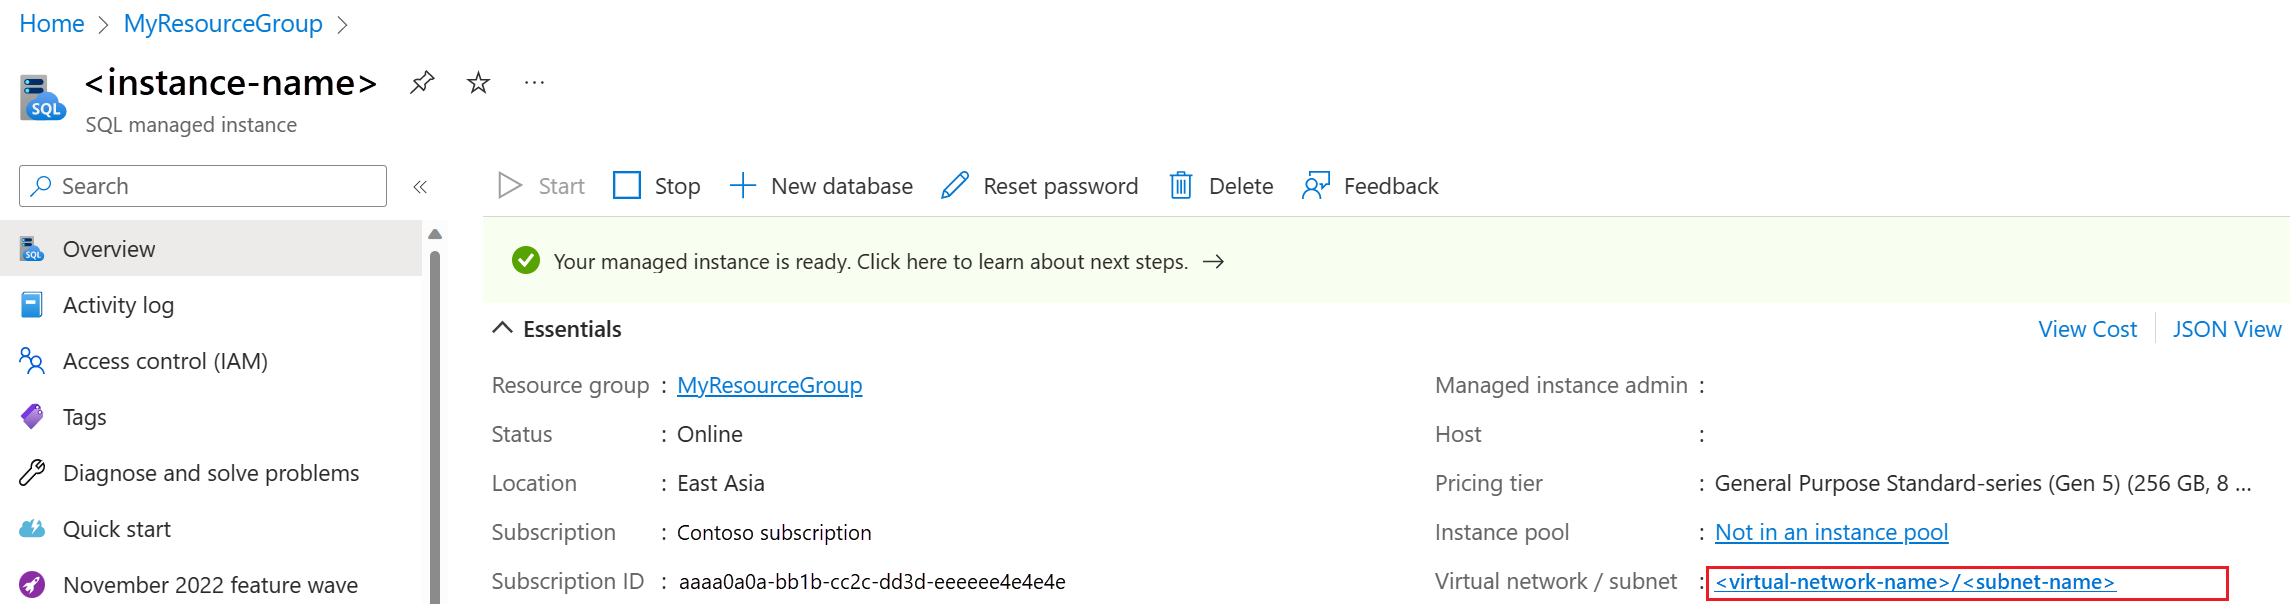
On the Subnets page, select the name of the subnet to open the subnet configuration page.
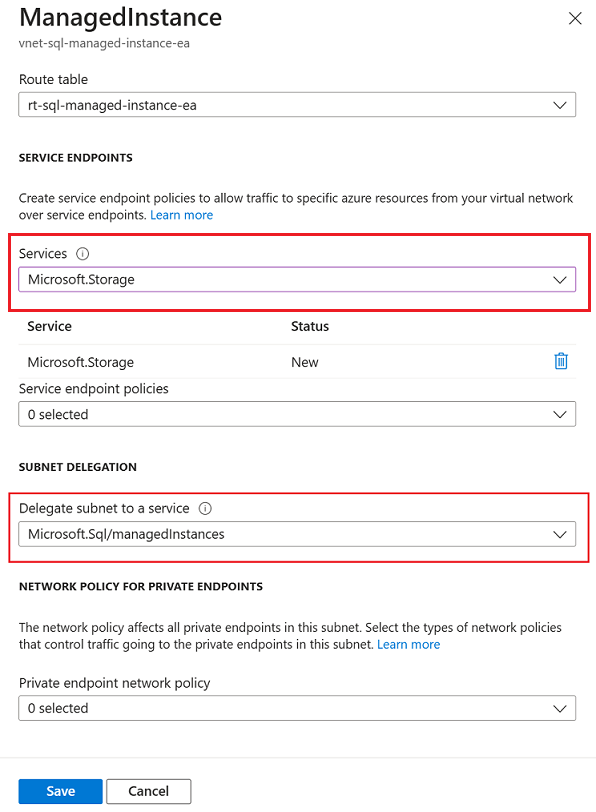
Under Subnet delegation, choose Microsoft.Sql/managedInstances from the Delegate subnet to a service dropdown list. Wait about an hour for permissions to propagate, and then, under Service endpoints, choose Microsoft.Storage from the Services dropdown list.
Next, go to your storage account in the Azure portal, select Networking under Security + networking and then choose the Firewalls and virtual networks tab.
On the Firewalls and virtual networks tab for your storage account, choose +Add existing virtual network to open the Add networks page.
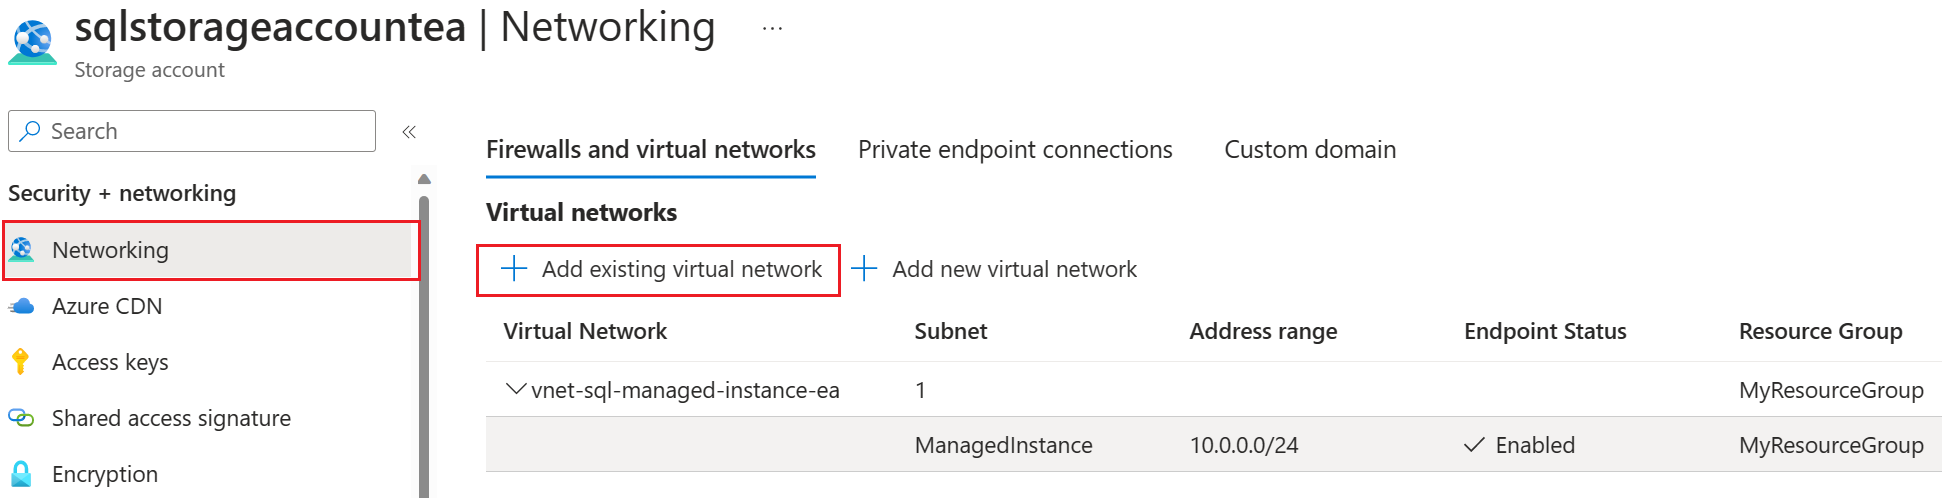
Select the appropriate subscription, virtual network, and managed instance subnet from the dropdown list menus and then select Add to add the virtual network of the SQL managed instance to the storage account.


Authenticate to your Blob Storage account
Use either a SAS token or a managed identity to access your Azure Blob Storage account.
Warning
You can't use both a SAS token and a managed identity in parallel on the same storage account. You can use either a SAS token or a managed identity, but not both.
Generate a Blob Storage SAS authentication token for LRS
Access your Azure Blob Storage account by using a SAS token.
You can use an Azure Blob Storage account as intermediary storage for backup files between your SQL Server instance and your SQL Managed Instance deployment. Generate a SAS authentication token for LRS with only Read and List permissions. The token enables LRS to access your Blob Storage account, and it uses the backup files to restore them to your managed instance.
Follow these steps to generate the token:
Go to the Storage center in the Azure portal and select your storage account.
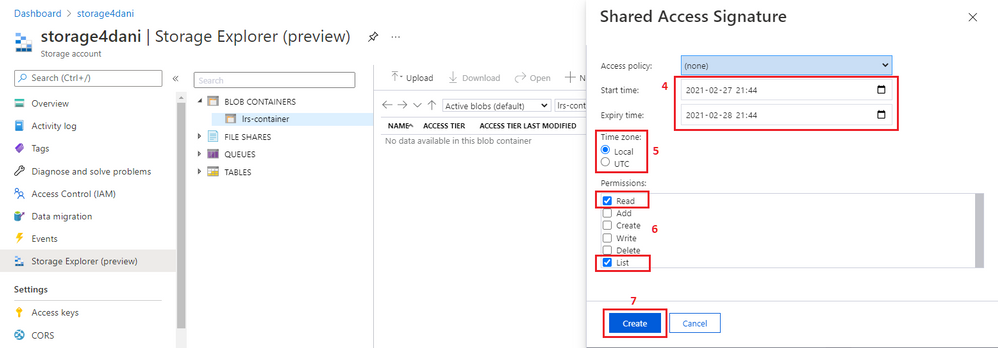
Under Security + networking, select Shared access signature to open the Shared access signature pane.
On the Shared access signature pane, configure the settings to generate a SAS token for LRS. Use the following guidelines to configure the settings:
Allowed services: Blob and File.
Allowed resource types: Service.
Permissions: Read and List only.
Important
Don't select any other permissions. If you do, LRS won't start. This security requirement is by design.
Blob versioning permissions: Optional
Allowed blob index permissions: Can be disabled.
Select the time zone for the token: UTC or your local time.
Important
The time zone of the token and your managed instance might mismatch. Ensure that the SAS token has the appropriate time validity, taking time zones into consideration. To account for time zone differences, set the validity From value well before your migration window starts, and the To value well after you expect your migration to finish.
Select Generate SAS and connection string to generate the token:
The SAS authentication is generated with the time validity that you specified.
Copy the value provided in the Blob Service SAS URL field, which is the URI version of the token that you need to start LRS.

Note
Using SAS tokens created with permissions that were set by defining a stored access policy isn't supported at this time. Follow the instructions in this procedure to manually specify Read and List permissions for the SAS token.
Copy parameters from the SAS token
Access your Azure Blob Storage account by using either a SAS token or a managed identity.
Before you use the SAS token to start LRS, you need to understand its structure. The URI of the generated SAS token consists of two parts, separated with a question mark (?), as shown in this example:

The first part, starting with https:// until the question mark (?), is used for the StorageContainerURI parameter that's fed as the input to LRS. It gives LRS information about the folder where the database backup files are stored.
The second part, from after the question mark (?) through the end of the string, is the StorageContainerSasToken parameter. This part is the actual signed authentication token, which is valid during the specified time. This part doesn't necessarily need to start with sp= as shown in the example. Your scenario might differ.
Copy the parameters as follows:
Copy the first part of the token, from
https://up to but not including the question mark (?). Use it as theStorageContainerUriparameter in PowerShell or the Azure CLI when you're starting LRS.Copy the second part of the token, from after the question mark (
?) through the end of the string. Use it as theStorageContainerSasTokenparameter in PowerShell or the Azure CLI when you're starting LRS.
Note
Don't include the question mark (?) when you copy either part of the token.
Validate your managed instance storage access
Validate that your managed instance can access your Blob Storage account.
First, upload any database backup, such as full_0_0.bak, to your Azure Blob Storage container.
Next, connect to your managed instance, and run a sample test query to determine if your managed instance is able to access the backup in the container.
If you're using a SAS token to authenticate to your storage account, then replace the <sastoken> with your SAS token and run the following query on your instance:
CREATE CREDENTIAL [https://<mystorageaccountname>.blob.core.windows.net/databases]
    WITH IDENTITY = 'SHARED ACCESS SIGNATURE',
    SECRET = '<sastoken>';

RESTORE HEADERONLY
    FROM URL = 'https://<mystorageaccountname>.blob.core.windows.net/<containername>/full_0_0.bak';
Upload backups to your Blob Storage account
When your blob container is ready and you've confirmed that your managed instance can access the container, you can begin uploading your backups to your Blob Storage account. You can either:
- Copy your backups to your Blob Storage account.
- Take backups from SQL Server directly to your Blob Storage account by using the BACKUP TO URL command, if your environment allows it (starting with SQL Server versions 2012 SP1 CU2 and SQL Server 2014).
Copy existing backups to your Blob Storage account
If you're on an earlier version of SQL Server, or if your environment doesn't support backing up directly to a URL, take your backups on your SQL Server instance as you normally would, and then copy them to your Blob Storage account.
Take backups on a SQL Server instance
Set databases that you want to migrate to the full recovery model to allow log backups.
-- To permit log backups, before the full database backup, modify the database to use the full recovery
USE master;

ALTER DATABASE SampleDB
SET RECOVERY FULL;
GO
To manually make full, differential, and log backups of your database to local storage, use the following sample T-SQL scripts. CHECKSUM isn't required, but it's recommended to prevent migrating a corrupt database, and for faster restore times.
The following example takes a full database backup to the local disk:
-- Take full database backup to local disk
BACKUP DATABASE [SampleDB]
    TO DISK = 'C:\BACKUP\SampleDB_full.bak'
    WITH INIT, COMPRESSION, CHECKSUM;
GO
The following example takes a differential backup to the local disk:
-- Take differential database backup to local disk
BACKUP DATABASE [SampleDB]
    TO DISK = 'C:\BACKUP\SampleDB_diff.bak'
    WITH DIFFERENTIAL, COMPRESSION, CHECKSUM;
GO
The following example takes a transaction log backup to the local disk:
-- Take transactional log backup to local disk
BACKUP LOG [SampleDB]
    TO DISK = 'C:\BACKUP\SampleDB_log.trn'
    WITH COMPRESSION, CHECKSUM;
GO
Copy backups to your Blob Storage account
After your backups are ready, and you want to start migrating databases to a managed instance by using LRS, you can use the following approaches to copy existing backups to your Blob Storage account:
- Download and install AzCopy.
- Download and install Azure Storage Explorer.
- Use Storage Explorer in the Azure portal.
Note
To migrate multiple databases by using the same Azure Blob Storage container, place all backup files for an individual database into a separate folder inside the container. Use flat-file structure for each database folder. Nesting folders inside database folders isn't supported.
Take backups directly to your Blob Storage account
If you're on a supported version of SQL Server (starting with SQL Server 2012 SP1 CU2 and SQL Server 2014), and your corporate and network policies allow it, you can take backups from SQL Server directly to your Blob Storage account by using the native SQL Server BACKUP TO URL option. If you can use BACKUP TO URL, you don't need to take backups to local storage and upload them to your Blob Storage account.
When you take native backups directly to your Blob Storage account, you have to authenticate to the storage account.
Use the following command to create a credential that imports the SAS token to your SQL Server instance:
CREATE CREDENTIAL [https://<mystorageaccountname>.blob.core.windows.net/<containername>]
    WITH IDENTITY = 'SHARED ACCESS SIGNATURE',
    SECRET = '<SAS_TOKEN>';
For detailed instructions working with SAS tokens, review the tutorial Use Azure Blob Storage with SQL Server.
After you've created the credential to authenticate your SQL Server instance with Blob Storage, you can use the BACKUP TO URL command to take backups directly to the storage account. CHECKSUM is recommended, but not required.
The following example takes a full database backup to a URL:
-- Take a full database backup to a URL
BACKUP DATABASE [SampleDB]
    TO URL = 'https://<mystorageaccountname>.blob.core.windows.net/<containername>/<databasefolder>/SampleDB_full.bak'
    WITH INIT, COMPRESSION, CHECKSUM;
GO
The following example takes a differential database backup to a URL:
-- Take a differential database backup to a URL
BACKUP DATABASE [SampleDB]
    TO URL = 'https://<mystorageaccountname>.blob.core.windows.net/<containername>/<databasefolder>/SampleDB_diff.bak'
    WITH DIFFERENTIAL, COMPRESSION, CHECKSUM;
GO
The following example takes a transaction log backup to a URL:
-- Take a transactional log backup to a URL
BACKUP LOG [SampleDB]
    TO URL = 'https://<mystorageaccountname>.blob.core.windows.net/<containername>/<databasefolder>/SampleDB_log.trn'
    WITH COMPRESSION, CHECKSUM;
Sign in to Azure and select a subscription
Use the following PowerShell cmdlet to sign in to Azure:
Login-AzAccount
Select the subscription where your managed instance resides by using the following PowerShell cmdlet:
Select-AzSubscription -SubscriptionId <subscription ID>
Start the migration
Start the migration by starting LRS. You can start the service in either autocomplete or continuous mode.
When you use autocomplete mode, the migration finishes automatically when the last of the specified backup files have been restored. This option requires the entire backup chain to be available in advance and uploaded to your Blob Storage account. It doesn't allow adding new backup files while migration is in progress. This option requires the start command to specify the file name of the last backup file. We recommend this mode for passive workloads for which data catch-up isn't required.
When you use continuous mode, the service continuously scans the Azure Blob Storage folder and restores any new backup files that get added while migration is in progress. The migration finishes only after the manual cutover has been requested. You need to use continuous mode migration when you don't have the entire backup chain in advance, and when you plan to add new backup files after the migration is in progress. We recommend this mode for active workloads for which data catch-up is required.
Plan to complete a single LRS migration job within a maximum of 30 days. When this time expires, the LRS job is automatically canceled.
Note
When you're migrating multiple databases, each database must be in its own folder. LRS must be started separately for each database, pointing to the full URI path of the Azure Blob Storage container and the individual database folder. Nested folders inside database folders aren't supported.
Start LRS in autocomplete mode
Ensure that the entire backup chain has been uploaded to your Azure Blob Storage account. This option doesn't allow new backup files to be added while the migration is in progress.
To start LRS in autocomplete mode, use PowerShell or Azure CLI commands. Specify the last backup file name by using the -LastBackupName parameter. After the restore of the last specified backup file has finished, the service automatically initiates a cutover.
Restore your database from the storage account by using either the SAS token or a managed identity.
Important
Ensure that the entire backup chain has been uploaded to your Azure Blob Storage account before you start the migration in autocomplete mode. This mode doesn't allow new backup files to be added while the migration is in progress.
Ensure that you've specified the last backup file correctly, and that you haven't uploaded more files after it. If the system detects more backup files beyond the last specified backup file, the migration will fail.
The following PowerShell example starts LRS in autocomplete mode by using a SAS token:
Start-AzSqlInstanceDatabaseLogReplay -ResourceGroupName "ResourceGroup01" `
    -InstanceName "ManagedInstance01" `
    -Name "ManagedDatabaseName" `
    -Collation "SQL_Latin1_General_CP1_CI_AS" `
    -StorageContainerUri "https://<mystorageaccountname>.blob.core.windows.net/<containername>/<databasefolder>" `
    -StorageContainerSasToken "sv=2019-02-02&ss=b&srt=sco&sp=rl&se=2023-12-02T00:09:14Z&st=2019-11-25T16:09:14Z&spr=https&sig=92kAe4QYmXaht%2Fgjocqwerqwer41s%3D" `
    -AutoCompleteRestore `
    -LastBackupName "last_backup.bak"
The following Azure CLI example starts LRS in autocomplete mode by using a SAS token:
az sql midb log-replay start -g mygroup --mi myinstance -n mymanageddb -a --last-bn "backup.bak"
    --storage-uri "https://<mystorageaccountname>.blob.core.windows.net/<containername>/<databasefolder>"
    --storage-sas "sv=2019-02-02&ss=b&srt=sco&sp=rl&se=2023-12-02T00:09:14Z&st=2019-11-25T16:09:14Z&spr=https&sig=92kAe4QYmXaht%2Fgjocqwerqwer41s%3D"
Start LRS in continuous mode
Ensure that you've uploaded your initial backup chain to your Azure Blob Storage account.
Important
After you've started LRS in continuous mode, you'll be able to add new log and differential backups to your storage account until the manual cutover. After the manual cutover has been initiated, no additional differential files can be added or restored.
The following PowerShell example starts LRS in continuous mode by using a SAS token:
Start-AzSqlInstanceDatabaseLogReplay -ResourceGroupName "ResourceGroup01" `
    -InstanceName "ManagedInstance01" `
    -Name "ManagedDatabaseName" `
    -Collation "SQL_Latin1_General_CP1_CI_AS" -StorageContainerUri "https://<mystorageaccountname>.blob.core.windows.net/<containername>/<databasefolder>" `
    -StorageContainerSasToken "sv=2019-02-02&ss=b&srt=sco&sp=rl&se=2023-12-02T00:09:14Z&st=2019-11-25T16:09:14Z&spr=https&sig=92kAe4QYmXaht%2Fgjocqwerqwer41s%3D"
The following Azure CLI example starts LRS in continuous mode:
az sql midb log-replay start -g mygroup --mi myinstance -n mymanageddb
    --storage-uri "https://<mystorageaccountname>.blob.core.windows.net/<containername>/<databasefolder>"
    --storage-sas "sv=2019-02-02&ss=b&srt=sco&sp=rl&se=2023-12-02T00:09:14Z&st=2019-11-25T16:09:14Z&spr=https&sig=92kAe4QYmXaht%2Fgjocqwerqwer41s%3D"
Script the migration job
PowerShell and Azure CLI clients that start LRS in continuous mode are synchronous. In this mode, PowerShell and the Azure CLI wait for the API response to report on success or failure before they start the job.
During this wait, the command won't return control to the command prompt. If you're scripting the migration experience, and you need the LRS start command to give back control immediately to continue with the rest of the script, you can run PowerShell as a background job with the -AsJob switch. For example:
$lrsjob = Start-AzSqlInstanceDatabaseLogReplay <required parameters> -AsJob
When you start a background job, a job object returns immediately, even if the job takes an extended time to finish. You can continue to work in the session without interruption while the job runs. For details on running PowerShell as a background job, see the PowerShell Start-Job documentation.
Similarly, to start an Azure CLI command on Linux as a background process, use the ampersand (&) at the end of the LRS start command:
az sql midb log-replay start <required parameters> &
Monitor migration progress
Az.SQL 4.0.0 and later provides a detailed progress report. Review Managed Database Restore Details - Get for a sample output.
To monitor ongoing migration progress through PowerShell, use the following command:
Get-AzSqlInstanceDatabaseLogReplay -ResourceGroupName "ResourceGroup01" `
    -InstanceName "ManagedInstance01" `
    -Name "ManagedDatabaseName"
To monitor ongoing migration progress through the Azure CLI, use the following command:
az sql midb log-replay show -g mygroup --mi myinstance -n mymanageddb
To track additional details on a failed request, use the PowerShell command Get-AzSqlInstanceOperation or use Azure CLI command az sql mi op show.
Stop the migration (optional)
If you need to stop the migration, use PowerShell or the Azure CLI. Stopping the migration deletes the restoring database on your managed instance, so resuming the migration won't be possible.
To stop the migration process through PowerShell, use the following command:
Stop-AzSqlInstanceDatabaseLogReplay -ResourceGroupName "ResourceGroup01" `
    -InstanceName "ManagedInstance01" `
    -Name "ManagedDatabaseName"
To stop the migration process through the Azure CLI, use the following command:
az sql midb log-replay stop -g mygroup --mi myinstance -n mymanageddb
Complete the migration (continuous mode)
If you start LRS in continuous mode, ensure that your application and SQL Server workload have been stopped to prevent any new backup files from being generated. Ensure that the last backup from your SQL Server instance has been uploaded to your Azure Blob Storage account. Monitor the restore progress on your managed instance, and ensure that the last log-tail backup has been restored.
When the last log-tail backup has been restored on your managed instance, initiate the manual cutover to complete the migration. After the cutover has finished, the database becomes available for read and write access on the managed instance.
To complete the migration process in LRS continuous mode through PowerShell, use the following command:
Complete-AzSqlInstanceDatabaseLogReplay -ResourceGroupName "ResourceGroup01" `
-InstanceName "ManagedInstance01" `
-Name "ManagedDatabaseName" `
-LastBackupName "last_backup.bak"
To complete the migration process in LRS continuous mode through the Azure CLI, use the following command:
az sql midb log-replay complete -g mygroup --mi myinstance -n mymanageddb --last-backup-name "backup.bak"
Limitations
Consider the following limitations when migrating with LRS:
- You can't use databases that are being restored through LRS until the migration process finishes.
- During the migration process, databases that are being migrated can't be used for read-only access on SQL Managed Instance.
- After the migration finishes, the migration process is final and can't be resumed with additional differential backups.
- Only database
.bak,.log, and.difffiles are supported by LRS. Dacpac and bacpac files aren't supported. - You have to configure a maintenance window to schedule system updates at a specific day and time. Plan to run and finish migrations outside the scheduled maintenance window.
- Database backups that are taken without
CHECKSUM:- can potentially migrate corrupt databases.
- take longer to restore than database backups with
CHECKSUMenabled.
- The shared access signature (SAS) token that LRS uses must be generated for the entire Azure Blob Storage container, and it must have
ReadandListpermissions only. For example, if you grantRead,List, andWritepermissions, LRS fails to start because of the extraWritepermission. - Using SAS tokens created with permissions that are set through defining a stored access policy isn't supported. Follow the instructions in this article to manually specify Read and List permissions for the SAS token.
- You must place backup files for different databases in separate folders on the Blob Storage account in a flat-file structure. Nesting folders inside database folders isn't supported.
- If you're using autocomplete mode, the entire backup chain needs to be available in advance on the Blob Storage account. It isn't possible to add new backup files in autocomplete mode. Use continuous mode if you need to add new backup files while migration is in progress.
- You must start LRS separately for each database that points to the full URI path that contains an individual database folder.
- The backup URI path, container name, or folder names can't contain
backuporBackupas these are reserved keywords. - When starting multiple Log Replay restores in parallel, targeting the same storage container, ensure that the same valid SAS token is provided for every restore operation.
- LRS supports migrating a total number of databases to a single instance up to the resource limits of the service tier. For example, you can restore up to 100 total databases in the General Purpose service tier, and up to 500 total databases in the Next-Gen General Purpose service tier.
- LRS supports 100 simultaneous database restores to a single instance, and 150 simultaneous database restores for all instances in a single subscription. For example, you can restore 100 databases in parallel to two instances in the same subscription at the same time, or 50 databases in three simultaneous batches in parallel to four separate instances within the same subscription.
- A single LRS job can run for a maximum of 30 days, after which it will be automatically canceled.
- While it's possible to use an Azure Storage account behind a firewall, extra configuration is necessary, and the storage account and managed instance must either be in the same region, or two paired regions. Review Configure firewall to learn more.
- The maximum number of databases you can restore in parallel is 150 per single subscription. In some cases, it's possible to increase this limit by opening a support ticket.
- Uploading thousands of database files to restore can lead to excessive migration times and even failure. Consolidate databases into fewer files to speed up the migration process, and ensure its success.
- There are two scenarios, at the beginning and end of the migration process, where a migration is aborted if a failover occurs, and the migration job must be manually restarted from the beginning as the database is dropped from SQL Managed Instance:
- If a failover occurs when the first full database backup is in the process of being restored to SQL Managed Instance when the migration job is first started, then the migration job must be manually restarted from the beginning.
- If a failover occurs after migration cutover is initiated, the migration job must be manually restarted from the beginning. Ensure the last backup file is as small as possible to minimize cutover time and reduce the risk of a failover during the cutover process.
- If accelerated database recovery is disabled on your source SQL Server 2019 and later instances, you can no longer enable it after migrating to Azure SQL Managed Instance. Additionally, if the persistent version store (PVS) isn't set to
PRIMARY, you can experience issues with restore operations on the target SQL managed instance. - If Service Broker is disabled on the source SQL Server instance, you can't use Service Broker on the target SQL managed instance after migration.
Note
If you require a database to be read-only accessible during the migration, with a much longer time frame for performing the migration and with minimal downtime, consider using the Overview of the Managed Instance link feature as a recommended migration solution.
Limitations when migrating to the Business Critical service tier
When migrating to a SQL Managed Instance in the Business Critical service tier, consider the following limitations:
- When migrating large databases, there might be considerable downtime as databases are unavailable after cutover while databases are seeded to secondary replicas of the Business Critical service tier. Workarounds are listed in the longer cutover section.
- Migration is automatically restarted from the beginning if the migration is interrupted by an unplanned failover, system update, or security patch, making it difficult to plan a predictable migration without last minute surprises.
Important
These limitations are only applicable when migrating to the Business Critical service tier, and not to the General Purpose service tier.
Longer cutover in the Business Critical service tier
If you're migrating to a SQL Managed Instance in the Business Critical service tier, account for the delay in bringing the databases online on the primary replica while they're seeded to the secondary replicas. This is especially true for larger databases.
Migrating to a SQL Managed Instance in the Business Critical service tier takes longer to complete than in the General Purpose service tier. After cutover to Azure completes, databases are unavailable until they've been seeded from the primary replica to the three secondary replicas, which can take a prolonged amount of time depending on your database size. The larger the database, the longer seeding to the secondary replicas takes - up to several hours, potentially.
If it's important that databases are available as soon as cutover completes, then consider the following workarounds:
- Migrate to the General Purpose service tier first, and then upgrade to the Business Critical service tier. Upgrading your service tier is an online operation that keeps your databases online until a short failover as the final step of the upgrade operation.
- Use the Managed Instance link for an online migration to a Business Critical instance without having to wait for databases to be available after the cutover.
Known issues after migrating to SQL Managed Instance
Consider the following known issues after migrating to Azure SQL Managed Instance:
Restore operation failures after migrating to SQL Managed Instance
If you migrate a database to Azure SQL Managed Instance from SQL Server 2019 and later versions with accelerated database recovery enabled, but configured with the persistent version store (PVS) set to something other than the PRIMARY file group, you can experience restore operation failures on the target SQL managed instance.
To work around this issue, make sure you set the persistent version store (PVS) to PRIMARY on the source SQL Server database before you migrate it to SQL Managed Instance. If you already migrated the database without setting the PVS to PRIMARY, you can set it on the source SQL Server database, and then re-migrate the database to SQL Managed Instance.
Unable to use accelerated database recovery after migrating to SQL Managed Instance
Starting with SQL Server 2019, if you migrate a database to Azure SQL Managed Instance, and the source database has accelerated database recovery disabled, you can't use accelerated database recovery on the target SQL managed instance.
To work around this issue, make sure you enable accelerated database recovery on the source SQL Server database before you migrate it to SQL Managed Instance. If you already migrated the database without enabling accelerated database recovery, you can enable it on the source SQL Server database, and then re-migrate the database to SQL managed instance.
SQL Server 2017 and earlier versions don't support accelerated database recovery, so this issue doesn't apply to databases migrated from those versions of SQL Server.
Unable to use Service Broker after migrating to SQL Managed Instance
If you migrate a database to Azure SQL Managed Instance, and Service Broker is disabled on the source database, you can't use Service Broker on the target SQL managed instance.
To work around this issue, make sure you enable Service Broker on the source SQL Server database before you migrate it to SQL Managed Instance. If you already migrated the database without enabling Service Broker, you can enable it on the source SQL Server database, and then re-migrate the database to SQL Managed Instance.
Troubleshoot LRS issues
After you start LRS, use either of the following monitoring cmdlets to see the status of the ongoing operation:
- For PowerShell:
get-azsqlinstancedatabaselogreplay - For the Azure CLI:
az_sql_midb_log_replay_show
To review details about a failed operation:
- For PowerShell: Get-AzSqlInstanceOperation
- For Azure CLI: az sql mi op show
If LRS fails to start after some time and you get an error, check for the most common issues:
- Does an existing database on your managed instance have the same name as the one you're trying to migrate from your SQL Server instance? Resolve this conflict by renaming one of the databases.
- Are the permissions granted for the SAS token Read and List only? Granting more permissions than
ReadandListwill cause LRS to fail. - Did you copy the SAS token for LRS after the question mark (
?), with content that looks likesv=2020-02-10...? - Is the SAS token validity time appropriate for the time window of starting and completing the migration? There might be mismatches because of the different time zones used for your SQL Managed Instance deployment and the SAS token. Try regenerating the SAS token and extending the token validity of the time window before and after the current date.
- When starting multiple Log Replay restores in parallel targeting the same storage container, ensure that the same valid SAS token is provided for every restore operation.
- Are the database name, resource group name, and managed instance name spelled correctly?
- If you started LRS in autocomplete mode, was a valid file name for the last backup file specified?
- Does the backup URI path contain keywords
backuporbackups? Rename the container or folders that are usingbackuporbackupsas these are reserved keywords.
Related content
- Overview of Log Replay Service with Azure SQL Managed Instance
- Overview of the Managed Instance link
- Migrate from SQL Server to Azure SQL Managed Instance
- T-SQL differences between SQL Server and Azure SQL Managed Instance
- Best practices to cost and size workloads migrated to Azure
- Compare LRS with Managed Instance link