Note
Access to this page requires authorization. You can try signing in or changing directories.
Access to this page requires authorization. You can try changing directories.
Applies to: ![]() Azure SQL Managed Instance
Azure SQL Managed Instance
Public endpoints for Azure SQL Managed Instance enable data access to your managed instance from outside the virtual network. You're able to access your managed instance from multitenant Azure services like Power BI, Azure App Service, or an on-premises network. By using the public endpoint on a managed instance, you don't need to use a VPN, which can help avoid VPN throughput issues.
In this article, you learn how to:
- Enable or disable a public endpoint for your managed instance
- Configure your managed instance network security group (NSG) to allow traffic to the managed instance public endpoint
- Obtain the managed instance public endpoint connection string
Permissions
Due to the sensitivity of data in a managed instance, the configuration to enable managed instance public endpoint requires a two-step process. This security measure adheres to separation of duties (SoD):
- The managed instance admin needs to enable the public endpoint on the managed instance. The managed instance admin can be found on the Overview page for your managed instance resource.
- A network admin needs to allow traffic to the managed instance using a network security group (NSG). For more information, review network security group permissions.
Enable public endpoint
You can enable the public endpoint for your SQL Managed Instance by using the Azure portal, Azure PowerShell, or the Azure CLI.
To enable the public endpoint for your SQL Managed Instance in the Azure portal, follow these steps:
- Go to the Azure portal.
- Open the resource group with the managed instance, and select the SQL managed instance that you want to configure public endpoint on.
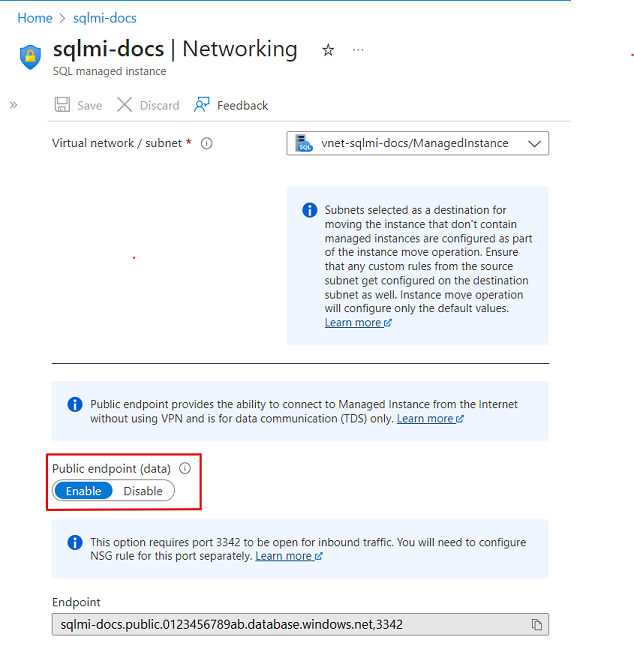
- On the Security settings, select the Networking tab.
- In the Virtual network configuration page, select Enable and then the Save icon to update the configuration.
Disable public endpoint
You can disable the public endpoint for your SQL Managed Instance by using the Azure portal, Azure PowerShell, and the Azure CLI.
To disable the public endpoint by using the Azure portal, follow these steps:
- Go to the Azure portal.
- Open the resource group with the managed instance, and select the SQL managed instance that you want to configure public endpoint on.
- On the Security settings, select the Networking tab.
- In the Virtual network configuration page, select Disable and then the Save icon to update the configuration.
Allow public endpoint traffic in the network security group
Use the Azure portal to allow public traffic within the network security group. Follow these steps:
Go to the Overview page for your SQL Managed Instance in the Azure portal.
Select the Virtual network/subnet link, which takes you to the Virtual network configuration page.

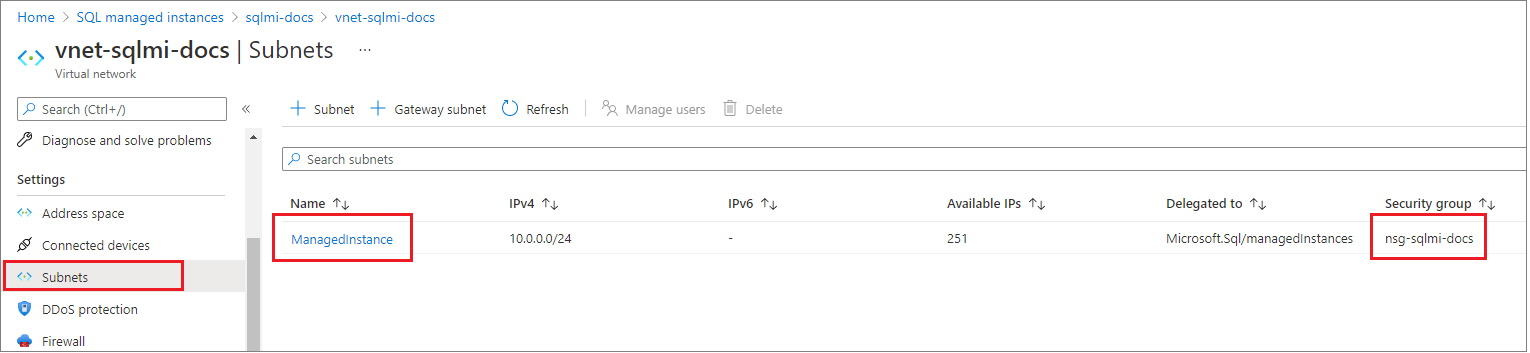
Select the Subnets tab on the configuration pane of your Virtual network, and make note of the SECURITY GROUP name for your managed instance.
Go back to the resource group that contains your managed instance. You should see the Network security group name noted previously. Select the Network security group name to open the Network Security Group configuration page.
Select the Inbound security rules tab, and Add a rule that has higher priority than the deny_all_inbound rule with the following settings:
Setting Suggested value Description Source Any IP address or Service tag - For Azure services like Power BI, select the Azure Cloud Service Tag
- For your computer or Azure virtual machine, use NAT IP address
Source port ranges * Leave this to * (any) as source ports are typically dynamically allocated and as such, unpredictable Destination Any Leaving destination as Any to allow traffic into the managed instance subnet Destination port ranges 3342 Scope destination port to 3342, which is the managed instance public TDS endpoint Protocol TCP SQL Managed Instance uses TCP protocol for TDS Action Allow Allow inbound traffic to managed instance through the public endpoint Priority 1300 Make sure this rule is higher priority than the deny_all_inbound rule 
Note
Port 3342 is used for public endpoint connections to managed instance, and can't be changed currently.
Confirm that routing is properly configured
A route with the 0.0.0.0/0 address prefix instructs Azure how to route traffic destined for an IP address that is not within the address prefix of any other route in a subnet's route table. When a subnet is created, Azure creates a default route to the 0.0.0.0/0 address prefix, with the Internet next hop type.
Overriding this default route without adding the necessary route(s) to ensure the public endpoint traffic is routed directly to Internet may cause asymmetric routing issues since incoming traffic does not flow via the Virtual appliance/Virtual network gateway. Ensure that all traffic reaching the managed instance over public internet goes back out over public internet as well by either adding specific routes for each source or setting the default route to the 0.0.0.0/0 address prefix back to Internet as next hop type.
See more the details about impact of changes on this default route at 0.0.0.0/0 address prefix.
Obtain the public endpoint connection string
Navigate to the managed instance configuration page that has been enabled for public endpoint. Select the Connection strings tab under the Settings configuration.
The public endpoint host name comes in the format <mi_name>.public.<dns_zone>.database.windows.net and that the port used for the connection is 3342. Here's an example of a server value of the connection string denoting the public endpoint port that can be used in SQL Server Management Studio or Azure Data Studio connections:
<mi_name>.public.<dns_zone>.database.windows.net,3342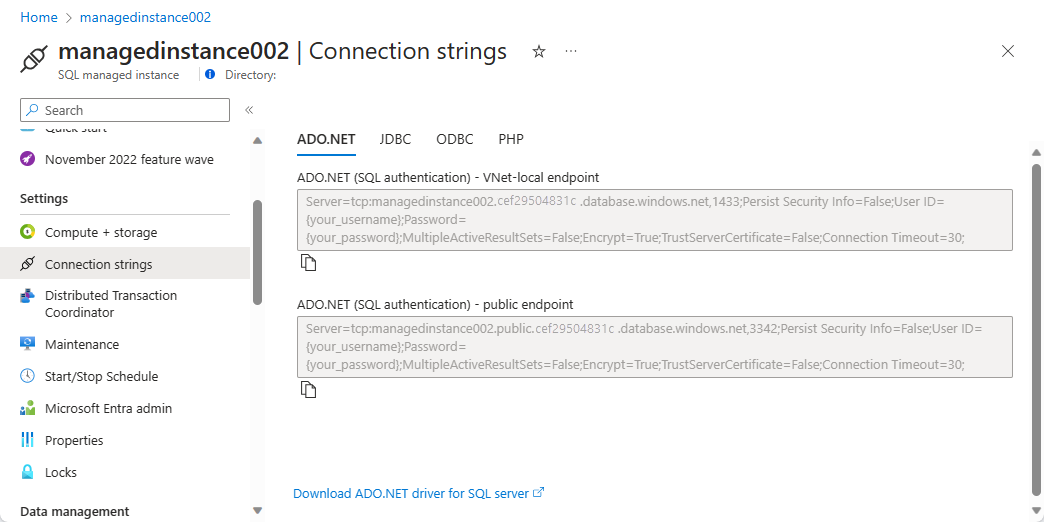

Next steps
Learn about using Azure SQL Managed Instance securely with public endpoint.