Note
Access to this page requires authorization. You can try signing in or changing directories.
Access to this page requires authorization. You can try changing directories.
Applies to: ![]() SQL Server on Azure VM
SQL Server on Azure VM
Tip
There are many methods to deploy an availability group. Simplify your deployment and eliminate the need for an Azure Load Balancer or distributed network name (DNN) for your Always On availability group by creating your SQL Server virtual machines (VMs) in multiple subnets within the same Azure virtual network. If you've already created your availability group in a single subnet, you can migrate it to a multi-subnet environment.
This tutorial shows how to create an Always On availability group for SQL Server on Azure VMs within a single subnet. The complete tutorial creates an availability group with a database replica on two SQL Server instances.
This article manually configures the availability group environment. It's also possible to automate the steps by using the Azure portal, PowerShell or the Azure CLI, or Azure Quickstart Templates.
Time estimate: This tutorial takes about 30 minutes to complete after you meet the prerequisites.
Prerequisites
The tutorial assumes that you have a basic understanding of SQL Server Always On availability groups. If you need more information, see Overview of Always On availability groups (SQL Server).
Before you begin the procedures in this tutorial, you need to complete prerequisites for creating Always On availability groups in Azure virtual machines. If you completed these prerequisites already, you can jump to Create the cluster.
The following table summarizes the prerequisites that you need before you can complete this tutorial:
| Requirement | Description |
|---|---|
 Two SQL Server instances
 |
- In an Azure availability set - In a single domain - With failover clustering installed |
|
Windows Server |
File share for a cluster witness |
|
SQL Server service account |
Domain account |
|
SQL Server Agent service account |
Domain account |
|
Firewall ports open |
- SQL Server: 1433 for a default instance - Database mirroring endpoint: 5022 or any available port - Load balancer IP address health probe for an availability group: 59999 or any available port - Load balancer IP address health probe for cluster core: 58888 or any available port |
|
Failover clustering |
Required for both SQL Server instances |
|
Installation domain account |
- Local administrator on each SQL Server instance - Member of the sysadmin fixed server role for each SQL Server instance |
|
Network Security Groups (NSGs) |
If the environment is using Network security groups, ensure that the current configuration allows Network traffic through ports described in Configure the firewall. |
Create the cluster
The first task is to create a Windows Server failover cluster with both SQL Server VMs and a witness server:
Use Bastion to connect to the first SQL Server VM. Use a domain account that's an administrator on both SQL Server VMs and the witness server.
Tip
In the prerequisites, you created an account called CORP\Install. Use this account.
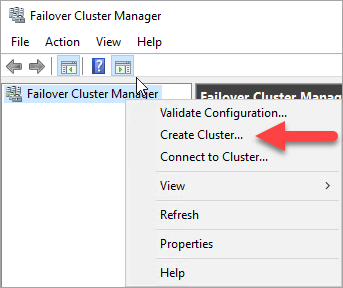
On the Server Manager dashboard, select Tools, and then select Failover Cluster Manager.
On the left pane, right-click Failover Cluster Manager, and then select Create Cluster.
In the Create Cluster Wizard, create a one-node cluster by stepping through the pages with the settings in the following table:
Page Setting Before You Begin Use defaults. Select Servers Enter the first SQL Server VM name in Enter server name, and then select Add. Validation Warning Select No. I do not require support from Microsoft for this cluster, and therefore do not want to run the validation tests. When I select Next, continue Creating the cluster. Access Point for Administering the Cluster In Cluster Name, enter a cluster name (for example, SQLAGCluster1). Confirmation Use defaults unless you're using Storage Spaces.
Set the Windows Server failover cluster's IP address
Note
On Windows Server 2019, the cluster creates a Distributed Server Name value instead of the Cluster Network Name value. If you're using Windows Server 2019, skip any steps that refer to the cluster core name in this tutorial. You can create a cluster network name by using PowerShell. For more information, review the blog post Failover Cluster: Cluster Network Object.
In Failover Cluster Manager, scroll down to Cluster Core Resources and expand the cluster details. Both the Name and IP Address resources should be in the Failed state.
The IP address resource can't be brought online because the cluster is assigned the same IP address as the machine itself. It's a duplicate address.
Right-click the failed IP Address resource, and then select Properties.
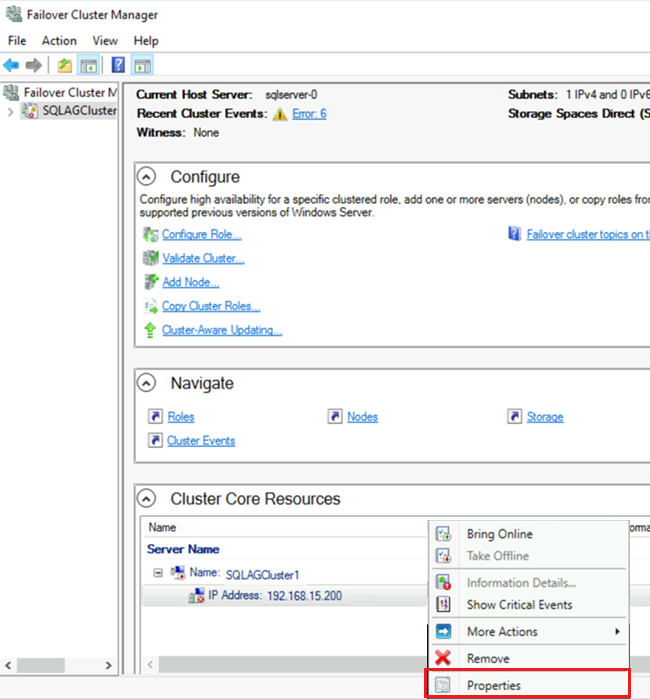
Select Static IP Address. Specify an available address from the same subnet as your virtual machines.
In the Cluster Core Resources section, right-click the cluster name and select Bring Online. Wait until both resources are online.
When the cluster name resource comes online, it updates the domain controller server with a new Active Directory computer account. Use this Active Directory account to run the availability group's clustered service later.
Add the other SQL Server instance to the cluster
In the browser tree, right-click the cluster and select Add Node.
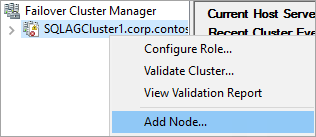
In the Add Node Wizard, select Next.
On the Select Servers page, add the second SQL Server VM. Enter the VM name in Enter server name, and then select Add > Next.
On the Validation Warning page, select No. (In a production scenario, you should perform the validation tests.) Then, select Next.
On the Confirmation page, if you're using Storage Spaces, clear the Add all eligible storage to the cluster checkbox.
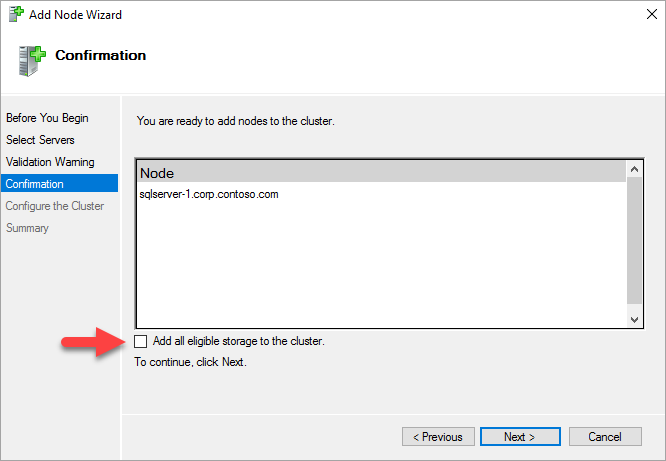
Warning
If you don't clear Add all eligible storage to the cluster, Windows detaches the virtual disks during the clustering process. As a result, they don't appear in Disk Manager or Object Explorer until the storage is removed from the cluster and reattached via PowerShell.
Select Next.
Select Finish.
Failover Cluster Manager shows that your cluster has a new node and lists it in the Nodes container.
Sign out of the remote desktop session.
Add a file share for a cluster quorum
In this example, the Windows cluster uses a file share to create a cluster quorum. This tutorial uses a NodeAndFileShareMajority quorum. For more information, see Configure and manage quorum.
Connect to the file share witness server VM by using a remote desktop session.
In Server Manager, select Tools. Open Computer Management.
Select Shared Folders.
Right-click Shares, and then select New Share.
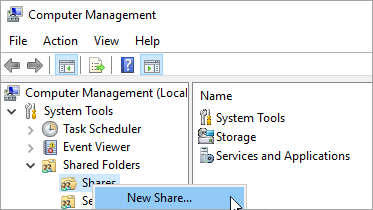
Use the Create a Shared Folder Wizard to create a share.
On the Folder Path page, select Browse. Locate or create a path for the shared folder, and then select Next.
On the Name, Description, and Settings page, verify the share name and path. Select Next.
On the Shared Folder Permissions page, set Customize permissions. Select Custom.
In the Customize Permissions dialog, select Add.
Make sure that the account that's used to create the cluster has full control.
Select OK.
On the Shared Folder Permissions page, select Finish. Then select Finish again.
Sign out of the server.
Configure the cluster quorum
Note
Depending on the configuration of your availability group, it might be necessary to change the quorum vote of a node that's participating in the Windows Server failover cluster. For more information, see Configure cluster quorum for SQL Server on Azure VMs.
Connect to the first cluster node by using a remote desktop session.
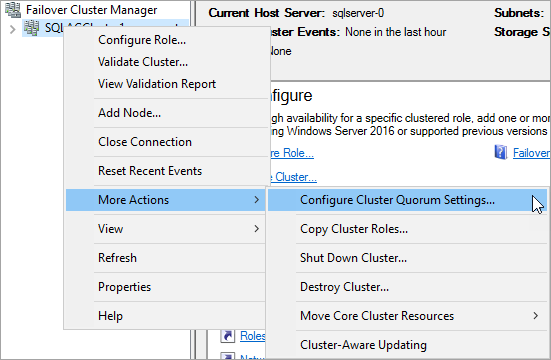
In Failover Cluster Manager, right-click the cluster, point to More Actions, and then select Configure Cluster Quorum Settings.
In the Configure Cluster Quorum Wizard, select Next.
On the Select Quorum Configuration Option page, choose Select the quorum witness, and then select Next.
On the Select Quorum Witness page, select Configure a file share witness.
Tip
Windows Server 2016 supports a cloud witness. If you choose this type of witness, you don't need a file share witness. For more information, see Deploy a cloud witness for a failover cluster. This tutorial uses a file share witness, which previous operating systems support.
In Configure File Share Witness, enter the path for the share that you created. Then select Next.
On the Confirmation page, verify the settings. Then select Next.
Select Finish.
The cluster core resources are configured with a file share witness.
Enable availability groups
Next, enable Always On availability groups. Complete these steps on both SQL Server VMs.
From the Start screen, open SQL Server Configuration Manager.
In the browser tree, select SQL Server Services. Then right-click the SQL Server (MSSQLSERVER) service and select Properties.
Select the Always On High Availability tab, and then select Enable Always On availability groups.
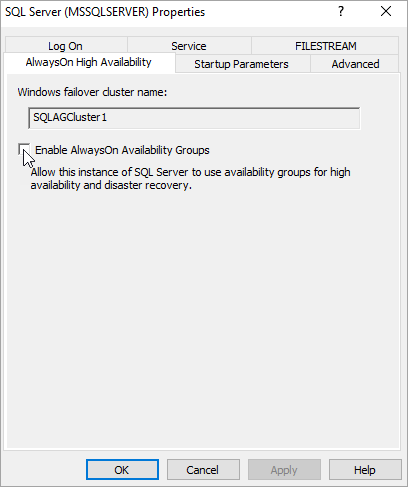
Select Apply. Select OK in the pop-up dialog.
Restart the SQL Server service.
Enable FILESTREAM feature
If you're not using FILESTREAM for your database in the availability group, skip this step and move to the next step - Create Database.
If you plan on adding a database to your availability group that uses FILESTREAM, then FILESTREAM needs to be enabled as the feature is disabled by default. Use the SQL Server Configuration Manager to enable the feature on both SQL Server instances.
To enable the FILESTREAM feature, follow these steps:
Connect to the first SQL Server VM (such as SQL-VM-1) with a domain account that is a member of sysadmin fixed server role, such as the CORP\Install domain account created in the prerequisites document
From the Start screen of one your SQL Server VMs, launch SQL Server Configuration Manager.
In the browser tree, highlight SQL Server Services, right-click the SQL Server (MSSQLSERVER) service and select Properties.
Select the FILESTREAM tab, then check the box to Enable FILESTREAM for Transact-SQL access:
Select Apply. Select OK in the pop-up dialog.
In SQL Server Management Studio, select New Query to display the Query Editor.
In Query Editor, enter the following Transact-SQL code:
EXEC sp_configure filestream_access_level, 2
RECONFIGURE
Select Execute.
Restart the SQL Server service.
Repeat these steps for the other SQL Server instance.
Create a database on the first SQL Server instance
- Connect to the first SQL Server VM with a domain account that's a member of sysadmin fixed server role.
- Open SQL Server Management Studio (SSMS) and connect to the first SQL Server instance.
- In Object Explorer, right-click Databases and select New Database.
- In Database name, enter MyDB1, and then select OK.
Create a backup share
On the first SQL Server VM in Server Manager, select Tools. Open Computer Management.
Select Shared Folders.
Right-click Shares, and then select New Share.
Use the Create a Shared Folder Wizard to create a share.
On the Folder Path page, select Browse. Locate or create a path for the database backup's shared folder, and then select Next.
On the Name, Description, and Settings page, verify the share name and path. Then select Next.
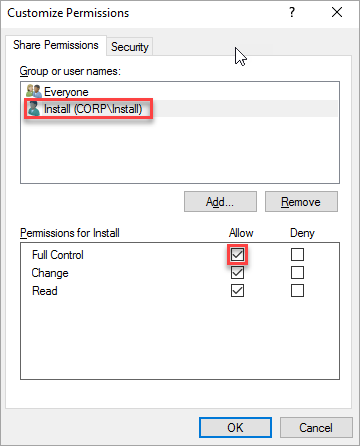
On the Shared Folder Permissions page, set Customize permissions. Then select Custom.
In the Customize Permissions dialog, select Add.
Check Full Control to grant full access to the share the SQL Server service account (
Corp\SQLSvc):
Select OK.
On the Shared Folder Permissions page, select Finish. Select Finish again.
Take a full backup of the database
You need to back up the new database to initialize the log chain. If you don't take a backup of the new database, it can't be included in an availability group.
In Object Explorer, right-click the database, point to Tasks, and then select Back Up.
Select OK to take a full backup to the default backup location.
Create an availability group
You're now ready to create and configure an availability group by doing the following tasks:
- Create a database on the first SQL Server instance.
- Take both a full backup and a transaction log backup of the database.
- Restore the full and log backups to the second SQL Server instance by using the
NO RECOVERYoption. - Create the availability group (MyTestAG) with synchronous commit, automatic failover, and readable secondary replicas.
Create the availability group
Connect to your SQL Server VM by using remote desktop, and open SQL Server Management Studio.
In Object Explorer in SSMS, right-click Always On High Availability and select New Availability Group Wizard.

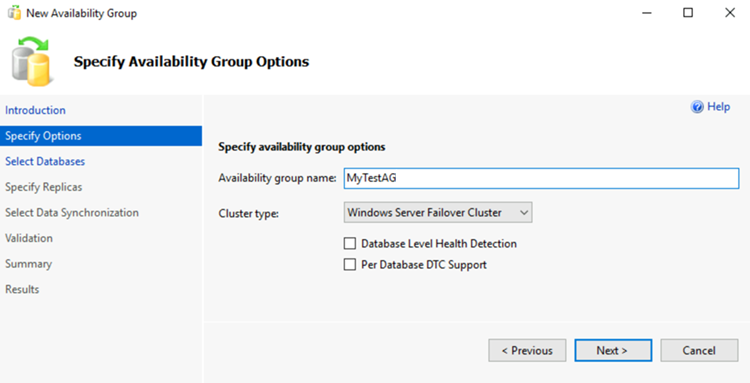
On the Introduction page, select Next. On the Specify Availability Group Options page, enter a name for the availability group in the Availability group name box. For example, enter MyTestAG. Then select Next.
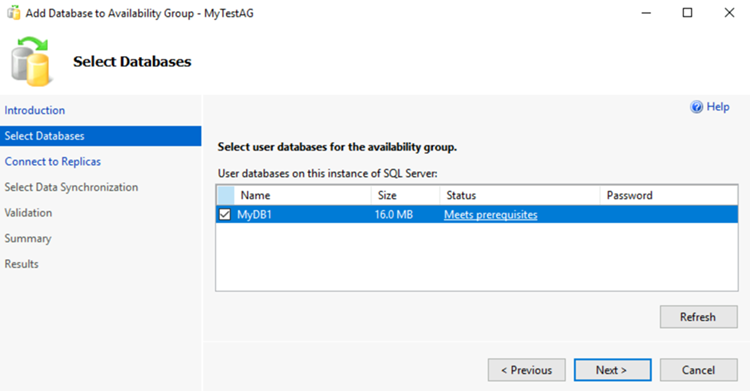
On the Select Databases page, select your database, and then select Next.
Note
The database meets the prerequisites for an availability group because you've taken at least one full backup on the intended primary replica.
On the Specify Replicas page, select Add Replica.
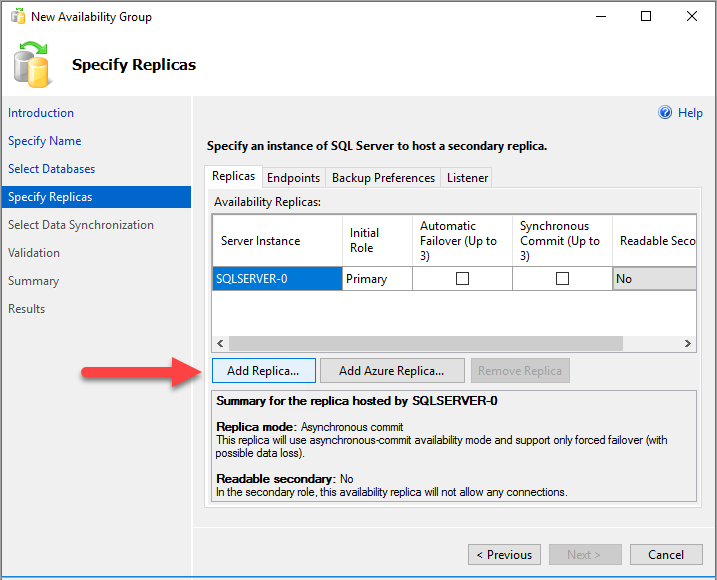
In the Connect to Server dialog, for Server name, enter the name of the second SQL Server instance. Then select Connect.
Back on the Specify Replicas page, you should now see the second server listed under Availability Replicas. Configure the replicas as follows.
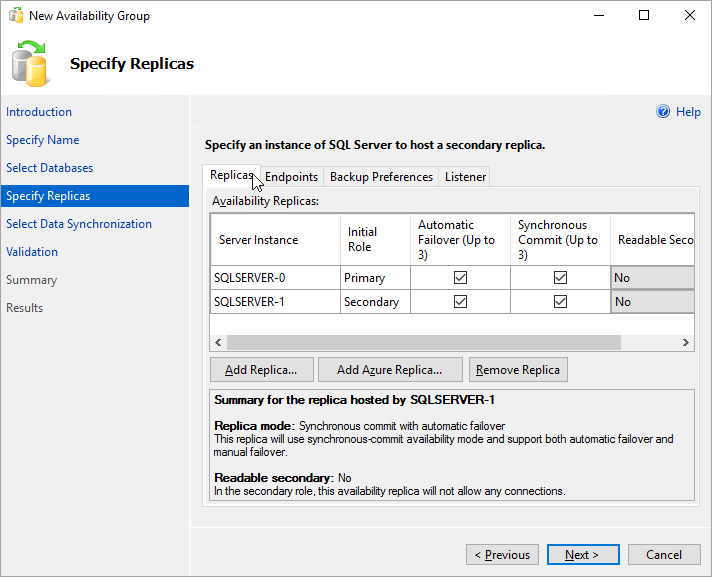
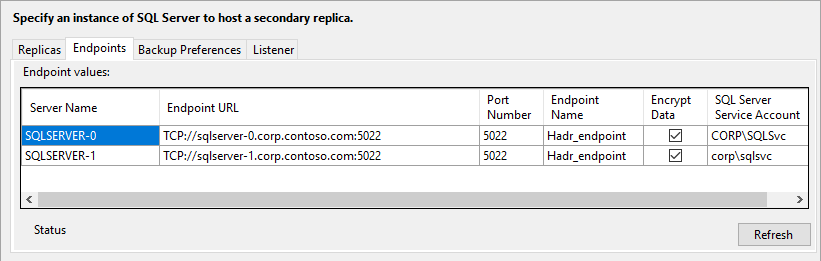
Select Endpoints to see the database mirroring endpoint for this availability group. Use the same port that you used when you set the firewall rule for database mirroring endpoints.
On the Select Initial Data Synchronization page, select Full and specify a shared network location. For the location, use the backup share that you created. In the example, it was \\<First SQL Server Instance>\Backup\. Select Next.
Note
Full synchronization takes a full backup of the database on the first instance of SQL Server and restores it to the second instance. For large databases, we don't recommend full synchronization because it might take a long time.
You can reduce this time by manually taking a backup of the database and restoring it with
NO RECOVERY. If the database is already restored withNO RECOVERYon the second SQL Server instance before you configure the availability group, select Join only. If you want to take the backup after configuring the availability group, select Skip initial data synchronization.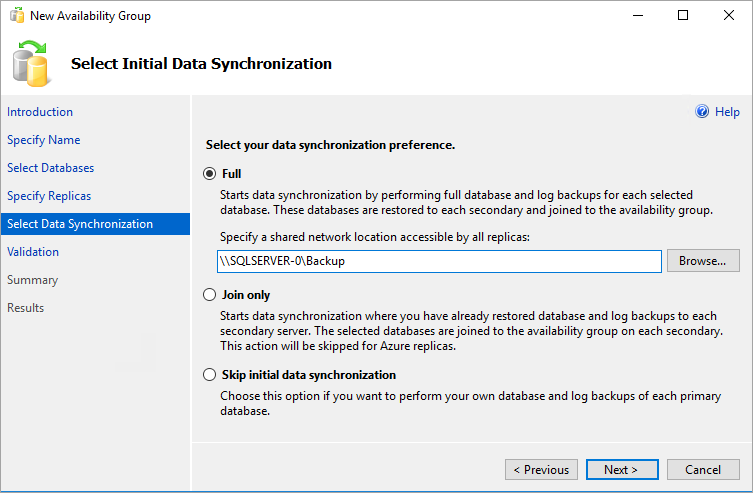
On the Validation page, select Next. This page should look similar to the following image:
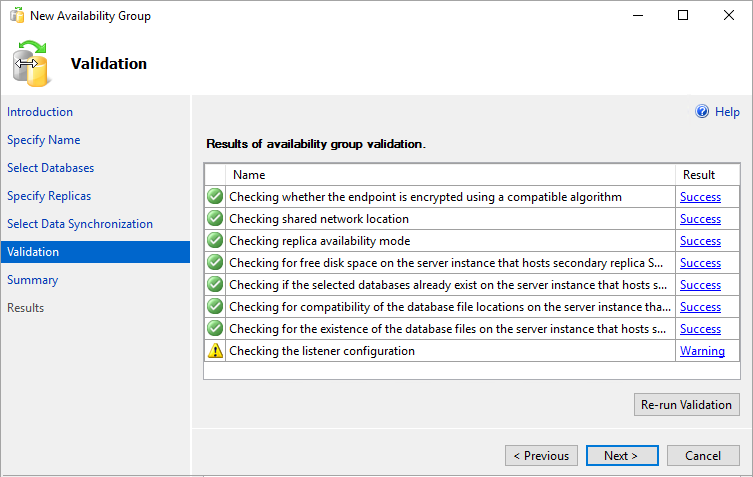
Note
There's a warning for the listener configuration because you haven't configured an availability group listener. You can ignore this warning because on Azure virtual machines, you create the listener after you create the Azure load balancer.
On the Summary page, select Finish, and then wait while the wizard configures the new availability group. On the Progress page, you can select More details to view the detailed progress.
After the wizard finishes the configuration, inspect the Results page to verify that the availability group is successfully created.
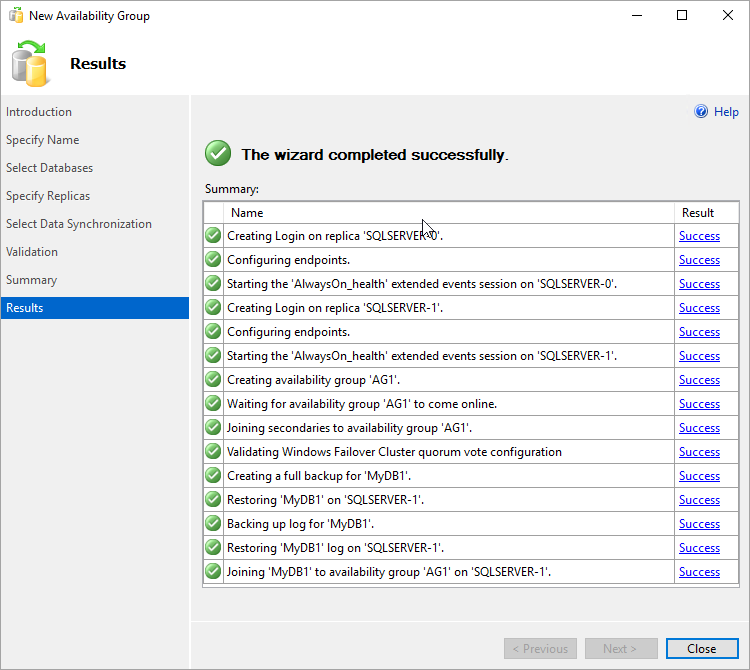
Select Close to close the wizard.

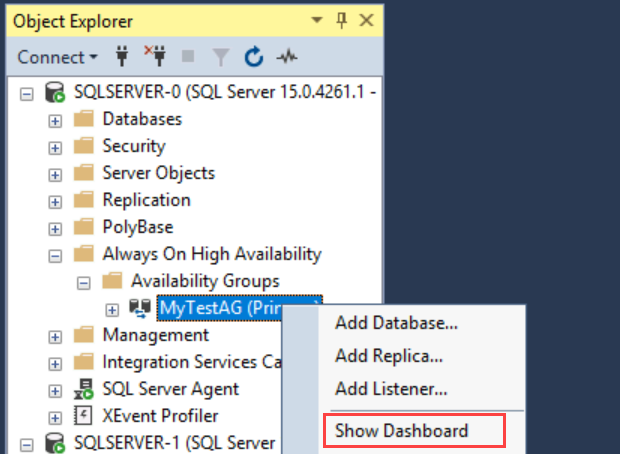
Check the availability group
In Object Explorer, expand Always On High Availability, and then expand Availability Groups. You should now see the new availability group in this container. Right-click the availability group and select Show Dashboard.
Your availability group dashboard should look similar to the following screenshot:
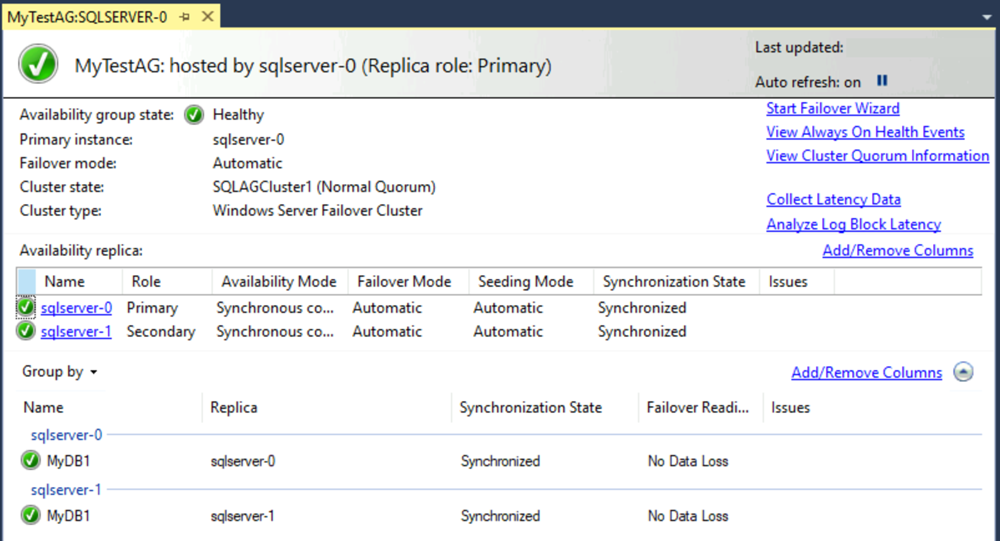
The dashboard shows the replicas, the failover mode of each replica, and the synchronization state.
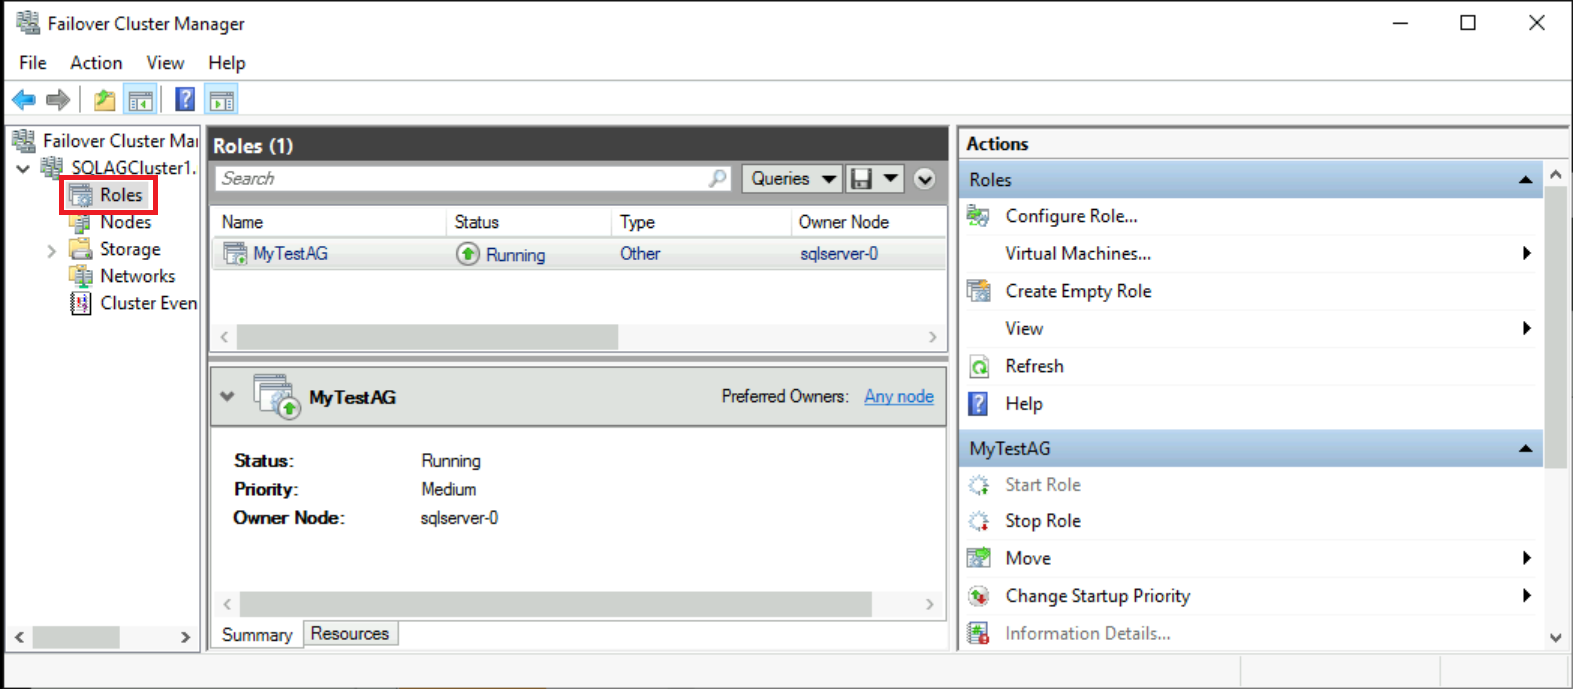
In Failover Cluster Manager, select your cluster. Select Roles.
The availability group name that you used is a role on the cluster. That availability group doesn't have an IP address for client connections because you didn't configure a listener. You'll configure the listener after you create an Azure load balancer.
Warning
Don't try to fail over the availability group from Failover Cluster Manager. All failover operations should be performed on the availability group dashboard in SSMS. Learn more about restrictions on using Failover Cluster Manager with availability groups.


At this point, you have an availability group with two SQL Server replicas. You can move the availability group between instances. You can't connect to the availability group yet because you don't have a listener.
In Azure virtual machines, the listener requires a load balancer. The next step is to create the load balancer in Azure.
Create an Azure load balancer
Note
Availability group deployments to multiple subnets don't require a load balancer. In a single-subnet environment, customers who use SQL Server 2019 CU8 and later on Windows 2016 and later can replace the traditional virtual network name (VNN) listener and Azure Load Balancer with a distributed network name (DNN) listener. If you want to use a DNN, skip any tutorial steps that configure Azure Load Balancer for your availability group.
On Azure virtual machines in a single subnet, a SQL Server availability group requires a load balancer. The load balancer holds the IP addresses for the availability group listeners and the Windows Server failover cluster. This section summarizes how to create the load balancer in the Azure portal.
A load balancer in Azure can be either standard or basic. A standard load balancer has more features than the basic load balancer. For an availability group, the standard load balancer is required if you use an availability zone (instead of an availability set). For details on the difference between the SKUs, see Azure Load Balancer SKUs.
Important
On September 30, 2025, the Basic SKU for Azure Load Balancer will be retired. For more information, see the official announcement. If you're currently using Basic Load Balancer, upgrade to Standard Load Balancer before the retirement date. For guidance, review Upgrade Load Balancer.
In the Azure portal, go to the resource group that contains your SQL Server VMs and select + Add.
Search for load balancer. Choose the load balancer that Microsoft publishes.
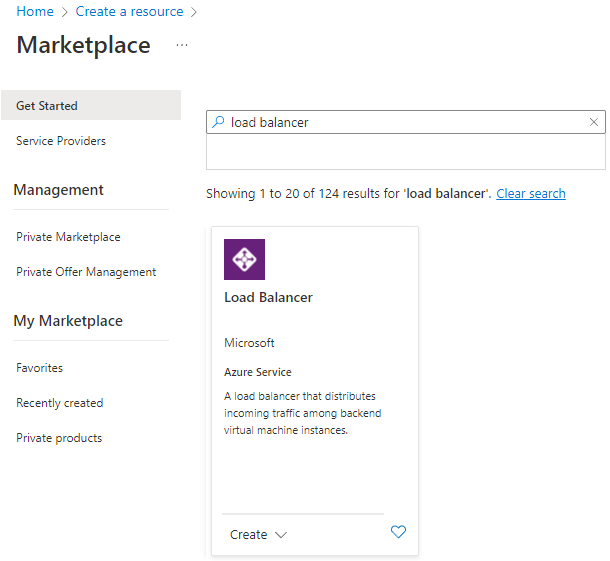
Select Create.
On the Create load balancer page, configure the following parameters for the load balancer:
Setting Entry or selection Subscription Use the same subscription as the virtual machine. Resource group Use the same resource group as the virtual machine. Name Use a text name for the load balancer, such as sqlLB. Region Use the same region as the virtual machine. SKU Select Standard. Type Select Internal. The page should look like this:
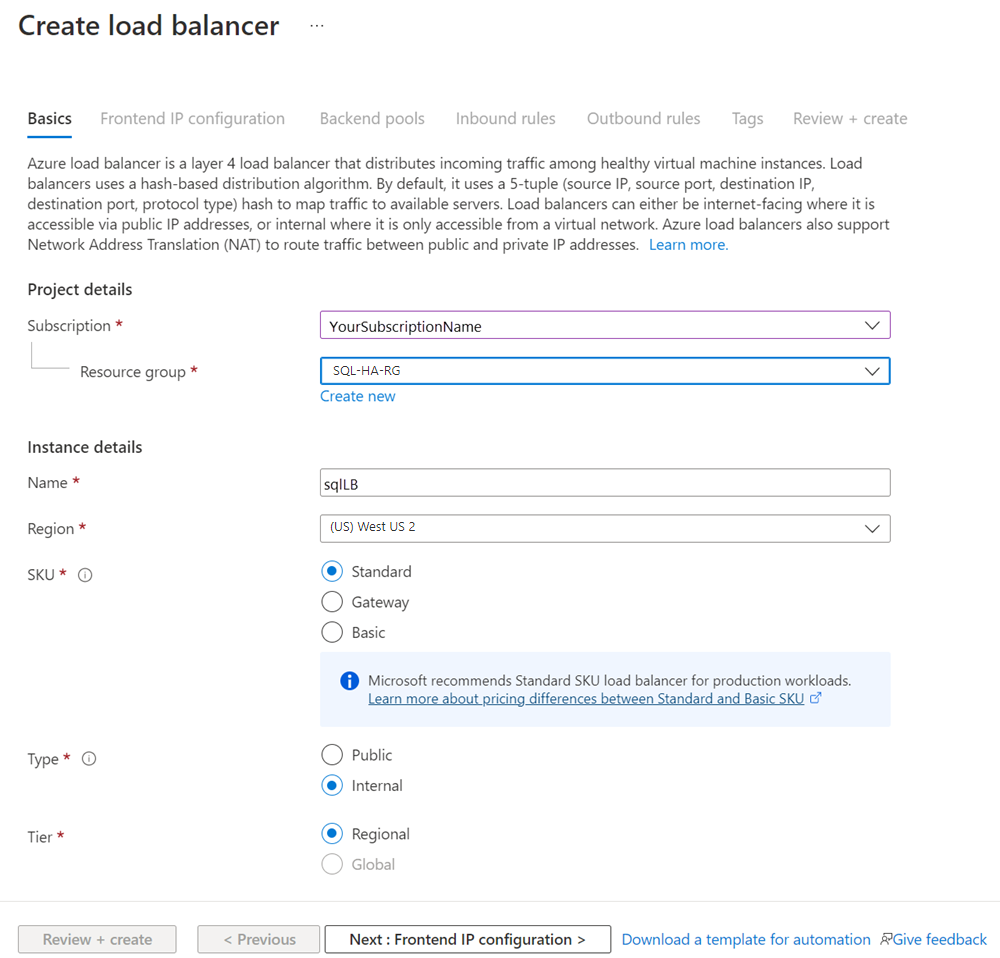
Select Next: Frontend IP configuration.
Select + Add a frontend IP configuration.
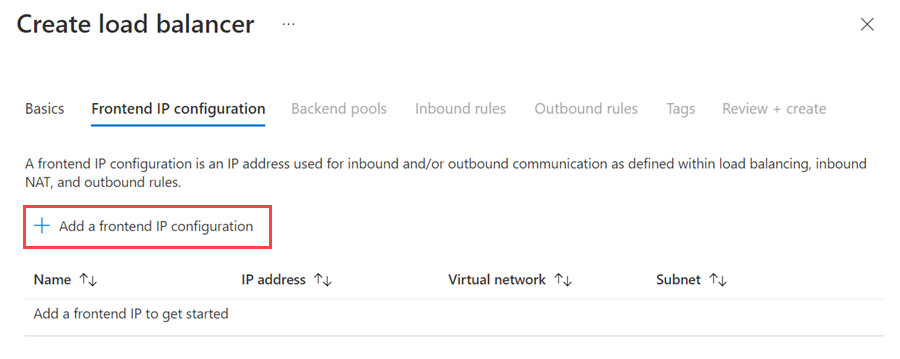
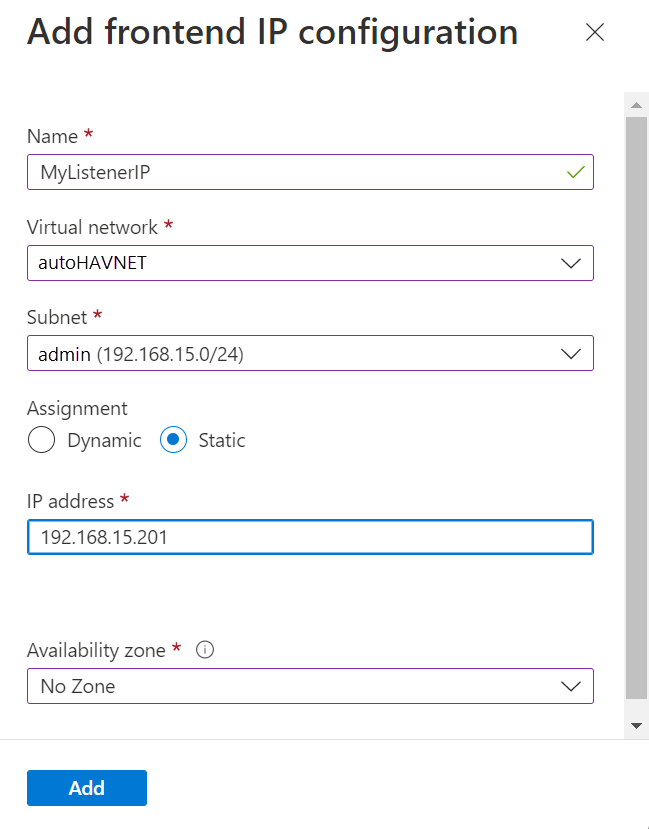
Set up the frontend IP address by using the following values:
- Name: Enter a name that identifies the frontend IP configuration.
- Virtual network: Select the same network as the virtual machines.
- Subnet: Select the same subnet as the virtual machines.
- Assignment: Select Static.
- IP address: Use an available address from the subnet. Use this address for your availability group listener. This address is different from your cluster IP address.
- Availability zone: Optionally, choose an availability zone to deploy your IP address to.
The following image shows the Add frontend IP configuration dialog:
Select Add.
Choose Review + Create to validate the configuration. Then select Create to create the load balancer and the frontend IP address.


To configure the load balancer, you need to create a backend pool, create a probe, and set the load-balancing rules.
Add a backend pool for the availability group listener
In the Azure portal, go to your resource group. You might need to refresh the view to see the newly created load balancer.

Select the load balancer, select Backend pools, and then select +Add.
For Name, provide a name for the backend pool.
For Backend Pool Configuration, select NIC.
Select Add to associate the backend pool with the availability set that contains the VMs.
Under Virtual machine, choose the virtual machines that will host availability group replicas. Don't include the file share witness server.
Note
If both virtual machines are not specified, only connections to the primary replica will succeed.
Select Add to add the virtual machines to the backend pool.
Select Save to create the backend pool.

Set the probe
In the Azure portal, select the load balancer, select Health probes, and then select +Add.
Set the listener health probe as follows:
Setting Description Example Name Text SQLAlwaysOnEndPointProbe Protocol Choose TCP TCP Port Any unused port 59999 Interval The amount of time between probe attempts, in seconds 5 Select Add.
Set the load balancing rules
In the Azure portal, select the load balancer, select Load balancing rules, and then select +Add.
Set the listener's load-balancing rules as follows:
Setting Description Example Name Text SQLAlwaysOnEndPointListener Frontend IP address Choose an address Use the address that you created when you created the load balancer. Backend pool Choose the backend pool Select the backend pool that contains the virtual machines targeted for the load balancer. Protocol Choose TCP TCP Port Use the port for the availability group listener 1433 Backend Port This field isn't used when a floating IP is set for direct server return 1433 Health Probe The name that you specified for the probe SQLAlwaysOnEndPointProbe Session Persistence Dropdown list None Idle Timeout Minutes to keep a TCP connection open 4 Floating IP (direct server return) A flow topology and an IP address mapping scheme Enabled Warning
Direct server return is set during creation. You can't change it.
Select Save.
Add the cluster core IP address for the Windows Server failover cluster
The IP address for the Windows Server failover cluster also needs to be on the load balancer. If you're using Windows Server 2019, skip this process because the cluster creates a Distributed Server Name value instead of the Cluster Network Name value.
In the Azure portal, go to the same Azure load balancer. Select Frontend IP configuration, and then select +Add. Use the IP address that you configured for the Windows Server failover cluster in the cluster core resources. Set the IP address as Static.
On the load balancer, select Health probes, and then select +Add.
Set the cluster core IP address health probe for the Windows Server failover cluster as follows:
Setting Description Example Name Text WSFCEndPointProbe Protocol Choose TCP TCP Port Any unused port 58888 Interval The amount of time between probe attempts, in seconds 5 Select Add to set the health probe.
Select Load balancing rules, and then select +Add.
Set the load-balancing rules for the cluster core IP address as follows:
Setting Description Example Name Text WSFCEndPoint Frontend IP address Choose an address Use the address that you created when you configured the IP address for the Windows Server failover cluster. This is different from the listener IP address. Backend pool Choose the backend pool Select the backend pool that contains the virtual machines targeted for the load balancer. Protocol Choose TCP TCP Port Use the port for the cluster IP address. This is an available port that isn't used for the listener probe port. 58888 Backend Port This field isn't used when a floating IP is set for direct server return 58888 Probe The name that you specified for the probe WSFCEndPointProbe Session Persistence Dropdown list None Idle Timeout Minutes to keep a TCP connection open 4 Floating IP (direct server return) A flow topology and an IP address mapping scheme Enabled Warning
Direct server return is set during creation. You can't change it.
Select OK.
Configure the listener
The next thing to do is configure an availability group listener on the failover cluster.
Note
This tutorial shows how to create a single listener, with one IP address for the internal load balancer. To create listeners by using one or more IP addresses, see Configure one or more Always On availability group listeners.
The availability group listener is an IP address and network name that the SQL Server availability group listens on. To create the availability group listener:
Get the name of the cluster network resource:
a. Use RDP to connect to the Azure virtual machine that hosts the primary replica.
b. Open Failover Cluster Manager.
c. Select the Networks node, and note the cluster network name. Use this name in the
$ClusterNetworkNamevariable in the PowerShell script. In the following image, the cluster network name is Cluster Network 1: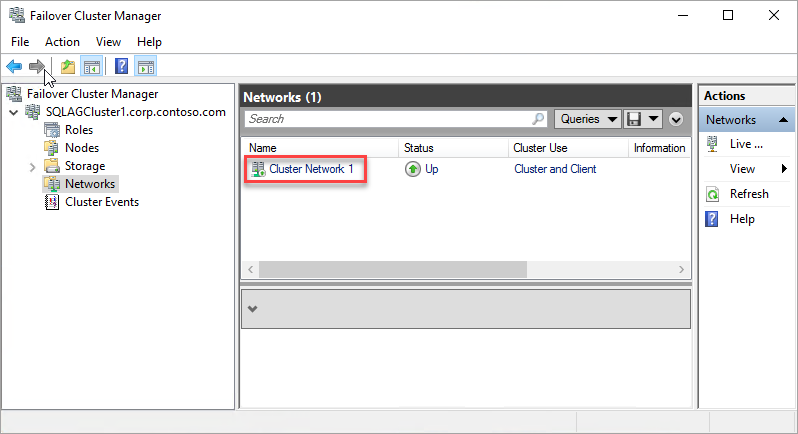
Add the client access point. The client access point is the network name that applications use to connect to the databases in an availability group.
a. In Failover Cluster Manager, expand the cluster name, and then select Roles.
b. On the Roles pane, right-click the availability group name, and then select Add Resource > Client Access Point.
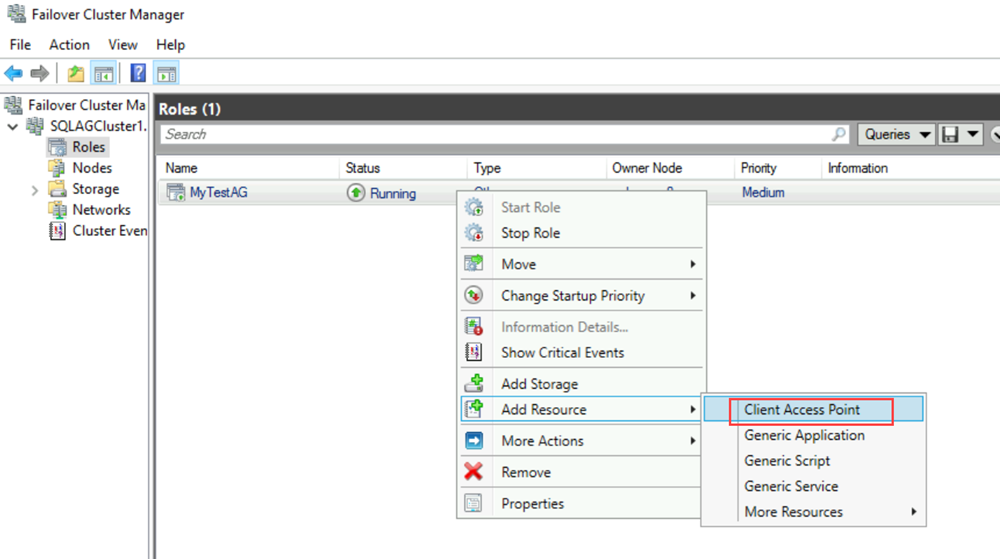
c. In the Name box, create a name for this new listener. The name for the new listener is the network name that applications use to connect to databases in the SQL Server availability group.
d. To finish creating the listener, select Next twice, and then select Finish. Don't bring the listener or resource online at this point.
Take the cluster role for the availability group offline. In Failover Cluster Manager, under Roles, right-click the role, and then select Stop Role.
Configure the IP resource for the availability group:
a. Select the Resources tab, and then expand the client access point that you created. The client access point is offline.
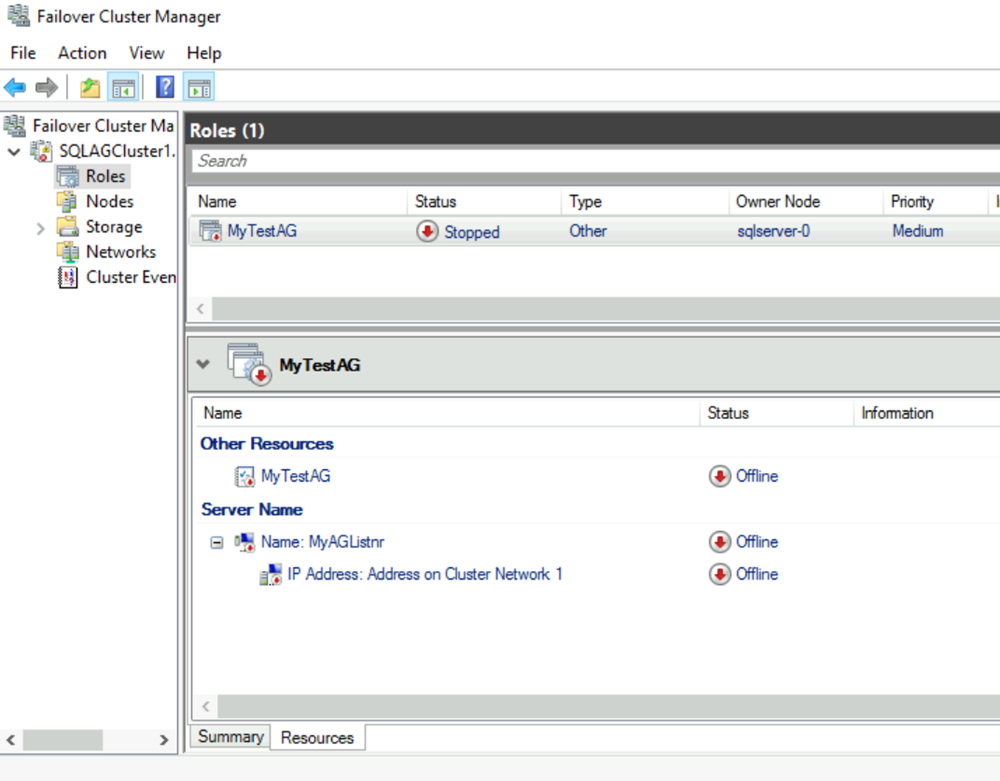
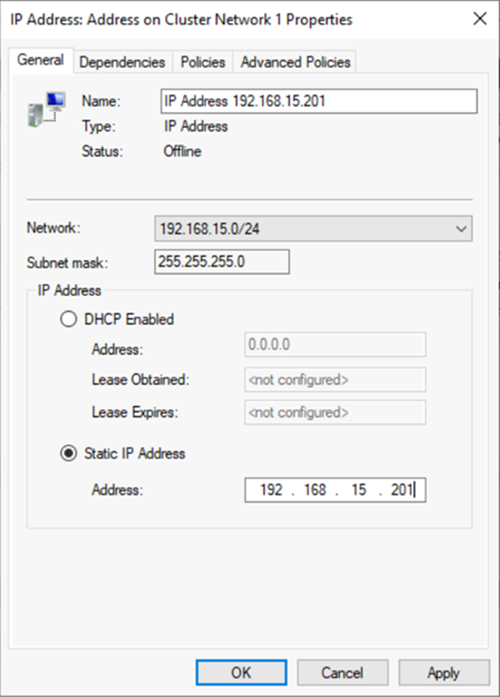
b. Right-click the IP resource, and then select Properties. Note the name of the IP address, and use it in the
$IPResourceNamevariable in the PowerShell script.c. Under IP Address, select Static IP Address. Set the IP address as the same address that you used when you set the load balancer address on the Azure portal.
Make the SQL Server availability group dependent on the client access point:
a. In Failover Cluster Manager, select Roles, and then select your availability group.
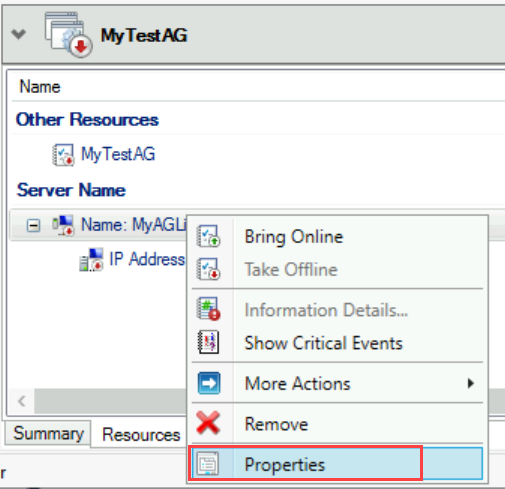
b. On the Resources tab, under Other Resources, right-click the availability group resource, and then select Properties.
c. On the Dependencies tab, add the name of the client access point (the listener).
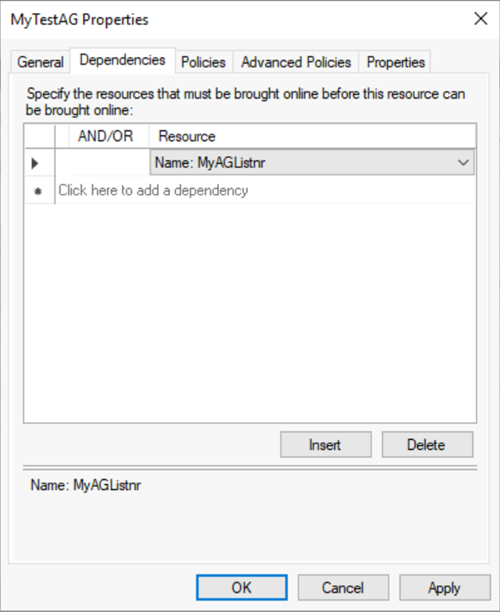
d. Select OK.
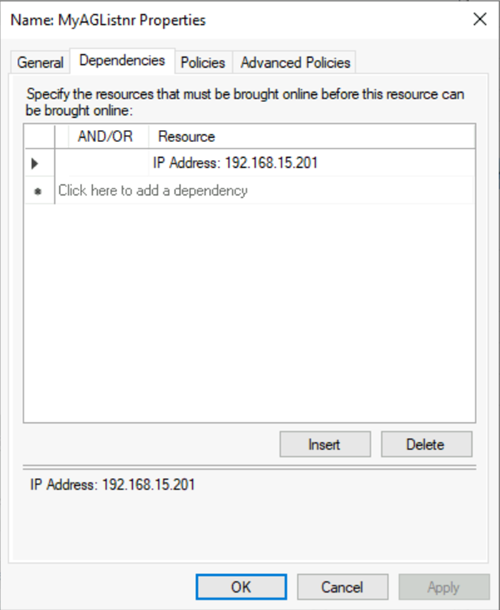
Make the client access point dependent on the IP address:
a. In Failover Cluster Manager, select Roles, and then select your availability group.
b. On the Resources tab, right-click the client access point under Server Name, and then select Properties.
c. Select the Dependencies tab. Verify that the IP address is a dependency. If it isn't, set a dependency on the IP address. If multiple resources are listed, verify that the IP addresses have OR, not AND, dependencies. Then select OK.
Tip
You can validate that the dependencies are correctly configured. In Failover Cluster Manager, go to Roles, right-click the availability group, select More Actions, and then select Show Dependency Report. When the dependencies are correctly configured, the availability group is dependent on the network name, and the network name is dependent on the IP address.
Set the cluster parameters in PowerShell:
a. Copy the following PowerShell script to one of your SQL Server instances. Update the variables for your environment.
$ClusterNetworkNamefind the name in the Failover Cluster Manager by selecting Networks, right-click the network and select Properties. The $ClusterNetworkName is under Name on the General tab.$IPResourceNameis the name given to the IP Address resource in the Failover Cluster Manager. This is found in the Failover Cluster Manager by selecting Roles, select the SQL Server AG or FCI name, select the Resources tab under Server Name, right-click the IP address resource and select Properties. The correct value is under Name on the General tab.$ListenerILBIPis the IP address that you created on the Azure load balancer for the availability group listener. Find the $ListenerILBIP in the Failover Cluster Manager on the same properties page as the SQL Server AG/FCI Listener Resource Name.$ListenerProbePortis the port that you configured on the Azure load balancer for the availability group listener, such as 59999. Any unused TCP port is valid.
$ClusterNetworkName = "<MyClusterNetworkName>" # The cluster network name. Use Get-ClusterNetwork on Windows Server 2012 or later to find the name.
$IPResourceName = "<IPResourceName>" # The IP address resource name.
$ListenerILBIP = "<n.n.n.n>" # The IP address of the internal load balancer. This is the static IP address for the load balancer that you configured in the Azure portal.
[int]$ListenerProbePort = <nnnnn>

Import-Module FailoverClusters

Get-ClusterResource $IPResourceName | Set-ClusterParameter -Multiple @{"Address"="$ListenerILBIP";"ProbePort"=$ListenerProbePort;"SubnetMask"="255.255.255.255";"Network"="$ClusterNetworkName";"EnableDhcp"=0}
b. Set the cluster parameters by running the PowerShell script on one of the cluster nodes.
Note
If your SQL Server instances are in separate regions, you need to run the PowerShell script twice. The first time, use the
$ListenerILBIPand$ListenerProbePortvalues from the first region. The second time, use the$ListenerILBIPand$ListenerProbePortvalues from the second region. The cluster network name and the cluster IP resource name are also different for each region.Bring the cluster role for the availability group online. In Failover Cluster Manager, under Roles, right-click the role, and then select Start Role.
If necessary, repeat the preceding steps to set the cluster parameters for the IP address of the Windows Server failover cluster:
Get the IP address name of the Windows Server failover cluster. In Failover Cluster Manager, under Cluster Core Resources, locate Server Name.
Right-click IP Address, and then select Properties.
Copy the name of the IP address from Name. It might be Cluster IP Address.
Set the cluster parameters in PowerShell:
a. Copy the following PowerShell script to one of your SQL Server instances. Update the variables for your environment.
$ClusterCoreIPis the IP address that you created on the Azure load balancer for the Windows Server failover cluster's core cluster resource. It's different from the IP address for the availability group listener.$ClusterProbePortis the port that you configured on the Azure load balancer for the Windows Server failover cluster's health probe. It's different from the probe for the availability group listener.
$ClusterNetworkName = "<MyClusterNetworkName>" # The cluster network name. Use Get-ClusterNetwork on Windows Server 2012 or later to find the name.
$IPResourceName = "<ClusterIPResourceName>" # The IP address resource name.
$ClusterCoreIP = "<n.n.n.n>" # The IP address of the cluster IP resource. This is the static IP address for the load balancer that you configured in the Azure portal.
[int]$ClusterProbePort = <nnnnn> # The probe port from WSFCEndPointprobe in the Azure portal. This port must be different from the probe port for the availability group listener.

Import-Module FailoverClusters

Get-ClusterResource $IPResourceName | Set-ClusterParameter -Multiple @{"Address"="$ClusterCoreIP";"ProbePort"=$ClusterProbePort;"SubnetMask"="255.255.255.255";"Network"="$ClusterNetworkName";"EnableDhcp"=0}
b. Set the cluster parameters by running the PowerShell script on one of the cluster nodes.
If any SQL resource is configured to use a port between 49152 and 65536 (the default dynamic port range for TCP/IP), add an exclusion for each port. Such resources might include:
- SQL Server database engine
- Always On availability group listener
- Health probe for the failover cluster instance
- Database mirroring endpoint
- Cluster core IP resource
Adding an exclusion will prevent other system processes from being dynamically assigned to the same port. For this scenario, configure the following exclusions on all cluster nodes:
netsh int ipv4 add excludedportrange tcp startport=58888 numberofports=1 store=persistentnetsh int ipv4 add excludedportrange tcp startport=59999 numberofports=1 store=persistent
It's important to configure the port exclusion when the port is not in use. Otherwise, the command will fail with a message like "The process cannot access the file because it is being used by another process."
To confirm that the exclusions are configured correctly, use the following command: netsh int ipv4 show excludedportrange tcp.
Warning
The port for the availability group listener's health probe has to be different from the port for the cluster core IP address's health probe. In these examples, the listener port is 59999 and the cluster core IP address's health probe port is 58888. Both ports require an "allow inbound" firewall rule.
Set the listener port
In SQL Server Management Studio, set the listener port:
Open SQL Server Management Studio and connect to the primary replica.
Go to Always On High Availability > Availability groups > Availability group listeners.
Right-click the listener name that you created in Failover Cluster Manager, and then select Properties.
In the Port box, specify the port number for the availability group listener. The default is 1433. Select OK.
You now have an availability group for SQL Server on Azure VMs running in Azure Resource Manager mode.
Test the connection to the listener
To test the connection:
Use Bastion to connect to a SQL Server VM that's in the same virtual network but doesn't own the replica, such as the other replica.
Use the sqlcmd utility to test the connection. For example, the following script establishes a sqlcmd connection to the primary replica through the listener by using Windows authentication:
sqlcmd -S <listenerName> -EIf the listener is using a port other than the default port (1433), specify the port in the connection string. For example, the following command connects to a listener at port 1435:
sqlcmd -S <listenerName>,1435 -E
The sqlcmd utility automatically connects to whichever SQL Server instance is the current primary replica of the availability group.
Tip
Make sure that the port you specify is open on the firewall of both SQL Server VMs. Both servers require an inbound rule for the TCP port that you use. For more information, see Add or edit firewall rules.
Related content
- Add an IP address to a load balancer for a second availability group
- Configure automatic or manual failover
- Windows Server failover cluster with SQL Server on Azure VMs
- Always On availability groups with SQL Server on Azure VMs
- Overview of Always On availability groups
- HADR settings for SQL Server on Azure VMs