Note
Access to this page requires authorization. You can try signing in or changing directories.
Access to this page requires authorization. You can try changing directories.
Applies to: ![]() SQL Server on Azure VM
SQL Server on Azure VM
This article describes how to change the edition of SQL Server on a Windows virtual machine in Azure.
The edition of SQL Server is determined by the product key, and is specified during the installation process using the installation media. The edition dictates what features are available in the SQL Server product. You can change the SQL Server edition with the installation media and either downgrade to reduce cost or upgrade to enable more features.
Once the edition of SQL Server has been changed internally to the SQL Server VM, you must then update the edition property of SQL Server in the Azure portal for billing purposes.
Prerequisites
To do an in-place change of the edition of SQL Server, you need the following:
- An Azure subscription.
- A SQL Server VM on Windows registered with the SQL IaaS Agent extension.
- Setup media with the desired edition of SQL Server. Customers who have Software Assurance can obtain their installation media from the Volume Licensing Center. Customers who don't have Software Assurance can deploy an Azure Marketplace SQL Server VM image with the desired edition of SQL Server and then copy the setup media (typically located in
C:\SQLServerFull) from it to their target SQL Server VM.
Delete the extension
Before you modify the edition of SQL Server, be sure to delete the SQL IaaS Agent extension from the SQL Server VM. You can do so with the Azure portal, PowerShell, or the Azure CLI.
To delete the extension from your SQL Server VM with Azure PowerShell, use the following sample command:
Remove-AzSqlVM -ResourceGroupName <resource_group_name> -Name <SQL VM resource name>
Upgrade an edition
Warning
Upgrading the edition of SQL Server will restart the service for SQL Server, along with any associated services, such as Analysis Services and R Services.
To upgrade the edition of SQL Server, obtain the SQL Server setup media for the desired edition of SQL Server, and then do the following:
Open Setup.exe from the SQL Server installation media.
Go to Maintenance and choose the Edition Upgrade option.
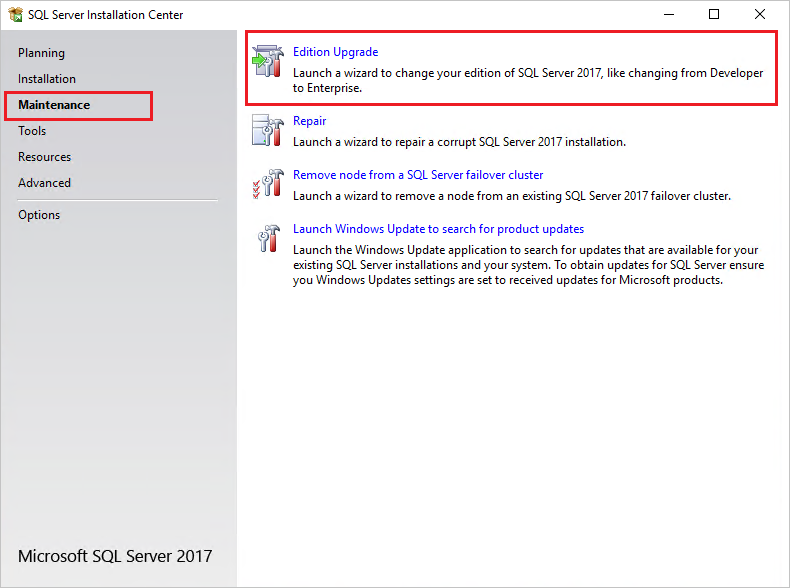
Select Next until you reach the Ready to upgrade edition page, and then select Upgrade. The setup window might stop responding for a few minutes while the change is taking effect. A Complete page confirms that your edition upgrade is finished.
After the SQL Server edition is upgraded, modify the edition property of the SQL Server virtual machine in the Azure portal. This updates the metadata and billing associated with this VM.
After you change the edition of SQL Server, register your SQL Server VM with the SQL IaaS Agent extension again so that you can use the Azure portal to view the edition of SQL Server. Then be sure to Change the edition of SQL Server in the Azure portal.
Downgrade an edition
To downgrade the edition of SQL Server, you need to completely uninstall SQL Server, and reinstall it again with the desired edition setup media. You can get the setup media by deploying a SQL Server VM from the marketplace image with your desired edition, and then copying the setup media to the target SQL Server VM, or using the Volume Licensing Center if you have software assurance.
Warning
Uninstalling SQL Server might incur additional downtime.
You can downgrade the edition of SQL Server by following these steps:
- Back up all databases, including the system databases.
- Move system databases (master, model, and msdb) to a new location.
- Completely uninstall SQL Server and all associated services.
- Restart the virtual machine.
- Install SQL Server by using the media with the desired edition of SQL Server.
- Install the latest service packs and cumulative updates.
- Replace the new system databases that were created during installation with the system databases that you previously moved to a different location.
- After the SQL Server edition is downgraded, modify the edition property of the SQL Server virtual machine in the Azure portal. This updates the metadata and billing associated with this VM.
After you change the edition of SQL Server, register your SQL Server VM with the SQL IaaS Agent extension again so that you can use the Azure portal to view the edition of SQL Server. Then be sure to Change the edition of SQL Server in the Azure portal.
Register with the extension
After you've successfully changed the edition of SQL Server, you must register your SQL Server VM with the SQL IaaS Agent extension again to manage it from the Azure portal.
Register a SQL Server VM with Azure PowerShell:
# Get the existing Compute VM
$vm = Get-AzVM -Name <vm_name> -ResourceGroupName <resource_group_name>

New-AzSqlVM -Name $vm.Name -ResourceGroupName $vm.ResourceGroupName -Location $vm.Location `
-LicenseType <license_type>
Change edition property for billing
Once you've modified the edition of SQL Server using the installation media, and you've registered your SQL Server VM with the SQL IaaS Agent extension, you can then use the Azure portal or the Azure CLI to modify the edition property of the SQL Server VM for billing purposes.
To change the edition property of the SQL Server VM for billing purposes by using the Azure portal, follow these steps:
Sign in to the Azure portal.
Go to your SQL Server virtual machine resource.
Under Settings, select Configure. Then select your desired edition of SQL Server from the drop-down list under Edition.
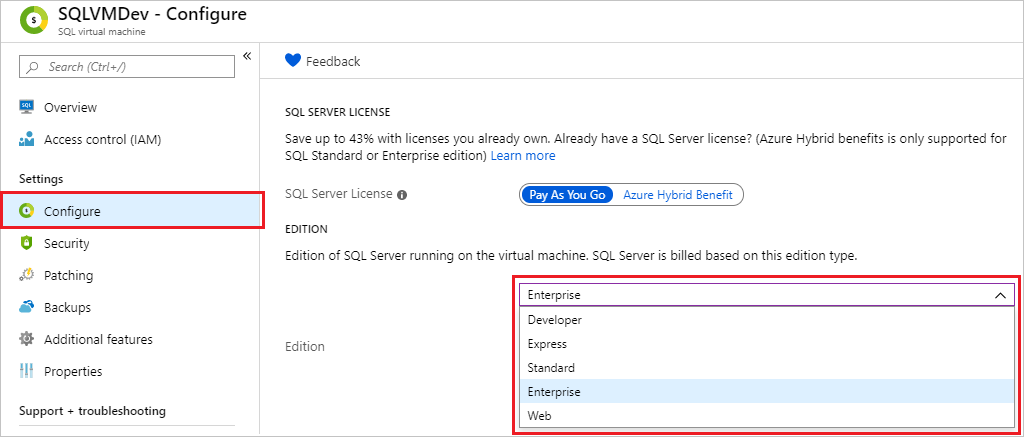
Review the warning that says you must change the SQL Server edition first, and that the edition property must match the SQL Server edition.
Select Apply to apply your edition metadata changes.
Remarks
- The edition property for the SQL Server VM must match the edition of the SQL Server instance installed for all SQL Server virtual machines, including both pay-as-you-go and bring-your-own-license types of licenses.
- If you drop your SQL Server VM resource, you'll go back to the hard-coded edition setting of the image.
- The ability to change the edition is a feature of the SQL IaaS Agent extension. Deploying an Azure Marketplace image through the Azure portal automatically registers a SQL Server VM with the SQL IaaS Agent extension. However, customers who are self-installing SQL Server need to manually register their SQL Server VM.
- Adding a SQL Server VM to an availability set requires re-creating the VM. Any VMs added to an availability set go back to the default edition, and the edition needs to be modified again.