Note
Access to this page requires authorization. You can try signing in or changing directories.
Access to this page requires authorization. You can try changing directories.
Applies to: ![]() SQL Server on Azure VM
SQL Server on Azure VM
Overview
This article describes how to connect to your SQL on Azure virtual machine (VM). It covers some general connectivity scenarios. If you need to troubleshoot or configure connectivity outside of the portal, see the manual configuration at the end of this topic.
If you would rather have a full walkthrough of both provisioning and connectivity, see Provision a SQL Server virtual machine on Azure.
Connection scenarios
The way a client connects to a SQL Server VM differs depending on the location of the client and the networking configuration.
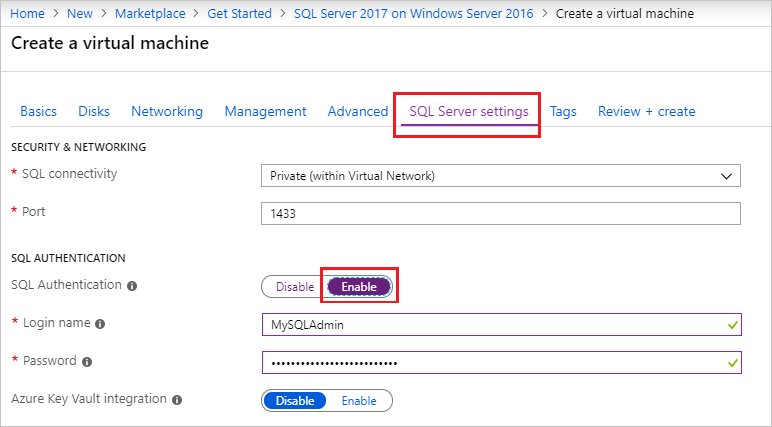
If you provision a SQL Server VM in the Azure portal, you have the option of specifying the type of SQL connectivity.
Your options for connectivity include:
| Option | Description |
|---|---|
| Public | Connect to SQL Server over the internet. |
| Private | Connect to SQL Server in the same virtual network. |
| Local | Connect to SQL Server locally on the same virtual machine. |
The following sections explain the Public and Private options in more detail.
Connect to SQL Server over the internet
If you want to connect to your SQL Server database engine from the internet, select Public for the SQL connectivity type in the portal during provisioning. The portal automatically does the following steps:
- Enables the TCP/IP protocol for SQL Server.
- Configures a firewall rule to open the SQL Server TCP port (default 1433).
- Enables SQL Server authentication, required for public access.
- Configures the network security group on the VM to all TCP traffic on the SQL Server port.
Important
The virtual machine images for the SQL Server Developer and Express editions do not automatically enable the TCP/IP protocol. For Developer and Express editions, you must use SQL Server Configuration Manager to manually enable the TCP/IP protocol after creating the VM.
Any client with internet access can connect to the SQL Server instance by specifying either the public IP address of the virtual machine or any DNS label assigned to that IP address. If the SQL Server port is 1433, you do not need to specify it in the connection string. The following connection string connects to a SQL VM with a DNS label of sqlvmlabel.eastus.cloudapp.azure.com using SQL authentication (you could also use the public IP address).
Server=sqlvmlabel.eastus.cloudapp.azure.com;Integrated Security=false;User ID=<login_name>;Password=<password>
Although this string enables connectivity for clients over the internet, this does not imply that anyone can connect to your SQL Server instance. Outside clients have to use the correct username and password. However, for additional security, you can avoid the well-known port 1433. For example, if you were to configure SQL Server to listen on port 1500 and establish proper firewall and network security group rules, you could connect by appending the port number to the server name. The following example alters the previous one by adding a custom port number, 1500, to the server name:
Server=sqlvmlabel.eastus.cloudapp.azure.com,1500;Integrated Security=false;User ID=<login_name>;Password=<password>"
Note
When you query SQL Server on VM over the internet, all outgoing data from the Azure datacenter is subject to normal pricing on outbound data transfers.
Connect to SQL Server within a virtual network
When you choose Private for the SQL connectivity type in the portal, Azure configures most of the settings identical to Public. The one difference is that there is no network security group rule to allow outside traffic on the SQL Server port (default 1433).
Important
The virtual machine images for the SQL Server Developer and Express editions do not automatically enable the TCP/IP protocol. For Developer and Express editions, you must use SQL Server Configuration Manager to manually enable the TCP/IP protocol after creating the VM.
Private connectivity is often used in conjunction with a virtual network, which enables several scenarios. You can connect VMs in the same virtual network, even if those VMs exist in different resource groups. And with a site-to-site VPN, you can create a hybrid architecture that connects VMs with on-premises networks and machines.
Virtual networks also enable you to join your Azure VMs to a domain. This is the only way to use Windows authentication to SQL Server. The other connection scenarios require SQL authentication with user names and passwords.
Assuming that you have configured DNS in your virtual network, you can connect to your SQL Server instance by specifying the SQL Server VM computer name in the connection string. The following example also assumes that Windows authentication has been configured and that the user has been granted access to the SQL Server instance.
Server=mysqlvm;Integrated Security=true
Enable TCP/IP for Developer and Express editions
When changing SQL Server connectivity settings, Azure does not automatically enable the TCP/IP protocol for SQL Server Developer and Express editions. The steps below explain how to manually enable TCP/IP so that you can connect remotely by IP address.
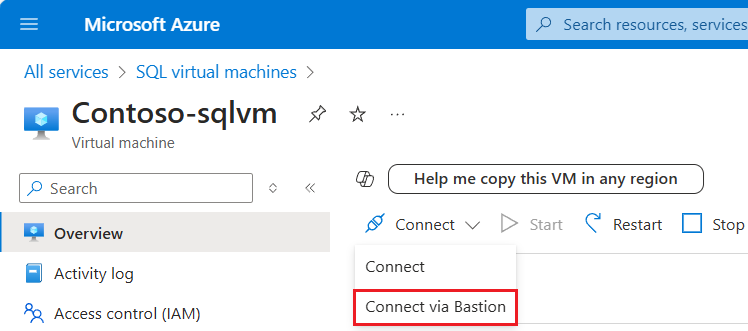
First, connect to the SQL Server virtual machine with remote desktop.
After the Azure virtual machine is created and running, select Virtual machine, and then choose your new VM.
Select Connect and then choose Connect via Bastion from the drop-down to go to the Bastion page for your VM.
Select Deploy Bastion and wait for the process to finish.
After Bastion is deployed successfully, choose the authentication type, enter authentication details, and then select Connect:
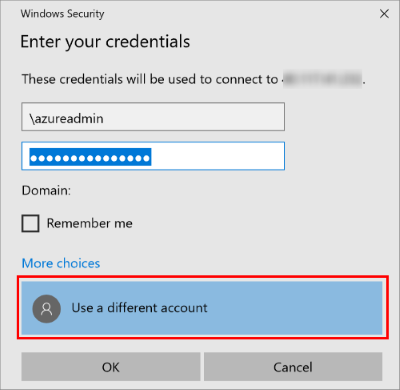
You may need to disable the pop-up blocker in your browser to open the Bastion session in a new browser tab.
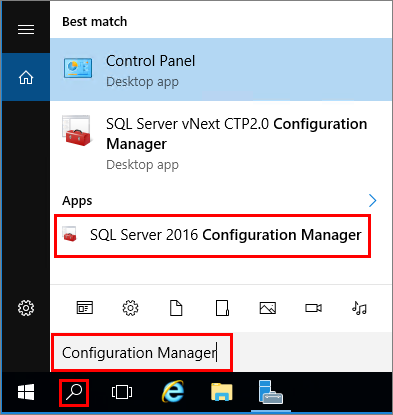
Next, enable the TCP/IP protocol with SQL Server Configuration Manager.
While connected to the virtual machine with remote desktop, search for Configuration Manager:
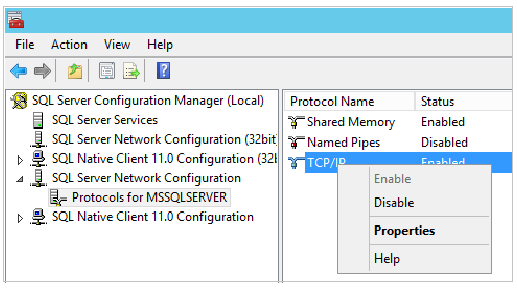
In SQL Server Configuration Manager, in the console pane, expand SQL Server Network Configuration.
In the console pane, click Protocols for MSSQLSERVER (the default instance name.) In the details pane, right-click TCP and click Enable if it is not already enabled.
In the console pane, click SQL Server Services. In the details pane, right-click SQL Server (instance name) (the default instance is SQL Server (MSSQLSERVER)), and then click Restart, to stop and restart the instance of SQL Server.

Close SQL Server Configuration Manager.
For more information about enabling protocols for the SQL Server Database Engine, see Enable or Disable a Server Network Protocol.
Connect with SSMS
The following steps show how to create an optional DNS label for your Azure VM and then connect with SQL Server Management Studio (SSMS).
Configure a DNS Label for the public IP address
To connect to the SQL Server Database Engine from the Internet, consider creating a DNS Label for your public IP address. You can connect by IP address, but the DNS Label creates an A Record that is easier to identify and abstracts the underlying public IP address.
Note
DNS Labels are not required if you plan to only connect to the SQL Server instance within the same Virtual Network or only locally.
To create a DNS Label, first select Virtual machines in the portal. Select your SQL Server VM to bring up its properties.
In the virtual machine overview, select your Public IP address.
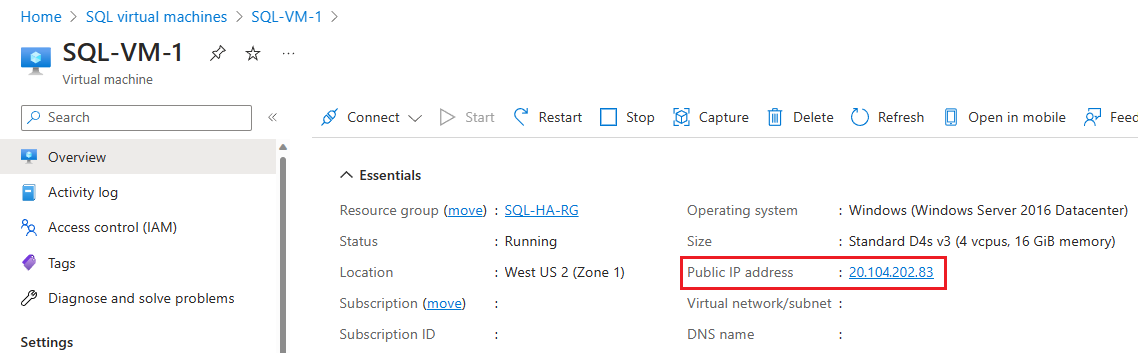
In the properties for your Public IP address, expand Configuration.
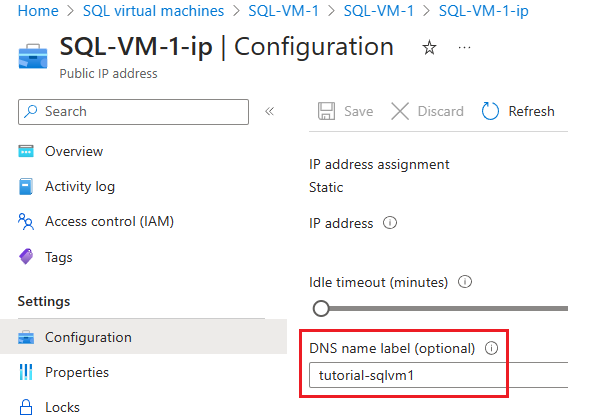
Enter a DNS Label name. This name is an A Record that can be used to connect to your SQL Server VM by name instead of by IP Address directly.
Select the Save button.
Connect to the Database Engine from another computer
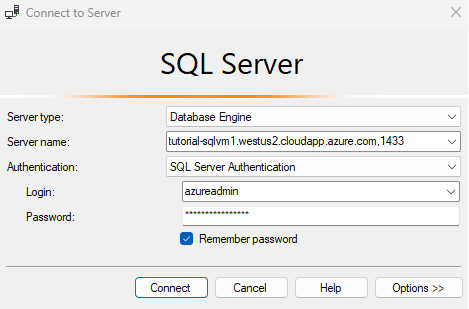
On a computer connected to the internet, open SQL Server Management Studio (SSMS). If you do not have SQL Server Management Studio, you can download it here.
In the Connect to Server or Connect to Database Engine dialog box, edit the Server name value. Enter the IP address or full DNS name of the virtual machine (determined in the previous task). You can also add a comma and provide SQL Server's TCP port. For example,
tutorial-sqlvm1.westus2.cloudapp.azure.com,1433.In the Authentication box, select SQL Server Authentication.
In the Login box, type the name of a valid SQL login.
In the Password box, type the password of the login.
Select Connect.
Manual configuration and troubleshooting
Although the portal provides options to automatically configure connectivity, it is useful to know how to manually configure connectivity. Understanding the requirements can also aid troubleshooting.
The following table lists the requirements to connect to SQL Server on Azure VM.
| Requirement | Description |
|---|---|
| Enable SQL Server authentication mode | SQL Server authentication is needed to connect to the VM remotely unless you have configured Active Directory on a virtual network. |
| Create a SQL login | If you are using SQL authentication, you need a SQL login with a user name and password that also has permissions to your target database. |
| Enable TCP/IP protocol | SQL Server must allow connections over TCP. |
| Enable firewall rule for the SQL Server port | The firewall on the VM must allow inbound traffic on the SQL Server port (default 1433). |
| Create a network security group rule for TCP 1433 | You must allow the VM to receive traffic on the SQL Server port (default 1433) if you want to connect over the internet. Local and virtual-network-only connections do not require this. This is the only step required in the Azure portal. |
Tip
The steps in the preceding table are done for you when you configure connectivity in the portal. Use these steps only to confirm your configuration or to set up connectivity manually for SQL Server.
Connect to a SQL Server on Azure VM using Microsoft Entra ID
Enable authentication with Microsoft Entra ID (formerly Azure Active Directory) for your SQL Server on Azure Virtual Machines via the Azure portal. SQL Server with Microsoft Entra authentication is only supported on SQL Server 2022 (16.x) and later versions.
Next steps
To see provisioning instructions along with these connectivity steps, see Provisioning a SQL Server virtual machine on Azure.
For other topics related to running SQL Server on Azure VMs, see SQL Server on Azure virtual machines.