Connect Azure Stack Hub to Azure using VPN
This article describes how to create a site-to-site VPN to connect a virtual network in Azure Stack Hub to a virtual network in Azure.
Before you begin
To complete the connection configuration, make sure you have the following items before you begin:
- An Azure Stack Hub integrated systems (multi-node) deployment that is directly connected to the internet. Your external public IP address range must be directly reachable from the public internet.
- A valid Azure subscription. If you don't have an Azure subscription, you can create a free Azure account here.
VPN connection diagram
The following figure shows what the connection configuration should look like when you're done:

Network configuration example values
The network configuration examples table shows the values that are used for examples in this article. You can use these values, or you can refer to them to better understand the examples in this article:
| Value | Azure Stack Hub | Azure |
|---|---|---|
| Virtual network name | Azs-VNet | AzureVNet |
| Virtual network address space | 10.1.0.0/16 | 10.100.0.0/16 |
| Subnet name | FrontEnd | FrontEnd |
| Subnet address range | 10.1.0.0/24 | 10.100.0.0/24 |
| Gateway subnet | 10.1.1.0/24 | 10.100.1.0/24 |
Create the network resources in Azure
First, create the network resources for Azure. The following instructions show how to create the resources by using the Azure portal.
Create the virtual network and virtual machine (VM) subnet
- Sign in to the Azure portal using your Azure account.
- In the user portal, select + Create a resource.
- Go to Marketplace, and then select Networking.
- Select Virtual network.
- Use the information from the network configuration table to identify the values for Azure Name, Address space, Subnet name, and Subnet address range.
- For Resource Group, create a new resource group or, if you already have one, select Use existing.
- Select the Location of your VNet. If you're using the example values, select East US or use another location.
- Select Pin to dashboard.
- Select Create.
Create the gateway subnet
Open the virtual network resource you created (AzureVNet) from the dashboard.
On the Settings section, select Subnets.
Select Gateway subnet to add a gateway subnet to the virtual network.
The name of the subnet is set to GatewaySubnet by default.
Important
Gateway subnets are special and must have this specific name to function properly.
In the Address range field, verify the address is 10.100.1.0/24.
Select OK to create the gateway subnet.
Create the virtual network gateway
- In the Azure portal, select + Create a resource.
- Go to Marketplace, and then select Networking.
- From the list of network resources, select Virtual network gateway.
- In the Name field, type Azure-GW.
- To choose a virtual network, select Virtual network. Then select AzureVnet from the list.
- Select Public IP address. When the Choose public IP address section opens, select Create new.
- In the Name field, type Azure-GW-PiP, and then select OK.
- Verify that Subscription and Location are correct. You can pin the resource to the dashboard. Select Create.
Create the local network gateway resource
In the Azure portal, select + Create a resource.
Go to Marketplace, and then select Networking.
From the list of resources, select Local network gateway.
In the Name field, type Azs-GW.
In the IP address field, type the public IP address for your Azure Stack Hub Virtual Network Gateway that is listed previously in the network configuration table.
In the Address Space field, from Azure Stack Hub, type the 10.1.0.0/24 and 10.1.1.0/24 address space for AzureVNet.
Verify that your Subscription, Resource Group, and Location are correct, and then select Create.
Create the connection
In the user portal, select + Create a resource.
Go to Marketplace, and then select Networking.
From the list of resources, select Connection.
On the Basic settings section, for the Connection type, choose Site-to-site (IPSec).
Select the Subscription, Resource Group, and Location, and then select OK.
On the Settings section, select Virtual network gateway, and then select Azure-GW.
Select Local network gateway, and then select Azs-GW.
In Connection name, type Azure-Azs.
In Shared key (PSK), type 12345, then select OK.
Note
If you use a different value for the shared key, remember that it must match the value for the shared key that you create on the other end of the connection.
Review the Summary section, and then select OK.
Create a custom IPSec policy
A custom IPSec policy is needed in order for Azure to match Azure Stack Hub.
Create a custom policy:
$IPSecPolicy = New-AzIpsecPolicy -IkeEncryption AES256 -IkeIntegrity SHA384 -DhGroup ECP384  `
-IpsecEncryption GCMAES256 -IpsecIntegrity GCMAES256 -PfsGroup ECP384 -SALifeTimeSeconds 27000 `
-SADataSizeKilobytes 102400000
Apply the policy to the connection:
$Connection = Get-AzVirtualNetworkGatewayConnection -Name myTunnel -ResourceGroupName myRG
Set-AzVirtualNetworkGatewayConnection -IpsecPolicies $IPSecPolicy -VirtualNetworkGatewayConnection $Connection
Create a VM
Now create a VM in Azure, and put it on your VM subnet in your virtual network.
In the Azure portal, select + Create a resource.
Go to Marketplace, and then select Compute.
In the list of VM images, select the Windows Server 2016 Datacenter Eval image.
On the Basics section, for Name, type AzureVM.
Type a valid username and password. You use this account to sign in to the VM after it's created.
Provide a Subscription, Resource Group, and Location, and then select OK.
On the Size section, select a VM size for this instance, and then select Select.
In the Settings section, you can use the default settings. Before you select OK, confirm that:
- The AzureVnet virtual network is selected.
- The subnet is set to 10.100.0.0/24.
Select OK.
Review the settings on the Summary section, and then select OK.
Create the network resources in Azure Stack Hub
Next, create the network resources in Azure Stack Hub.
Sign in as a user
A service admin can sign in as a user to test the plans, offers, and subscriptions that their users might use. If you don't already have one, create a user account before you sign in.
Create the virtual network and a VM subnet
Use a user account to sign in to the user portal.
In the user portal, select + Create a resource.
Go to Marketplace, and then select Networking.
Select Virtual network.
For Name, Address space, Subnet name, and Subnet address range, use the values from the network configuration table.
In Subscription, the subscription that you created earlier appears.
For Resource Group, you can either create a resource group or if you already have one, select Use existing.
Verify the default location.
Select Pin to dashboard.
Select Create.
Create the gateway subnet
On the dashboard, open the Azs-VNet virtual network resource you created.
On the Settings section, select Subnets.
To add a gateway subnet to the virtual network, select Gateway Subnet.
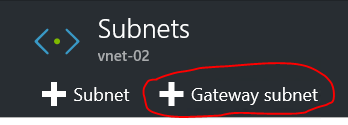
By default, the subnet name is set to GatewaySubnet. For gateway subnets to function properly, they must use the GatewaySubnet name.
In Address range, verify that the address is 10.1.1.0/24.
Select OK to create the gateway subnet.
Create the virtual network gateway
In the Azure Stack Hub portal, select + Create a resource.
Go to Marketplace, and then select Networking.
From the list of network resources, select Virtual network gateway.
In Name, type Azs-GW.
Select the Virtual network item to choose a virtual network. Select Azs-VNet from the list.
Select the Public IP address menu item. When the Choose public IP address section opens, select Create new.
In Name, type Azs-GW-PiP, and then select OK.
By default, Route-based is selected for VPN type. Keep the Route-based VPN type.
Verify that Subscription and Location are correct. You can pin the resource to the dashboard. Select Create.
Create the local network gateway
The concept of a local network gateway in Azure Stack Hub is different than in an Azure deployment.
In an Azure deployment, a local network gateway represents an on-premises (at the user location) physical device that you connect to a virtual network gateway in Azure. However, in Azure Stack Hub both ends of the connection are virtual network gateways.
A more generic description is that the local network gateway resource always indicates the remote gateway at the other end of the connection.
Create the local network gateway resource
Sign in to the Azure Stack Hub portal.
In the user portal, select + Create a resource.
Go to Marketplace, and then select Networking.
From the list of resources, select local network gateway.
In the Name field, type Azure-GW.
In the IP address field, type the public IP address for the virtual network gateway in Azure Azure-GW-PiP. This address appears earlier in the network configuration table.
In the Address Space field, for the address space of the Azure VNET that you created, type 10.100.0.0/24 and 10.100.1.0/24.
Verify that your Subscription, Resource Group, and location values are correct, and then select Create.
Create the connection
In the user portal, select + Create a resource.
Go to Marketplace, and then select Networking.
From the list of resources, select Connection.
On the Basics settings section, for the Connection type, select Site-to-site (IPSec).
Select the Subscription, Resource Group, and Location, and then select OK.
On the Settings section, select Virtual network gateway, and then select Azs-GW.
Select Local network gateway, and then select Azure-GW.
In Connection Name, type Azs-Azure.
In Shared key (PSK), type 12345, and then select OK.
On the Summary section, select OK.
Create a VM
To check the VPN connection, create two VMs: one in Azure, and one in Azure Stack Hub. After you create these VMs, you can use them to send and receive data through the VPN tunnel.
In the Azure portal, select + Create a resource.
Go to Marketplace, and then select Compute.
In the list of VM images, select the Windows Server 2016 Datacenter Eval image.
On the Basics section, in Name, type Azs-VM.
Type a valid username and password. You use this account to sign in to the VM after it's created.
Provide a Subscription, Resource Group, and Location, and then select OK.
On the Size section, for this instance, select a VM size, and then select Select.
On the Settings section, accept the defaults. Make sure that the Azs-VNet virtual network is selected. Verify that the subnet is set to 10.1.0.0/24. Then select OK.
On the Summary section, review the settings, and then select OK.
Test the connection
After the site-to-site connection is established, you should verify that you can get data flowing in both directions. The easiest way to test the connection is by doing a ping test:
- Sign in to the VM you created in Azure Stack Hub and ping the VM in Azure.
- Sign in to the VM you created in Azure and ping the VM in Azure Stack Hub.
Note
To make sure that you're sending traffic through the site-to-site connection, ping the Direct IP (DIP) address of the VM on the remote subnet, not the VIP.
Sign in to the user VM in Azure Stack Hub
Sign in to the Azure Stack Hub portal.
In the left navigation bar, select Virtual Machines.
In the list of VMs, find Azs-VM that you created previously, and then select it.
On the section for the VM, select Connect, and then open the Azs-VM.rdp file.

Sign in with the account that you configured when you created the VM.
Open an elevated Windows PowerShell prompt.
Type ipconfig /all.
In the output, find the IPv4 Address, and then save the address for later use. This is the address that you ping from Azure. In the example environment, the address is 10.1.0.4, but in your environment it might be different. It should fall within the 10.1.0.0/24 subnet that you created previously.
To create a firewall rule that allows the VM to respond to pings, run the following PowerShell command:
New-NetFirewallRule `
 -DisplayName "Allow ICMPv4-In" `
 -Protocol ICMPv4
Sign in to the tenant VM in Azure
Sign in to the Azure portal.
In the left navigation bar, select Virtual Machines.
From the list of VMs, find Azure-VM that you created previously, and then select it.
On the section for the VM, select Connect.
Sign in with the account that you configured when you created the VM.
Open an elevated Windows PowerShell window.
Type ipconfig /all.
You should see an IPv4 address that falls within 10.100.0.0/24. In the example environment, the address is 10.100.0.4, but your address might be different.
To create a firewall rule that allows the VM to respond to pings, run the following PowerShell command:
New-NetFirewallRule `
 -DisplayName "Allow ICMPv4-In" `
 -Protocol ICMPv4
From the VM in Azure, ping the VM in Azure Stack Hub, through the tunnel. To do this, you ping the DIP that you recorded from Azs-VM. In the example environment, this is 10.1.0.4, but be sure to ping the address you noted in your lab. You should see a result that looks like the following screen capture:
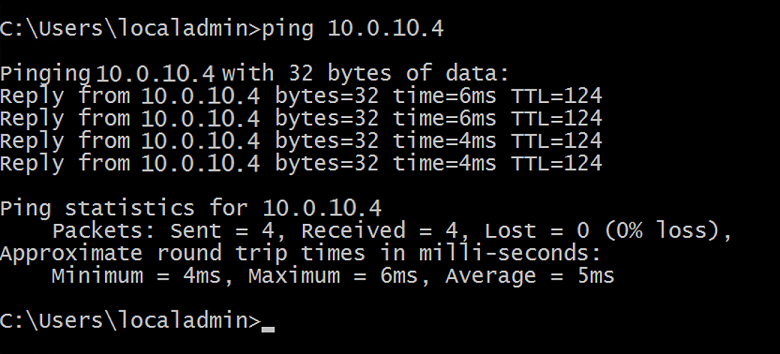
A reply from the remote VM indicates a successful test. You can close the VM window.
You should also do more rigorous data transfer testing (for example, copying differently-sized files in both directions).
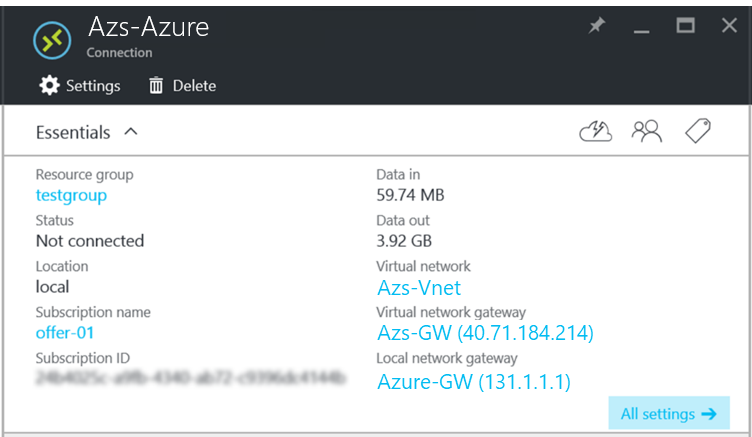
Viewing data transfer statistics through the gateway connection
If you want to know how much data passes through your site-to-site connection, this information is available in the Connection section. This test is also another way to verify the ping you just sent actually went through the VPN connection.
While signed in to the user VM in Azure Stack Hub, use your user account to sign in to the user portal.
Go to All resources, and then select the Azs-Azure connection. Connections appears.
On the Connection section, the statistics for Data in and Data out appear. In the following screen capture, the large numbers are attributed to additional file transfer. You should see some nonzero values there.