Note
Access to this page requires authorization. You can try signing in or changing directories.
Access to this page requires authorization. You can try changing directories.
Note
Face identification, customization, and celebrity recognition features access is limited based on eligibility and usage criteria in order to support our Responsible AI principles. Face identification, customization, and celebrity recognition features are only available to Microsoft managed customers and partners. Use the Face Recognition intake form to apply for access.
To start using Azure AI Video Indexer, create an Azure AI Video Indexer account.
This article walks you through the steps of creating the Azure AI Video Indexer account and its accompanying resources. The account that gets created is an Azure Resource Manager (ARM) account. For more information about different account types, see Overview of account types.
Trial account
Try a free trial Azure AI Video Indexer account with your content. You don't need an Azure subscription. The account provides up to 2,400 minutes of free indexing using the Azure AI Video Indexer website or the Azure AI Video Indexer API (see the developer portal).
Note
If you don't use your trial account for 12 months, it can be deleted. To keep your account, sign in at least once every 12 months.
The trial account option isn't available for the Azure Government cloud. For other Azure Government limitations, see Limitations of Azure AI Video Indexer on Azure Government.
Create an account
To create an Azure AI Video Indexer account, you can use the Azure portal or the API. The following sections describe how to create an account using each method.
Prerequisites
- An Azure subscription
- At the subscription level, either the Owner role, or both Contributor and User Access Administrator roles
To determine what roles are currently assigned, see View the access a user has to Azure resources.
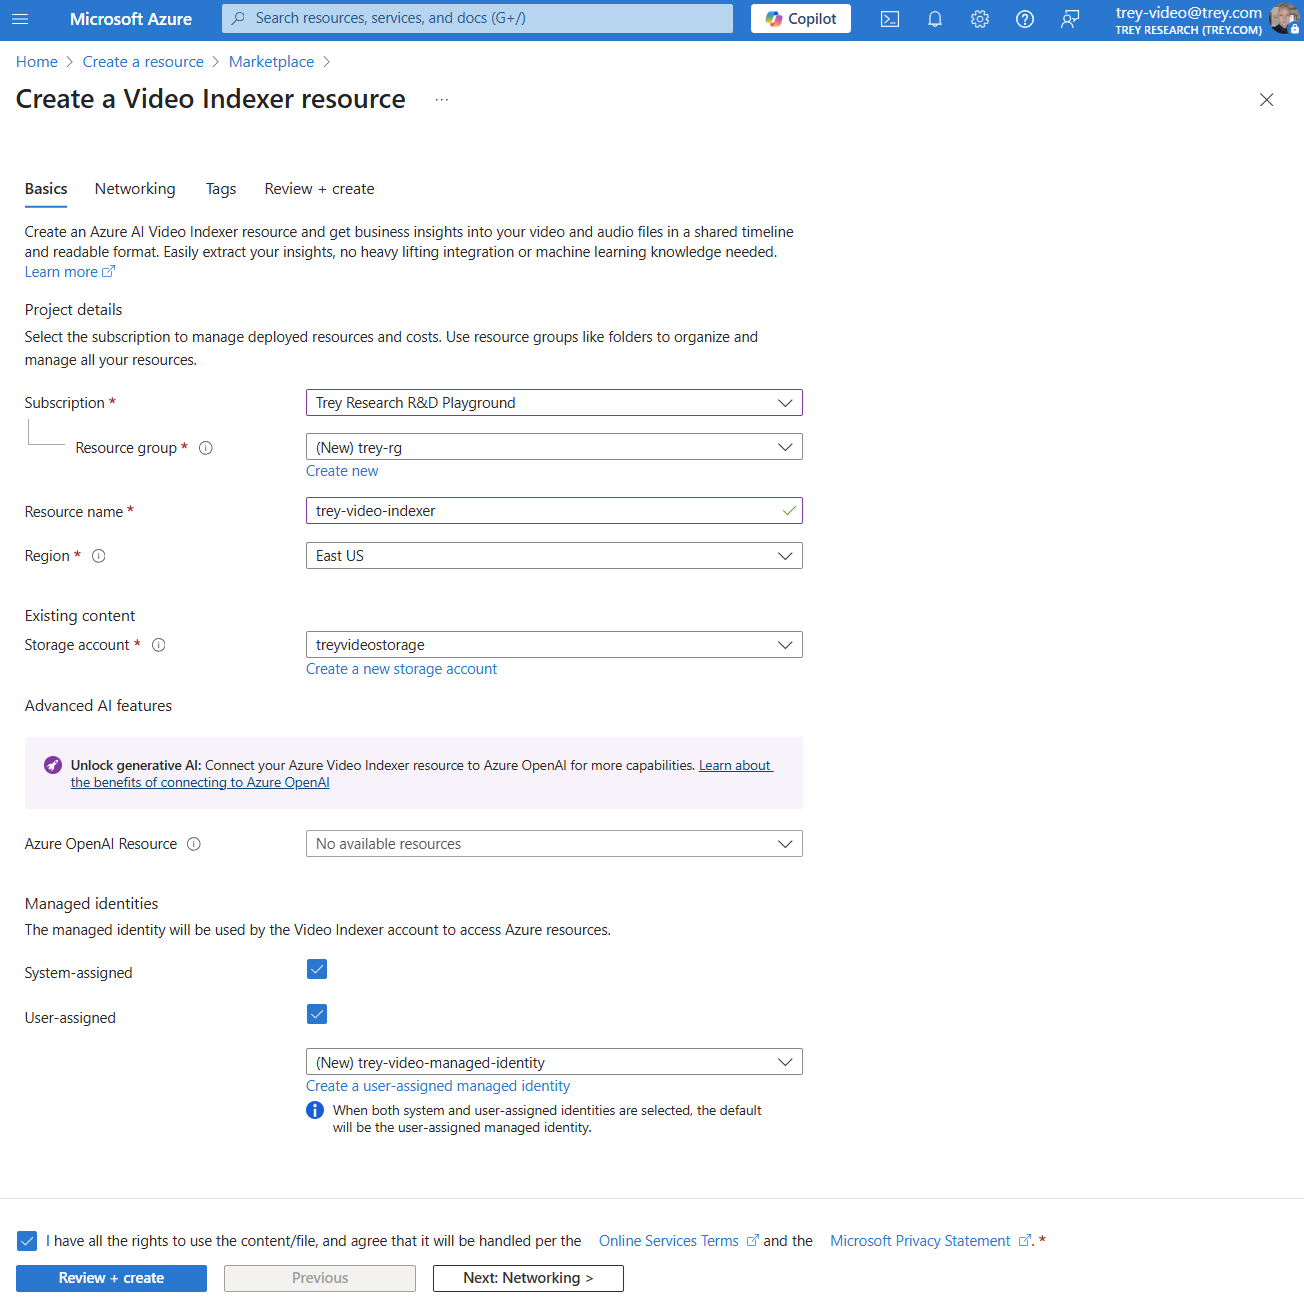
- In the Azure portal, select + Create a resource.
- Search for and select Azure AI Video Indexer.
- On the Marketplace page, select Create and then select Azure AI Video Indexer. The Create a Video Indexer resource page appears.
- Create a resource group (or select an existing one) and select a Region.
- Enter an account a name in the Resource name field.
- Connect the account to a Storage account. Either:
- Select an existing storage account from the Storage account dropdown or
- Create a new storage account. For more information about creating a storage account, see Create a storage account. Storage accounts for VI must be a Standard StorageV2 (general-purpose v2) storage account.
- Select or create a User-assigned managed identity. If you don't create one, you're prompted later.
- Agree to the terms and conditions by selecting the agreement box.
- Select Review + create. Validation for the configuration starts.
- When validation completes, select Create.
- When the deployment completes, select Go to resource. The Azure AI Video Indexer resource overview page appears.
- If you assigned a system-assigned managed identity during the storage creation process, a notification on the page says that you must select a managed identity role assignment to connect to the Storage account. Select Assign a role to assign your managed identity to the Storage account.

Government account
Government accounts have special requirements and limitations.
- Only paid accounts are available with Azure Government.
- No manual content moderation is available in Azure Government. In the public cloud, when content is deemed offensive based on a content moderation, you can ask for a human to review the content and potentially revert that decision.
- For Azure Government, a Bing description of celebrities and named entities identified isn't presented. It's a UI capability only.
Prerequisites for connecting to Azure Government
- An Azure subscription in Azure Government.
- A Microsoft Entra ID account in Azure Government.
- Prerequisites for permissions and resources as described in the standard account section.
Create a new account in the Azure Government portal
To create a paid account in Azure Government, go to Create Account.
If you aren't an Owner or Contributor for any Azure AI Video Indexer accounts in Azure Government, you're given an empty experience where you can start creating your account.
If you're already a contributor or an administrator of an existing Azure AI Video Indexer account in Azure Government, you're taken to that account and from there you can use the steps described in the standard account section.
Classic accounts are deprecated
You can't create a classic account. Classic accounts retired on June 30, 2024.