Note
Access to this page requires authorization. You can try signing in or changing directories.
Access to this page requires authorization. You can try changing directories.
Cloud Backup for Virtual Machines enables you to restore virtual machines (VMs) from the cloud backup to the vCenter.
This article covers how to:
- Restore VMs from backups
- Restore deleted VMs from backups
- Restore VM disks (VMDKs) from backups
- Recovery of Cloud Backup for Virtual Machines internal database
Restore VMs from backups
When you restore a VM, you can overwrite the existing content with the backup copy that you select or you can restore a deleted VM from a backup copy. You can restore VMs to the following locations:
- Restore to original location
- To the original datastore mounted on the original ESXi host (this overwrites the original VM)
- Restore to alternate location
- To a different datastore mounted on the original ESXi host
- To the original datastore mounted on a different ESXi host that is managed by the same vCenter
- To a different datastore mounted on a different ESXi host that is managed by the same vCenter
Prerequisites to restore VMs
- A backup must exist: you need to create a backup of the VM using the Cloud Backup for Virtual Machines before you can restore the VM.
Note
Restore operations cannot finish successfully if there are snapshots of the VM that were performed by software other than the Cloud Backup for Virtual Machines.
- The VM must not be in transit: the VM that you want to restore must not be in a state of vMotion or Storage vMotion.
- High Availability (HA) configuration errors: ensure there are no HA configuration errors displayed on the vCenter ESXi Host Summary screen before restoring backups to a different location.
Considerations for restoring VMs from backups
- VM is unregistered and registered again: The restore operation for VMs unregisters the original VM, restores the VM from a backup snapshot, and registers the restored VM with the same name and configuration on the same ESXi server. You must manually add the VMs to resource groups after the restore.
- Restoring datastores: You can't restore a datastore, but you can restore any VM in the datastore.
- VMware consistency snapshot failures for a VM: Even if a VMware consistency snapshot for a VM fails, the VM is nevertheless backed up. You can view the entities contained in the backup copy in the Restore wizard and use it for restore operations.
Restore a VM from a backup
- In the VMware vSphere web client GUI, select Menu in the toolbar. Select Inventory and then Virtual Machines and Templates.
- In the left navigation, right-click a Virtual Machine, then select NetApp Cloud Backup. In the drop-down list, select Restore to initiate the wizard.
- In the Restore wizard, on the Select Backup page, select the backup snapshot copy that you want to restore.
Note
You can search for a specific backup name or a partial backup name, or you can filter the backup list by selecting the filter icon and then choosing a date and time range, selecting whether you want backups that contain VMware snapshots, whether you want mounted backups, and the location. Select OK to return to the wizard.
- On the Select Scope page, select Entire Virtual Machine in the Restore scope field, then select Restore location, and then enter the destination ESXi information where the backup should be mounted.
- When you restore partial backups, the restore operation skips the Select Scope page.
- Enable Restart VM checkbox if you want the VM to be powered on after the restore operation.
- On the Select Location page, select the location for the primary location.
- Review the Summary page and then select Finish.
- Optional: Monitor the operation progress by selecting Recent Tasks at the bottom of the screen.
Although the VMs are restored, they're not automatically added to their former resource groups. Therefore, you must manually add the restored VMs to the appropriate resource groups.
Restore deleted VMs from backups
You can restore a deleted VM from a datastore primary backup to an ESXi host that you select. You can restore VMs to the original datastore mounted on the original ESXi host, which creates a clone of the VM.
Prerequisites to restore deleted VMs
- You need to add the Azure cloud Subscription account. The user account in vCenter must have the minimum vCenter privileges required for Cloud Backup for Virtual Machines.
- A backup must exist. You need to create a backup of the VM using the Cloud Backup for Virtual Machines before you can restore the VMDKs on that VM.
Considerations for restoring deleted VMs
You can't restore a datastore, but you can restore any VM in the datastore.
Restore deleted VMs
- Select Menu and then select the Inventory option.
- Select a datastore, then select the Configure tab, then the Backups in the Cloud Backup for Virtual Machines section.
- Select (double-click) a backup to see a list of all VMs that are included in the backup.
- Select the deleted VM from the backup list and then select Restore.
- On the Select Scope page, select Entire Virtual Machine in the Restore scope field, then select the restore location, and then enter the destination ESXi information where the backup should be mounted.
- Enable Restart VM checkbox if you want the VM to be powered on after the restore operation.
- On the Select Location page, select the location of the backup that you want to restore to.
- Review the Summary page, then select Finish.
Restore VMDKs from backups
You can restore existing VMDKs or deleted or detached VMDKs from either a primary or secondary backup. You can restore one or more VMDKs on a VM to the same datastore.
Prerequisites to restore VMDKs
- A backup must exist. You need to create a backup of the VM using the Cloud Backup for Virtual Machines.
- The VM must not be in transit. The VM that you want to restore must not be in a state of vMotion or Storage vMotion.
Considerations for restoring VMDKs
- If the VMDK is deleted or detached from the VM, then the restore operation attaches the VMDK to the VM.
- Attach and restore operations connect VMDKs using the default SCSI controller. VMDKs that are attached to a VM with an NVME controller are backed up, but for attach and restore operations they're connected back using a SCSI controller.
Restore VMDKs
- In the VMware vSphere web client GUI, select Menu in the toolbar. Select Inventory, then Virtual Machines and Templates.
- In the left navigation, right-click a VM and select NetApp Cloud Backup. In the drop-down list, select Restore.
- In the Restore wizard, on the Select Backup page, select the backup copy from which you want to restore. To find the backup, do one of the following options:
- Search for a specific backup name or a partial backup name.
- Filter the backup list by selecting the filter icon and a date and time range. Select if you want backups that contain VMware snapshots, if you want mounted backups, and primary location. Select OK to return to the wizard.
- On the Select Scope page, select Particular virtual disk in the Restore scope field, then select the virtual disk and destination datastore.
- On the Select Location page, select the location that you want to restore to.
- Review the Summary page and then select Finish.
- Optional: Monitor the operation progress by clicking Recent Tasks at the bottom of the screen.
Recovery of Cloud Backup for Virtual Machines internal database
You can use the maintenance console to restore a specific backup of the MySQL database (also called an NSM database) for Cloud Backup for Virtual Machines.
- Open a maintenance console window.
- From the main menu, enter option 1 Application Configuration.
- From the Application Configuration menu, enter option 6 MySQL backup and restore.
- From the MySQL Backup and Restore Configuration menu, enter option 2 List MySQL backups. Make note of the backup you want to restore.
- From the MySQL Backup and Restore Configuration menu, enter option 3 Restore MySQL backup.
- At the prompt “Restore using the most recent backup,” enter N.
- At the prompt “Backup to restore from,” enter the backup name, and then select Enter. The selected backup MySQL database gets restored to its original location.
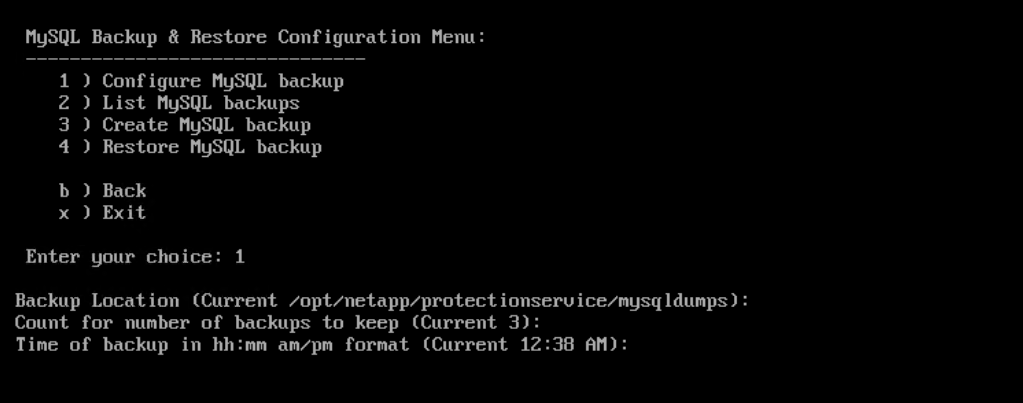
If you need to change the MySQL database backup configuration, you can modify:
- The backup location (the default is:
/opt/netapp/protectionservice/mysqldumps) - The number of backups kept (the default value is three)
- The time of day the backup is recorded (the default value is 12:39 a.m.)
Open a maintenance console window.
From the main menu, enter option 1 Application Configuration.
From the Application Configuration menu, enter option 6 MySQL backup and restore.
From the MySQL Backup & Restore Configuration, menu, enter option 1 Configure MySQL backup.