Note
Access to this page requires authorization. You can try signing in or changing directories.
Access to this page requires authorization. You can try changing directories.
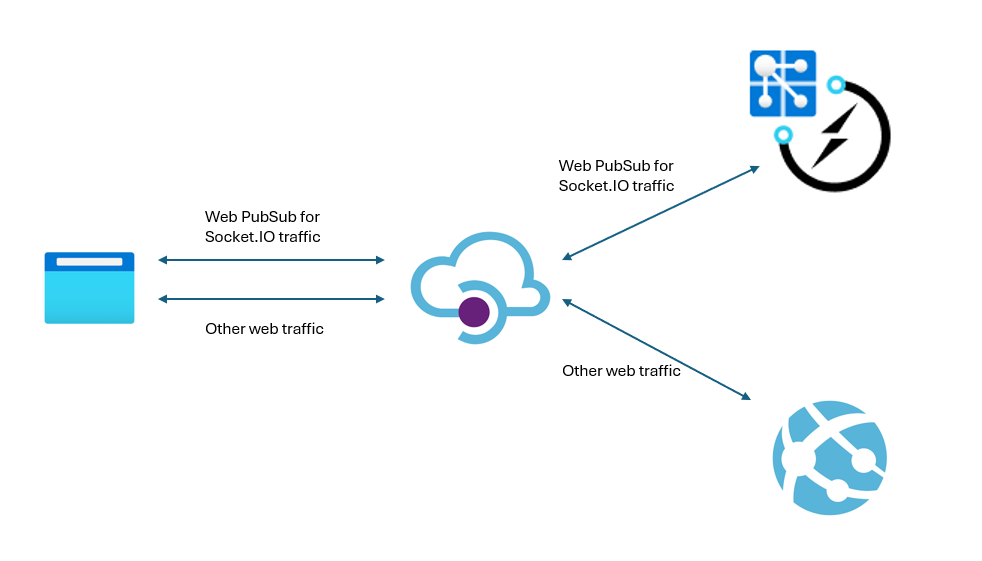
Azure API Management service provides a hybrid, multicloud management platform for APIs across all environments. This article shows you how to add real-time capability to your application with Azure API Management and Web PubSub for Socket.IO.
Limitations
Socket.IO clients support WebSocket and Long Polling and by default, the client connects to the service with Long Polling and then upgrade to WebSocket. However, as for now, API Management doesn't yet support different types of APIs (WebSocket or HTTP) with the same path. You must set either websocket or polling in client settings.
Create resources
In order to follow the step-by-step guide, you need
- Follow Create a Web PubSub for Socket.IO resource to create a Web PubSub for Socket.IO instance.
- Follow Quickstart: Use an ARM template to deploy Azure API Management and create an API Management instance.
Set up API Management
Configure APIs when client connects with websocket transport
This section describes the steps to configure API Management when the Socket.IO clients connect with websocket transport.
Go to APIs tab in the portal for API Management instance, select Add API and choose WebSocket, Create with the following parameters:
- Display name:
Web PubSub for Socket.IO - Web service URL:
wss://<your-webpubsubforsocketio-service-url>/clients/socketio/hubs/eio_hub - API URL suffix:
clients/socketio/hubs/eio_hub
The hub name can be changed to meet your application.
- Display name:
Press Create to create the API and after created, switch to Settings tab and uncheck Subscription required for quick demo purpose
Configure APIs when client connects with polling transport
This section describes the steps to configure API Management when the Socket.IO clients connect with websocket transport.
Go to APIs tab in the portal for API Management instance, select Add API and choose WebSocket, Create with the following parameters:
- Display name:
Web PubSub for Socket.IO - Web service URL:
https://<your-webpubsubforsocketio-service-url>/clients/socketio/hubs/eio_hub - API URL suffix:
clients/socketio/hubs/eio_hub
The hub name can be changed to meet your application.
- Display name:
Switch to Settings tab and uncheck Subscription required for quick demo purpose
Switch to Design tab and select Add operation, and Save with the following parameters:
Add operation for post data
- Display name: connect
- URL: POST /
Add operation for get data
- Display name: connect get
- GET /
Try Sample
Now, the traffic can reach Web PubSub for Socket.IO through API Management. There are some configurations in application. Let’s use a chat application as an example.
Clone GitHub repo https://github.com/Azure/azure-webpubsub and investigate to sdk/webpubsub-socketio-extension/examples/chat folder
Then make some changes to let the sample work with API Management
Open
public/main.jsand it's the Socket.IO client side codesEdit the constructor of Socket.IO. You have to select either
websocketorpollingas the transport:const webPubSubEndpoint = "https://<api-management-url>"; var socket = io(webPubSubEndpoint, { transports: ["websocket"], // Depends on your transport choice. If you use WebSocket in API Management, set it to "websocket". If choosing Long Polling, set it to "polling" path: "/clients/socketio/hubs/eio_hub", // The path also need to match the settings in API Management });On the Keys tab of Web PubSub for Socket.IO. Copy the Connection String and use the following command to run the server:
npm install
npm run start -- <connection-string>
According to the output, use browser to visit the endpoint
Visit http://localhost:3000In the sample, you can chat with other users.