Note
Access to this page requires authorization. You can try signing in or changing directories.
Access to this page requires authorization. You can try changing directories.
This article describes how to use Azure PowerShell to back up and recover a SQL database within an Azure VM using Azure Backup in a Recovery Services vault.
Prerequisites
Before you back up and restore SQL databases in Azure VMs with PowerShell, ensure that the following prerequisites are met:
- Check the feature capabilities for backing up SQL databases within Azure VMs.
- Review the PowerShell object hierarchy for Recovery Services.
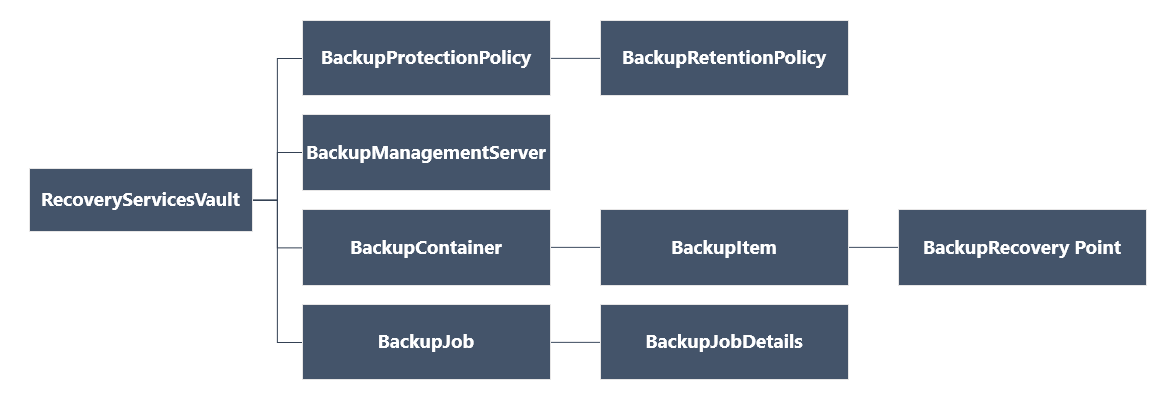
Recovery Services object hierarchy
The object hierarchy is summarized in the following diagram.
Review the Az.RecoveryServices cmdlet reference reference in the Azure library.
Set up and install PowerShell for Azure Backup
Set up PowerShell as follows:
Download the latest version of Az PowerShell. The minimum version required is 1.5.0.
Find the Azure Backup PowerShell cmdlets with this command:
Get-Command *azrecoveryservices*Review the aliases and cmdlets for Azure Backup and the Recovery Services vault. Here's an example of what you might see. It's not a complete list of cmdlets.

Sign in to your Azure account with Connect-AzAccount.
On the web page that appears, you're prompted to input your account credentials.
- Alternately, you can include your account credentials as a parameter in the Connect-AzAccount cmdlet with -Credential.
- If you're a CSP partner working for a tenant, specify the customer as a tenant, using their tenantID or tenant primary domain name. An example is Connect-AzAccount -Tenant fabrikam.com.
Associate the subscription you want to use with the account, because an account can have several subscriptions.
Select-AzSubscription -SubscriptionName $SubscriptionNameIf you're using Azure Backup for the first time, use the Register-AzResourceProvider cmdlet to register the Azure Recovery Services provider with your subscription.
Register-AzResourceProvider -ProviderNamespace "Microsoft.RecoveryServices"Verify that the providers registered successfully:
Get-AzResourceProvider -ProviderNamespace "Microsoft.RecoveryServices"In the command output, verify that RegistrationState changes to Registered. If it doesn't, run the Register-AzResourceProvider cmdlet again.
Create the Recovery Services vault and set the vault context
To set up backup for SQL databases in Azure VMs, you first need to create a Recovery Services vault and set the vault context.
Create a Recovery Services vault
Follow these steps to create a Recovery Services vault.
The Recovery Services vault is a Resource Manager resource, so you must place it within a resource group. You can use an existing resource group, or you can create a resource group with the New-AzResourceGroup cmdlet. When you create a resource group, specify the name and location for the resource group.
A vault is placed in a resource group. If you don't have an existing resource group, create a new one with the New-AzResourceGroup. In this example, we create a new resource group in the West US region.
New-AzResourceGroup -Name "test-rg" -Location "West US"Use the New-AzRecoveryServicesVault cmdlet to create the vault. Specify the same location for the vault as was used for the resource group.
New-AzRecoveryServicesVault -Name "testvault" -ResourceGroupName "test-rg" -Location "West US"Specify the type of redundancy to use for the vault storage.
- You can use locally redundant storage, geo-redundant storage or zone-redundant storage .
- The following example sets the
-BackupStorageRedundancyoption for the Set-AzRecoveryServicesBackupProperty cmd fortestvaultset toGeoRedundant.
$vault1 = Get-AzRecoveryServicesVault -Name "testvault"
Set-AzRecoveryServicesBackupProperties  -Vault $vault1 -BackupStorageRedundancy GeoRedundant
View the vaults in a subscription
To view all vaults in the subscription, use Get-AzRecoveryServicesVault.
Get-AzRecoveryServicesVault
The output is similar to the following. The associated resource group and location are provided.
Name              : Contoso-vault
ID                : /subscriptions/1234
Type              : Microsoft.RecoveryServices/vaults
Location          : WestUS
ResourceGroupName : Contoso-docs-rg
SubscriptionId    : 1234-567f-8910-abc
Properties        : Microsoft.Azure.Commands.RecoveryServices.ARSVaultProperties
Set the vault context
Store the vault object in a variable, and set the vault context.
- Many Azure Backup cmdlets require the Recovery Services vault object as an input, so it's convenient to store the vault object in a variable.
- The vault context is the type of data protected in the vault. Set it with Set-AzRecoveryServicesVaultContext. After the context is set, it applies to all subsequent cmdlets.
The following example sets the vault context for testvault
Get-AzRecoveryServicesVault -Name "testvault" | Set-AzRecoveryServicesVaultContext
Fetch the vault ID
We plan on deprecating the vault context setting in accordance with Azure PowerShell guidelines. Instead, you can store or fetch the vault ID, and pass it to relevant commands, as follows:
$testVault = Get-AzRecoveryServicesVault -ResourceGroupName "Contoso-docs-rg" -Name "testvault"
$testVault.ID
Configure a backup policy for SQL databases
A backup policy specifies the schedule for backups, and how long backup recovery points should be kept:
- A backup policy is associated with at least one retention policy. A retention policy defines how long a recovery point is kept before it's deleted.
- View the default backup policy retention using Get-AzRecoveryServicesBackupRetentionPolicyObject.
- View the default backup policy schedule using Get-AzRecoveryServicesBackupSchedulePolicyObject.
- You use the New-AzRecoveryServicesBackupProtectionPolicy cmdlet to create a new backup policy. You input the schedule and retention policy objects.
By default, a start time is defined in the Schedule Policy Object. Use the following example to change the start time to the desired start time. The desired start time should be in UTC as well. The following example assumes the desired start time is 01:00 AM UTC for daily backups.
$schPol = Get-AzRecoveryServicesBackupSchedulePolicyObject -WorkloadType "MSSQL"
$UtcTime = (Get-Date -Date "2019-03-20 01:30:00Z").ToUniversalTime()
$schPol.FullBackupSchedulePolicy.ScheduleRunTimes[0] = $UtcTime
Important
You need to provide the start time in 30 minute multiples only. In the above example, it can be only "01:00:00" or "02:30:00". The start time can't be "01:15:00".
The following example stores the schedule policy and the retention policy in variables. It then uses those variables as parameters for a new policy (NewSQLPolicy). NewSQLPolicy takes a daily "Full" backup, retains it for 180 days and takes a log backup every 2 hours
$schPol = Get-AzRecoveryServicesBackupSchedulePolicyObject -WorkloadType "MSSQL"
$retPol = Get-AzRecoveryServicesBackupRetentionPolicyObject -WorkloadType "MSSQL"
$NewSQLPolicy = New-AzRecoveryServicesBackupProtectionPolicy -Name "NewSQLPolicy" -WorkloadType "MSSQL" -RetentionPolicy $retPol -SchedulePolicy $schPol
The output is similar to the following.
Name                 WorkloadType       BackupManagementType BackupTime                Frequency                                IsDifferentialBackup IsLogBackupEnabled
                                                                                                                                Enabled
----                 ------------       -------------------- ----------                ---------                                -------------------- ------------------
NewSQLPolicy         MSSQL              AzureWorkload        3/15/2019 01:30:00 AM      Daily                                    False                True
Enable backup for SQL databases
Register the SQL VM
For Azure VM backups and Azure File shares, Backup service can connect to these Azure Resource Manager resources and fetch the relevant details. Since SQL is an application within an Azure VM, Backup service needs permission to access the application and fetch the necessary details. In order to do that, you need to 'register' the Azure VM that contains the SQL application with a Recovery Services vault. Once you register a SQL VM with a vault, you can protect the SQL DBs to that vault only. Use Register-AzRecoveryServicesBackupContainer PowerShell cmdlet to register the VM.
 $myVM = Get-AzVM -ResourceGroupName <VMRG Name> -Name <VMName>
Register-AzRecoveryServicesBackupContainer -ResourceId $myVM.ID -BackupManagementType AzureWorkload -WorkloadType MSSQL -VaultId $testVault.ID -Force
The command will return a 'backup container' of this resource and the status will be 'registered'
Note
If the force parameter isn't given, you're asked to confirm with a text 'Do you want to disable protection for this container'. Please ignore this text and say "Y" to confirm. This is a known issue and we're working to remove the text and the requirement for the force parameter.
Fetch SQL DBs
Once the registration is done, Backup service will be able to list all the available SQL components within the VM. To view all the SQL components yet to be backed up to this vault use Get-AzRecoveryServicesBackupProtectableItem PowerShell cmdlet
Get-AzRecoveryServicesBackupProtectableItem -WorkloadType MSSQL -VaultId $testVault.ID
The output will show all unprotected SQL components across all SQL VMs registered to this vault with Item Type and ServerName. You can further filter to a particular SQL VM by passing the '-Container' parameter or use the combination of 'Name' and 'ServerName' along with ItemType flag to arrive at a unique SQL item.
$SQLDB = Get-AzRecoveryServicesBackupProtectableItem -workloadType MSSQL -ItemType SQLDataBase -VaultId $testVault.ID -Name "<Item Name>" -ServerName "<Server Name>"
Configure backup
Now that we have the required SQL DB and the policy with which it needs to be backed up, we can use the Enable-AzRecoveryServicesBackupProtection cmdlet to configure backup for this SQL DB.
Enable-AzRecoveryServicesBackupProtection -ProtectableItem $SQLDB -Policy $NewSQLPolicy
The command waits until the backup configuration is completed and returns the following output.
WorkloadName     Operation            Status               StartTime                 EndTime                   JobID
------------     ---------            ------               ---------                 -------                   -----
master           ConfigureBackup      Completed            3/18/2019 6:00:21 PM      3/18/2019 6:01:35 PM      654e8aa2-4096-402b-b5a9-e5e71a496c4e
Fetch the new SQL databases
Once the machine is registered, Backup service will fetch the details of the DBs available then. If SQL DBs or SQL instances are added to the registered machine later, you need to manually trigger the backup service to perform a fresh 'inquiry' to get all the unprotected DBs (including the newly added ones) again. Use the Initialize-AzRecoveryServicesBackupItem PowerShell cmdlet on the SQL VM to perform a fresh inquiry. The command waits until the operation is completed. Later use the Get-AzRecoveryServicesBackupProtectableItem PowerShell cmdlet to get the list of latest unprotected SQL components.
$SQLContainer = Get-AzRecoveryServicesBackupContainer -ContainerType AzureVMAppContainer -FriendlyName <VM name> -VaultId $testVault.ID
Initialize-AzRecoveryServicesBackupProtectableItem -Container $SQLContainer -WorkloadType MSSQL -VaultId $testVault.ID
Get-AzRecoveryServicesBackupProtectableItem -workloadType MSSQL -ItemType SQLDataBase -VaultId $testVault.ID
Once the relevant protectable items are fetched, enable the backups as instructed in the above section. If one doesn't want to manually detect new DBs, they can opt for autoprotection as explained below.
Enable autoprotection for future SQL databases
You can configure backup so all DBs added in the future are automatically protected with a certain policy. To enable autoprotection, use Enable-AzRecoveryServicesBackupAutoProtection PowerShell cmdlet.
Since the instruction is to back up all future databases, the operation is done at a SQLInstance level.
$SQLInstance = Get-AzRecoveryServicesBackupProtectableItem -workloadType MSSQL -ItemType SQLInstance -VaultId $testVault.ID -Name "<Protectable Item name>" -ServerName "<Server Name>"
Enable-AzRecoveryServicesBackupAutoProtection -InputItem $SQLInstance -BackupManagementType AzureWorkload -WorkloadType MSSQL -Policy $NewSQLPolicy -VaultId $testVault.ID
Once the autoprotection intent is given, the inquiry into the machine to fetch newly added DBs takes place as a scheduled background task every 8 hours.
Restore SQL databases in Azure VMs
Azure Backup can restore SQL Server databases that are running on Azure VMs as follows:
- Restore to a specific date or time (to the second) by using transaction log backups. Azure Backup automatically determines the appropriate full differential backup and the chain of log backups that are required to restore based on the selected time.
- Restore a specific full or differential backup to restore to a specific recovery point.
Check the prerequisites mentioned here before restoring SQL DBs.
Warning
Due to a security issue related to RBAC, we had to introduce a breaking change in the restore commands for SQL DB via PowerShell. Please upgrade to Az 6.0.0 version or above for the proper restore commands to be submitted via PowerShell. The latest PS commands are provided below.
First fetch the relevant backed up SQL DB using the Get-AzRecoveryServicesBackupItem PowerShell cmdlet.
$bkpItem = Get-AzRecoveryServicesBackupItem -BackupManagementType AzureWorkload -WorkloadType MSSQL -Name "<backup item name>" -VaultId $testVault.ID
Fetch the relevant restore time
As outlined above, you can restore the backed-up SQL DB to a full/differential copy OR to a log point-in-time.
Fetch distinct recovery points
Use Get-AzRecoveryServicesBackupRecoveryPoint to fetch distinct (Full/differential) recovery points for a backed-up SQL DB.
$startDate = (Get-Date).AddDays(-7).ToUniversalTime()
$endDate = (Get-Date).ToUniversalTime()
Get-AzRecoveryServicesBackupRecoveryPoint -Item $bkpItem -VaultId $testVault.ID -StartDate $startdate -EndDate $endDate
The output is similar to the following example
RecoveryPointId    RecoveryPointType  RecoveryPointTime      ItemName                             BackupManagemen
                                                                                                  tType
---------------    -----------------  -----------------      --------                             ---------------
6660368097802      Full               3/18/2019 8:09:35 PM   MSSQLSERVER;model             AzureWorkload
Use the 'RecoveryPointId' filter or an array filter to fetch the relevant recovery point.
$FullRP = Get-AzRecoveryServicesBackupRecoveryPoint -Item $bkpItem -VaultId $testVault.ID -RecoveryPointId "6660368097802"
Fetch point-in-time recovery point
If you want to restore the DB to a certain point-in-time, use Get-AzRecoveryServicesBackupRecoveryLogChain PowerShell cmdlet. The cmdlet returns a list of dates that represent start and end times of an unbroken, continuous log chain for that SQL backup item. The desired point-in-time should be within this range.
Get-AzRecoveryServicesBackupRecoveryLogChain -Item $bkpItem -VaultId $testVault.ID
The output will be similar to the following example.
ItemName                       StartTime                      EndTime
--------                       ---------                      -------
SQLDataBase;MSSQLSERVER;azu... 3/18/2019 8:09:35 PM           3/19/2019 12:08:32 PM
The above output means that you can restore to any point-in-time between the displayed start time and end time. The times are in UTC. Construct any point-in-time in PowerShell that's within the range shown above.
Note
When a log point-in-time selected for restore, you don't need to specify the starting point, that is, the full backup from which the DB is restored. Azure Backup service will take care of the entire recovery plan, that is, which full backup to choose, what log backups to apply, and so on.
Determine recovery configuration
For a SQL DB restore, the following restore scenarios are supported.
- Overriding the backed-up SQL DB with data from another recovery point - OriginalWorkloadRestore
- Restoring the SQL DB as a new DB in the same SQL instance - AlternateWorkloadRestore
- Restoring the SQL DB as a new DB in another SQL instance in another SQL VM - AlternateWorkloadRestore
- Restoring the SQL DB as .bak files -RestoreAsFiles
After fetching the relevant recovery point (distinct or log point-in-time), use Get-AzRecoveryServicesBackupWorkloadRecoveryConfig PowerShell cmdlet to fetch the recovery config object according to the desired recovery plan.
Original workload restores
To override the backed-up DB with data from the recovery point, just specify the right flag and the relevant recovery point as shown in the following example(s).
Original restore with distinct Recovery point
$OverwriteWithFullConfig = Get-AzRecoveryServicesBackupWorkloadRecoveryConfig -RecoveryPoint $FullRP -OriginalWorkloadRestore -VaultId $testVault.ID
Original restore with log point-in-time
$OverwriteWithLogConfig = Get-AzRecoveryServicesBackupWorkloadRecoveryConfig -PointInTime $PointInTime -Item $bkpItem -OriginalWorkloadRestore -VaultId $testVault.ID
Alternate workload restores
Important
A backed-up SQL DB can be restored as a new DB to another SQLInstance only, in an Azure VM 'registered' to this vault.
As outlined above, if the target SQLInstance lies within another Azure VM, make sure it's registered to this vault and the relevant SQLInstance appears as a protectable item. In this document, let's assume that the target SQLInstance name is MSSQLSERVER within another VM "Contoso2".
$TargetContainer =  Get-AzRecoveryServicesBackupContainer -ContainerType AzureVMAppContainer -Status Registered  -VaultId $testVault.ID -FriendlyName "Contoso2"
$TargetInstance = Get-AzRecoveryServicesBackupProtectableItem -WorkloadType MSSQL -ItemType SQLInstance -Name "MSSQLSERVER" -ServerName "Contoso2" -VaultId $testVault.ID
Then just pass the relevant recovery point, target SQL instance with the right flag as shown below and the target container under which the target SQL instance exists.
Alternate restore with distinct Recovery point
$AnotherInstanceWithFullConfig = Get-AzRecoveryServicesBackupWorkloadRecoveryConfig -RecoveryPoint $FullRP -TargetItem $TargetInstance -AlternateWorkloadRestore -VaultId $testVault.ID -TargetContainer $TargetContainer
Alternate restore with log point-in-time
$AnotherInstanceWithLogConfig = Get-AzRecoveryServicesBackupWorkloadRecoveryConfig -PointInTime $PointInTime -Item $bkpItem -TargetItem $TargetInstance -AlternateWorkloadRestore -VaultId $testVault.ID -TargetContainer $TargetContainer
Restore as Files
To restore the backup data as .bak files instead of a database, choose the Restore as Files option. The backed-up SQL DB can be restored to any target VM that's registered to this vault.
$TargetContainer= Get-AzRecoveryServicesBackupContainer -ContainerType AzureVMAppContainer -FriendlyName "VM name" -VaultId $vaultID
Restore as files with distinct Recovery point
$FileRestoreWithFullConfig = Get-AzRecoveryServicesBackupWorkloadRecoveryConfig -RecoveryPoint $FullRP -TargetContainer $TargetContainer -RestoreAsFiles -FilePath "<>" -VaultId $testVault.ID
Restore as files with log point-in-time from latest full
$FileRestoreWithLogConfig = Get-AzRecoveryServicesBackupWorkloadRecoveryConfig -PointInTime $PointInTime -TargetContainer $TargetContainer -RestoreAsFiles -FilePath "<>" -VaultId $testVault.ID
Restore as files with log point-in-time from a specified full
If you want to give a specific full that should be used for restore, use the following command:
$FileRestoreWithLogAndSpecificFullConfig = Get-AzRecoveryServicesBackupWorkloadRecoveryConfig -PointInTime $PointInTime -FromFull $FullRP -TargetContainer $TargetContainer -RestoreAsFiles -FilePath "<>" -VaultId $testVault.ID
The final recovery point configuration object obtained from Get-AzRecoveryServicesBackupWorkloadRecoveryConfig PowerShell cmdlet has all the relevant information for restore and is as shown below.
TargetServer         : <SQL server name>
TargetInstance       : <Target Instance name>
RestoredDBName       : <Target Instance name>/azurebackup1_restored_3_19_2019_1850
OverwriteWLIfpresent : No
NoRecoveryMode       : Disabled
targetPhysicalPath   : {azurebackup1, azurebackup1_log}
ContainerId          : /Subscriptions/00000000-0000-0000-0000-000000000000/resourceGroups/testRG/providers/Microsoft.RecoveryServices/vaults/testVault/backupFabrics/Azure/protectionContainers/vmappcontainer;compute;computeRG;SQLVMName
SourceResourceId     : /subscriptions/00000000-0000-0000-0000-000000000000/resourceGroups/computeRG/VMAppContainer/SQLVMName
RestoreRequestType   : Alternate WL Restore
RecoveryPoint        : Microsoft.Azure.Commands.RecoveryServices.Backup.Cmdlets.Models.AzureWorkloadRecoveryPoint
PointInTime          : 1/1/0001 12:00:00 AM
You can edit the restored DB name, OverwriteWLIfpresent, NoRecoveryMode, and targetPhysicalPath fields. Get more details for the target file paths as shown below.
$AnotherInstanceWithFullConfig.targetPhysicalPath
MappingType SourceLogicalName SourcePath                  TargetPath
----------- ----------------- ----------                  ----------
Data        azurebackup1      F:\Data\azurebackup1.mdf    F:\Data\azurebackup1_1553001753.mdf
Log         azurebackup1_log  F:\Log\azurebackup1_log.ldf F:\Log\azurebackup1_log_1553001753.ldf
Set the relevant PowerShell properties as string values as shown below.
$AnotherInstanceWithFullConfig.OverwriteWLIfpresent = "Yes"
$AnotherInstanceWithFullConfig | fl
TargetServer         : <SQL server name>
TargetInstance       : <Target Instance name>
RestoredDBName       : <Target Instance name>/azurebackup1_restored_3_19_2019_1850
OverwriteWLIfpresent : Yes
NoRecoveryMode       : Disabled
targetPhysicalPath   : {azurebackup1, azurebackup1_log}
ContainerId          : /Subscriptions/00000000-0000-0000-0000-000000000000/resourceGroups/testRG/providers/Microsoft.RecoveryServices/vaults/testVault/backupFabrics/Azure/protectionContainers/vmappcontainer;compute;computeRG;SQLVMName
SourceResourceId     : /subscriptions/00000000-0000-0000-0000-000000000000/resourceGroups/computeRG/VMAppContainer/SQLVMName
RestoreRequestType   : Alternate WL Restore
RecoveryPoint        : Microsoft.Azure.Commands.RecoveryServices.Backup.Cmdlets.Models.AzureWorkloadRecoveryPoint
PointInTime          : 1/1/0001 12:00:00 AM
Important
Make sure that the final recovery config object has all the necessary and proper values since the restore operation will be based on the config object.
Note
If you don't want to restore the entire chain but only a subset of files, follow the steps as documented here.
Alternate workload restores to a vault in secondary region
Important
Support for secondary region restores for SQL from PowerShell is available from Az 6.0.0
If you have enabled cross region restore, then the recovery points will be replicated to the secondary, paired region as well. Then, you can fetch those recovery points and trigger a restore to a machine, present in that paired region. As with the normal restore, the target machine should be registered to the target vault in the secondary region. The following sequence of steps should clarify the end-to-end process.
- Fetch the backup items which are replicated to the secondary region
- For such an item, fetch the recovery points (distinct and/or logs) which are replicated to the secondary region
- Then choose a target server, registered to a vault within the secondary paired region
- Trigger the restore to that server and track it using the JobId.
Fetch backup items from secondary region
Fetch all the SQL backup items from the secondary region with the usual command but with an extra parameter to indicate that these items should be fetched from secondary region.
$secondaryBkpItems = Get-AzRecoveryServicesBackupItem -BackupManagementType AzureWorkload -WorkloadType MSSQL -VaultId $testVault.ID -UseSecondaryRegion
Fetch distinct recovery points from secondary region
Use Get-AzRecoveryServicesBackupRecoveryPoint to fetch distinct (Full/differential) recovery points for a backed-up SQL DB and add a parameter to indicate that these are recovery points fetched from the secondary region
$startDate = (Get-Date).AddDays(-7).ToUniversalTime()
$endDate = (Get-Date).ToUniversalTime()
Get-AzRecoveryServicesBackupRecoveryPoint -Item $secondaryBkpItems[0] -VaultId $testVault.ID -StartDate $startdate -EndDate $endDate -UseSecondaryRegion
The output is similar to the following example
RecoveryPointId    RecoveryPointType  RecoveryPointTime      ItemName                             BackupManagemen
                                                                                                  tType
---------------    -----------------  -----------------      --------                             ---------------
6660368097802      Full               3/18/2019 8:09:35 PM   MSSQLSERVER;model             AzureWorkload
Use the 'RecoveryPointId' filter or an array filter to fetch the relevant recovery point.
$FullRPFromSec = Get-AzRecoveryServicesBackupRecoveryPoint -Item $secondaryBkpItems[0] -VaultId $testVault.ID -RecoveryPointId "6660368097802" -UseSecondaryRegion
Fetch log recovery points from secondary region
Use Get-AzRecoveryServicesBackupRecoveryLogChain PowerShell cmdlet with the parameter '-UseSecondaryRegion' which will return start and end times of an unbroken, continuous log chain for that SQL backup item from the secondary region. The desired point-in-time should be within this range.
Get-AzRecoveryServicesBackupRecoveryLogChain -Item $secondaryBkpItems[0] -VaultId $testVault.ID -UseSecondaryRegion
The output will be similar to the following example.
ItemName                       StartTime                      EndTime
--------                       ---------                      -------
SQLDataBase;MSSQLSERVER;azu... 3/18/2019 8:09:35 PM           3/19/2019 12:08:32 PM
The above output means that you can restore to any point-in-time between the displayed start time and end time. The times are in UTC. Construct any point-in-time in PowerShell that's within the range shown above.
Fetch target server from secondary region
From the secondary region, we need a vault and a target server registered to that vault. Once we have the secondary region target container and the SQL instance, we can re-use the existing cmdlets to generate a restore workload configuration. In this document, let's assume that the VM name is "secondaryVM" and the Instance name within that VM is "MSSQLInstance"
First, we fetch the relevant vault present in the secondary region and then get the registered containers within that vault.
$PairedRegionVault = Get-AzRecoveryServicesVault -ResourceGroupName SecondaryRG -Name PairedVault
$secContainer =  Get-AzRecoveryServicesBackupContainer -ContainerType AzureVMAppContainer -Status Registered  -VaultId $PairedRegionVault.ID -FriendlyName "secondaryVM"
Once the registered container is chosen, then we fetch the SQL instances within the container to which the database should be restored. Here we assume that there's 1 SQL instance within the "secondaryVM" and we fetch that instance.
$secSQLInstance = Get-AzRecoveryServicesBackupProtectableItem -WorkloadType MSSQL -ItemType SQLInstance -VaultId $PairedRegionVault.ID -Container $secContainer
Prepare the recovery configuration
As documented above for the normal SQL restore, the same command can be re-used to generate the relevant recovery configuration.
For full restores from secondary region
Get-AzRecoveryServicesBackupWorkloadRecoveryConfig -RecoveryPoint $FullRPFromSec[0] -TargetItem $secSQLInstance -AlternateWorkloadRestore -VaultId $vault.ID -TargetContainer $secContainer
For log point in time restores from secondary region
Get-AzRecoveryServicesBackupWorkloadRecoveryConfig -PointInTime $PointInTime -Item $secondaryBkpItems[0] -TargetItem $secSQLInstance -AlternateWorkloadRestore -VaultId $vault.ID -TargetContainer $secContainer
Once the relevant configuration is obtained for primary region restore or secondary region restore, the same restore command can be used to trigger restores and later tracked using the jobIDs.
Restore with relevant configuration
Once the relevant recovery Config object is obtained and verified, use the Restore-AzRecoveryServicesBackupItem PowerShell cmdlet to start the restore process.
Restore-AzRecoveryServicesBackupItem -WLRecoveryConfig $AnotherInstanceWithLogConfig -VaultId $testVault.ID -RestoreToSecondaryRegion
The restore operation returns a job to be tracked.
WorkloadName     Operation            Status               StartTime                 EndTime                   JobID
------------     ---------            ------               ---------                 -------                   -----
MSSQLSERVER/m... Restore              InProgress           3/17/2019 10:02:45 AM                                3274xg2b-e4fg-5952-89b4-8cb566gc1748
Manage SQL backups
On-demand backup
Once backup has been enabled for a DB, you can also trigger an on-demand backup for the DB using Backup-AzRecoveryServicesBackupItem PowerShell cmdlet. The following example triggers a copy-only-full backup on a SQL DB with compression enabled and the copy-only-full backup should be retained for 60 days.
Note
Copy-only-full backups are ideal for long term retention since they don't have any dependencies on other backup types such as logs. A 'Full' backup is treated as a parent of subsequent log backups and hence it's retention is tied to log retention in policy. Therefore, the customer provided expiry time is honored for copy-only-full backups and not for 'full' backups. A full backup retention time is set automatically for 45 days from the current time. It is also documented here.
$bkpItem = Get-AzRecoveryServicesBackupItem -BackupManagementType AzureWorkload -WorkloadType MSSQL -Name "<backup item name>" -VaultId $testVault.ID
$endDate = (Get-Date).AddDays(45).ToUniversalTime()
Backup-AzRecoveryServicesBackupItem -Item $bkpItem -BackupType CopyOnlyFull -EnableCompression -VaultId $testVault.ID -ExpiryDateTimeUTC $endDate
The on-demand backup command returns a job to be tracked.
WorkloadName     Operation            Status               StartTime                 EndTime                   JobID
------------     ---------            ------               ---------                 -------                   -----
MSSQLSERVER/m... Backup               InProgress           3/18/2019 8:41:27 PM                                2516bb1a-d3ef-4841-97a3-9ba455fb0637
If the output is lost or if you want to get the relevant Job ID, get the list of jobs from Azure Backup service and then track it and its details.
Change policy for backup items
You can change the policy of the backed-up item from Policy1 to Policy2. To switch policies for a backed-up item, fetch the relevant policy and back up item and use the Enable-AzRecoveryServices command with backup item as the parameter.
$TargetPol1 = Get-AzRecoveryServicesBackupProtectionPolicy -Name <PolicyName>
$anotherBkpItem = Get-AzRecoveryServicesBackupItem -WorkloadType MSSQL -BackupManagementType AzureWorkload -Name "<BackupItemName>"
Enable-AzRecoveryServicesBackupProtection -Item $anotherBkpItem -Policy $TargetPol1
The command waits until the backup configuration is completed and returns the following output.
WorkloadName     Operation            Status               StartTime                 EndTime                   JobID
------------     ---------            ------               ---------                 -------                   -----
master           ConfigureBackup      Completed            3/18/2019 8:00:21 PM      3/18/2019 8:02:16 PM      654e8aa2-4096-402b-b5a9-e5e71a496c4e
Edit an existing backup policy
To edit an existing policy, use the Set-AzRecoveryServicesBackupProtectionPolicy command.
Set-AzRecoveryServicesBackupProtectionPolicy -Policy $Pol -SchedulePolicy $SchPol -RetentionPolicy $RetPol
Check the backup jobs after some time has passed to track any failures. If there are, you need to fix the issues. Then rerun the edit policy command with the FixForInconsistentItems parameter to retry editing the policy on all the backup items for which the operation failed earlier.
Set-AzRecoveryServicesBackupProtectionPolicy -Policy $Pol -FixForInconsistentItems
Re-register SQL VMs
Warning
Make sure to read this document to understand the failure symptoms and causes before attempting re-registration
To trigger re-registration of the SQL VM, fetch the relevant backup container and pass it to the register cmdlet.
$SQLContainer = Get-AzRecoveryServicesBackupContainer -ContainerType AzureVMAppContainer -FriendlyName <VM name> -VaultId $testVault.ID
Register-AzRecoveryServicesBackupContainer -Container $SQLContainer -BackupManagementType AzureWorkload -WorkloadType MSSQL -VaultId $testVault.ID
Stop protection
Retain data
If you wish to stop protection, you can use the Disable-AzRecoveryServicesBackupProtection PowerShell cmdlet. This will stop the scheduled backups but the data backed up until now is retained forever.
$bkpItem = Get-AzRecoveryServicesBackupItem -BackupManagementType AzureWorkload -WorkloadType MSSQL -Name "<backup item name>" -VaultId $testVault.ID
Disable-AzRecoveryServicesBackupProtection -Item $bkpItem -VaultId $testVault.ID
Delete backup data
In order to completely remove the stored backup data in the vault, just add '-RemoveRecoveryPoints' flag/switch to the 'disable' protection command.
Disable-AzRecoveryServicesBackupProtection -Item $bkpItem -VaultId $testVault.ID -RemoveRecoveryPoints
Disable auto protection
If autoprotection was configured on a SQLInstance, you can disable it using the Disable-AzRecoveryServicesBackupAutoProtection PowerShell cmdlet.
Find the instances where auto-protection is enabled using the following PowerShell command.
Get-AzRecoveryServicesBackupProtectableItem -WorkloadType MSSQL -VaultId $testVault.ID | Where-Object {$_.IsAutoProtected -eq $true}
Then pick the relevant protectable item name and server name from the output and disable auto-protection for those instances.
$SQLInstance = Get-AzRecoveryServicesBackupProtectableItem -workloadType MSSQL -ItemType SQLInstance -VaultId $testVault.ID -Name "<Protectable Item name>" -ServerName "<Server Name>"
Disable-AzRecoveryServicesBackupAutoProtection -InputItem $SQLInstance -BackupManagementType AzureWorkload -WorkloadType MSSQL -VaultId $testVault.ID
Unregister SQL VM
If all the DBs of a SQL server are no longer protected and no backup data exists, you can unregister the SQL VM from this vault. Only then you can protect DBs to another vault. Use Unregister-AzRecoveryServicesBackupContainer PowerShell cmdlet to unregister the SQL VM.
$SQLContainer = Get-AzRecoveryServicesBackupContainer -ContainerType AzureVMAppContainer -FriendlyName <VM name> -VaultId $testVault.ID
 Unregister-AzRecoveryServicesBackupContainer -Container $SQLContainer -VaultId $testVault.ID
Track Azure Backup jobs
It's important to note that Azure Backup only tracks user triggered jobs in SQL backup. Scheduled backups (including log backups) aren't visible in the portal or PowerShell. However, if any scheduled jobs fail, a backup alert is generated and shown in portal. Use Azure Monitor to track all the scheduled jobs and other relevant information.
Users can track on-demand/user triggered operations with the JobID that's returned in the output of asynchronous jobs such as backup. Use Get-AzRecoveryServicesBackupJobDetail PowerShell cmdlet to track job and its details.
Get-AzRecoveryServicesBackupJobDetails -JobId 2516bb1a-d3ef-4841-97a3-9ba455fb0637 -VaultId $testVault.ID
To get the list of on-demand jobs and their statuses from Azure Backup service, use Get-AzRecoveryServicesBackupJob PowerShell cmdlet. The following example returns all the in-progress SQL jobs.
Get-AzRecoveryServicesBackupJob -Status InProgress -BackupManagementType AzureWorkload
To cancel an in-progress job, use the Stop-AzRecoveryServicesBackupJob PowerShell cmdlet.
Manage SQL Always On Availability groups
For SQL Always On Availability Groups, make sure to register all the nodes of the Availability group (AG). Once registration is done for all nodes, a SQL availability group object is logically created under protectable items. The databases under the SQL AG will be listed as 'SQLDatabase'. The nodes will show up as standalone instances and the default SQL databases under them will be listed as SQL databases as well.
For example, let's assume a SQL AG has two nodes: sql-server-0 and sql-server-1 and 1 SQL AG DB. Once both these nodes are registered, if you list the protectable items, it lists the following components
- A SQL AG object - protectable item type as SQLAvailabilityGroup
- A SQL AG DB - protectable item type as SQLDatabase
- sql-server-0 - protectable item type as SQLInstance
- sql-server-1 - protectable item type as SQLInstance
- Any default SQL DBs (master, model, msdb) under sql-server-0 - protectable item type as SQLDatabase
- Any default SQL DBs (master, model, msdb) under sql-server-1 - protectable item type as SQLDatabase
sql-server-0, sql-server-1 will also be listed as "AzureVMAppContainer" when backup containers are listed.
Just fetch the relevant database to enable backup and the on-demand backup and restore PowerShell cmdlets are identical.