Note
Access to this page requires authorization. You can try signing in or changing directories.
Access to this page requires authorization. You can try changing directories.
This article describes how to configure Multi-User Authorization (MUA) for Azure Backup to enhance the security of critical operations on Recovery Services vaults. It covers the creation of a Resource Guard in a separate tenant for maximum protection and demonstrates how to request and approve critical operation access using Microsoft Entra Privileged Identity Management within the tenant hosting the Resource Guard. Alternatively, you can use other methods to manage just-in-time (JIT) permissions based on your organizational setup.
Note
- Multi-user authorization for Azure Backup is available in all global Azure regions.
- Multi-user authorization using Resource Guard for Backup vault is now generally available. Learn more.
Prerequisites
Before you configure Multi-user authorization for a Recovery Services vault, ensure that the following prerequisites are met:
- The Resource Guard and the Recovery Services vault must be in the same Azure region.
- The Backup admin must not have Contributor, Backup MUA Admin, or Backup MUA Operator permissions on the Resource Guard. You can choose to have the Resource Guard in another subscription of the same directory or in another directory to ensure maximum isolation.
- The subscriptions containing the Recovery Services vault as well as the Resource Guard (in different subscriptions or tenants) must be registered to use the providers - Microsoft.RecoveryServices and Microsoft.DataProtection . For more information, see Azure resource providers and types.
Learn about various MUA usage scenarios.
Create a Resource Guard
The Security admin creates the Resource Guard. We recommend that you create it in a different subscription or a different tenant as the vault. However, it should be in the same region as the vault. The Backup admin must NOT have Contributor, Backup MUA Admin, or Backup MUA Operator access on the Resource Guard or the subscription that contains it.
Choose a client
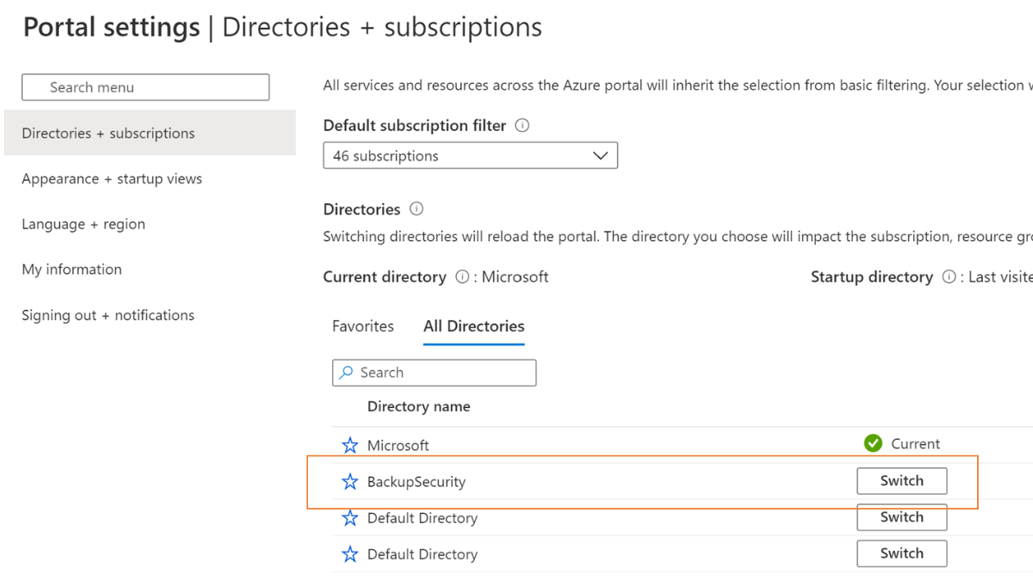
To create the Resource Guard in a tenant different from the vault tenant, follow these steps:
In the Azure portal, go to the directory under which you want to create the Resource Guard.
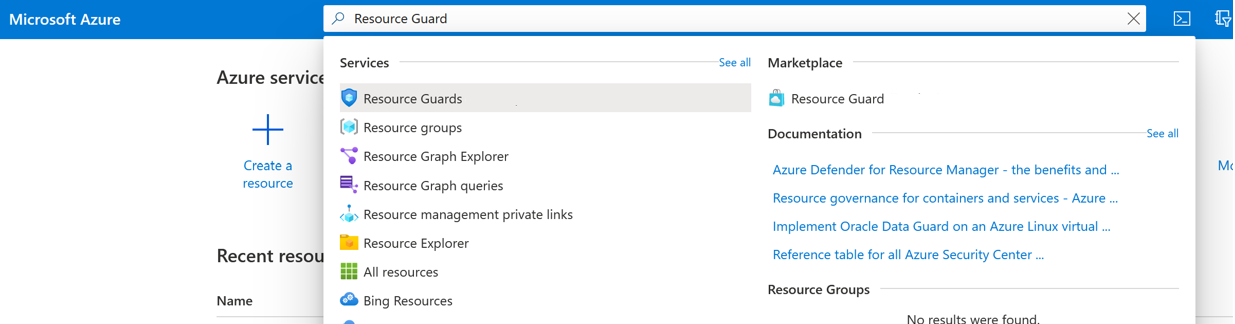
Search for Resource Guards in the search bar, and then select the corresponding item from the drop-down list.
- Select Create to start creating a Resource Guard.
- On the Create pane, fill in the required details for the Resource Guard.
- Make sure the Resource Guard is in the same Azure regions as the Recovery Services vault.
- Also, it's helpful to add a description of how to get or request access to perform actions on associated vaults when needed. This description would also appear in the associated vaults to guide the backup admin on getting the required permissions. You can edit the description later if needed, but having a well-defined description at all times is encouraged.
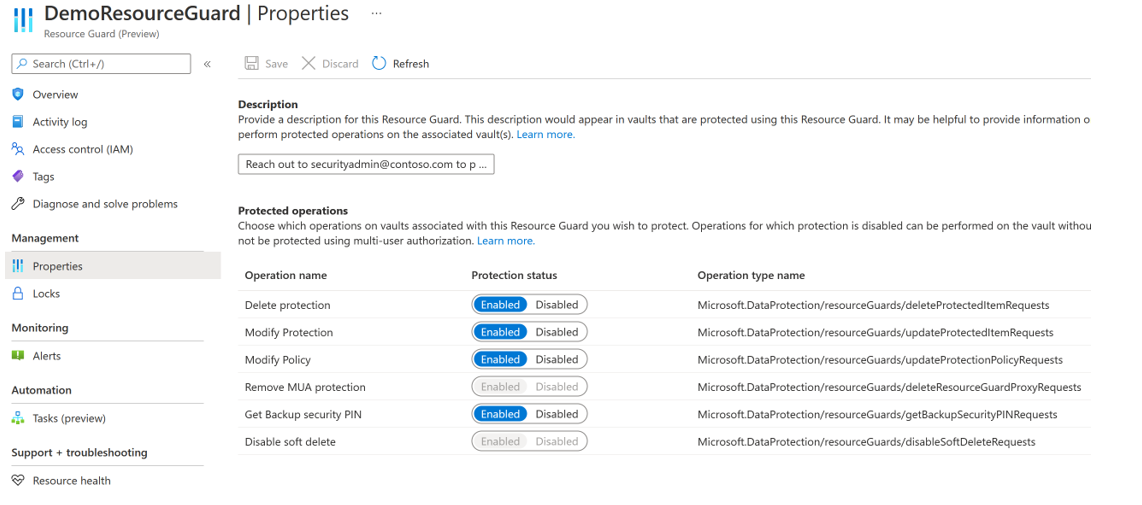
On the Protected operations tab, select the operations you need to protect using this resource guard.
You can also select the operations for protection after creating the resource guard.
Optionally, add any tags to the Resource Guard as per the requirements
Select Review + Create and follow notifications for status and successful creation of the Resource Guard.

Select operations to protect using Resource Guard
Choose the operations you want to protect using the Resource Guard out of all supported critical operations. By default, all supported critical operations are enabled. However, you (as the security admin) can exempt certain operations from falling under the purview of MUA using Resource Guard.
Choose a client
To exempt operations, follow these steps:
In the Resource Guard created above, go to Properties > Recovery Services vault tab.
Select Disable for operations that you want to exclude from being authorized using the Resource Guard.
Note
You can't disable the protected operations - Disable soft delete and Remove MUA protection.
Optionally, you can also update the description for the Resource Guard using this pane.
Select Save.

Assign permissions to the Backup admin on the Resource Guard to enable MUA
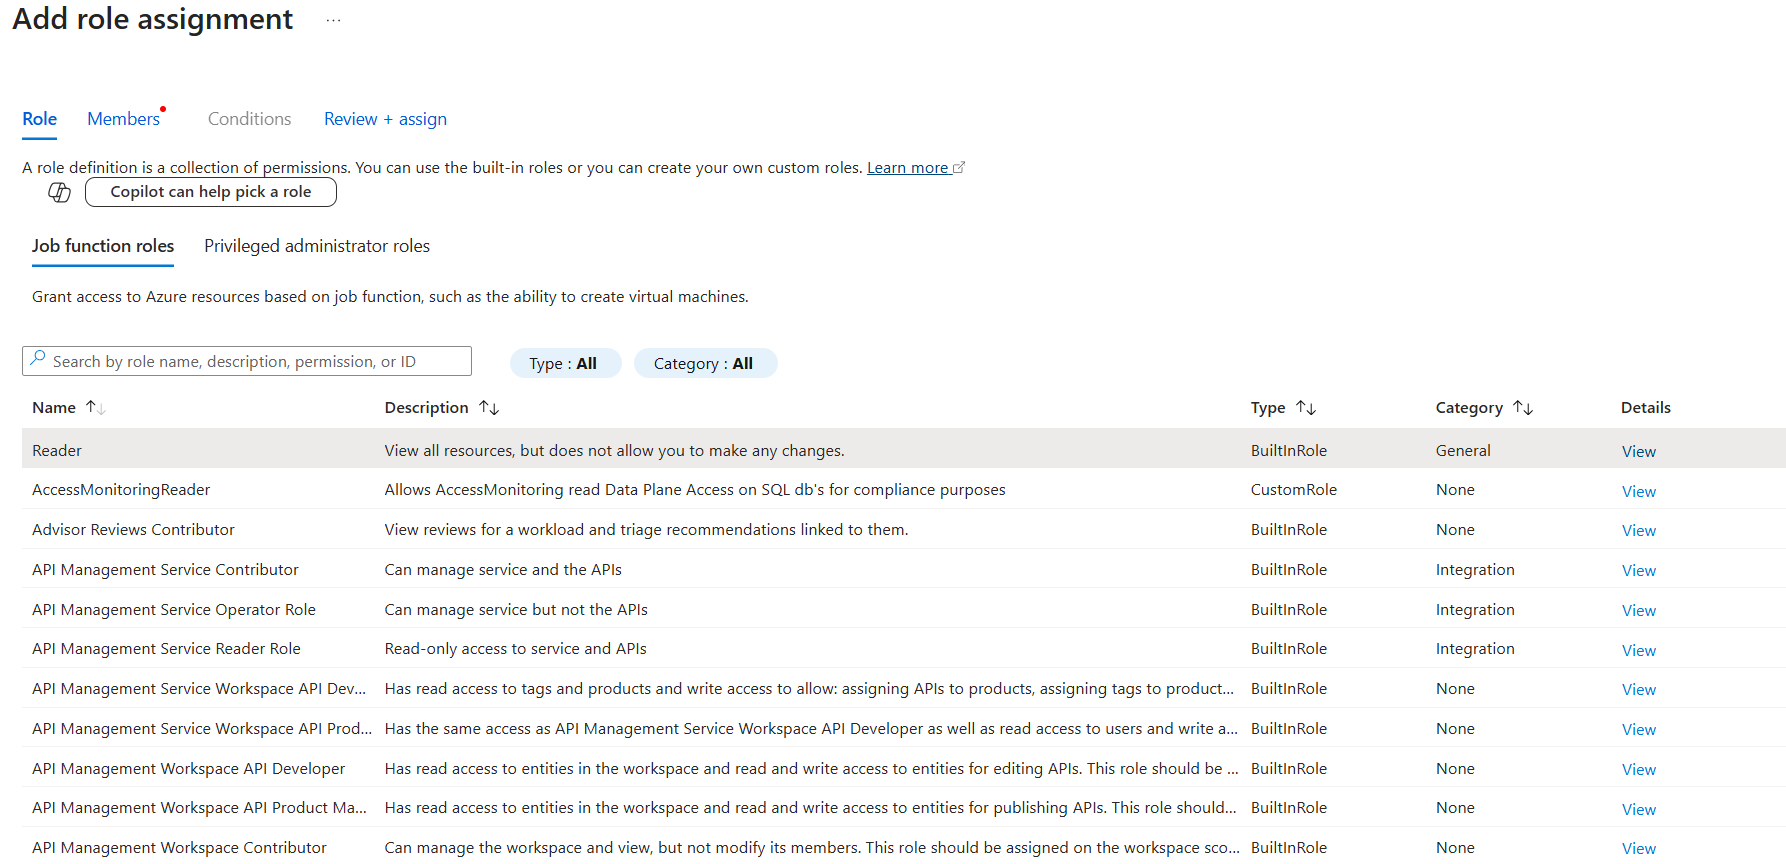
To enable MUA on a vault, the admin of the vault must have Reader role on the Resource Guard or subscription containing the Resource Guard. To assign the Reader role on the Resource Guard:
In the Resource Guard created above, go to the Access Control (IAM) pane, and then go to Add role assignment.
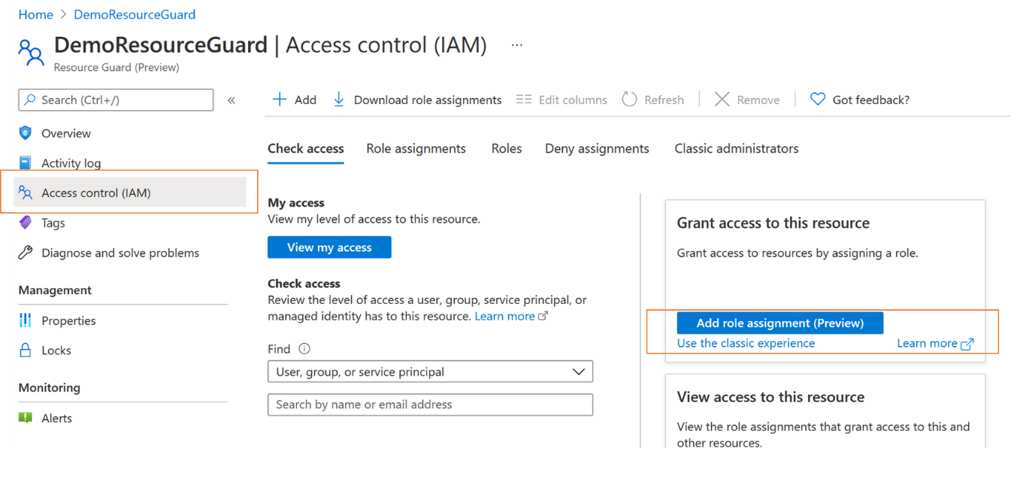
Select Reader from the list of built-in roles, and select Next.
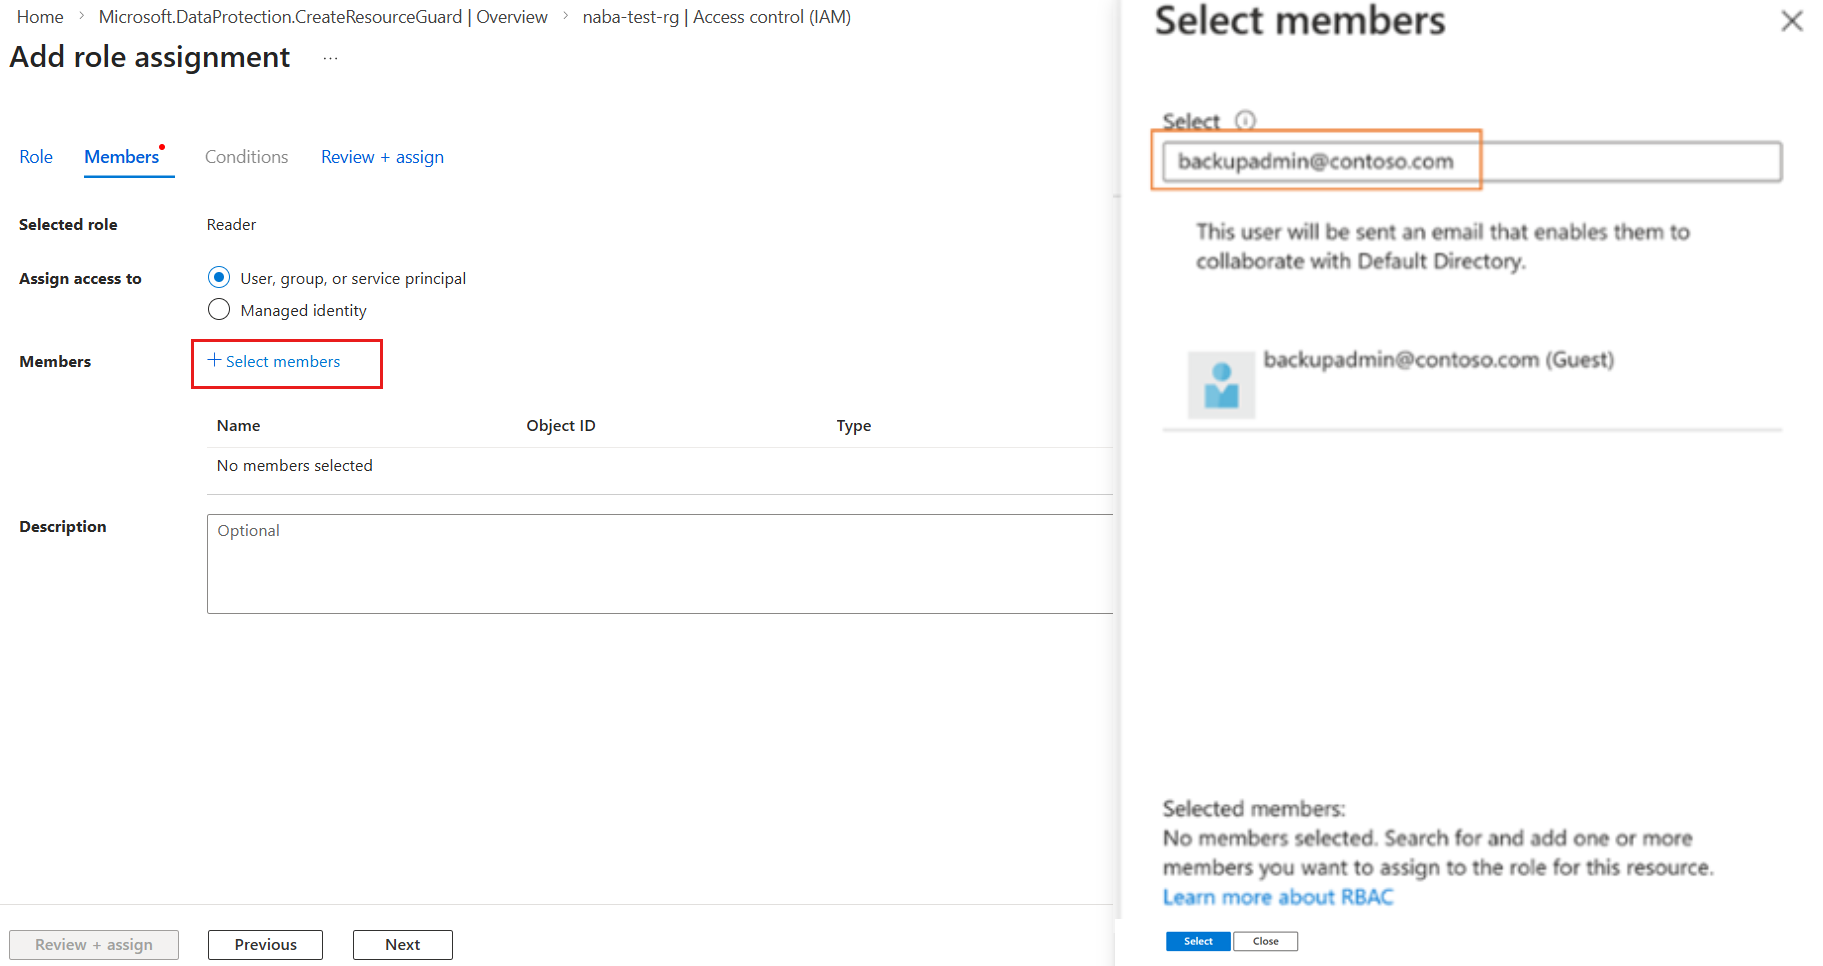
Click Select members and add the Backup admin’s email ID to add them as the Reader. As the Backup admin is in another tenant in this case, they'll be added as guests to the tenant containing the Resource Guard.
Click Select and then proceed to Review + assign to complete the role assignment.


Enable MUA on a Recovery Services vault
After the Reader role assignment on the Resource Guard is complete, enable multi-user authorization on vaults (as the Backup admin) that you manage.
Choose a client
To enable MUA on the vaults, follow these steps.
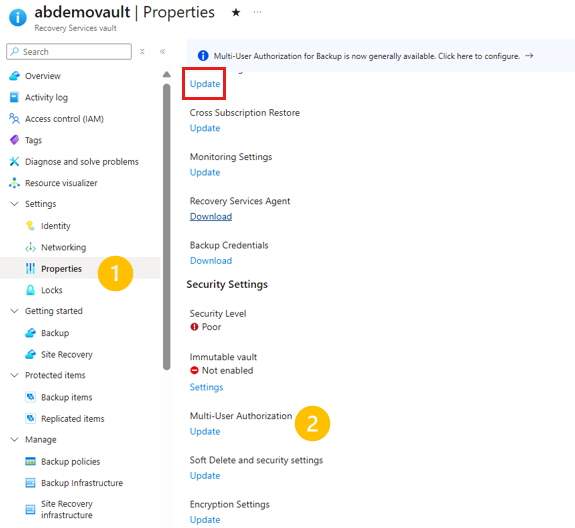
Go to the Recovery Services vault. Go to Properties on the left navigation panel, then to Multi-User Authorization and select Update.
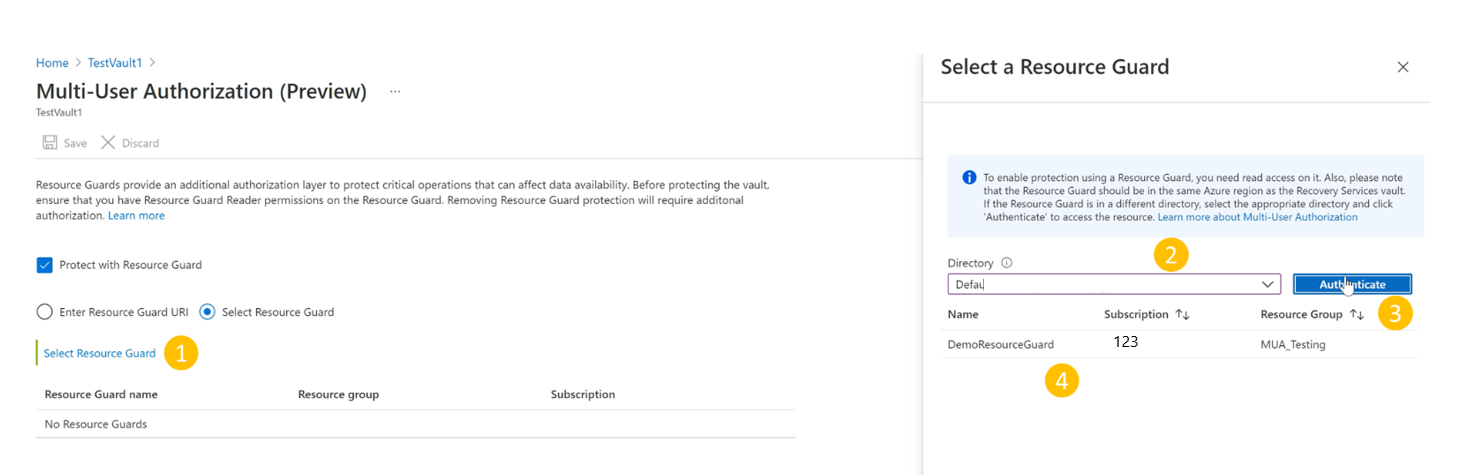
Now, you're presented with the option to enable MUA and choose a Resource Guard using one of the following ways:
You can either specify the URI of the Resource Guard, make sure you specify the URI of a Resource Guard you have Reader access to and that is the same regions as the vault. You can find the URI (Resource Guard ID) of the Resource Guard in its Overview screen:

Or, you can select the Resource Guard from the list of Resource Guards you have Reader access to, and those available in the region.
- Click Select Resource Guard
- Select the dropdown list, and then choose the directory the Resource Guard is in.
- Select Authenticate to validate your identity and access.
- After authentication, choose the Resource Guard from the list displayed.
Select Save once done to enable MUA.


Protected operations using MUA
Once you have enabled MUA, the operations in scope will be restricted on the vault, if the Backup admin tries to perform them without having the required role (that is, Backup MUA Operator role) on the Resource Guard.
Note
We highly recommend that you test your setup after enabling MUA to ensure that protected operations are blocked as expected and to ensure that MUA is correctly configured.
Depicted below is an illustration of what happens when the Backup admin tries to perform such a protected operation (For example, disabling immutability is depicted here. Other protected operations have a similar experience). The following steps are performed by a Backup admin without required permissions.
To disable immutability, follow these steps:
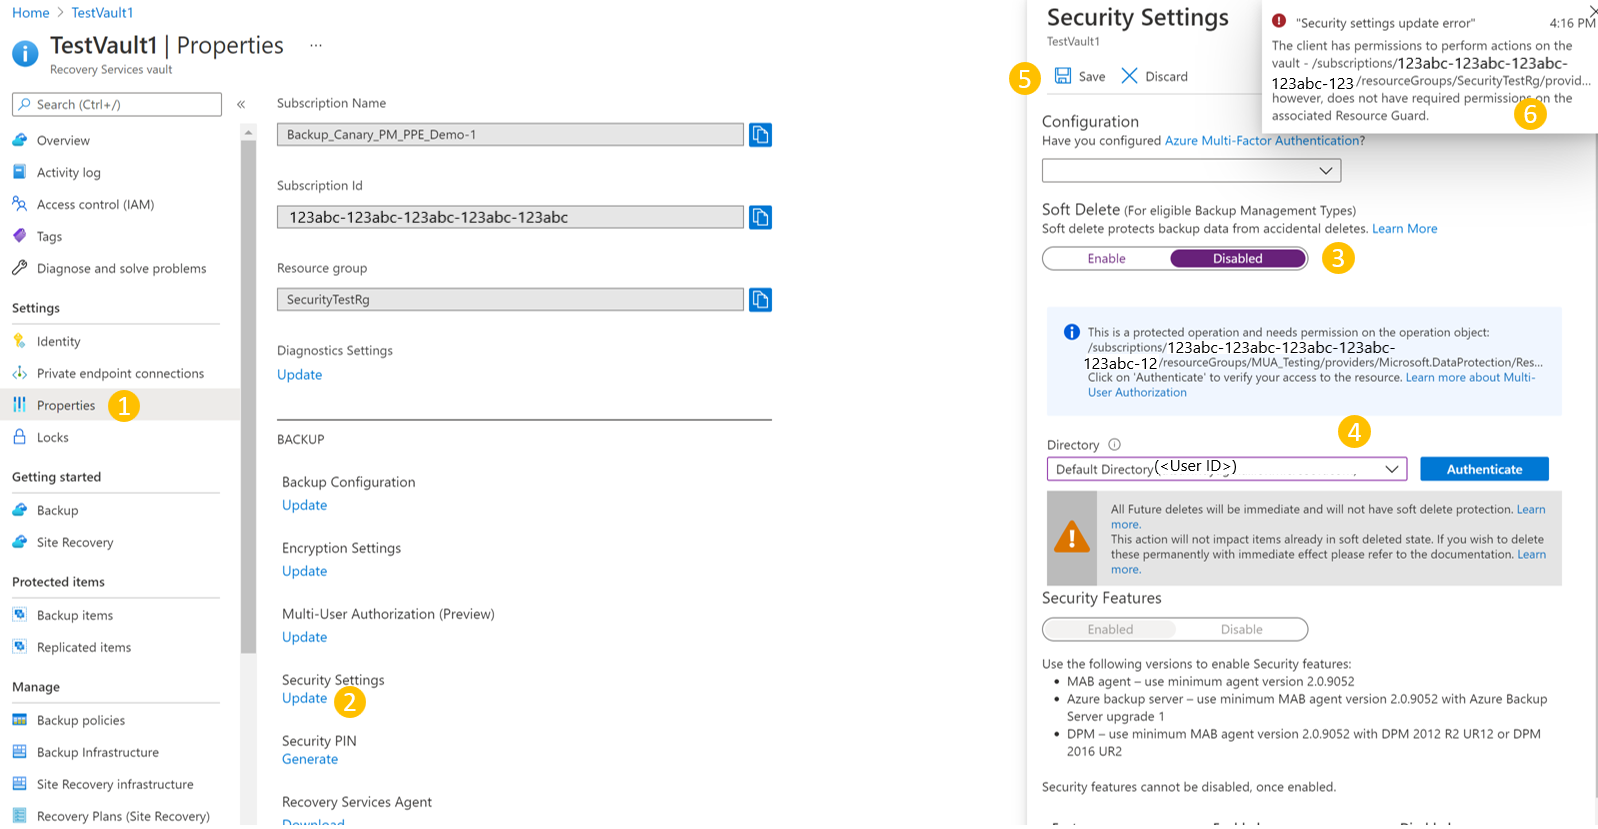
Go to the Recovery Services vault > Properties.
On the Properties pane, under Immutable vault, select Settings.
On the Immutable Vault pane, disable Immutability by clearing the Enable vault immutability checkbox.
You're informed that this is a protected operation, and you need to verify their access to the Resource Guard.
Select the directory containing the Resource Guard and Authenticate yourself.
Note
This action isn't required if the Resource Guard is in the same directory as the vault.
Select Apply.
The request fails with an error you don't have sufficient permissions on the Resource Guard to perform this operation.
Authorize critical (protected) operations using Microsoft Entra Privileged Identity Management
The following sections discuss authorizing these requests using PIM. There are cases where you may need to perform critical operations on your backups and MUA can help you ensure that these are performed only when the right approvals or permissions exist. As discussed earlier, the Backup admin needs to have a Backup MUA Operator role on the Resource Guard to perform critical operations that are in the Resource Guard scope. One of the ways to allow just-in-time for such operations is through the use of Microsoft Entra Privileged Identity Management.
Note
Though using Microsoft Entra PIM is the recommended approach, you can use manual or custom methods to manage access for the Backup admin on the Resource Guard. For managing access to the Resource Guard manually, use the ‘Access control (IAM)’ setting on the left navigation bar of the Resource Guard and grant the Backup MUA Operator role to the Backup admin.
Create an eligible assignment for the Backup admin (if using Microsoft Entra Privileged Identity Management)
The Security admin can use PIM to create an eligible assignment for the Backup admin and provide Backup MUA Operator role to the Resource Guard. This enables the Backup admin to raise a request (for the Backup MUA Operator role) when they need to perform a protected operation. To do so, the security admin performs the following:
In the security tenant (which contains the Resource Guard), go to Privileged Identity Management (search for this in the search bar in the Azure portal) and then go to Azure Resources (under Manage on the left menu).
Select the resource (the Resource Guard or the containing subscription/RG) to which you want to assign the Backup MUA Operator role.
If you don’t see the corresponding resource in the list of resources, ensure you add the containing subscription to be managed by PIM.
In the selected resource, go to Assignments (under Manage on the left menu) and go to Add assignments.

In the Add assignments:
- Select the role as Backup MUA Operator.
- Go to Select members and add the username (or email IDs) of the Backup admin.
- Select Next.

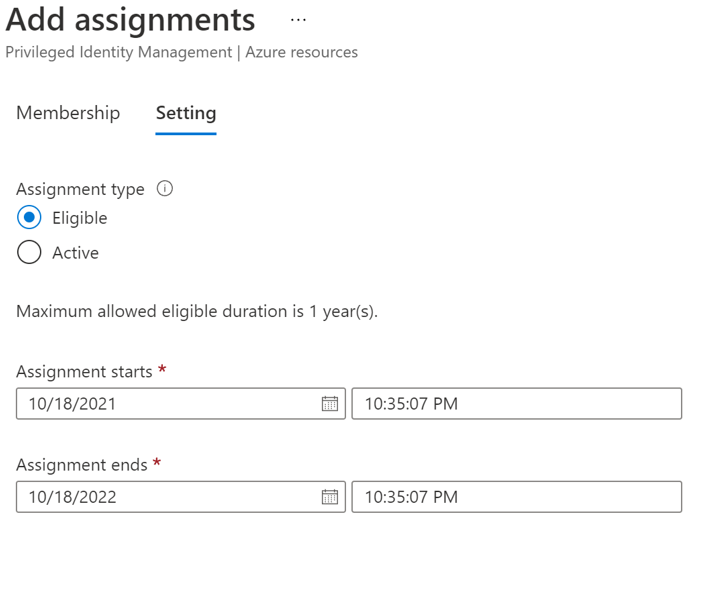
In the next screen:
- Under assignment type, choose Eligible.
- Specify the duration for which the eligible permission is valid.
- Select Assign to finish creating the eligible assignment.
Set up approvers for activating Backup MUA Operator role
By default, the above setup may not have an approver (and an approval flow requirement) configured in PIM. To ensure that approvers have the Backup MUA Operator role for request approval, the Security admin must follow these steps:
Note
If this isn't configured, any requests will be automatically approved without going through the security admins or a designated approver’s review. More details on this can be found here
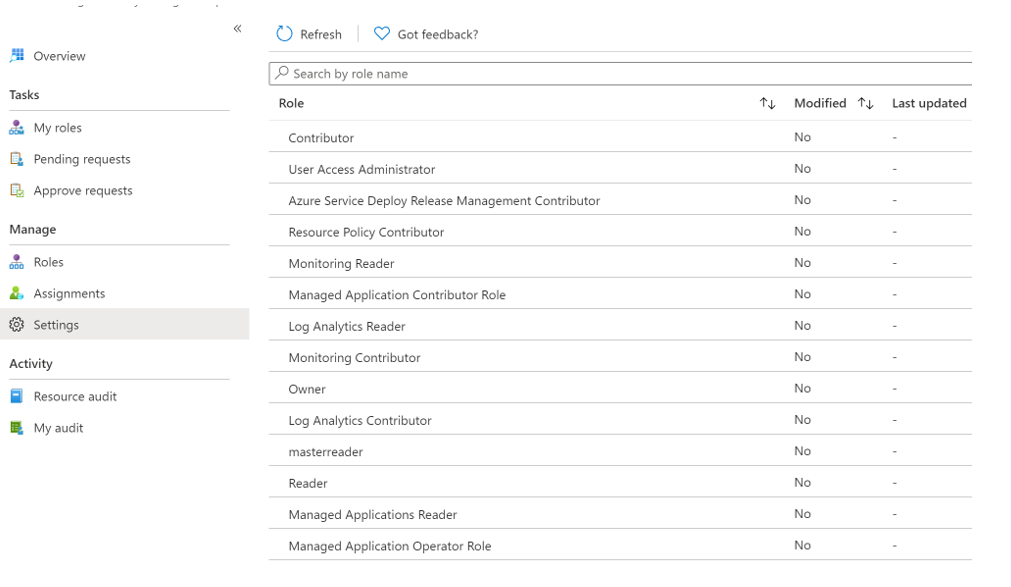
In Microsoft Entra PIM, select Azure Resources on the left navigation bar and select your Resource Guard.
Go to Settings and then go to the Backup MUA Operator role.
Select Edit to add the reviewers who must review and approve the activation request for the Backup MUA Operator role in case you find that Approvers show None or display incorrect approver(s).
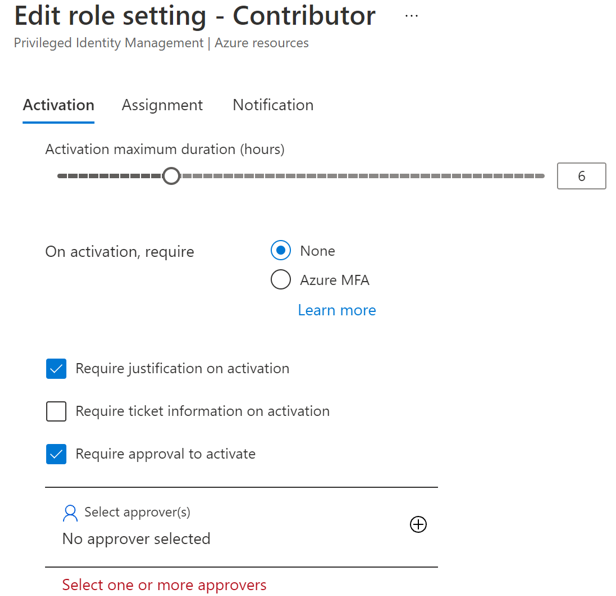
On the Activation tab, select Require approval to activate and add the approver(s) who need to approve each request.
Select security options, such as multifactor authentication (MFA), Mandating ticket to activate Backup MUA Operator role.
Select the appropriate options on the Assignment and Notification tabs as required.
Select Update to complete the setup of approvers to activate the Backup MUA Operator role.
Request activation of an eligible assignment to perform critical operations
After the security admin creates an eligible assignment, the Backup admin needs to activate the assignment for the Backup MUA Operator role to be able to perform protected actions.
To activate the role assignment, follow these steps:
Go to Microsoft Entra Privileged Identity Management. If the Resource Guard is in another directory, switch to that directory and then go to Microsoft Entra Privileged Identity Management.
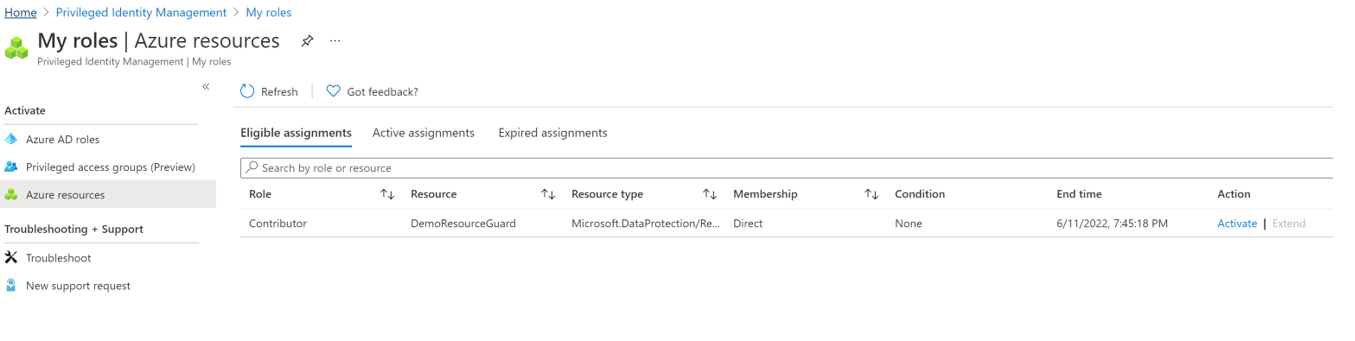
Go to My roles > Azure resources on the left menu.
Select Activate to activate the eligible assignment for Backup MUA Operator role.
A notification appears notifying that the request is sent for approval.

Approve activation of requests to perform critical operations
Once the Backup admin raises a request for activating the Backup MUA Operator role, the request is to be reviewed and approved by the security admin.
- In the security tenant, go to Microsoft Entra Privileged Identity Management.
- Go to Approve Requests.
- Under Azure resources, the request raised by the Backup admin requesting activation as a Backup MUA Operator can be seen.
- Review the request. If genuine, select the request and select Approve to approve it.
- The Backup admin is informed by email (or other organizational alerting mechanisms) that their request is now approved.
- Once approved, the Backup admin can perform protected operations for the requested period.
Perform a protected operation after approval
After the Backup admin’s request for the Backup MUA Operator role on the Resource Guard is approved, they can perform protected operations on the associated vault. If the Resource Guard is in another directory, the Backup admin would need to authenticate themselves.
Note
If the access was assigned using a JIT mechanism, the Backup MUA Operator role is retracted at the end of the approved period. Else, the Security admin manually removes the Backup MUA Operator role assigned to the Backup admin to perform the critical operation.
Disable MUA on a Recovery Services vault
Disabling MUA is a protected operation, so, so, vaults are protected using MUA. If you (the Backup admin) want to disable MUA, you must have the required Backup MUA Operator role in the Resource Guard.
Choose a client
To disable MUA on a vault, follow these steps:
The Backup admin requests the Security admin for Backup MUA Operator role on the Resource Guard. They can request this to use the methods approved by the organization such as JIT procedures, like Microsoft Entra Privileged Identity Management, or other internal tools and procedures.
The Security admin approves the request (if they find it worthy of being approved) and informs the Backup admin. Now the Backup admin has the Backup MUA Operator role on the Resource Guard.
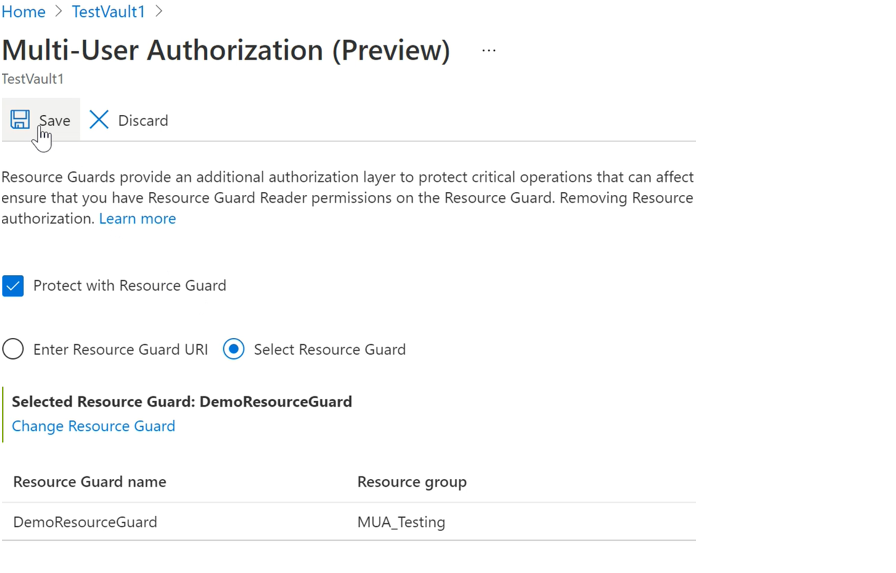
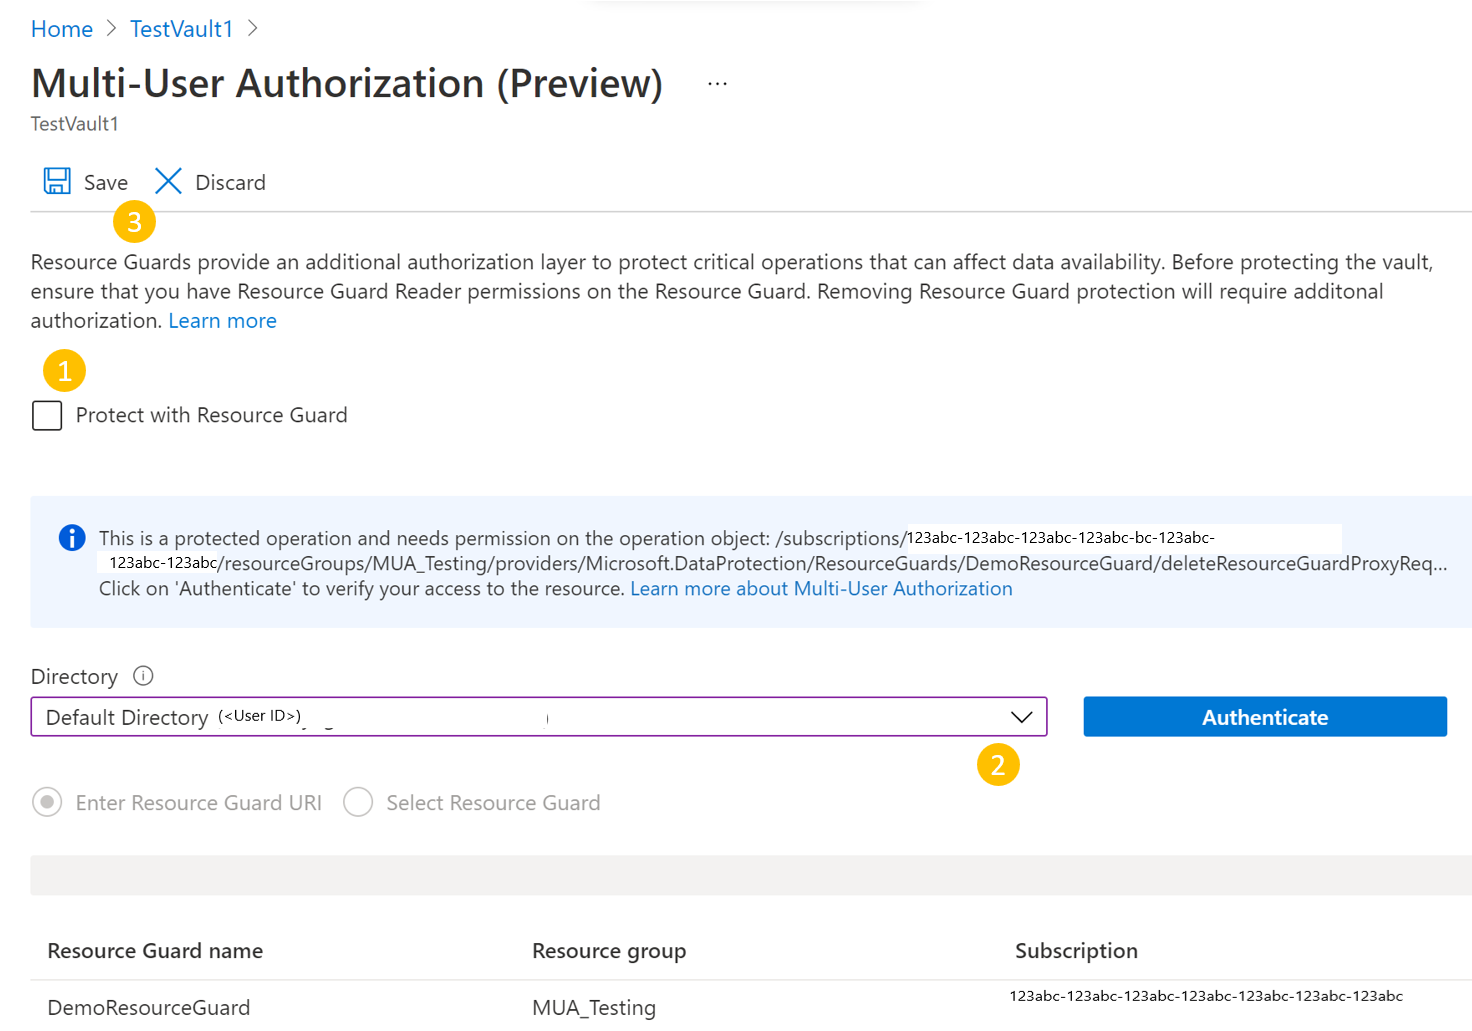
The Backup admin goes to the vault > Properties > Multi-user Authorization.
Select Update.
- Clear the Protect with Resource Guard checkbox.
- Choose the Directory that contains the Resource Guard and verify access using the Authenticate button (if applicable).
- After authentication, select Save. With the right access, the request should be successfully completed.
The tenant ID is required if the resource guard exists in a different tenant.
Example:
az backup vault resource-guard-mapping delete --resource-group RgName --name VaultName
This article describes how to configure Multi-User Authorization (MUA) for Azure Backup to enhance the security of critical operations on Backup vaults. It covers the creation of a Resource Guard in a separate tenant for maximum protection and demonstrates how to request and approve critical operation access using Microsoft Entra Privileged Identity Management within the tenant hosting the Resource Guard. Alternatively, you can use other methods to manage just-in-time (JIT) permissions based on your organizational setup.
Note
- Multi-user authorization using Resource Guard for Backup vault is now generally available.
- Multi-user authorization for Azure Backup is available in all global Azure regions.
Prerequisites
Before you configure Multi-user authorization for a Backup vault, ensure that the following prerequisites are met:
- The Resource Guard and the Backup vault must be in the same Azure region.
- The Backup admin must not have Contributor, Backup MUA Admin, or Backup MUA Operator permissions on the Resource Guard. You can choose to have the Resource Guard in another subscription of the same directory or in another directory to ensure maximum isolation.
- The subscriptions contain the Backup vault as well as the Resource Guard (in different subscriptions or tenants) must be registered to use the provider - Microsoft.DataProtection4. For more information, see Azure resource providers and types.
Learn about various MUA usage scenarios.
Create a Resource Guard
The Security admin creates the Resource Guard. We recommend that you create it in a different subscription or a different tenant as the vault. However, it should be in the same region as the vault.
The Backup admin must NOT have contributor, Backup MUA Admin, or Backup MUA Operator access on the Resource Guard or the subscription that contains it.
To create the Resource Guard in a tenant different from the vault tenant as a Security admin, follow these steps:
In the Azure portal, go to the directory under which you want to create the Resource Guard.
Search for Resource Guards in the search bar, and then select the corresponding item from the dropdown list.
- Select Create to create a Resource Guard.
- In the Create pane, fill in the required details for this Resource Guard.
- Ensure that the Resource Guard is in the same Azure region as the Backup vault.
- Add a description on how to request access to perform actions on associated vaults when needed. This description appears in the associated vaults to guide the Backup admin on how to get the required permissions.
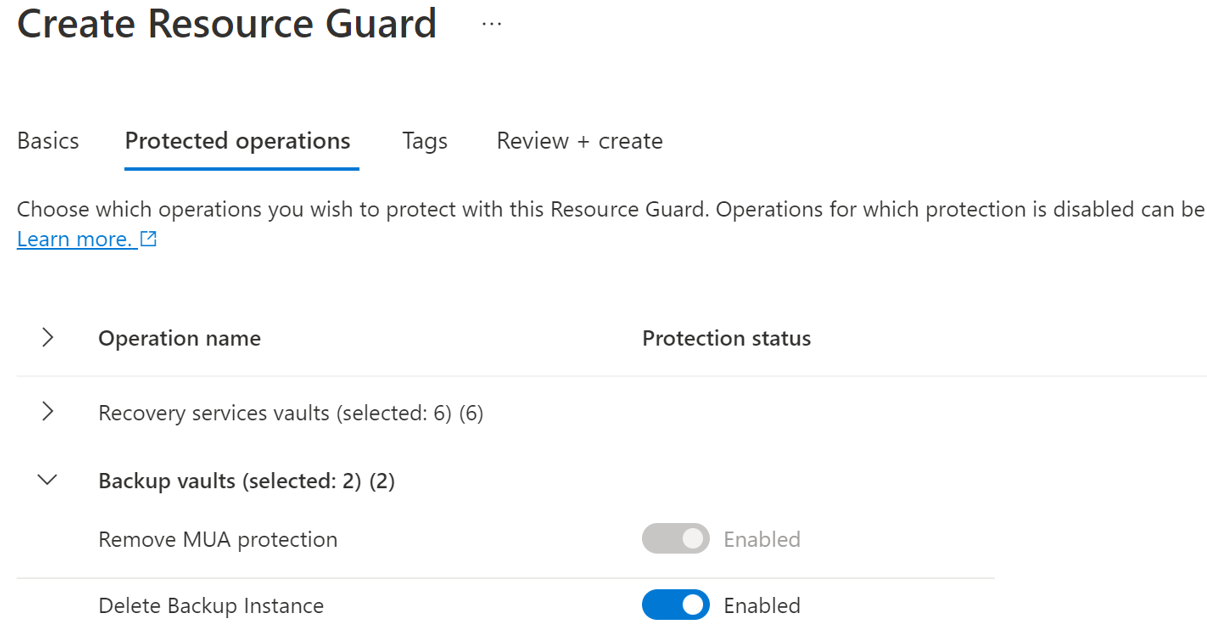
On the Protected operations tab, select the operations you need to protect using this resource guard under the Backup vault tab.
Currently, the Protected operations tab includes only the Delete backup instance option to disable.
You can also select the operations for protection after creating the resource guard.
Optionally, add any tags to the Resource Guard as per the requirements.
Select Review + Create and then follow the notifications to monitor the status and the successful creation of the Resource Guard.
Select operations to protect using Resource Guard
After vault creation, the Security admin can also choose the operations for protection using the Resource Guard among all supported critical operations. By default, all supported critical operations are enabled. However, the Security admin can exempt certain operations from falling under the purview of MUA using Resource Guard.
To select the operations for protection, follow these steps:
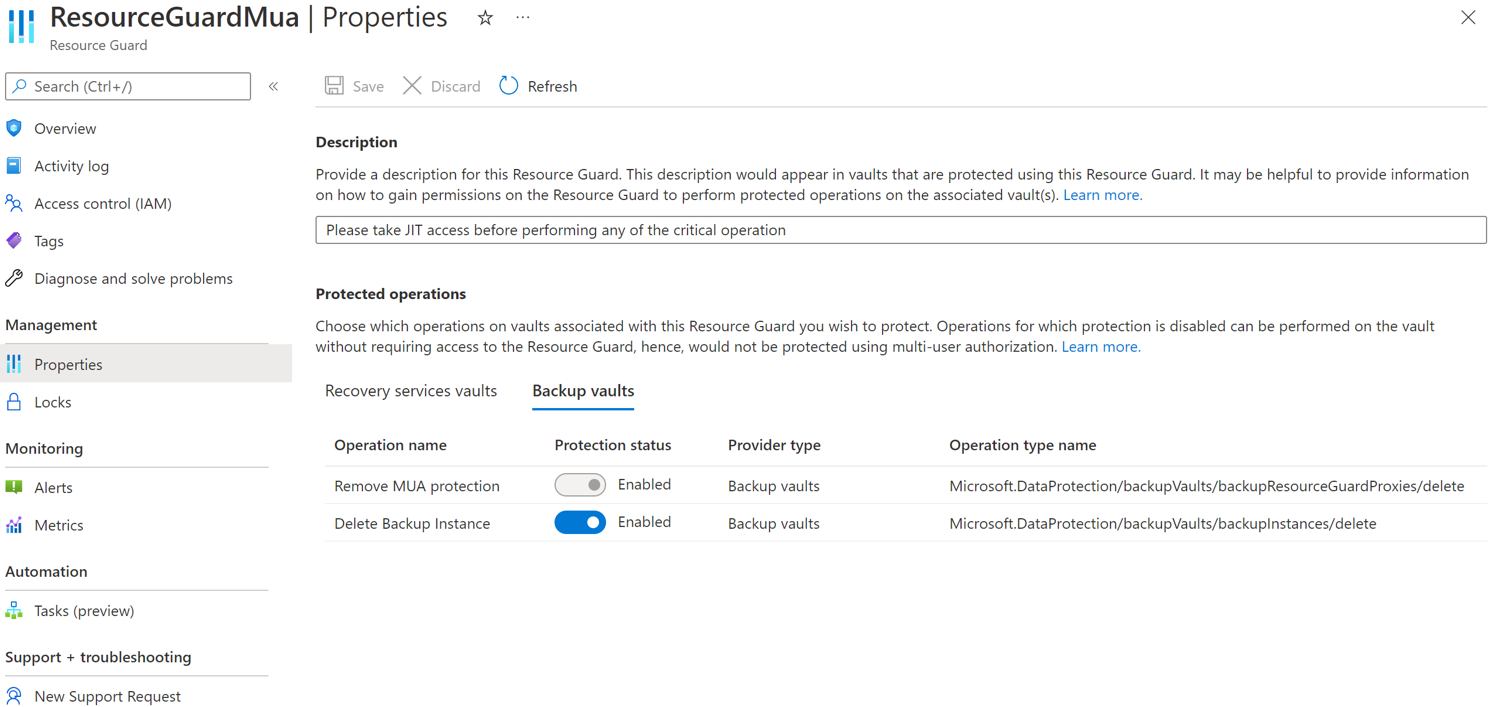
In the Resource Guard that you've created, go to Properties > Backup vault tab.
Select Disable for the operations that you want to exclude from being authorized.
You can't disable the Remove MUA protection and Disable soft delete operations.
Optionally, in the Backup vaults tab, update the description for the Resource Guard.
Select Save.

Assign permissions to the Backup admin on the Resource Guard to enable MUA
The Backup admin must have Reader role on the Resource Guard or subscription that contains the Resource Guard to enable MUA on a vault. The Security admin needs to assign this role to the Backup admin.
To assign the Reader role on the Resource Guard, follow these steps:
In the Resource Guard created above, go to the Access Control (IAM) pane, and then go to Add role assignment.
Select Reader from the list of built-in roles, and select Next.
Click Select members and add the Backup admin's email ID to assign the Reader role.
As the Backup admins are in another tenant, they'll be added as guests to the tenant that contains the Resource Guard.
Click Select > Review + assign to complete the role assignment.
Enable MUA on a Backup vault
Once the Backup admin has the Reader role on the Resource Guard, they can enable multi-user authorization on vaults managed by following these steps:
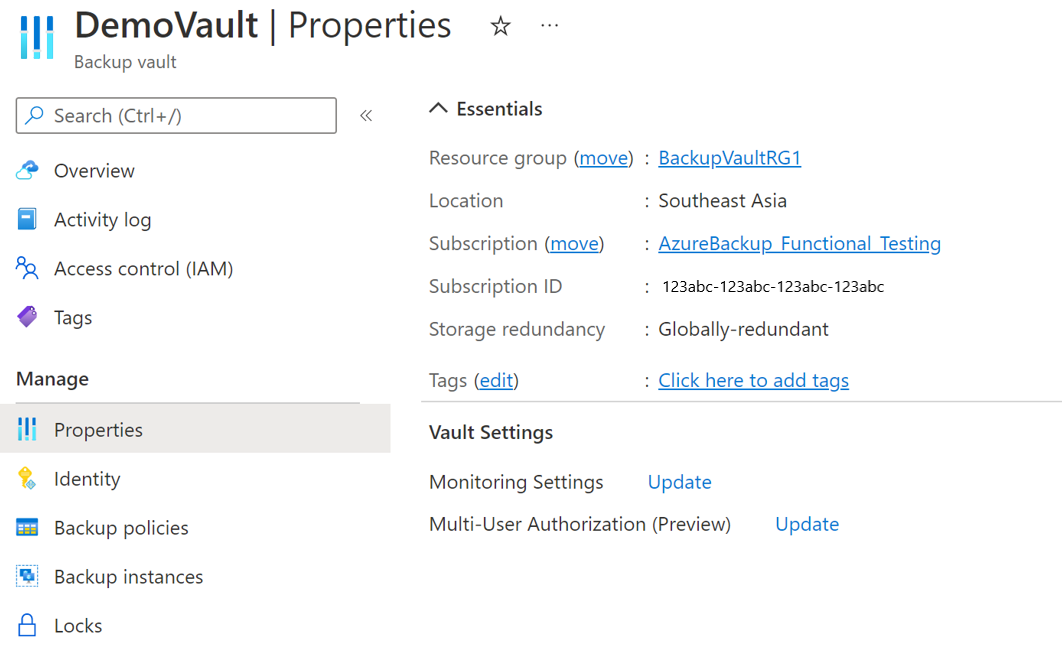
Go to the Backup vault for which you want to configure MUA.
On the left panel, select Properties.
Go to Multi-User Authorization and select Update.
To enable MUA and choose a Resource Guard, perform one of the following actions:
You can either specify the URI of the Resource Guard. Ensure that you specify the URI of a Resource Guard you have Reader access to and it's in the same region as the vault. You can find the URI (Resource Guard ID) of the Resource Guard on its Overview page.
Or, you can select the Resource Guard from the list of Resource Guards you have Reader access to, and those available in the region.
- Click Select Resource Guard.
- Select the dropdown and select the directory the Resource Guard is in.
- Select Authenticate to validate your identity and access.
- After authentication, choose the Resource Guard from the list displayed.

Select Save to enable MUA.
Protected operations using MUA
Once the Backup admin enables MUA, the operations in scope will be restricted on the vault, and the operations fail if the Backup admin tries to perform them without having the Backup MUA Operator role on the Resource Guard.
Note
We highly recommend you to test your setup after enabling MUA to ensure that:
- Protected operations are blocked as expected.
- MUA is correctly configured.
To perform a protected operation (disabling MUA), follow these steps:
Go to the vault > Properties in the left pane.
Clear the checkbox to disable MUA.
You'll receive a notification that it's a protected operation, and you need to have access to the Resource Guard.
Select the directory containing the Resource Guard and authenticate yourself.
This step may not be required if the Resource Guard is in the same directory as the vault.
Select Save.
The request fails with an error that you don't have sufficient permissions on the Resource Guard to perform this operation.

Authorize critical (protected) operations using Microsoft Entra Privileged Identity Management
There are scenarios where you may need to perform critical operations on your backups and you can perform them with the right approvals or permissions with MUA. The following sections explain how to authorize the critical operation requests using Privileged Identity Management (PIM).
The Backup admin must have a Backup MUA Operator role on the Resource Guard to perform critical operations in the Resource Guard scope. One of the ways to allow just-in-time (JIT) operations is through the use of Microsoft Entra Privileged Identity Management.
Note
We recommend that you use the Microsoft Entra PIM. However, you can also use manual or custom methods to manage access for the Backup admin on the Resource Guard. To manually manage access to the Resource Guard, use the Access control (IAM) setting on the left pane of the Resource Guard and grant the Backup MUA Operator role to the Backup admin.
Create an eligible assignment for the Backup admin using Microsoft Entra Privileged Identity Management
The Security admin can use PIM to create an eligible assignment for the Backup admin as a Backup MUA Operator to the Resource Guard. This enables the Backup admin to raise a request (for the Backup MUA Operator role) when they need to perform a protected operation.
To create an eligible assignment, follow the steps:
Sign in to the Azure portal.
Go to security tenant of Resource Guard, and in the search, enter Privileged Identity Management.
In the left pane, select Manage and go to Azure Resources.
Select the resource (the Resource Guard or the containing subscription/RG) to which you want to assign the Backup MUA Operator role.
If you don't find any corresponding resources, then add the containing subscription that is managed by PIM.
Select the resource and go to Manage > Assignments > Add assignments.
In the Add assignments:
- Select the role as Backup MUA Operator.
- Go to Select members and add the username (or email IDs) of the Backup admin.
- Select Next.
In Assignment, select Eligible and specify the validity of the duration of eligible permission.
Select Assign to complete creating the eligible assignment.
Set up approvers for activating Contributor role
By default, the above setup may not have an approver (and an approval flow requirement) configured in PIM. To ensure that approvers have the Contributor role for request approval, the Security admin must follow these steps:
Note
If the approver setup isn't configured, the requests are automatically approved without going through the Security admins or a designated approver’s review. Learn more.
In Microsoft Entra PIM, select Azure Resources on the left pane and select your Resource Guard.
Go to Settings > Contributor role.
Select Edit to add the reviewers who must review and approve the activation request for the Contributor role in case you find that Approvers show None or display incorrect approver(s).
On the Activation tab, select Require approval to activate to add the approver(s) who must approve each request.
Select security options, such as multifactor authentication (MFA), Mandating ticket to activate Contributor role.
Select the appropriate options on Assignment and Notification tabs as per your requirement.
Select Update to complete the setup of approvers to activate the Contributor role.
Request activation of an eligible assignment to perform critical operations
After the Security admin creates an eligible assignment, the Backup admin needs to activate the role assignment for the Contributor role to perform protected actions.
To activate the role assignment, follow the steps:
Go to Microsoft Entra Privileged Identity Management. If the Resource Guard is in another directory, switch to that directory and then go to Microsoft Entra Privileged Identity Management.
Go to My roles > Azure resources in the left pane.
Select Activate to activate the eligible assignment for Contributor role.
A notification appears notifying that the request is sent for approval.
Approve activation requests to perform critical operations
Once the Backup admin raises a request for activating the Contributor role, the Security admin must review and approve the request.
To review and approve the request, follow these steps:
In the security tenant, go to Microsoft Entra Privileged Identity Management.
Go to Approve Requests.
Under Azure resources, you can see the request awaiting approval.
Select Approve to review and approve the genuine request.
After the approval, the Backup admin receives a notification, via email or other internal alerting options, that the request is approved. Now, the Backup admin can perform the protected operations for the requested period.
Perform a protected operation after approval
Once the Security admin approves the Backup admin's request for the Backup MUA Operator role on the Resource Guard, they can perform protected operations on the associated vault. If the Resource Guard is in another directory, the Backup admin must authenticate themselves.
Note
If the access was assigned using a JIT mechanism, the Backup MUA Operator role is retracted at the end of the approved period. Otherwise, the Security admin manually removes the Backup MUA Operator role assigned to the Backup admin to perform the critical operation.
The following screenshot shows an example of disabling soft delete for an MUA-enabled vault.

Disable MUA on a Backup vault
Disabling the MUA is a protected operation that must be done by the Backup admin only. To do this, the Backup admin must have the required Backup MUA Operator role in the Resource Guard. To obtain this permission, the Backup admin must first request the Security admin for the Backup MUA Operator role on the Resource Guard using the just-in-time (JIT) procedure, such as Microsoft Entra Privileged Identity Management or internal tools.
Then the Security admin approves the request if it's genuine and updates the Backup admin who now has Backup MUA Operator role on the Resource guard. Learn more on how to get this role.
To disable the MUA, the Backup admins must follow these steps:
Go to vault > Properties > Multi-user Authorization.
Select Update and clear the Protect with Resource Guard checkbox.
Select Authenticate (if applicable) to choose the Directory that contains the Resource Guard and verify access.
Select Save to complete the process of disabling the MUA.
Next steps
Learn more about Multi-user authorization using Resource Guard.