Note
Access to this page requires authorization. You can try signing in or changing directories.
Access to this page requires authorization. You can try changing directories.
This quickstart describes how to use an Azure Resource Manager template (ARM template) to deploy Azure Bastion to a virtual network.
An ARM template is a JavaScript Object Notation (JSON) file that defines the infrastructure and configuration for your project. The template uses declarative syntax. In declarative syntax, you describe your intended deployment without writing the sequence of programming commands to create the deployment.
The following diagram shows the architecture of Bastion.

If your environment meets the prerequisites and you're familiar with using ARM templates, select the following Deploy to Azure button. The template opens in the Azure portal.

Prerequisites
Verify that you have an Azure subscription. If you don't already have an Azure subscription, you can activate your MSDN subscriber benefits or sign up for a free account.
Note
The use of Bastion with Azure Private DNS zones is not supported at this time. Before you begin, make sure that the virtual network where you plan to deploy your Bastion resource is not linked to a private DNS zone.
Review the template
To view the entire template that this quickstart uses, see Azure Bastion as a Service with NSG.
By default, this template creates a Bastion deployment with a resource group, a virtual network, network security group (NSG) settings, an AzureBastionSubnet subnet, a bastion host, and a public IP address resource that's used for the bastion host. Here's the purpose of each part of the template:
- Microsoft.Network/bastionHosts creates the bastion host.
- Microsoft.Network/virtualNetworks creates a virtual network.
- Microsoft.Network/virtualNetworks/subnets creates the subnet.
- Microsoft Network/networkSecurityGroups controls the NSG settings.
- Microsoft.Network/publicIpAddresses specifies the public IP address value for the bastion host.
Parameters
| Parameter name | Description |
|---|---|
Region |
Azure region for Bastion and the virtual network. |
vnet-name |
Name of a new or existing virtual network to which Bastion should be deployed. |
vnet-ip-prefix |
IP prefix for available addresses in a virtual network address space. |
vnet-new-or-existing |
Choice of whether to deploy new virtual network or deploy to an existing one. |
bastion-subnet-ip-prefix |
Bastion subnet IP prefix, which must be within the virtual network IP prefix's address space. |
bastion-host-name |
Name of the Bastion resource. |
Note
To find more templates, see Azure quickstart templates.
Deploy the template
Important
Hourly pricing starts from the moment that Bastion is deployed, regardless of outbound data usage. For more information, see Pricing and SKUs. If you're deploying Bastion as part of a tutorial or test, we recommend that you delete this resource after you finish using it.
In this section, you deploy Bastion by using the Azure portal. You don't connect and sign in to your virtual machine or deploy Bastion directly from your VM.
Sign in to the Azure portal.
Select the following Deploy to Azure button:
In the Azure Bastion as a Service template, enter or select information on the Basics tab. Keep these considerations in mind:
- If you're using the template for a test environment, you can use the example values that this step provides.
- To view the template, select Edit template. On this page, you can adjust some of the values, such as the address space or the name of certain resources. Select Save to save your changes, or select Discard to discard them.
- If you decide to create your bastion host in an existing virtual network, be sure to fill in the values for the template as they exist in your deployed environment, or the template will fail.
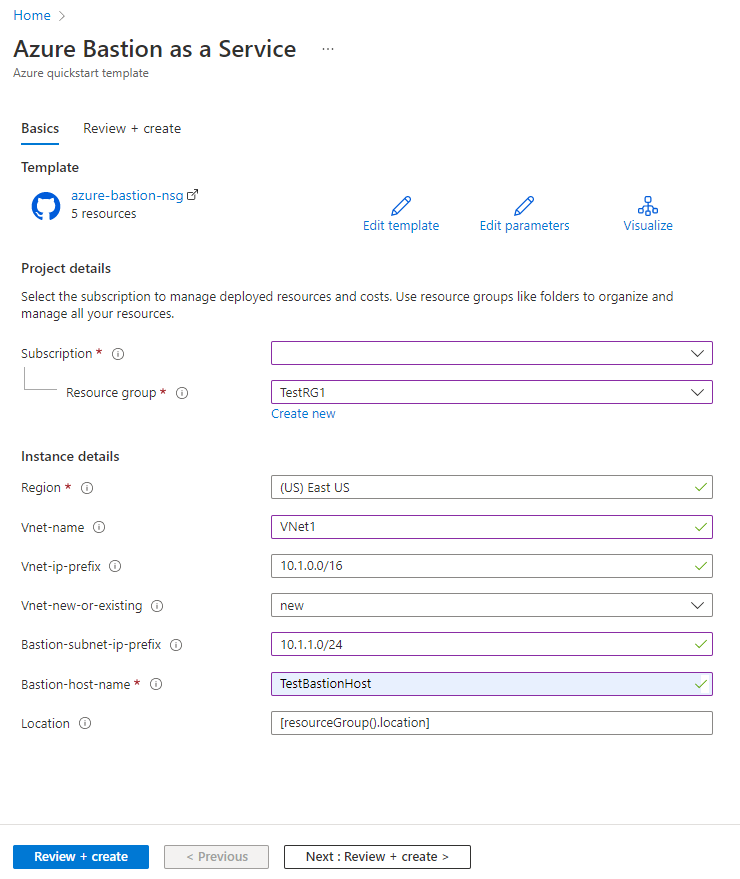
Setting Example value Subscription Select your Azure subscription. Resource group Select Create new, enter TestRG1, and then select OK. Region Enter East US. Vnet-name Enter VNet1. Vnet-ip-prefix Enter 10.1.0.0/16. Vnet-new-or-existing Select new. Bastion-subnet-ip-prefix Enter 10.1.1.0/24. Bastion-host-name Enter TestBastionHost. Select the Review + create tab, or select the Review + create button. Select Create.
The deployment finishes within 10 minutes. You can view the progress on the template Overview pane. If you close the portal, deployment continues.

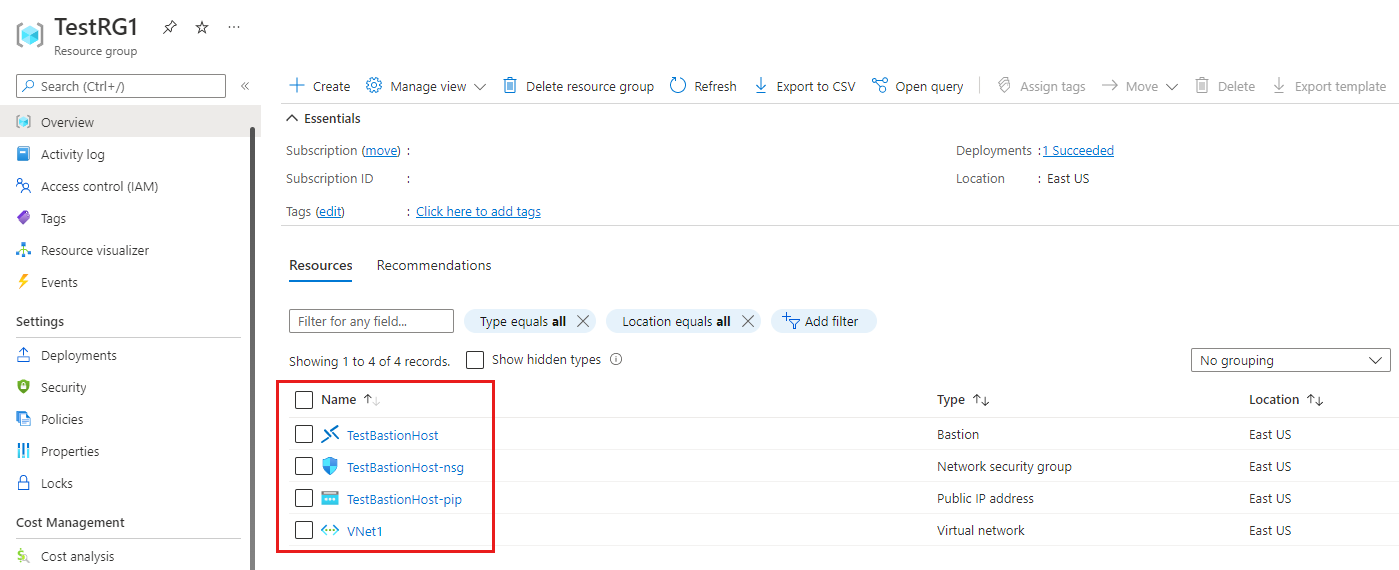
Validate the deployment
To validate the deployment of Bastion:
Sign in to the Azure portal.
Select the TestRG1 resource group that you created in the previous section.
From the Overview pane of the resource group, scroll down to the Resources tab. Validate the Bastion resource.

Clean up resources
When you finish using the virtual network and the virtual machines, delete the resource group and all of the resources that it contains:
- Enter the name of your resource group in the Search box at the top of the portal, and then select it from the search results.
- Select Delete resource group.
- Enter your resource group for TYPE THE RESOURCE GROUP NAME, and then select Delete.
Next steps
In this quickstart, you deployed Bastion by using an ARM template. You then connected to a virtual machine securely via Bastion. Continue with the following steps if you want to copy and paste to your virtual machine.