Note
Access to this page requires authorization. You can try signing in or changing directories.
Access to this page requires authorization. You can try changing directories.
Scheduling Batch jobs lets you prioritize the jobs you want to run first, while taking into account task dependencies. You can also make sure to use the least amount of resources. Nodes can be decommissioned when not needed, and tasks that are dependent on other tasks are spun up just in time to optimize the workflows. Since only one job at a time runs, jobs can be set to autocomplete, and a new one doesn't start until the previous one completes.
The tasks you schedule using the job manager task are associated with a job. The job manager task will create tasks for the job. To do so, the job manager task needs to authenticate with the Batch account. Use the AZ_BATCH_AUTHENTICATION_TOKEN access token. The token allows access to the rest of the job.
To manage a job using the Azure CLI, see az batch job-schedule. You can also create job schedules in the Azure portal.
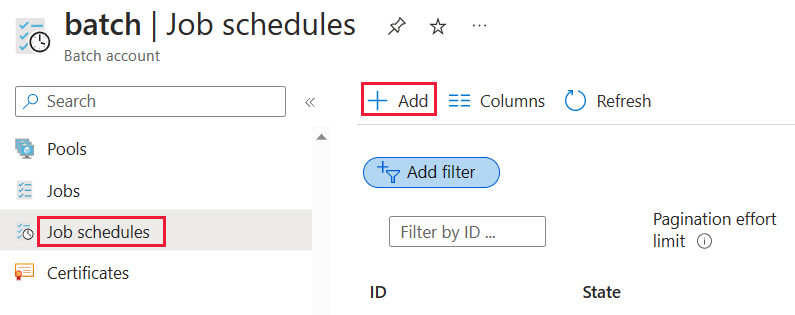
Schedule a job in the Azure portal
Sign in to the Azure portal.
Select the Batch account you want to schedule jobs in.
In the left navigation pane, select Job schedules.
Select Add to create a new job schedule.
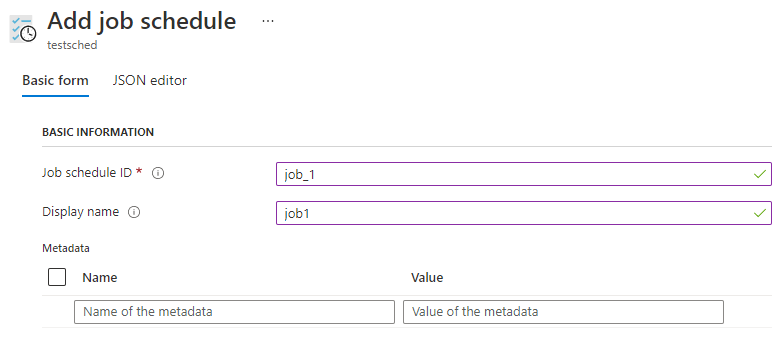
Under Basic form, enter the following information:
Job schedule ID: A unique identifier for this job schedule.
Display name: This name is optional and doesn't have to be unique. It has a maximum length of 1024 characters.
In the Schedule section, enter the following information:
Do not run until: Specifies the earliest time the job will run. If you don't set this, the schedule becomes ready to run jobs immediately.
Do not run after: No jobs will run after the time you enter here. If you don't specify a time, then you're creating a recurring job schedule, which remains active until you explicitly terminate it.
Recurrence interval: Select Enabled if you want to specify the amount of time between jobs. You can have only one job at a time scheduled, so if it's time to create a new job under a job schedule but the previous job is still running, the Batch service won't create the new job until the previous job finishes.
Start window: Select Custom if you'd like to specify the time interval within which a job must be created. If a job isn't created within this window, no new job will be created until the next recurrence of the schedule.

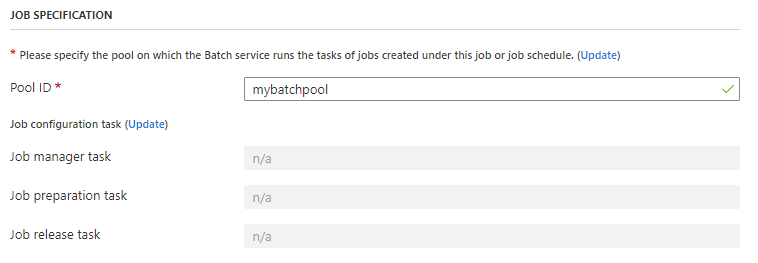
In the Job Specification section, enter the following information:
Pool ID: Select the pool where you want the job to run. To choose from a list of pools in your Batch account, select Update.
Job configuration task: Select Update to name and configure the job manager task, as well as the job preparation task and job release tasks, if you're using them.
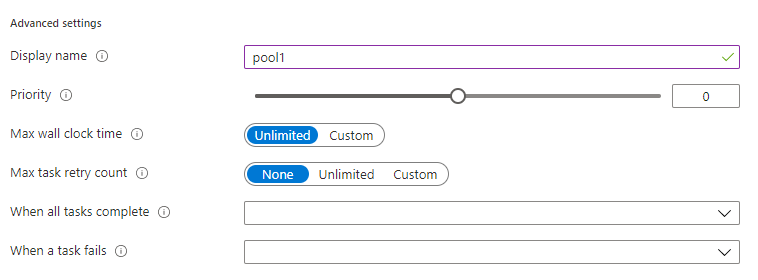
In the Advanced settings section, enter the following information:
Display name: This name is optional and doesn't have to be unique. It has a maximum length of 1024 characters.
Priority: Use the slider to set a priority for the job, or enter a value in the box.
Max wall clock time: Select Custom if you want to set a maximum amount of time for the job to run. If you do so, Batch will terminate the job if it doesn't complete within that time frame.
Max task retry count: Select Custom if you want to specify the number of times a task can be retried, or Unlimited if you want the task to be tried for as many times as is needed. This isn't the same as the number of retries an API call might have.
When all tasks complete: The default is NoAction, but you can select TerminateJob if you prefer to terminate the job when all tasks have been completed (or if there are no tasks in the job).
When a task fails: A task fails if the retry count is exhausted or there's an error when starting the task. The default is NoAction, but you can select PerformExitOptionsJobAction if you prefer to take the action associated with the task's exit condition if it fails.
Select Save to create your job schedule.
To track the execution of the job, return to Job schedules and select the job schedule. Expand Execution info to see details. You can also terminate, delete, or disable the job schedule from this screen.
Next steps
- Learn more about jobs and tasks.
- Create task dependencies to run tasks that depend on other tasks.