A bot is inherently stateless. Once your bot is deployed, it may not run in the same process or on the same machine from one turn to the next. However, your bot may need to track the context of a conversation so that it can manage its behavior and remember answers to previous questions. The state and storage features of the Bot Framework SDK allow you to add state to your bot. Bots use state management and storage objects to manage and persist state. The state manager provides an abstraction layer that lets you access state properties using property accessors, independent of the type of underlying storage.
Note
The Bot Framework JavaScript, C#, and Python SDKs will continue to be supported, however, the Java SDK is being retired with final long-term support ending in November 2023.
Existing bots built with the Java SDK will continue to function.
The code in this article is based on the State Management Bot sample. You'll need a copy of the sample in either C#, JavaScript, Java, or Python.
About this sample
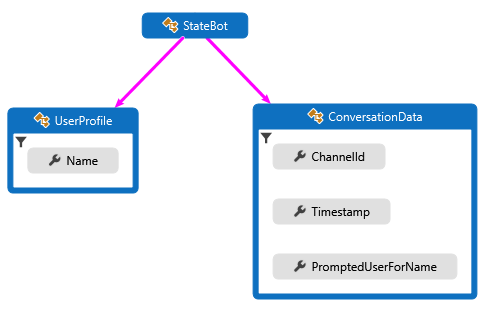
Upon receiving user input, this sample checks the stored conversation state to see if this user has previously been prompted to provide their name. If not, the user's name is requested and that input is stored within user state. If so, the name stored within user state is used to converse with the user and their input data, along with the time received and input channel ID, is returned back to the user. The time and channel ID values are retrieved from the user conversation data and then saved to conversation state. The following diagram shows the relationship between the bot, user profile, and conversation data classes.
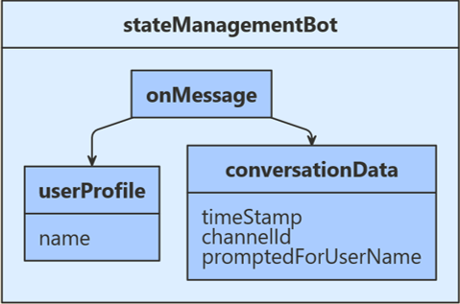
The first step in setting up state management is to define the classes containing the information to manage in the user and conversation state. The example used in this article, defines the following classes:
In UserProfile.cs, you define a UserProfile class for the user information that the bot will collect.
In ConversationData.cs, you define a ConversationData class to control our conversation state while gathering user information.
The following code examples show the definitions for the UserProfile and ConversationData classes.
UserProfile.cs
public class UserProfile
{
    public string Name { get; set; }
}
ConversationData.cs
public class ConversationData
{
    // The time-stamp of the most recent incoming message.
    public string Timestamp { get; set; }

    // The ID of the user's channel.
    public string ChannelId { get; set; }

    // Track whether we have already asked the user's name
    public bool PromptedUserForName { get; set; } = false;
}
This step isn't necessary in JavaScript.
The first step in setting up state management is to define the classes containing the information to manage in the user and conversation state. The example used in this article defines the following classes:
In UserProfile.java, you define a UserProfile class for the user information that the bot will collect.
In ConversationData.java, you define a ConversationData class to control our conversation state while gathering user information.
The following code examples show the definitions for the UserProfile and ConversationData classes.
UserProfile.java
public class UserProfile {
    private String name;

    public String getName() {
        return name;
    }

    public void setName(String withName) {
        name = withName;
    }
}
ConversationData.java
public class ConversationData {
    // The time-stamp of the most recent incoming message.
    private String timestamp;
    // The ID of the user's channel.
    private String channelId;
    // Track whether we have already asked the user's name.
    private boolean promptedUserForName = false;

    public String getTimestamp() {
        return timestamp;
    }

    public void setTimestamp(String withTimestamp) {
        timestamp = withTimestamp;
    }

    public String getChannelId() {
        return channelId;
    }

    public void setChannelId(String withChannelId) {
        channelId = withChannelId;
    }

    public boolean getPromptedUserForName() {
        return promptedUserForName;
    }

    public void setPromptedUserForName(boolean withPromptedUserForName) {
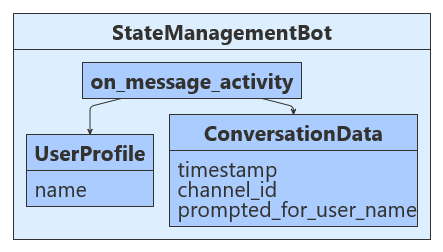
The first step in setting up state management is to define the classes containing the information to manage in the user and conversation state. The example used in this article, defines the following classes:
The user_profile.py contains the UserProfile class that stores the user information collected by the bot.
The conversation_data.py contains the ConversationData class that controls the conversation state while gathering user information.
The following code examples show the definitions for the UserProfile and ConversationData classes.
user_profile.py
class UserProfile:
    def __init__(self, name: str = None):
        self.name = name
Next, you register MemoryStorage that is used to create UserState and ConversationState objects. The user and conversation state objects are created at Startup and dependency injected into the bot constructor. Other services for a bot that are registered are: a credential provider, an adapter, and the bot implementation.
Startup.cs
// {
//     TypeNameHandling = TypeNameHandling.All,
// var storage = new BlobsStorage("<blob-storage-connection-string>", "bot-state");

// With a custom JSON SERIALIZER, use this instead.
// var storage = new BlobsStorage("<blob-storage-connection-string>", "bot-state", jsonSerializer);

/* END AZURE BLOB STORAGE */
Next, you register MemoryStorage that is then used to create UserState and ConversationState objects. These are created in index.js and consumed when the bot is created.
index.js
const memoryStorage = new MemoryStorage();

// Create conversation and user state with in-memory storage provider.
const conversationState = new ConversationState(memoryStorage);
const userState = new UserState(memoryStorage);

// Create the bot.
const bot = new StateManagementBot(conversationState, userState);
bots/stateManagementBot.js
const CONVERSATION_DATA_PROPERTY = 'conversationData';
const USER_PROFILE_PROPERTY = 'userProfile';

class StateManagementBot extends ActivityHandler {
    constructor(conversationState, userState) {
        super();
        // Create the state property accessors for the conversation data and user profile.
        this.conversationDataAccessor = conversationState.createProperty(CONVERSATION_DATA_PROPERTY);
        this.userProfileAccessor = userState.createProperty(USER_PROFILE_PROPERTY);

        // The state management objects for the conversation and user state.
        this.conversationState = conversationState;
        this.userState = userState;
Next, you register the StateManagementBot in Application.java. Both ConversationState and UserState are provided by default from the BotDependencyConfiguration class, and Spring will inject them into the getBot method.
Application.java
@Bean
public Bot getBot(
    ConversationState conversationState,
    UserState userState
) {
    return new StateManagementBot(conversationState, userState);
}
Next, you register MemoryStorage that is used to create UserState and ConversationState objects. These are created in app.py and consumed when the bot is created.
app.py
CONVERSATION_STATE = ConversationState(MEMORY)

# Create Bot
BOT = StateManagementBot(CONVERSATION_STATE, USER_STATE)


# Listen for incoming requests on /api/messages.
bots/state_management_bot.py
def __init__(self, conversation_state: ConversationState, user_state: UserState):
    if conversation_state is None:
        raise TypeError(
            "[StateManagementBot]: Missing parameter. conversation_state is required but None was given"
        )
    if user_state is None:
        raise TypeError(
            "[StateManagementBot]: Missing parameter. user_state is required but None was given"
        )

    self.conversation_state = conversation_state
    self.user_state = user_state

    self.conversation_data_accessor = self.conversation_state.create_property(
        "ConversationData"
    )
    self.user_profile_accessor = self.user_state.create_property("UserProfile")
Now you create property accessors using the CreateProperty method that provides a handle to the BotState object. Each state property accessor allows you to get or set the value of the associated state property. Before you use the state properties, use each accessor to load the property from storage and get it from the state cache. To get the properly scoped key associated with the state property, you call the GetAsync method.
Bots/StateManagementBot.cs
var conversationStateAccessors = _conversationState.CreateProperty<ConversationData>(nameof(ConversationData));
var userStateAccessors = _userState.CreateProperty<UserProfile>(nameof(UserProfile));
Now you create property accessors for UserState and ConversationState. Each state property accessor allows you to get or set the value of the associated state property. You use each accessor to load the associated property from storage and retrieve its current state from cache.
bots/stateManagementBot.js
// Create the state property accessors for the conversation data and user profile.
this.conversationDataAccessor = conversationState.createProperty(CONVERSATION_DATA_PROPERTY);
this.userProfileAccessor = userState.createProperty(USER_PROFILE_PROPERTY);
Now you create property accessors using the createProperty method. Each state property accessor allows you to get or set the value of the associated state property. Before you use the state properties, use each accessor to load the property from storage and get it from the state cache. To get the properly scoped key associated with the state property, you call the get method.
Now you create property accessors for UserProfile and ConversationData. Each state property accessor allows you to get or set the value of the associated state property. You use each accessor to load the associated property from storage and retrieve its current state from cache.
The preceding section covers the initialization-time steps to add state property accessors to our bot. Now, you can use those accessors at run-time to read and write state information. The sample code below uses the following logic flow:
If userProfile.Name is empty and conversationData.PromptedUserForName is true, you retrieve the user name provided and store this within user state.
If userProfile.Name is empty and conversationData.PromptedUserForName is false, you ask for the user's name.
If userProfile.Name was previously stored, you retrieve message time and channel ID from the user input, echo all data back to the user, and store the retrieved data within conversation state.
Bots/StateManagementBot.cs
protected override async Task OnMessageActivityAsync(ITurnContext<IMessageActivity> turnContext, CancellationToken cancellationToken)
{
// Get the state properties from the turn context.
var conversationStateAccessors = _conversationState.CreateProperty<ConversationData>(nameof(ConversationData));
var conversationData = await conversationStateAccessors.GetAsync(turnContext, () => new ConversationData());
var userStateAccessors = _userState.CreateProperty<UserProfile>(nameof(UserProfile));
var userProfile = await userStateAccessors.GetAsync(turnContext, () => new UserProfile());
if (string.IsNullOrEmpty(userProfile.Name))
{
// First time around this is set to false, so we will prompt user for name.
if (conversationData.PromptedUserForName)
{
// Set the name to what the user provided.
userProfile.Name = turnContext.Activity.Text?.Trim();
// Acknowledge that we got their name.
await turnContext.SendActivityAsync($"Thanks {userProfile.Name}. To see conversation data, type anything.");
// Reset the flag to allow the bot to go through the cycle again.
conversationData.PromptedUserForName = false;
}
else
{
// Prompt the user for their name.
await turnContext.SendActivityAsync($"What is your name?");
// Set the flag to true, so we don't prompt in the next turn.
conversationData.PromptedUserForName = true;
}
}
else
{
// Add message details to the conversation data.
// Convert saved Timestamp to local DateTimeOffset, then to string for display.
var messageTimeOffset = (DateTimeOffset)turnContext.Activity.Timestamp;
var localMessageTime = messageTimeOffset.ToLocalTime();
conversationData.Timestamp = localMessageTime.ToString();
conversationData.ChannelId = turnContext.Activity.ChannelId.ToString();
// Display state data.
await turnContext.SendActivityAsync($"{userProfile.Name} sent: {turnContext.Activity.Text}");
await turnContext.SendActivityAsync($"Message received at: {conversationData.Timestamp}");
await turnContext.SendActivityAsync($"Message received from: {conversationData.ChannelId}");
}
}
Before you exit the turn handler, you use the state management objects' SaveChangesAsync() method to write all state changes back to storage.
Bots/StateManagementBot.cs
public override async Task OnTurnAsync(ITurnContext turnContext, CancellationToken cancellationToken = default(CancellationToken))
{
await base.OnTurnAsync(turnContext, cancellationToken);
// Save any state changes that might have occurred during the turn.
await _conversationState.SaveChangesAsync(turnContext, false, cancellationToken);
await _userState.SaveChangesAsync(turnContext, false, cancellationToken);
}
If userProfile.Name is empty and conversationData.PromptedUserForName is true, you retrieve the user name provided and store this within user state.
If userProfile.Name is empty and conversationData.PromptedUserForName is false, you ask for the user's name.
If userProfile.Name was previously stored, you retrieve message time and channel ID from the user input, echo all data back to the user, and store the retrieved data within conversation state.
bots/stateManagementBot.js
this.onMessage(async (turnContext, next) => {
// Get the state properties from the turn context.
const userProfile = await this.userProfileAccessor.get(turnContext, {});
const conversationData = await this.conversationDataAccessor.get(
turnContext, { promptedForUserName: false });
if (!userProfile.name) {
// First time around this is undefined, so we will prompt user for name.
if (conversationData.promptedForUserName) {
// Set the name to what the user provided.
userProfile.name = turnContext.activity.text;
// Acknowledge that we got their name.
await turnContext.sendActivity(`Thanks ${ userProfile.name }. To see conversation data, type anything.`);
// Reset the flag to allow the bot to go though the cycle again.
conversationData.promptedForUserName = false;
} else {
// Prompt the user for their name.
await turnContext.sendActivity('What is your name?');
// Set the flag to true, so we don't prompt in the next turn.
conversationData.promptedForUserName = true;
}
} else {
// Add message details to the conversation data.
conversationData.timestamp = turnContext.activity.timestamp.toLocaleString();
conversationData.channelId = turnContext.activity.channelId;
// Display state data.
await turnContext.sendActivity(`${ userProfile.name } sent: ${ turnContext.activity.text }`);
await turnContext.sendActivity(`Message received at: ${ conversationData.timestamp }`);
await turnContext.sendActivity(`Message received from: ${ conversationData.channelId }`);
}
// By calling next() you ensure that the next BotHandler is run.
await next();
});
Before you exit each dialog turn, you use the state management objects' saveChanges() method to persist all changes by writing state back out to storage.
bots/stateManagementBot.js
/**
* Override the ActivityHandler.run() method to save state changes after the bot logic completes.
*/
async run(context) {
await super.run(context);
// Save any state changes. The load happened during the execution of the Dialog.
await this.conversationState.saveChanges(context, false);
await this.userState.saveChanges(context, false);
}
If userProfile.getName() is empty and conversationData.getPromptedUserForName() is true, you retrieve the user name provided and store this within user state.
If userProfile.getName() is empty and conversationData.getPromptedUserForName() is false, you ask for the user's name.
If userProfile.getName() was previously stored, you retrieve message time and channel ID from the user input, echo all data back to the user, and store the retrieved data within conversation state.
StateManagementBot.java
@Override
protected CompletableFuture<Void> onMessageActivity(TurnContext turnContext) {
// Get state data from ConversationState.
StatePropertyAccessor<ConversationData> dataAccessor =
    conversationState.createProperty("data");
CompletableFuture<ConversationData> dataFuture =
    dataAccessor.get(turnContext, ConversationData::new);
// Get profile from UserState.
StatePropertyAccessor<UserProfile> profileAccessor = userState.createProperty("profile");
CompletableFuture<UserProfile> profileFuture =
profileAccessor.get(turnContext, UserProfile::new);
return dataFuture.thenCombine(profileFuture, (conversationData, userProfile) -> {
if (StringUtils.isBlank(userProfile.getName())) {
// First time around this is set to false, so we will prompt user for name.
if (conversationData.getPromptedUserForName()) {
// Reset the flag to allow the bot to go though the cycle again.
conversationData.setPromptedUserForName(false);
// Set the name to what the user provided and reply.
userProfile.setName(turnContext.getActivity().getText());
// Acknowledge that we got their name.
return turnContext.sendActivity(
MessageFactory.text(
"Thanks " + userProfile.getName()
+ ". To see conversation data, type anything."
)
);
} else {
// Set the flag to true, so we don't prompt in the next turn.
conversationData.setPromptedUserForName(true);
// Prompt the user for their name.
return turnContext.sendActivity(MessageFactory.text("What is your name?"));
}
} else {
OffsetDateTime messageTimeOffset = turnContext.getActivity().getTimestamp();
LocalDateTime localMessageTime = messageTimeOffset.toLocalDateTime();
//Displaying current date and time in 12 hour format with AM/PM
DateTimeFormatter dateTimeAMPMFormat = DateTimeFormatter.ofPattern("MM/dd/yyyy, hh:mm:ss a");
conversationData.setTimestamp(dateTimeAMPMFormat.format(localMessageTime));
conversationData.setChannelId(turnContext.getActivity().getChannelId());
List<Activity> sendToUser = new ArrayList<>();
sendToUser.add(
MessageFactory.text(
userProfile.getName() + " sent: " + turnContext.getActivity().getText()
)
);
sendToUser.add(
MessageFactory.text("Message received at: " + conversationData.getTimestamp()
)
);
sendToUser.add(
MessageFactory.text("Message received from: " + conversationData.getChannelId()
)
);
return turnContext.sendActivities(sendToUser);
}
})
// make the return value happy.
.thenApply(resourceResponse -> null);
}
Before you exit the turn handler, you use the state management objects' saveChanges() method to write all state changes back to storage.
StateManagementBot.java
@Override
public CompletableFuture<Void> onTurn(TurnContext turnContext) {
    return super.onTurn(turnContext)
        // Save any state changes that might have occurred during the turn.
        .thenCompose(turnResult -> conversationState.saveChanges(turnContext))
        .thenCompose(saveResult -> userState.saveChanges(turnContext));
}
If user_profile.name is empty and conversation_data.prompted_for_user_name is true, the bot retrieves the name provided by the user and stores it in the user's state.
If user_profile.name is empty and conversation_data.prompted_for_user_name is false, the bot asks for the user's name.
If user_profile.name was previously stored, the bot retrieves message time and channel ID from the user input, echoes the data back to the user, and stores the retrieved data in the conversation state.
bots/state_management_bot.py
async def on_message_activity(self, turn_context: TurnContext):
    # Get the state properties from the turn context.
    user_profile = await self.user_profile_accessor.get(turn_context, UserProfile)
    conversation_data = await self.conversation_data_accessor.get(
        turn_context, ConversationData
    )

    if user_profile.name is None:
        # First time around this is undefined, so we will prompt user for name.
        if conversation_data.prompted_for_user_name:
            # Set the name to what the user provided.
            user_profile.name = turn_context.activity.text

            # Acknowledge that we got their name.
            await turn_context.send_activity(
                f"Thanks { user_profile.name }. To see conversation data, type anything."
            )

            # Reset the flag to allow the bot to go though the cycle again.
            conversation_data.prompted_for_user_name = False
        else:
            # Prompt the user for their name.
            await turn_context.send_activity("What is your name?")

            # Set the flag to true, so we don't prompt in the next turn.
            conversation_data.prompted_for_user_name = True
    else:
        # Add message details to the conversation data.
        conversation_data.timestamp = self.__datetime_from_utc_to_local(
            turn_context.activity.timestamp
        )
        conversation_data.channel_id = turn_context.activity.channel_id

        # Display state data.
        await turn_context.send_activity(
            f"{ user_profile.name } sent: { turn_context.activity.text }"
        )
        await turn_context.send_activity(
            f"Message received at: { conversation_data.timestamp }"
        )
        await turn_context.send_activity(
            f"Message received from: { conversation_data.channel_id }"
        )
Before each dialog turn ends, the bot uses the state management objects' save_changes method to persist all changes by writing state information in the storage.
All of the state management calls are asynchronous, and last-writer-wins by default. In practice, you should get, set, and save state as close together in your bot as possible. For a discussion of how to implement optimistic locking, see Implement custom storage for your bot.
Critical business data
Use bot state to store preferences, user name, or the last thing they ordered, but don't use it to store critical business data. For critical data, create your own storage components or write directly to storage.
Recognizer-Text
The sample uses the Microsoft/Recognizers-Text libraries to parse and validate user input. For more information, see the overview page.
Next steps
Learn how to ask the user a series of questions, validate their answers, and save their input.
Coming soon: Throughout 2024 we will be phasing out GitHub Issues as the feedback mechanism for content and replacing it with a new feedback system. For more information see: https://aka.ms/ContentUserFeedback.