Gathering information by posing questions is one of the main ways a bot interacts with users. The dialogs library provides useful built-in features such as prompt classes that make it easy to ask questions and validate the response to make sure it matches a specific data type or meets custom validation rules.
You can manage linear and more complex conversation flows using the dialogs library. In a linear interaction, the bot runs through a fixed sequence of steps, and the conversation finishes. A dialog is useful when the bot needs to gather information from the user.
This article shows how to implement linear conversation flow by creating prompts and calling them from a waterfall dialog.
For examples of how to write your own prompts without using the dialogs library, see the Create your own prompts to gather user input article.
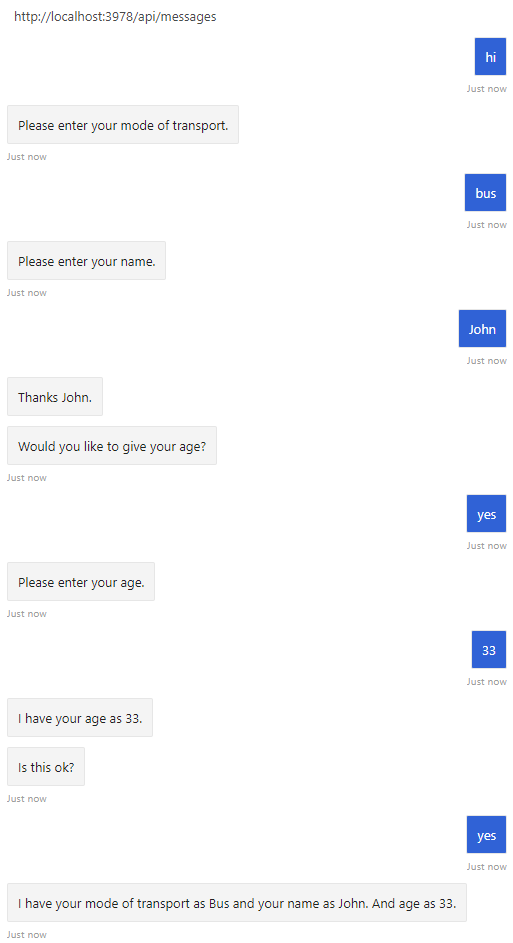
The multi-turn prompts sample uses a waterfall dialog, a few prompts, and a component dialog to create a linear interaction that asks the user a series of questions. The code uses a dialog to cycle through these steps:
Finally, if they answered yes, display the collected information; otherwise, tell the user that their information won't be kept.
To use dialogs, install the Microsoft.Bot.Builder.Dialogs NuGet package.
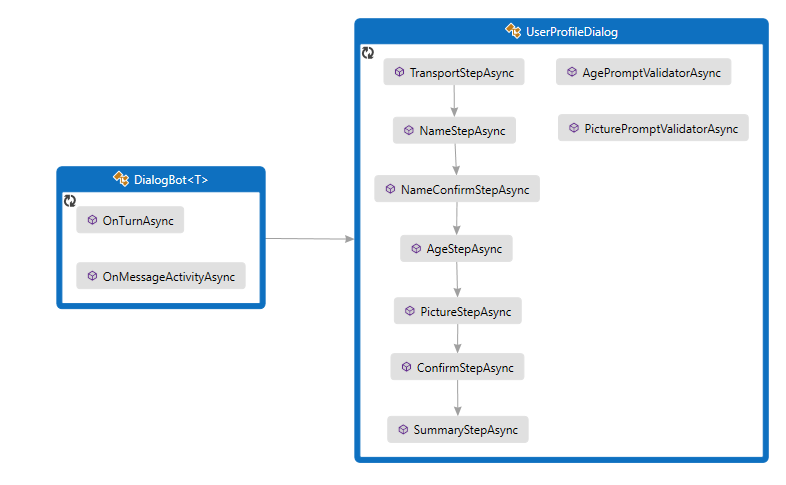
The bot interacts with the user via UserProfileDialog. When creating the bot's DialogBot class, the UserProfileDialog is set as its main dialog. The bot then uses a Run helper method to access the dialog.
Dialogs\UserProfileDialog.cs
Begin by creating the UserProfileDialog that derives from the ComponentDialog class, and has seven steps.
In the UserProfileDialog constructor, create the waterfall steps, prompts and the waterfall dialog, and add them to the dialog set. The prompts need to be in the same dialog set in which they're used.
public UserProfileDialog(UserState userState)
    : base(nameof(UserProfileDialog))
{
    _userProfileAccessor = userState.CreateProperty<UserProfile>("UserProfile");

    // This array defines how the Waterfall will execute.
    var waterfallSteps = new WaterfallStep[]
    {
        TransportStepAsync,
        NameStepAsync,
        NameConfirmStepAsync,
        AgeStepAsync,
        PictureStepAsync,
        SummaryStepAsync,
        ConfirmStepAsync,
    };

    // Add named dialogs to the DialogSet. These names are saved in the dialog state.
    AddDialog(new WaterfallDialog(nameof(WaterfallDialog), waterfallSteps));
    AddDialog(new TextPrompt(nameof(TextPrompt)));
    AddDialog(new NumberPrompt<int>(nameof(NumberPrompt<int>), AgePromptValidatorAsync));
    AddDialog(new ChoicePrompt(nameof(ChoicePrompt)));
    AddDialog(new ConfirmPrompt(nameof(ConfirmPrompt)));
    AddDialog(new AttachmentPrompt(nameof(AttachmentPrompt), PicturePromptValidatorAsync));

    // The initial child Dialog to run.
    InitialDialogId = nameof(WaterfallDialog);
}
Next, add the steps that the dialog uses to prompt for input. To use a prompt, call it from a step in your dialog and retrieve the prompt result in the following step using stepContext.Result. Behind the scenes, prompts are a two-step dialog. First, the prompt asks for input. Then it returns the valid value, or starts over from the beginning with a reprompt until it receives a valid input.
You should always return a non-null DialogTurnResult from a waterfall step. If you don't, your dialog may not work as designed. Shown below is the implementation for NameStepAsync in the waterfall dialog.
private static async Task<DialogTurnResult> NameStepAsync(WaterfallStepContext stepContext, CancellationToken cancellationToken)
{
    stepContext.Values["transport"] = ((FoundChoice)stepContext.Result).Value;

    return await stepContext.PromptAsync(nameof(TextPrompt), new PromptOptions { Prompt = MessageFactory.Text("Please enter your name.") }, cancellationToken);
}
In AgeStepAsync, specify a retry prompt for when the user's input fails to validate, either because it's in a format that the prompt can't parse, or the input fails a validation criteria. In this case, if no retry prompt was provided, the prompt will use the initial prompt text to reprompt the user for input.
private async Task<DialogTurnResult> AgeStepAsync(WaterfallStepContext stepContext, CancellationToken cancellationToken)
{
    if ((bool)stepContext.Result)
    {
        // User said "yes" so we will be prompting for the age.
        // WaterfallStep always finishes with the end of the Waterfall or with another dialog; here it is a Prompt Dialog.
        var promptOptions = new PromptOptions
        {
            Prompt = MessageFactory.Text("Please enter your age."),
            RetryPrompt = MessageFactory.Text("The value entered must be greater than 0 and less than 150."),
        };

        return await stepContext.PromptAsync(nameof(NumberPrompt<int>), promptOptions, cancellationToken);
    }
    else
    {
        // User said "no" so we will skip the next step. Give -1 as the age.
        return await stepContext.NextAsync(-1, cancellationToken);
    }
}
UserProfile.cs
The user's mode of transportation, name, and age are saved in an instance of the UserProfile class.
public class UserProfile
{
    public string Transport { get; set; }

    public string Name { get; set; }

    public int Age { get; set; }

    public Attachment Picture { get; set; }
}
Dialogs\UserProfileDialog.cs
In the last step, check the stepContext.Result returned by the dialog called in the previous waterfall step. If the return value is true, the user profile accessor gets and updates the user profile. To get the user profile, call GetAsync and then set the values of the userProfile.Transport, userProfile.Name, userProfile.Age and userProfile.Picture properties. Finally, summarize the information for the user before calling EndDialogAsync, which ends the dialog. Ending the dialog pops it off the dialog stack and returns an optional result to the dialog's parent. The parent is the dialog or method that started the dialog that just ended.
    else
    {
        msg += $" Your profile will not be kept.";
    }

    await stepContext.Context.SendActivityAsync(MessageFactory.Text(msg), cancellationToken);

    // WaterfallStep always finishes with the end of the Waterfall or with another dialog; here it is the end.
    return await stepContext.EndDialogAsync(cancellationToken: cancellationToken);
}

private async Task<DialogTurnResult> SummaryStepAsync(WaterfallStepContext stepContext, CancellationToken cancellationToken)
{
    stepContext.Values["picture"] = ((IList<Attachment>)stepContext.Result)?.FirstOrDefault();

    // Get the current profile object from user state.
    var userProfile = await _userProfileAccessor.GetAsync(stepContext.Context, () => new UserProfile(), cancellationToken);

    userProfile.Transport = (string)stepContext.Values["transport"];
    userProfile.Name = (string)stepContext.Values["name"];
    userProfile.Age = (int)stepContext.Values["age"];
    userProfile.Picture = (Attachment)stepContext.Values["picture"];

    var msg = $"I have your mode of transport as {userProfile.Transport} and your name as {userProfile.Name}";

    if (userProfile.Age != -1)
    {
        msg += $" and your age as {userProfile.Age}";
    }

    msg += ".";

    await stepContext.Context.SendActivityAsync(MessageFactory.Text(msg), cancellationToken);

    if (userProfile.Picture != null)
    {
        try
        {
            await stepContext.Context.SendActivityAsync(MessageFactory.Attachment(userProfile.Picture, "This is your profile picture."), cancellationToken);
        }
        catch
        {
            await stepContext.Context.SendActivityAsync(MessageFactory.Text("A profile picture was saved but could not be displayed here."), cancellationToken);
To use dialogs, your project needs to install the botbuilder-dialogs npm package.
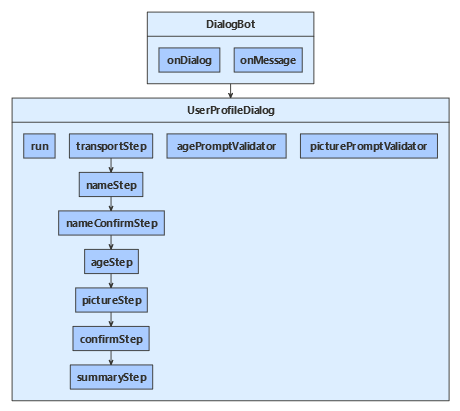
The bot interacts with the user via a UserProfileDialog. When creating the bot's DialogBot, the UserProfileDialog is set as its main dialog. The bot then uses a run helper method to access the dialog.
dialogs/userProfileDialog.js
Begin by creating the UserProfileDialog that derives from the ComponentDialog class, and has seven steps.
In the UserProfileDialog constructor, create the waterfall steps, prompts and the waterfall dialog, and add them to the dialog set. The prompts need to be in the same dialog set in which they're used.
constructor(userState) {
    super('userProfileDialog');

    this.userProfile = userState.createProperty(USER_PROFILE);

    this.addDialog(new TextPrompt(NAME_PROMPT));
    this.addDialog(new ChoicePrompt(CHOICE_PROMPT));
    this.addDialog(new ConfirmPrompt(CONFIRM_PROMPT));
    this.addDialog(new NumberPrompt(NUMBER_PROMPT, this.agePromptValidator));
    this.addDialog(new AttachmentPrompt(ATTACHMENT_PROMPT, this.picturePromptValidator));

    this.addDialog(new WaterfallDialog(WATERFALL_DIALOG, [
        this.transportStep.bind(this),
        this.nameStep.bind(this),
        this.nameConfirmStep.bind(this),
        this.ageStep.bind(this),
        this.pictureStep.bind(this),
        this.summaryStep.bind(this),
        this.confirmStep.bind(this)
    ]));

    this.initialDialogId = WATERFALL_DIALOG;
}
Next, add the steps that the dialog uses to prompt for input. To use a prompt, call it from a step in your dialog and retrieve the prompt result in the following step from the step context, in this case by using step.result. Behind the scenes, prompts are a two-step dialog. First, the prompt asks for input. Then it returns the valid value, or starts over from the beginning with a reprompt until it receives a valid input.
You should always return a non-null DialogTurnResult from a waterfall step. If you don't, your dialog may not work as designed. Shown below is the implementation for the nameStep in the waterfall dialog.
async nameStep(step) {
    step.values.transport = step.result.value;
    return await step.prompt(NAME_PROMPT, 'Please enter your name.');
}
In ageStep, specify a retry prompt for when the user's input fails to validate, either because it's in a format that the prompt can't parse, or the input fails a validation criteria, specified in the constructor above. In this case, if no retry prompt was provided, the prompt will use the initial prompt text to reprompt the user for input.
async ageStep(step) {
    if (step.result) {
        // User said "yes" so we will be prompting for the age.
        // WaterfallStep always finishes with the end of the Waterfall or with another dialog; here it is a Prompt Dialog.
        const promptOptions = { prompt: 'Please enter your age.', retryPrompt: 'The value entered must be greater than 0 and less than 150.' };

        return await step.prompt(NUMBER_PROMPT, promptOptions);
    } else {
        // User said "no" so we will skip the next step. Give -1 as the age.
        return await step.next(-1);
    }
}
userProfile.js
The user's mode of transportation, name, and age are saved in an instance of the UserProfile class.
class UserProfile {
    constructor(transport, name, age, picture) {
        this.transport = transport;
        this.name = name;
        this.age = age;
        this.picture = picture;
    }
}
dialogs/userProfileDialog.js
In the last step, check the step.result returned by the dialog called in the previous waterfall step. If the return value is true, the user profile accessor gets and updates the user profile. To get the user profile, call get, and then set the values of the userProfile.transport, userProfile.name, userProfile.age and userProfile.picture properties. Finally, summarize the information for the user before calling endDialog, which ends the dialog. Ending the dialog pops it off the dialog stack and returns an optional result to the dialog's parent. The parent is the dialog or method that started the dialog that just ended.
    await step.context.sendActivity(msg);

    // WaterfallStep always finishes with the end of the Waterfall or with another dialog; here it is a Prompt Dialog.
    return await step.endDialog();
}

async summaryStep(step) {
    step.values.picture = step.result && step.result[0];

    // Get the current profile object from user state.
    const userProfile = await this.userProfile.get(step.context, new UserProfile());

    userProfile.transport = step.values.transport;
    userProfile.name = step.values.name;
    userProfile.age = step.values.age;
    userProfile.picture = step.values.picture;

    let msg = `I have your mode of transport as ${ userProfile.transport } and your name as ${ userProfile.name }`;
    if (userProfile.age !== -1) {
        msg += ` and your age as ${ userProfile.age }`;
    }

    msg += '.';
    await step.context.sendActivity(msg);
    if (userProfile.picture) {
        try {
            await step.context.sendActivity(MessageFactory.attachment(userProfile.picture, 'This is your profile picture.'));
        } catch {
            await step.context.sendActivity('A profile picture was saved but could not be displayed here.');
        }
Create the extension method to run the waterfall dialog
A run helper method, defined inside userProfileDialog, is used to create and access the dialog context. Here, accessor is the state property accessor for the dialog state property, and this is the user profile component dialog. Since component dialogs define an inner dialog set, an outer dialog set must be created that's visible to the message handler code and used to create a dialog context.
The dialog context is created by calling the createContext method, and is used to interact with the dialog set from within the bot's turn handler. The dialog context includes the current turn context, the parent dialog, and the dialog state, which provides a method for preserving information within the dialog.
The dialog context allows you to start a dialog with the string ID, or continue the current dialog (like a waterfall dialog that has multiple steps). The dialog context is passed through to all the bot's dialogs and waterfall steps.
async run(turnContext, accessor) {
    const dialogSet = new DialogSet(accessor);
    dialogSet.add(this);

    const dialogContext = await dialogSet.createContext(turnContext);
    const results = await dialogContext.continueDialog();
    if (results.status === DialogTurnStatus.empty) {
        await dialogContext.beginDialog(this.id);
    }
}
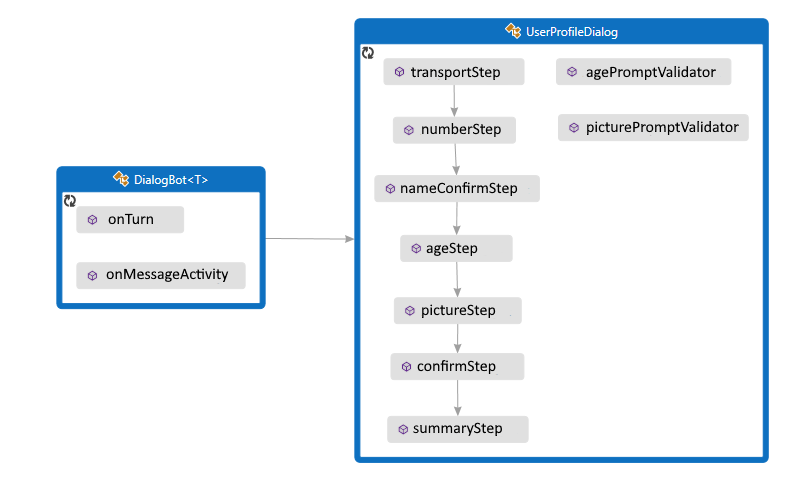
The bot interacts with the user via UserProfileDialog. When creating the bot's DialogBot class, the UserProfileDialog is set as its main dialog. The bot then uses a Run helper method to access the dialog.
UserProfileDialog.java
Begin by creating the UserProfileDialog that derives from the ComponentDialog class, and has seven steps.
In the UserProfileDialog constructor, create the waterfall steps, prompts and the waterfall dialog, and add them to the dialog set. The prompts need to be in the same dialog set in which they're used.
public UserProfileDialog(UserState withUserState) {
    super("UserProfileDialog");

    userProfileAccessor = withUserState.createProperty("UserProfile");

    WaterfallStep[] waterfallSteps = {
        UserProfileDialog::transportStep,
        UserProfileDialog::nameStep,
        this::nameConfirmStep,
        this::ageStep,
        UserProfileDialog::pictureStep,
        this::confirmStep,
        this::summaryStep
    };

    // Add named dialogs to the DialogSet. These names are saved in the dialog state.
    addDialog(new WaterfallDialog("WaterfallDialog", Arrays.asList(waterfallSteps)));
    addDialog(new TextPrompt("TextPrompt"));
    addDialog(new NumberPrompt<Integer>("NumberPrompt", UserProfileDialog::agePromptValidator, Integer.class));
    addDialog(new ChoicePrompt("ChoicePrompt"));
    addDialog(new ConfirmPrompt("ConfirmPrompt"));
    addDialog(new AttachmentPrompt("AttachmentPrompt", UserProfileDialog::picturePromptValidator));

    // The initial child Dialog to run.
    setInitialDialogId("WaterfallDialog");
}
Next, add the steps that the dialog uses to prompt for input. To use a prompt, call it from a step in your dialog and retrieve the prompt result in the following step using stepContext.getResult(). Behind the scenes, prompts are a two-step dialog. First, the prompt asks for input. Then it returns the valid value, or starts over from the beginning with a reprompt until it receives a valid input.
You should always return a non-null DialogTurnResult from a waterfall step. If you don't, your dialog may not work as designed. Shown below is the implementation for nameStep in the waterfall dialog.
private static CompletableFuture<DialogTurnResult> nameStep(WaterfallStepContext stepContext) {
    stepContext.getValues().put("transport", ((FoundChoice) stepContext.getResult()).getValue());

    PromptOptions promptOptions = new PromptOptions();
    promptOptions.setPrompt(MessageFactory.text("Please enter your name."));
    return stepContext.prompt("TextPrompt", promptOptions);
}
In ageStep, specify a retry prompt for when the user's input fails to validate, either because it's in a format that the prompt can't parse, or the input fails a validation criteria. In this case, if no retry prompt was provided, the prompt will use the initial prompt text to reprompt the user for input.
private CompletableFuture<DialogTurnResult> ageStep(WaterfallStepContext stepContext) {
    if ((Boolean)stepContext.getResult()) {
        // User said "yes" so we will be prompting for the age.
        // WaterfallStep always finishes with the end of the Waterfall or with another dialog; here it is a Prompt Dialog.
        PromptOptions promptOptions = new PromptOptions();
        promptOptions.setPrompt(MessageFactory.text("Please enter your age."));
        promptOptions.setRetryPrompt(MessageFactory.text("The value entered must be greater than 0 and less than 150."));

        return stepContext.prompt("NumberPrompt", promptOptions);
    }

    // User said "no" so we will skip the next step. Give -1 as the age.
    return stepContext.next(-1);
}
UserProfile.java
The user's mode of transportation, name, and age are saved in an instance of the UserProfile class.
// Copyright (c) Microsoft Corporation. All rights reserved.
// Licensed under the MIT License.

package com.microsoft.bot.sample.multiturnprompt;

import com.microsoft.bot.schema.Attachment;

/**
 * This is our application state.
 */
public class UserProfile {
    public String transport;
    public String name;
    public Integer age;
    public Attachment picture;
}
UserProfileDialog.java
In the last step, check the stepContext.Result returned by the dialog called in the previous waterfall step. If the return value is true, the user profile accessor gets and updates the user profile. To get the user profile, call get and then set the values of the userProfile.Transport, userProfile.Name, userProfile.Age and userProfile.Picture properties. Finally, summarize the information for the user before calling endDialog, which ends the dialog. Ending the dialog pops it off the dialog stack and returns an optional result to the dialog's parent. The parent is the dialog or method that started the dialog that just ended.
// Copyright (c) Microsoft Corporation. All rights reserved.
// Licensed under the MIT License.

package com.microsoft.bot.sample.multiturnprompt;

import com.microsoft.bot.builder.MessageFactory;
import com.microsoft.bot.builder.StatePropertyAccessor;
import com.microsoft.bot.builder.UserState;
import com.microsoft.bot.connector.Channels;
import com.microsoft.bot.dialogs.ComponentDialog;
import com.microsoft.bot.dialogs.DialogTurnResult;
import com.microsoft.bot.dialogs.WaterfallDialog;
import com.microsoft.bot.dialogs.WaterfallStep;
import com.microsoft.bot.dialogs.WaterfallStepContext;
import com.microsoft.bot.dialogs.choices.ChoiceFactory;
import com.microsoft.bot.dialogs.choices.FoundChoice;
import com.microsoft.bot.dialogs.prompts.AttachmentPrompt;
import com.microsoft.bot.dialogs.prompts.ChoicePrompt;
import com.microsoft.bot.dialogs.prompts.ConfirmPrompt;
import com.microsoft.bot.dialogs.prompts.NumberPrompt;
import com.microsoft.bot.dialogs.prompts.PromptOptions;
import com.microsoft.bot.dialogs.prompts.PromptValidatorContext;
import com.microsoft.bot.dialogs.prompts.TextPrompt;
import com.microsoft.bot.schema.Attachment;
import java.util.ArrayList;
import java.util.Arrays;
import java.util.List;
import java.util.concurrent.CompletableFuture;
import org.apache.commons.lang3.StringUtils;

public class UserProfileDialog extends ComponentDialog {
    private final StatePropertyAccessor<UserProfile> userProfileAccessor;

    public UserProfileDialog(UserState withUserState) {
        super("UserProfileDialog");

        userProfileAccessor = withUserState.createProperty("UserProfile");

        WaterfallStep[] waterfallSteps = {
            UserProfileDialog::transportStep,
            UserProfileDialog::nameStep,
            this::nameConfirmStep,
            this::ageStep,
            UserProfileDialog::pictureStep,
            this::confirmStep,
            this::summaryStep
        };

        // Add named dialogs to the DialogSet. These names are saved in the dialog state.
        addDialog(new WaterfallDialog("WaterfallDialog", Arrays.asList(waterfallSteps)));
        addDialog(new TextPrompt("TextPrompt"));
        addDialog(new NumberPrompt<Integer>("NumberPrompt", UserProfileDialog::agePromptValidator, Integer.class));
        addDialog(new ChoicePrompt("ChoicePrompt"));
        addDialog(new ConfirmPrompt("ConfirmPrompt"));
        addDialog(new AttachmentPrompt("AttachmentPrompt", UserProfileDialog::picturePromptValidator));

        // The initial child Dialog to run.
        setInitialDialogId("WaterfallDialog");
    }

    private static CompletableFuture<DialogTurnResult> transportStep(WaterfallStepContext stepContext) {
        // WaterfallStep always finishes with the end of the Waterfall or with another dialog; here it is a Prompt Dialog.
        // Running a prompt here means the next WaterfallStep will be run when the user's response is received.
        PromptOptions promptOptions = new PromptOptions();
        promptOptions.setPrompt(MessageFactory.text("Please enter your mode of transport."));
        promptOptions.setChoices(ChoiceFactory.toChoices("Car", "Bus", "Bicycle"));

        return stepContext.prompt("ChoicePrompt", promptOptions);
    }

    private static CompletableFuture<DialogTurnResult> nameStep(WaterfallStepContext stepContext) {
        stepContext.getValues().put("transport", ((FoundChoice) stepContext.getResult()).getValue());

        PromptOptions promptOptions = new PromptOptions();
        promptOptions.setPrompt(MessageFactory.text("Please enter your name."));
        return stepContext.prompt("TextPrompt", promptOptions);
    }

    private CompletableFuture<DialogTurnResult> nameConfirmStep(WaterfallStepContext stepContext) {
        stepContext.getValues().put("name", stepContext.getResult());

        // We can send messages to the user at any point in the WaterfallStep.
        return stepContext.getContext().sendActivity(MessageFactory.text(String.format("Thanks %s.", stepContext.getResult())))
            .thenCompose(resourceResponse -> {
                // WaterfallStep always finishes with the end of the Waterfall or with another dialog; here it is a Prompt Dialog.
                PromptOptions promptOptions = new PromptOptions();
                promptOptions.setPrompt(MessageFactory.text("Would you like to give your age?"));
                return stepContext.prompt("ConfirmPrompt", promptOptions);
            });
    }

    private CompletableFuture<DialogTurnResult> ageStep(WaterfallStepContext stepContext) {
        if ((Boolean)stepContext.getResult()) {
            // User said "yes" so we will be prompting for the age.
            // WaterfallStep always finishes with the end of the Waterfall or with another dialog; here it is a Prompt Dialog.
            PromptOptions promptOptions = new PromptOptions();
            promptOptions.setPrompt(MessageFactory.text("Please enter your age."));
            promptOptions.setRetryPrompt(MessageFactory.text("The value entered must be greater than 0 and less than 150."));

            return stepContext.prompt("NumberPrompt", promptOptions);
        }

        // User said "no" so we will skip the next step. Give -1 as the age.
        return stepContext.next(-1);
    }

    private static CompletableFuture<DialogTurnResult> pictureStep(WaterfallStepContext stepContext) {
        stepContext.getValues().put("age", (Integer) stepContext.getResult());

        String msg = (Integer)stepContext.getValues().get("age") == -1
            ? "No age given."
            : String.format("I have your age as %d.", (Integer)stepContext.getValues().get("age"));

        // We can send messages to the user at any point in the WaterfallStep.
        return stepContext.getContext().sendActivity(MessageFactory.text(msg))
            .thenCompose(resourceResponse -> {
                if (StringUtils.equals(stepContext.getContext().getActivity().getChannelId(), Channels.MSTEAMS)) {
                    // This attachment prompt example is not designed to work for Teams attachments, so skip it in this case
                    return stepContext.getContext().sendActivity(MessageFactory.text("Skipping attachment prompt in Teams channel..."))
                        .thenCompose(resourceResponse1 -> stepContext.next(null));
                }

                // WaterfallStep always finishes with the end of the Waterfall or with another dialog; here it is a Prompt Dialog.
                PromptOptions promptOptions = new PromptOptions();
                promptOptions.setPrompt(MessageFactory.text("Please attach a profile picture (or type any message to skip)."));
                promptOptions.setRetryPrompt(MessageFactory.text("The attachment must be a jpeg/png image file."));

                return stepContext.prompt("AttachmentPrompt", promptOptions);
            });
    }

    private CompletableFuture<DialogTurnResult> confirmStep(WaterfallStepContext stepContext) {
        List<Attachment> attachments = (List<Attachment>)stepContext.getResult();
        stepContext.getValues().put("picture", attachments == null ? null : attachments.get(0));

        // WaterfallStep always finishes with the end of the Waterfall or with another dialog; here it is a Prompt Dialog.
        PromptOptions promptOptions = new PromptOptions();
        promptOptions.setPrompt(MessageFactory.text("Is this ok?"));
        return stepContext.prompt("ConfirmPrompt", promptOptions);
    }

    private CompletableFuture<DialogTurnResult> summaryStep(WaterfallStepContext stepContext) {
        if ((Boolean)stepContext.getResult()) {
            // Get the current profile object from user state.
            return userProfileAccessor.get(stepContext.getContext(), () -> new UserProfile())
                .thenCompose(userProfile -> {
                    userProfile.transport = (String) stepContext.getValues().get("transport");
                    userProfile.name = (String) stepContext.getValues().get("name");
                    userProfile.age = (Integer) stepContext.getValues().get("age");
                    userProfile.picture = (Attachment) stepContext.getValues().get("picture");

                    String msg = String.format(
                        "I have your mode of transport as %s and your name as %s",
                        userProfile.transport, userProfile.name
                    );

                    if (userProfile.age != -1) {
                        msg += String.format(" and your age as %s", userProfile.age);
                    }

                    msg += ".";

                    return stepContext.getContext().sendActivity(MessageFactory.text(msg))
                        .thenApply(resourceResponse -> userProfile);
                })
                .thenCompose(userProfile -> {
                    if (userProfile.picture != null) {
                        try {
                            return stepContext.getContext().sendActivity(
                                    MessageFactory.attachment(userProfile.picture,
                                            "This is your profile picture."
                                    ));
                        } catch(Exception ex) {
                            return stepContext.getContext().sendActivity(
                                    MessageFactory.text(
                                            "A profile picture was saved but could not be displayed here."
                                    ));
                        }
                    }

                    return stepContext.getContext().sendActivity(
                        MessageFactory.text("A profile picture wasn't attached.")
                    );
                })
                .thenCompose(resourceResponse -> stepContext.endDialog());
        }

        // WaterfallStep always finishes with the end of the Waterfall or with another dialog; here it is the end.
        return stepContext.getContext().sendActivity(MessageFactory.text("Thanks. Your profile will not be kept."))
            .thenCompose(resourceResponse -> stepContext.endDialog());
    }

    private static CompletableFuture<Boolean> agePromptValidator(
            PromptValidatorContext<Integer> promptContext
    ) {
        // This condition is our validation rule. You can also change the value at this point.
        return CompletableFuture.completedFuture(
                promptContext.getRecognized().getSucceeded()
                        && promptContext.getRecognized().getValue() > 0
                        && promptContext.getRecognized().getValue() < 150);
    }

    private static CompletableFuture<Boolean> picturePromptValidator(
        PromptValidatorContext<List<Attachment>> promptContext
    ) {
        if (promptContext.getRecognized().getSucceeded()) {
            List<Attachment> attachments = promptContext.getRecognized().getValue();
            List<Attachment> validImages = new ArrayList<>();

            for (Attachment attachment : attachments) {
                if (StringUtils.equals(
                    attachment.getContentType(), "image/jpeg") || StringUtils.equals(attachment.getContentType(), "image/png")
                ) {
                    validImages.add(attachment);
                }
            }

            promptContext.getRecognized().setValue(validImages);

            // If none of the attachments are valid images, the retry prompt should be sent.
            return CompletableFuture.completedFuture(!validImages.isEmpty());
        }
        else {
            // We can return true from a validator function even if Recognized.Succeeded is false.
            return promptContext.getContext().sendActivity("No attachments received. Proceeding without a profile picture...")
                .thenApply(resourceResponse -> true);
        }
    }
}
To use dialogs, install the botbuilder-dialogs and botbuilder-ai PyPI packages by running pip install botbuilder-dialogs and pip install botbuilder-ai from a terminal.
The bot interacts with the user via UserProfileDialog. When the bot's DialogBot class is created, the UserProfileDialog is set as its main dialog. The bot then uses a run_dialog helper method to access the dialog.
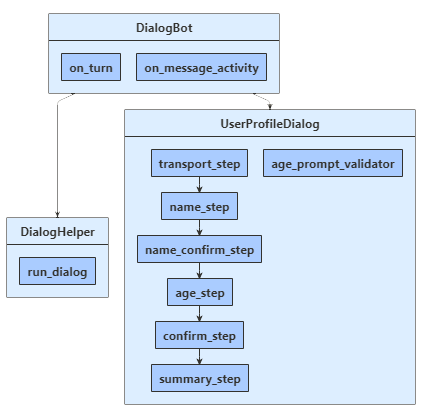
dialogs\user_profile_dialog.py
Begin by creating the UserProfileDialog that derives from the ComponentDialog class, and has seven steps.
In the UserProfileDialog constructor, create the waterfall steps, prompts and the waterfall dialog, and add them to the dialog set. The prompts need to be in the same dialog set in which they're used.
def __init__(self, user_state: UserState):
    super(UserProfileDialog, self).__init__(UserProfileDialog.__name__)

    self.user_profile_accessor = user_state.create_property("UserProfile")

    self.add_dialog(
        WaterfallDialog(
            WaterfallDialog.__name__,
            [
                self.transport_step,
                self.name_step,
                self.name_confirm_step,
                self.age_step,
                self.picture_step,
                self.summary_step,
                self.confirm_step,
            ],
        )
    )
    self.add_dialog(TextPrompt(TextPrompt.__name__))
    self.add_dialog(
        NumberPrompt(NumberPrompt.__name__, UserProfileDialog.age_prompt_validator)
    )
    self.add_dialog(ChoicePrompt(ChoicePrompt.__name__))
    self.add_dialog(ConfirmPrompt(ConfirmPrompt.__name__))
    self.add_dialog(
        AttachmentPrompt(
            AttachmentPrompt.__name__, UserProfileDialog.picture_prompt_validator
        )
    )

    self.initial_dialog_id = WaterfallDialog.__name__
Next, add the steps that the dialog uses to prompt for input. To use a prompt, call it from a step in your dialog and retrieve the prompt result in the following step using step_context.result. Behind the scenes, prompts are a two-step dialog. First, the prompt asks for input. Then it returns the valid value, or starts over from the beginning with a reprompt until it receives a valid input.
You should always return a non-null DialogTurnResult from a waterfall step. If you don't, your dialog may not work as designed. Here you can see the implementation for the name_step in the waterfall dialog.
async def name_step(self, step_context: WaterfallStepContext) -> DialogTurnResult:
    step_context.values["transport"] = step_context.result.value

    return await step_context.prompt(
        TextPrompt.__name__,
        PromptOptions(prompt=MessageFactory.text("Please enter your name.")),
    )
In age_step, specify a retry prompt for when the user's input fails to validate, either because it's in a format that the prompt can't parse, or the input fails a validation criteria, specified in the constructor above. In this case, if no retry prompt was provided, the prompt will use the initial prompt text to reprompt the user for input
async def age_step(self, step_context: WaterfallStepContext) -> DialogTurnResult:
    if step_context.result:
        # User said "yes" so we will be prompting for the age.
        # WaterfallStep always finishes with the end of the Waterfall or with another dialog,
        # here it is a Prompt Dialog.
        return await step_context.prompt(
            NumberPrompt.__name__,
            PromptOptions(
                prompt=MessageFactory.text("Please enter your age."),
                retry_prompt=MessageFactory.text(
                    "The value entered must be greater than 0 and less than 150."
                ),
            ),
        )

    # User said "no" so we will skip the next step. Give -1 as the age.
    return await step_context.next(-1)
data_models\user_profile.py
The user's mode of transportation, name, and age are saved in an instance of the UserProfile class.
class UserProfile:
    """
      This is our application state. Just a regular serializable Python class.
    """

    def __init__(self, name: str = None, transport: str = None, age: int = 0, picture: Attachment = None):
        self.name = name
        self.transport = transport
        self.age = age
        self.picture = picture
dialogs\user_profile_dialog.py
In the last step, check the step_context.result returned by the dialog called in the previous waterfall step. If the return value is true, the user profile accessor gets and updates the user profile. To get the user profile, call get, and then set the values of the user_profile.transport, user_profile.name, and user_profile.age properties. Finally, summarize the information for the user before calling end_dialog, which ends the dialog. Ending the dialog pops it off the dialog stack and returns an optional result to the dialog's parent. The parent is the dialog or method that started the dialog that just ended.
async def summary_step(
    self, step_context: WaterfallStepContext
) -> DialogTurnResult:
    step_context.values["picture"] = (
        None if not step_context.result else step_context.result[0]
    )
    # Get the current profile object from user state.  Changes to it
    # will saved during Bot.on_turn.
    user_profile = await self.user_profile_accessor.get(
        step_context.context, UserProfile
    )

    user_profile.transport = step_context.values["transport"]
    user_profile.name = step_context.values["name"]
    user_profile.age = step_context.values["age"]
    user_profile.picture = step_context.values["picture"]

    msg = f"I have your mode of transport as {user_profile.transport} and your name as {user_profile.name}."
    if user_profile.age != -1:
        msg += f" And age as {user_profile.age}."

    await step_context.context.send_activity(MessageFactory.text(msg))

    if user_profile.picture:
        await step_context.context.send_activity(
            MessageFactory.attachment(
                user_profile.picture, "This is your profile picture."
            )
        )
    else:
        await step_context.context.send_activity(
            "A profile picture was saved but could not be displayed here."
        )

    # WaterfallStep always finishes with the end of the Waterfall or with another
    # dialog, here it is the end.
    return await step_context.prompt(
        ConfirmPrompt.__name__,
Create the extension method to run the waterfall dialog
A run_dialog() helper method is defined in helpers\dialog_helper.py that's used to create and access the dialog context. Here, accessor is the state property accessor for the dialog state property, and dialog is the user profile component dialog. Since component dialogs define an inner dialog set, an outer dialog set must be created that's visible to the message handler code and use that to create a dialog context.
Create the dialog context by calling the create_context, which is used to interact with the dialog set from within the bot's turn handler. The dialog context includes the current turn context, the parent dialog, and the dialog state, which provides a method for preserving information within the dialog.
The dialog context allows you to start a dialog with the string ID, or continue the current dialog (such as a waterfall dialog that has multiple steps). The dialog context is passed through to all the bot's dialogs and waterfall steps.
class DialogHelper:
    @staticmethod
    async def run_dialog(
        dialog: Dialog, turn_context: TurnContext, accessor: StatePropertyAccessor
    ):
        dialog_set = DialogSet(accessor)
        dialog_set.add(dialog)

        dialog_context = await dialog_set.create_context(turn_context)
        results = await dialog_context.continue_dialog()
        if results.status == DialogTurnStatus.Empty:
            await dialog_context.begin_dialog(dialog.id)
This sample updates the user profile state from within the dialog. This practice can work for some bots, but it won't work if you want to reuse a dialog across bots.
There are various options for keeping dialog steps and bot state separate. For example, once your dialog gathers complete information, you can: