View protected items and perform actions (preview)
This tutorial describes how to view your datasources that are protected by one or more solutions and perform actions on them from Azure Business Continuity (ABC) center (preview).
Prerequisites
Before you start this tutorial:
- Review supported regions for ABC center.
- You need to have permission on the resources to view them in ABC center.
View protected items
As a business continuity and disaster recovery (BCDR) admin, identify and configure protection for critical resources that don't have backup or replication configured. You can also view their protection details.
Azure Business Continuity center provides you with a centralized and at scale view for overseeing your protection landscape, offering a unified perspective across various solutions.
Follow these steps to view your protected items:
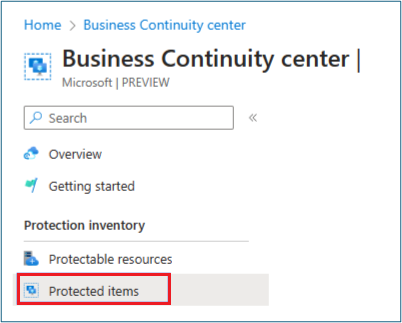
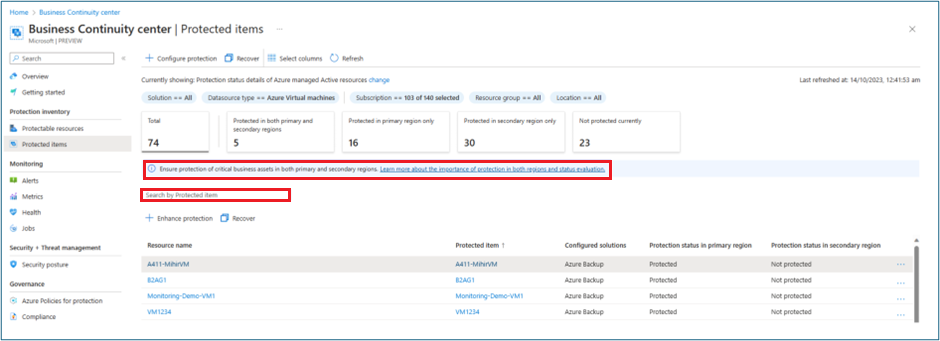
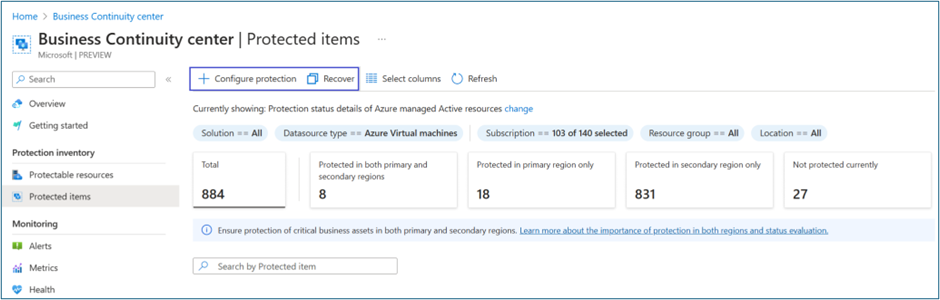
In Azure Business Continuity center, select Protected items under Protection inventory.
In this view, you can see a list of all the protected items across the supported solution across the subscription, resource groups, location, type, and so on, along with their protection status.
Azure Business Continuity allows you to change the default view using a scope picker. Select the Change option beside the Currently showing: details displayed at the top.
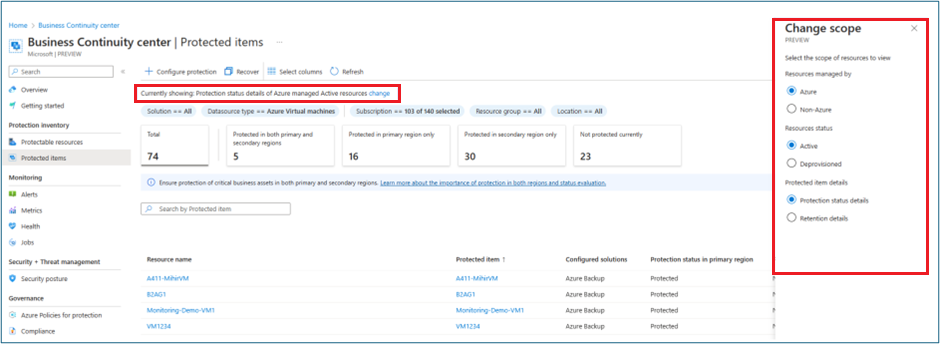
To change the scope for Security posture view from the scope picker, select the required options:
- Resource managed by:
- Azure resource: resources managed by Azure
- Non-Azure resources: resources not managed by Azure
- Resource status:
- Active resources: Resources that are currently active, which are not deleted.
- Deprovisioned resources - Describes resources that no longer exist, yet their backup and recovery points are retained.
- Protected item details:
- Protection status - protection status of protected item in primary and secondary regions
- Retention details: Retention details for protected items
- Resource managed by:
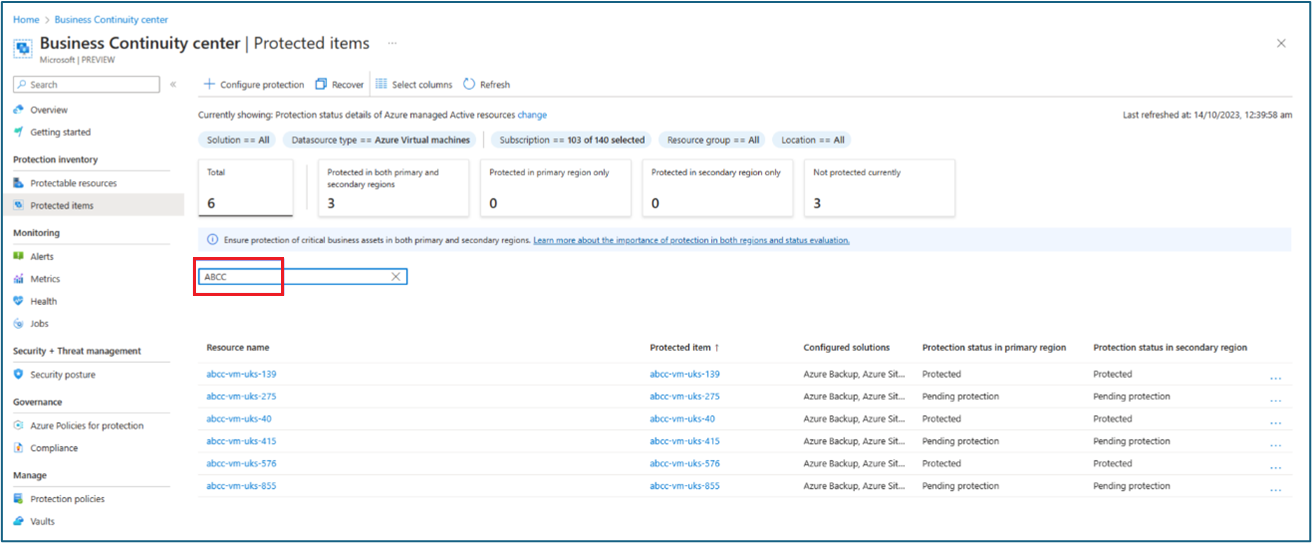
To effectively look for specific items, you can utilize various filters, such as subscriptions, resource groups, location, resource type, and so on.
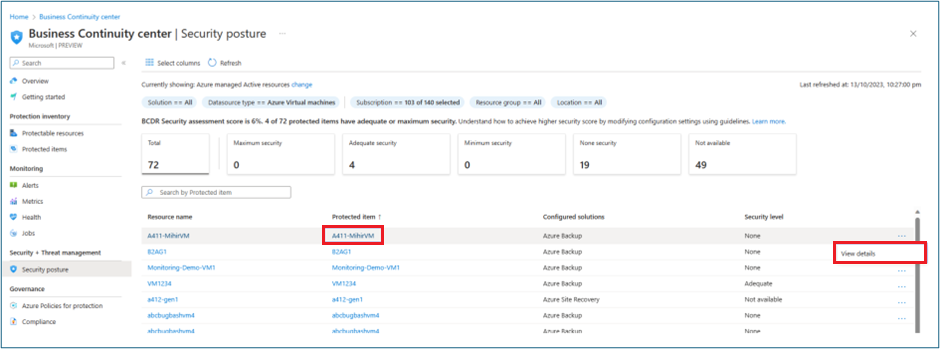
Summary cards display an aggregated count for each security level, considering the applied filters. These cards can be selected to refine the filtering of the Protected items table.

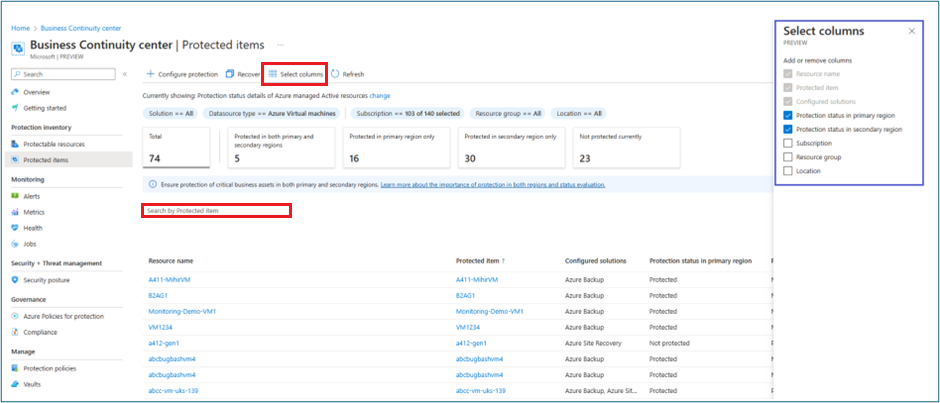
You can also search by specific item name to get information specific to it.
Use Select columns from the menu available at the top of the views to add or remove columns.
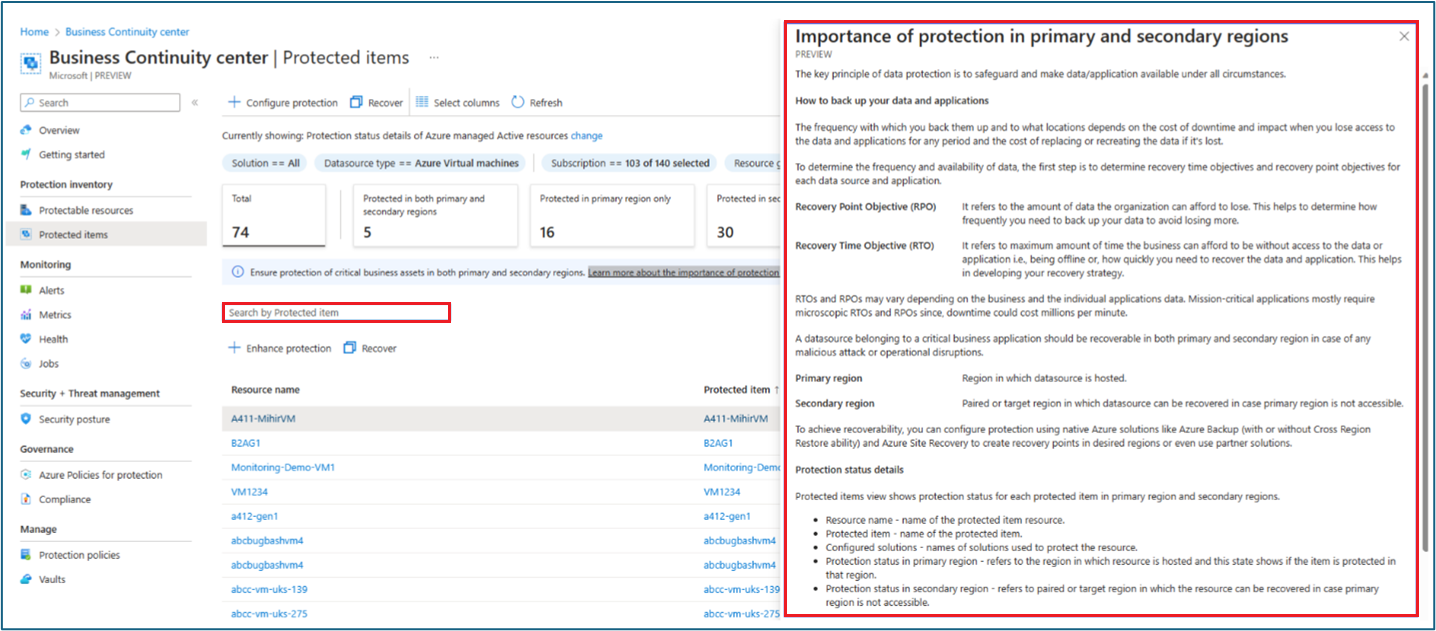
Azure Business Continuity center provides in-built help to learn more about the protected item view and guidance on protection. Select Learn more about the importance of protection in both regions and status evaluation to access it.
The help provides guidance on the various security levels and the settings that are required to meet each level.
The Protected items details table shows the protection status for each protected item in the primary and secondary regions.
Resource name: Lists the underlying resource that is protected.
Protected item: Shows the name of the protected resource.
Configured solutions: Shows the number of solutions protecting the resource.
Protection status: Protected items should be recoverable in both the primary and secondary regions. Protection status in the primary region refers to the region in which datasource is hosted, and Protection status in secondary region refers to the paired or target region in which datasource can be recovered in case the primary region isn't accessible.
The protection status values can be Pending protection (protection is triggered and is in-progress), Protection disabled (protection has been disabled, for example, protection is in soft-deleted state like in the case of Azure Backup) or Protection paused (protection is stopped; however, the protection data will be retained as per solution provider), or Protected. When the datasource is protected by multiple solutions (that is, Configured solutions >= 2), the Protection Status for an item is computed in the following order:
- When one or more solutions indicate that the protection status is disabled, then the protected item status is shown as Protection disabled.
- When one or more solutions indicate that the protection status is paused, then the protected item status is shown as Protection paused.
- When one or more solutions indicate that the protection status is pending, then the protected item status is shown as Pending protection.
- When all the configured solutions indicate that the protection status is protected, then the protected item status is shown as Protected.
- If there's no protection for a datasource in primary or secondary region, then the protected item status for that region is shown as Not protected.
- For example, if a resource is protected by both Azure Backup (with status Protection paused) and Azure Site Recovery (with status Protected), then the protection status for the region displays Protection paused.
Under Scope, when you choose the retention details, the view loads the retention information for the protected items. The Protected items retention table shows the retention details for each protected item in the primary and secondary regions.
- Resource name: Lists the underlying resource that is protected.
- Protected item: Shows the name of the protected resource.
- Configured solutions: Shows the number of solutions protecting the resource.
- Retention in primary
- Retention in secondary


You can also query information on protection for your resources at no additional cost using Azure Resource Graph (ARG). ARG is an Azure service designed to extend Azure Resource Management. It aims to provide efficient resource exploration with the ability to query at scale across a given set of subscriptions.
To get started with querying information on protection for your resources using ARG, you can use the sample query provided, by selecting Open query.

View Protected item details
To view additional details for a specific protected item, follow these steps:
In the Azure Business Continuity center, select Protected items under Protection inventory.
You can select the item name or select the more icon … > View details action menu to navigate and view further details for an item.
On the item details view, you can see more information for item.
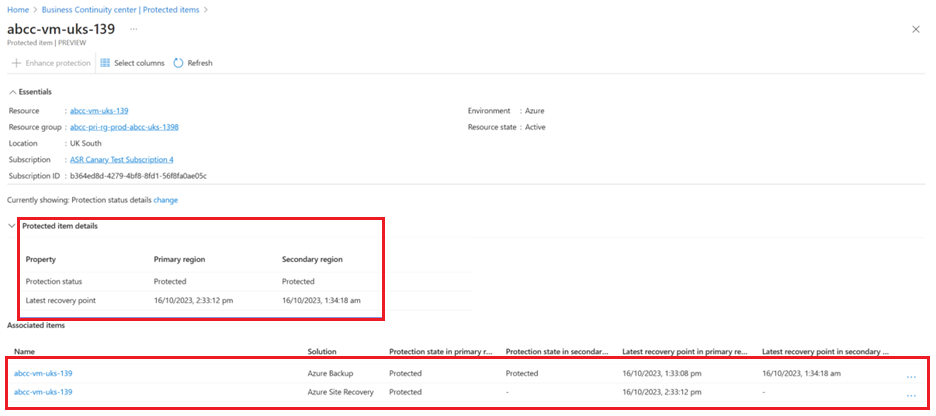
The view also allows you to change the default view using the scope picker from Currently showing: Protection status details, select Change.
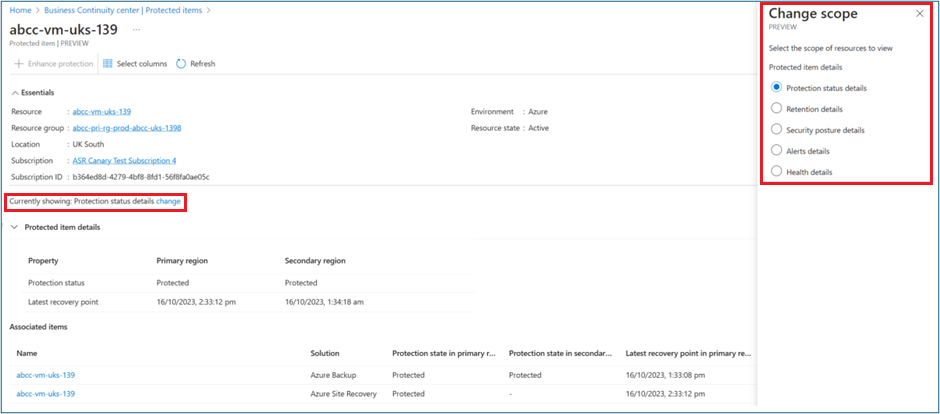
To change the scope for Security posture view from the scope-picker, select the required options:
- Protection status - protection status of the protected item in primary and secondary regions
- Retention details - retention details for protected items
- Security posture details - security details for protected items
- Alert details - alerts fired details for protected items
- Health details - health details for protected items


Perform actions
With the protected items view, you can choose to perform actions from:
The menu available at the top of the view for actions like configure protection, recover, and so on. Using this option allows you to select multiple data sources.
The menu on individual items in Protected items view. This option allows you to perform actions for the single resource.
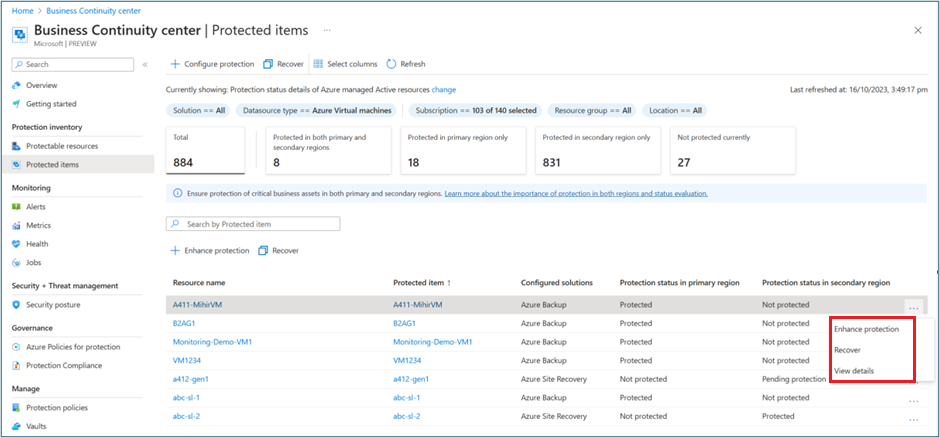
When Solutions filter is set to ALL, common actions across the solutions are available on the item like
- Enhance protection – Allows you to protect the items with the other solutions than the ones that are already used to protect the item.
- Recover – Allows you to perform the available recovery actions for the solutions with which the item is protected, that is, configured solutions.
- View details – Allows you to view more information for the protected item.
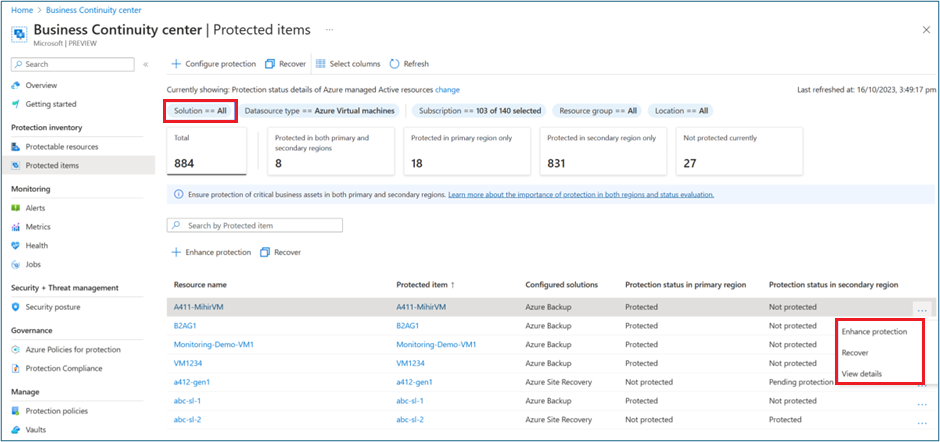
Choose a specific solution in the filter and notice solution specific actions command bar (appears over the protected items table and on the Protected item) by selecting the more icon … corresponding to the specific item.


Next steps
For more information about Azure Business Continuity center and how it works, check out Configure protection from ABC center.